A chair is an important and irreplaceable household item, an achievement of European culture.
This is a necessary part of the interior of any home, office or other premises. Available in all kinds and shapes, these products can be made from various materials. The easiest and most reliable way to produce them at home is from wood material. This article provides a detailed description of the process of how to make a chair from wood with your own hands.
All parts of furniture products are made from a set of wooden blanks. The most common materials for chairs are beech, oak or ash. However, any wood you have on hand will do. For the production of any furniture, it is necessary to choose only dry wood.
Advice! It is advisable that drying be carried out in special dryers, because... Under natural conditions, wood is susceptible to damage from insects, and the humidity of the street air will not allow achieving high drying rates.
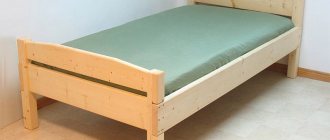
The homemade chair with a backrest, which is proposed to be made in this article with your own hands, is a kitchen sample that belongs to the standard solid wooden version.
Image of the finished product.
What tools are needed?
Without tools it is impossible to create a chair. Even if you can do it with your hands, it will hardly be possible to sit on it.
To make a chair you need a number of “helpers”. A saw or hacksaw is necessary first. Hammer, screwdriver, jigsaw, chisel, plane, mallet, grinder, stapler (construction), clamps, square and tape measure.
This is the list that we will need to prepare the stool
Decoration
Furniture assembly work ends with decoration. Before decoration, the surfaces are treated with sheets of sandpaper and coated with clear varnish. Decoration is carried out using the techniques of decoupage, patination, engraving, simple or artistic coloring, etc.
Wood carving allows you to create original patterns and engravings. The design can be contour, geometric, relief, etc. Fine carving will give the room lightness and airiness. After engraving, the product is coated with transparent varnish or thick paint. The design method is suitable for rooms in the Art Nouveau, Baroque, and Shabby Chic styles.
Antique chairs are decorated with your own hands using decoupage techniques. Furniture is complemented with floral prints or reproductions of art paintings, artificially aging the surface. The work is completed by varnishing the surfaces. The decor will suit rooms in retro, vintage, Provencal styles.
Coloring allows you to harmoniously fit furniture into the interior, making models contrasting or neutral. When applying enamel, it is possible to use patination techniques, stylization like marble and glass. Paints can be translucent or dense depending on the interior design.
Let's get to the chair
So now we get to the chair itself:
First of all, prepare 4 bars forty by forty mm and 440 mm long.
The most important thing when working with wood is to remove burrs. They can always bring pain, become a thorn and simply ruin your mood. For this you need the same sandpaper. Absolutely every wooden stick must be sanded.
It is necessary to prepare 4 drawers, which will act as jumpers between the legs. The seating area will subsequently rest on these legs. Typically, their parameters are 20x50x280 mm. However, here you can make a choice.
Now we need 4 more jumpers that will help strengthen the legs (or rather, what will be between them - the legs). Dimensions will be 30x20x280 mm. How to make a chair out of wood? Now you'll find out.
The main task of a chair is to seat. It is necessary to make it as comfortable as possible, which means using a wide board.
The next step will be the task of preparing the spikes. They must be done on all sides.
You need to make grooves in certain places on the legs. Their length and depth should be 2 centimeters, but the height of the grooves for securing the legs should be 27 centimeters from the floor.
Now we put it all together into a single structure, like a construction set. This way you can determine whether the seat is level and whether corrections are needed.
If everything is in order, we assemble the structure together, first connecting all the elements with wood glue. It is advisable to strengthen all this with self-tapping screws.
Then we simply screw long screws into all the legs. The places where the caps will be located must be thoroughly recessed in the wood so that they are not visible. After this, paint the chair thoroughly. That's all.
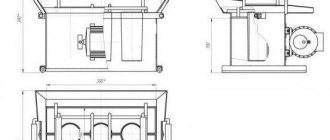
Calculations and drawings
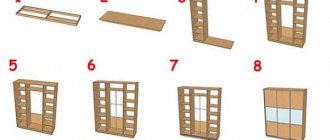
To create a chair with a backrest with your own hands, you need to determine the type of structure, draw a sketch, and develop a drawing. The diagram must indicate the details according to which the timber will be cut.
A homemade chair consists of a back, seat, front legs, back legs, drawers and legs. The drawing must indicate the exact dimensions of the elements. It is possible to implement an original project, but there are standard standards for the type of construction. The height of the product from the seat to the lower surface of the legs can vary from 40 to 60 cm. The distance to the armrests is also taken into account if there are elements in the product. The height from the floor to the top of the back of the chair is 80-90 cm.
A soft chair
If you are interested in how to make a soft chair, then the answer is simple - you need to add a special pillow to the seat and back.
To do this, it is enough to use a pillow made of wood and soft material inside. Feathers won't work since it's a chair.
Material: wood or plywood?
Since chairs are used by people quite often, high demands are placed on them:
- strength and reliability;
- ability to withstand heavy weight;
- durability;
- ease of use;
- ease of care.
In order for a home-made kitchen stool to be truly practical, you need to carefully select the materials for its manufacture. You can make chairs for the kitchen from different lumber:
Natural wood. This option will harmoniously fit into any classic interior and become its main decoration. When choosing a type of wood, preference should be given to: oak, beech, ash .
Such materials have a high cost, but they also have the highest technical characteristics. For budget options for making furniture yourself at home, pine, larch or birch are perfect.Wooden furniture will delight its owners: its naturalness and environmental friendliness. It will not release harmful toxins and provoke allergic reactions. The tree also has an unobtrusive but pleasant aroma. It is pleasant and warm to the touch and comes in a wide range of textures and shades. To use solid wood furniture in the kitchen, the wood will need to be pre-treated with antiseptic agents. This will increase its resistance to moisture and other negative factors.
Plywood.
Such furniture can cope with various mechanical loads. Plywood is made from natural wood, therefore, it is safe for use. It is resistant to moisture, sudden temperature changes and other negative factors . For the manufacture of chairs, it is recommended to choose a material with a thickness of at least 8 mm.Plywood is easy to cut and saw with hand or power tools and has a long service life.
- Chipboard. This furniture is characterized by good technical performance and affordable cost. The stores offer a wide range of chipboards in various shades. The sheets are easy to work with. They are cut with both an electric jigsaw and a regular wood hacksaw.
- MDF. It has good performance, is distinguished by durability, favorable cost and a wide range.
Advice : if all the options seem equally attractive to you, take a tree. It will make it easier to correct minor defects that may arise during the manufacturing process.
Paper chair
There is also an option to make a table out of paper. This is a great way to make a children's cuddle chair. For example, if a small child wants to create a small house in which his characters will live.
However, for this you need to already learn how to work with paper. You can find out how to do this on the Internet.
Decor options
When the furniture is ready, you need to decorate the product to make it even more individual. To do this, you need to decide in what style the room will be decorated, where you plan to put the finished furniture.
A classic style or chalet will require monotony and clear lines. The increasingly popular shabby chic implies more original options.
One of these methods is craquelure. The method gives a very unusual effect, but not everyone likes it. It gives the product a similarity to a chair that has old, cracked paint, and this effect looks extremely unusual.
First of all, after the primer, a layer of paint is applied, which will be visible through the cracks. Then craquelure and paint are applied, which will be cracked. It instantly cracks and creates a beautiful effect. This effect must also be secured with varnish when the coating dries so that the decor lasts as long as possible.
And in general, a chair decorated in this way, using white paint as the top layer, will look good in any interior.
Why are folding chairs needed?
We make folding chairs in order to use them in places where they will not be located for a long time. For example, in nature.
If you go somewhere outdoors, then a folding chair would be an excellent option. It is easy to install and does not need to be assembled for a long time.
Additional Tips
If you make furniture from solid wood, it is important to ensure that it is not only beautiful, but also safe. This is especially necessary if there are small children in the house. So, all surfaces and corners of boards and bars must be sanded. Then they should be painted or treated with stain and varnish. As for the latter, it is better to use one that is odorless - water-based. This way you can be sure that the coating is harmless.
It has already been said above what kind of wood chairs are usually made from. But there are some nuances here too. Red rocks, for example, look simply gorgeous and have a beautiful structure. Linden is lighter than oak, but with the help of stain it can be tinted to match it. Carved chairs look beautiful in elegant interiors. So if you have carving skills, do not miss the opportunity to practice on the back and even the legs of the product.
If you are making furniture for a baby, do not use metal corners, because he can get hurt on them. The parts can be connected with screws or dowels. To make the structure more stable, simply choose thicker parts.
Photos of chairs
https://www.youtube.com/watch?v=BsUOyE1nz5k
Fairytale kitchen: every housewife's dream
Do-it-yourself kitchen furniture is a skillfully made set, a dining chair, chairs, a bar counter, a cupboard, allowing every representative of the fair sex to experience an inspiring feeling of bliss every day from using multifunctional structures. After all, most housewives dream of one thing - space and convenience that reigns in the kitchen. There is only one way to achieve this - making furniture with your own hands.
Rational use of every centimeter of kitchen space, equipping the furniture with parts that allow you to place cutlery, dishes, and kitchen accessories
in such a way that everything is at hand for the hostess - the main trump cards of furniture created in a home workshop. If you think that only professional craftsmen with high-tech equipment can make sofas, coffee tables or bedside tables, then you are mistaken.
Everyone without exception can make furniture with their own hands - the fair sex, men and even children. You just need to clearly decide on the model, the size of the desired furniture and the materials from which it will be made.
It is important in the process of creating a design layout for a kitchen set to think through all the details down to the smallest detail. After all, it should be as spacious as possible, beautiful and courageously withstand the daily attack of moisture coming from steaming pots and a fire-breathing oven.
If you want to significantly save space in a small kitchen, then WESTWING advises equipping your kitchen unit with the following details:
- A retractable organizer that allows you to compactly arrange a large number of containers for convenient storage of cereals, flour, spices and other bulk products.
- A stationary cutting board with a hole, which needs to be placed above the drawer, where you can place a bowl for collecting chopped meat products, vegetables, and fruits.
- A retractable design equipped with numerous hooks on which you can hang pans and various kitchen accessories
. - Shelf for storing lids. To prevent it from taking up space in a floor or wall cabinet, it is advisable to attach a thin metal tube to its door at a short distance from the base, which serves as a shelf for lids.
- Pull-out drawer with built-in bowls for feeding animals. Thus, order will always reign in your kitchen, regardless of the number of pets living in the house.
- A tee built into the tabletop that can become visible when you press an inconspicuous button.
The process of cooking will stop tiring you if such a multifunctional and spacious kitchen set appears in your kitchen.
Do-it-yourself furniture, a photo of which you will always proudly show to your friends, colleagues and acquaintances, will glorify you and make others believe in themselves if they cannot decide to independently create unique models of console tables or cribs.
Add a seat
To make your own upholstered L seat, follow the instructions below. Having finished upholstering the seat, place it on the chair close to the back legs B and in the middle between the side frames E. Using the countersunk mounting holes in the corner braces K, drill pilot holes in the seat L. Attach the seat to the corner braces with screws.
- Step 1. Using spray adhesive, glue a piece of sponge to the seat with side trim allowances. Trim off any excess by running a knife blade along the edges of the seat. Try to make the cut strictly vertically.
- Step 2: To ensure the edges of the seat are rounded, cut off the top sharp edges of the sponge. To do this, use a marker and a ruler to draw lines 100 mm from the edge into the seat and 25 mm down.
- Step 3. Cut the top corners according to the markings made. Maintain a constant angle of the blade, aligning it with the lines on the top and side of the sponge.
- Step 4. Place a piece of thick padding polyester measuring 540x540 mm on the workbench. Align the sponge seat with the center of this piece. Wrap the edges of the padding around the seat and secure them with staples. Trim off excess padding at the corners.
- Step 5. Align the padded polyester seat with the center of a piece of upholstery material measuring 540x540 mm. Secure the edges of the upholstery with staples in the middle of each side of the seat. Working from the middle of the sides to the corners, pull the edges of the upholstery material taut and secure with staples.
- Step 6. Gather the material in the corners and trim off the excess, leaving about 20 mm from the seat. As you stretch the rest of the upholstery, spread it evenly with staples. Trim off any excess material.