The hallway creates the first impression of the apartment and the people who live in it. The beautifully designed entrance area communicates the homeliness and hospitality of the owners.
If the room is well planned, there is enough space in it to comfortably dress and put on shoes, help a lady take off her coat, put bags and shopping. Let's take a step-by-step look at how to make a hallway with your own hands.
Design project
First, let's analyze the planning features of the room.
Internal filling of the wardrobe
So, before we start making our own piece of furniture that interests us, we need to decide on the zoning inside it.
Parameters of a regular wardrobe
Prices for sliding wardrobes
Closet
So, you need to think about filling the closet, determining where specific items will be stored in it. To make the most efficient use of the space available to you, we suggest following the following list of rules.
Rule 1. Outerwear should be placed in a closet in vertical niches on both sides of the closet, or only on one side. It is better, of course, that these niches are not too narrow, however, if they are, they will still be able to accommodate a significant part of your wardrobe.
Outerwear is stored at the edge
Each of these vertical niches should be equipped with a crossbar for hangers, on which we will place our outerwear.
The location along the edge is due to the fact that you need to protect items constantly stored in the closet from moisture and dirt that can drain from outerwear you take off in bad weather.
Rule 2. It is better to place valuable items, for example, documents, as well as various small things (cosmetics, curling iron, comb, etc.) in closed drawers, located approximately at the level of the groin or lower segment of the abdomen of a person, so that they it was convenient to look in and find what you needed.
At the same time, you need to take into account that you don’t need to make the drawers too wide, but you shouldn’t narrow them either, as they will lose all their capacity. If you want to make several wide and deep drawers, then it would be best to arrange them in tiers on top of each other.
Linen and accessories are stored at a height of no less than 40 centimeters from the floor
Dry clothes, that is, those that you put on under your outerwear, will need to be placed in niches at the top of the closet. So, nuda can be laid or hung:
- dresses;
- shirts;
- T-shirts;
- trousers and jeans;
- shorts;
- skirts, etc.
As for underwear, bedding, tights, socks and other accessories, they should not be placed in compartments that are located at the very bottom of the closet or at a height less than 40 centimeters from the floor, since it is to this distance that dirt and dust rise from its surface.
Traditional wardrobe
As a result, you will have to find swelling for all these small clothes at chest level, but not higher, since each time reaching, for example, to the very top for clean socks, or taking a stool for this is very inconvenient and dreary.
In the lowest section of the closet, it is wise to place a large number of nets and drawers, inside of which clean shoes that are not suitable for the season, and those shoes that are being used immediately will be stored.
Hallway configuration
An elongated narrow corridor needs to be visually expanded. A sliding wardrobe with mirrored doors installed along a long wall will add air and light.
Painting the ends of the room in darker colors than the side walls will help visually shorten the length. Horizontal stripes will expand the space.
A small hallway will require a thoughtful, compact solution to save every centimeter. Mezzanines, narrow wall hangers, and folding shelves would be appropriate here. A corner cabinet will help save space.
A large hallway allows you to create additional storage areas for sports equipment: bicycles, skis, skateboards, and for household items: vacuum cleaner, ironing board.
Main varieties and styles
The style of the future homemade hallway is chosen taking into account the size of the room, as well as the general concept of the interior. It is important to carefully consider aesthetic aspects so as not to harm the main design idea, but, on the contrary, to emphasize it. Only after this can you move on to the practical part and begin preparing materials.
In any case, the homemade version will demonstrate special uniqueness, since it is created solely by the imagination of the home owner. However, to successfully work without the help of designers and engineers in the furniture industry, you will have to study various small details and important nuances. Among the key types of hallways are :
- Corner.
- Open.
- The compartment.
- I swing it open.
They are selected taking into account the specific type and requirements for pieces of furniture. The corner option is most in demand for rooms with limited space, because it allows you to make maximum use of empty corners, turning them into useful places for storing clothes, shoes and other personal items. Open shelves will be freely placed near the wardrobe, and cabinets and classic hangers will be installed in another place. To achieve a visual expansion of space, the cabinet doors need to be mirrored.
Open types are characterized by a minimum amount of furniture, while soft products will have to be abandoned, and the cabinet used will be very small. The complete opposite is the compartment hallway, which implies the presence of a wardrobe of the same name. In this design, the furniture is quite spacious, because you can store personal belongings of all family members in it, and also not worry about additional space for clothes for different seasons.
Design
It is advisable to design the hallway in the same style as the rest of the rooms. At the same time, the design can be diversified with artifacts that express the individuality of family members.
Posters or paintings placed in frames on a free wall will tell about your passion for art. An original banquette with ethnic motifs and exotic little things will communicate your love of travel.
General design principles
Decorating the hallway is one of the most important stages in arranging any apartment. This part of the home should remain roomy, compact and neat, which can only be achieved by proper design of its appearance.
You will have to abandon an excessive number of decorative elements, since the main purpose of this room is to store things. But it’s also not worth sacrificing design in order to save space or money, because the hallway is also the hallmark of the room.
To successfully achieve this goal, it is necessary to carry out many calculations, draw up drawings and determine the dimensions of future drawers, cabinets, cabinets and other items. Their number should be determined by both the area of the room and the number of family members living in the house. The main thing is not to overload the space with unnecessary elements.
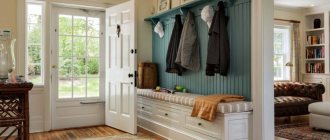
The unusual hooks on the wall, as well as a niche for storing shoes, look especially beautiful. A wooden bench will fit perfectly into a spacious hallway, highlighting the elegance of the interior and giving it a unique twist. The most win-win option is a sliding wardrobe, which is suitable for almost any interior style. And the wardrobes are not only spacious, but also convenient to use.
When arranging a small corridor, it is recommended to choose built-in cabinets that take up little space. Also, to create a visual expansion of the space, you should acquire mirrors and light colors in the decoration.
When choosing suitable finishing options, it is important to be guided by the practicality of future furniture. If the area of the room is very limited, it is better to combine the functions of storing shoes and clothes in one multifunctional closet. An excellent compromise between space and aesthetics is a corner cabinet. Despite its miniature size, it has great depth and spaciousness.
Considering the specifics of the placement of the hallway, it is better to refuse to introduce light colors in its design. On white walls or light-colored furniture, any street dirt will be very noticeable.
Floor repair
To repair the floor, the old covering is removed and unevenness is corrected with a thin layer of screed. Then a soundproofing or other underlying layer is laid, depending on the type of flooring.
Quite often, large-sized ceramic tiles or porcelain stoneware are used in the hallway. The solid material is resistant to mechanical stress and has various textures similar to natural stone and wood.
Another popular material is laminate, usually at least 32 washability class. These materials can be combined: the entrance area near the door is covered with porcelain stoneware, and the rest of the hallway is covered with laminate
A common covering option in the hallway is semi-commercial linoleum. It is also resistant to heavy loads and comes in a variety of colors and textures.
What kind of shelves can be in the hallway: types of designs
If you lack experience and skills in making furniture, you can limit yourself to creating a shelf for the hallway. Anyone can cope with this task.
Taking into account their functional purpose, the following types of shelves are distinguished:
- for shoes;
- key holders;
- for bags;
- for storing small items;
- for hats;
- for newspapers, receipts, mail, etc.
To secure a shelf in the hallway, it is not necessary to master any technical subtleties. Therefore, when creating this piece of furniture, the main focus is on appearance. The structure can be open or closed. In the second case, things on the shelf are protected from dust.
It is recommended to increase the functionality of the shelf by adding additional baskets or drawers. These elements can be retractable or completely removable. The corner design will allow you to save space in the hallway. It is usually attached to the end of the cabinet.
If it is not possible to install a cabinet in the hallway, shelves can replace it.
Ceiling repair
The ceiling is made of suspended plasterboard. You can hide electrical wiring behind it. Drywall allows you to beautifully play up the differences in protruding structures on the ceiling and highlight individual functional areas.
- Pool finishing: description of all types and features of modern finishing
- How an independent examination of construction work is carried out: an overview of all stages
Fasteners for the construction of frame houses: features of the right choice
A stretch ceiling will look beautiful in a large hallway. A glossy monochromatic surface visually increases the height of the room. A suitable pattern on the canvas will help complete the stylistic design of the interior.
The hallways of small apartments have a small height. The surface of a low ceiling is leveled with putty, cleaned and painted with water-based paint or finished with ceiling tiles.
We make the hallway ourselves: choosing the material
The choice of material is important; you should not choose too expensive one. In addition, it should be easy to process and safe for health.
Suitable: plywood, chipboard, fiberboard, MDF, furniture board, edged board, wooden block, drywall - they have a long service life and good quality.
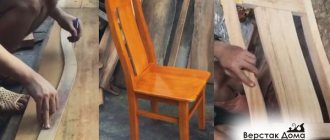
- Tree. Wood is an environmentally friendly material, so it is perfect for an apartment. It never goes out of fashion, and furniture made from it speaks of the wealth and excellent taste of the owners. A wooden hallway will harmoniously fit into any style. You can carve it, thereby adding individuality. Different species are used to make furniture: oak, birch, pine, beech, walnut. The only negative is the high price, but given the long service life, this cost will be well worth it.
- Furniture board. Made from natural materials, therefore safe for health. Looks elegant and lasts a long time. The cost is high, but below the tree.
- Chipboard. Chipboard is a common and convenient material for making a hallway yourself. It is simply cut and processed, weighs little, and there is no need for reinforced fasteners. With all the advantages, it is affordable.
- Plywood...Has the same qualities as chipboard, but is denser and more durable. From it you can make not only parts with curved lines, but also a slotted pattern.
- MDF. Slightly less durable than plywood. But it has limitless processing possibilities: painting, tinting, applying stain.
- Fiberboard. It is used only for making the back wall of cabinets.
- Wooden beam. Designed for assembling frame structures.
- Edged boards. Relatively expensive material; pine boards are the most affordable.
- Drywall. Built-in niches are equipped with plasterboard.
- Mirror or glass. Glass or mirror inserts will decorate any room, and you can’t do without a mirror in the hallway. However, they are heavy and cannot be handled alone.
DIY wardrobe
A home craftsman can independently make the main element of the hallway - a wardrobe. First, you should draw a sketch and plan where outerwear will hang, shoes will stand, and where hats will be placed.
The dimensions of all elements are determined in the drawing. To work you will need:
- furniture panels;
- plywood;
- furniture fittings;
- screwdriver;
- self-tapping screws.
Blanks from furniture panels are cut out according to given dimensions: side strips, base and shelves. A sheet of plywood is used as the back wall. The top cover must be overlapped. The entire structure is assembled using self-tapping screws, and wood glue is used for reliability.
Mark the location of the clothes rail. It should be located 4-5 cm below the top shelf. Now you need to screw the holders and insert the bar itself.
The doors are cut out of panels and each is hung on three hinges. Finally, the handles are attached and all surfaces are tinted with varnish.
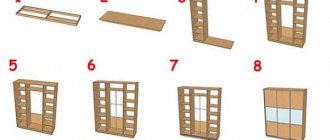
How to make it at home. Step-by-step instruction
In order to avoid correcting mistakes made during the work when creating the hallway interior yourself, you need to think through every step:
- determine the required height of the hallway;
- cut out two sidewalls from a furniture sheet of the required height;
- if there is a plinth on the floor, to install the product tightly, cut off the corners from both panels;
- To install the top part, cut off a corner.
We make a cover and a lower base from the shield, according to the dimensions. The sides, upper and lower bases are connected with fasteners. Continue as follows:
- A door is cut out of a furniture board. If it is not equal to the height of the bedside table, you can place a retractable drawer on top.
- The door is attached to the hinges of the cabinet.
- Making a box. The lower part can be made of plywood. To hide the contents of the drawer, its front part should rise above other parts. Self-tapping screws fasten the box structures together.
- After the necessary measurements, guides are attached to the cabinet and drawer.
- Mount the handles.
A larger cabinet is made in the same way.
Measurements, diagrams, drawings
Home craftsmen, both beginners and experienced ones, in order not to miss important details, need to decide on the dimensions and draw up the necessary diagrams and drawings.
Even in a small corridor there should be enough space to install the main elements of the hallway:
- shelves for shoes and clothes;
- benches for changing shoes;
- niches for small items;
- department for storing bags, umbrellas and hats.
For a medium-sized room, a standard set of hallway furniture is suitable:
- medium-sized wardrobe for clothes and accessories;
- soft seat;
- a chest of drawers or a cabinet, and several shelves.
Furnishing a large space is the easiest thing to do. You can realize any design fantasies. To make a diagram, you need to measure the parts and draw everything on a piece of paper:
- take measurements of the cabinet;
- depict the appearance of the manufactured product;
- determine locations for placing boxes;
- display the dimensions of door sections and mezzanines.
It is better to make a furniture project according to drawings that are posted on the Internet. You can draw a sketch of the hallway yourself, taking into account all the details.
Required tools and materials
Before starting work, you need to prepare the following tools in advance:
- ruler or tape measure;
- drill or screwdriver;
- marker or pencil;
- edge tape;
- pliers;
- ratchet wrench;
- glue;
- electric jigsaw;
- sandpaper;
- construction knife.
To assemble furniture with your own hands, you should pay attention to furniture panels, which are superior in quality to pine boards and other wood. They are made from environmentally friendly materials and provide stability to the structure. The downside is the high cost.
In order to save money, you can use products made from plywood, plasterboard and chipboard (laminated chipboard). The use of cheaper product options does not affect the build quality.
Accessories
Accessories are the final attribute in the design of hallway furniture. The style in which the room will be designed is chosen at will:
- A room in a retro style can be decorated with antique objects, massive handles on furniture, and vintage hooks. Instead of a bench, put a chest, a mirror in a carved frame, and add a carpet with a pattern or a picture.
- To create a good hallway design, you will need a lot of space and light. It is better to use light colors, glass and mirrors. You can hang original sconces or lamps on the walls. A bright homemade pouf will complement the composition.
Abstract designs, decorative stickers and window imitation are often used.
DIY cabinet in the hallway
A cabinet is made in a similar way, which can be adapted as a shoe rack or used to store various small items. The side parts are connected to the base and back wall using wood glue and self-tapping screws.
For drawers, ready-made guides are attached to the side strips. The boxes are assembled and inserted inside the cabinet, and then the top cover is attached.
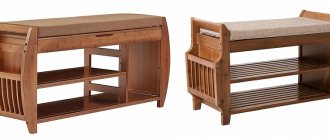
The top of the cabinet can be designed as a seat. To do this, glue a piece of furniture foam rubber onto the top cover. On top it should be wrapped with padding polyester, and on top with beautiful furniture fabric. The fabric is attached to the lid from the bottom side with a furniture stapler. As an option, the seat can be made folding by attaching hinges to the lid and to the back wall.
The composition will be complemented by a mirror in a wooden frame, a stand for umbrellas and bags.
You will find more ideas in a selection of photos of a hallway decorated with your own hands.
Choosing a hallway depending on the type of room
Before you start arranging, you should decide on the sizes and models of furniture. If the room is small, it is better not to overload it. In miniature corridors, you need to soften the corners to visually increase the free space.
It is better to refuse to use relief panels and natural stones, because... they create an unpleasant feeling when being in a small space. It is necessary to do without large patterns.
If there is a lot of space, the hallway assembly may include a wardrobe or a small dressing room with sliding doors. Having decided on the models, they begin to take measurements. When taking measurements, distance from each wall is 0.5 to 1 cm.
When making cabinets, you need to choose good quality materials that can maintain their attractiveness for many years.
Regular hallway
In simple versions of the built-in interior of a hallway with your own hands, drawings and diagrams may include a wall, a shoe rack, a hanger in the form of a shelf or a board with hooks, a chest of drawers with a mirror or a cabinet.
The main element in this set is the hanger. The most affordable option for making it is wall-mounted. It is a one-piece stand made of lining or slats arranged vertically. It is constructed from plywood, cut boards or chipboard. Attached to the wall. Complete with a shelf for small items and hooks.
Making a hallway:
- Calculate its dimensions and the required amount of fittings.
- The materials needed should be prepared in advance.
- First clean the boards, then sand them with a machine or sandpaper. Cut the chipboard to size and make an edge.
- The wood is varnished. If you need to change the color, treat it with stain of suitable tones.
- Use self-tapping screws to secure the vertical elements on the crossbar, following the scheme: make holes on the edges of the shelf with a drill, and fix the hat stick on confirmations (furniture hex screws).
- Then secure the hooks. It is better to place them in two rows: the first row is for outerwear, and the second, bottom row is for keys, bags, umbrellas and children's things.
You can create a simple hallway design. Chipboard panels or boards must be given an unusual shape. Cut a decorative picket fence from slats and attach hooks of different configurations.
Another option is original hangers. Take an irregularly shaped piece of wood, resembling a cut of a tree, for the base, and make coat hooks like decorative branches with knots.
Corner option
When making a corner version of a small hallway, you will have to start with calculations and measurements. If you make a mistake, you may lose some of the material. If the wall is uneven, you cannot do without a common frame. In other cases, the wall itself serves as the basis. Smooth walls are rare, so most often they install a frame.
The classic corner hallway consists of two parts connected to each other at right angles. Rounded shelves are attached at the top and bottom. To visually soften the corners, it is better not to resort to a rectangular shape.
Assembly diagram:
- Prepare a drawing indicating the mounting locations and dimensions. Fasteners are installed on European screws.
- Using a hacksaw or jigsaw, chipboard panels are cut and edged.
- Holes for dowels (wooden cylindrical fasteners) are drilled on the outer surface of the panel. The same notches are made in the edge of the other panel. At this stage of work, holes for confirmations are also made.
- It is necessary to lubricate with glue and install the sidewalls. After the glue has dried, the shelves are attached to the screw tie.
- Hooks for things and bags are placed at the desired height.
If there is no room for a mirror, you can glue it to the side of the hallway.
Non-standard hallway
When the corridor is of a non-standard shape, and it is difficult to place a hallway bought in a store in it, you can draw and make it yourself in a simple style. For example, a design consisting of a hanger and a mirror with a shoe rack or bedside table.
First, make a bedside table:
- take 2 profiles of the same size, which will serve as a cover and a base;
- the back wall is made from a piece of plywood;
- All components are secured with self-tapping screws;
- inside it is necessary to install runners on which drawers and fasteners for shelves are installed;
- put on the hinges of the bedside table door.
It's easy to make a hanger. You can get creative and make it in country style or in the form of tree branches.
Photo of the hallway with your own hands
Completion of work
10. We disassemble the structure in order to process all its elements with at least sandpaper, and, ideally, with a sander. We coat them with varnish in two layers and, after thorough drying, reassemble them. The part of the hallway in which clothes will hang on hooks is attached to the wall with self-tapping screws. Our internal shelves will be secured using special holders. We fix the facade of the cabinet, simultaneously screwing the handles. All is ready! (see photo 11).
Drawers and shelves can be filled with many little things that we need on a daily basis. The very ones that have the annoying property of always getting lost and getting in the way in our small hallways. It seems to us that in this case the light surface of the pine board looks just perfect and does not need decoration.
The working process
It is worth familiarizing yourself with the features of how to make a hallway with your own hands. If you have a small room, then give preference to those items that will not overload it. With a minimum number of square meters, you can use compartments designed to store outerwear, shoes, as well as the items you need.
If you have a spacious hallway, then you can use a spacious closet. Depending on its parameters, the cost of the product is calculated.
An interesting and at the same time profitable option in terms of compact placement is a corner hallway. From a visual point of view, it looks smaller than it actually is. Using this option allows you to fit everything you need.
After determining the model, it is necessary to take measurements and make accurate calculations. Prepare a set of tools that will be useful during work.