In the hallways there are two types of storage places for shoes: for those that are worn now and those that will be needed in other seasons. In the second case, space is allocated in closets and wardrobe compartments. Narrow shelves, drawers and baskets, various storage systems and organizers allow you to bring order and consistency. But for the first case, some kind of separate cabinet, chest of drawers or do-it-yourself shoe rack, made of the right size for the hallway, will come in handy. I selected photos and drew drawings and diagrams of the most successful models of narrow functional shoe holders and overshoes, which can be purchased ready-made or made independently.
Why you should make a shoe rack with your own hands for the hallway
The problem of placing shoes worn at a given time in the hallway can be solved in different ways. Typically, low cabinets with a soft seat are used for storing seasonal shoes and slippers - they are also called shoe boots.
They also design open shelving with shelves for shoes of shallow depth. If you place the shelves at an angle, you can make the rack narrower - after all, its depth is determined by the size of the shoes.
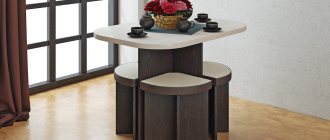
A slim shoe rack is perhaps the best option possible. In the reference book with a list of furniture and interior items, I defined “slim”. Essentially, this is a shoe rack with a rotating mechanism that you can make with your own hands.
Due to the fact that the shoes are in an almost vertical position, the depth of such a cabinet is very small - ideal for small and narrow hallways.
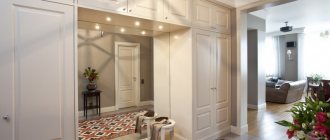
Since a shoe rack of this type is narrow and unstable, it must be attached to the wall. You can make it hanging, which will give the interior an additional zest and allow you to slide something under the body of the cabinet. Often a mirror is hung above a shoe rack, and its lid is used as a shelf for all sorts of small things, which is also very convenient. You can screw hooks, hangers for umbrellas and bags with your own hands to the side of the shoe rack - this will expand the functionality of the furniture and add comfort to the interior of the hallway.
The benefits of making your own shoe cabinet of the desired design are obvious:
- In order to make a shoe rack with your own hands, you can use scrap materials and any leftovers.
- The design of a typical shoe cabinet is extremely simple, and the variety of drawings and photos allows you to choose the best option.
- Since the material consumption is low, as is the cost of the product, such projects are reluctant to be commissioned. You can immediately save yourself time and do it yourself.
Old simplicity
Drawings of a shelf for shoes made of plywood
The traditional, simplest and cheapest option for storing common shoes in the hallway is a 2-row floor shelf made of 6-10 mm plywood; for drawings see fig. on right. Shoes with high tops or berets (laced tops with tongues) are placed on the protruding part. This shoe rack is good for everyone, except for one thing: for 10 pairs you will have to give almost 0.5 square meters. m of usable area. And what’s worse, the width of 400 mm is the minimum possible for such a design. What if the entire hallway is 1.25 m wide? Therefore, the main trend in the design of modern shoe racks is compactness due to elongation and the use of simple mechanisms.
Note: depending on the availability of free space, a simple shoe rack can be made in other ways, see for example. track. video.
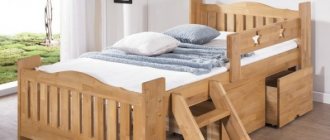
DIY shoe rack with seat, photos and drawings
The most comfortable sitting height is 350-500mm above floor level. The width of the seat must be at least 300mm. Most often, a compact shoe rack with a seat with your own hands has dimensions of 400x600x350mm. You can make the shoe cabinet longer and higher if the size of the hallway allows it.
DIY shoe rack made from pipes, photos and drawings
Such a small and practical piece of furniture can be made from scrap materials - everything that is left over. For example, use pipe cuttings.
In this case, the shoe rack can be made in the form of a tall narrow cabinet for shoes or a shoe cabinet with a seat.
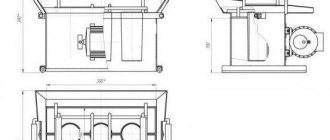
Pipes can also be used as supports for shelves. For example, in the implementation of a carousel shoe rack with a rotating base.
The rotating element is a conventional TV rotating mechanism with a square platform. To ensure stability of the cabinet, you can make the base larger; the height should not exceed the radius of the shelves without additional weighting the center of the structure.
DIY narrow shoe rack with inclined shelves, photos and drawings
The greater the slope of the shelves, the narrower the shoe rack itself can be made. But you will need to provide some kind of stopper that will prevent boots, sneakers and other items from sliding off the surface of the shelves due to the slope. The stopper can be made from a wooden or metal tube, or a narrow strip of chipboard or wood.
As inclined shelves, you can use special nets for wardrobes with a side.
I recommend that you familiarize yourself with the range of such components in various wardrobe systems and related accessories for sliding systems (such as Commander, Find, Aristo, etc.). There are a lot of storage systems for hallways and dressing rooms with fastening to the side and back walls, as well as the placement of shoes in a vertical position (sole top) on “peaks” and “petals”.
DIY shoe cabinet (video)
Hinges and clamps
In petal, and some other shoe racks (see below) with hinged doors, there is another, at first glance, tricky assembly unit - a rotary hinge. There seems to be no way other than buying it, but you can still make it yourself. You only need pieces of thin-walled seamless tube, preferably brass - pieces of ballpoint pen bodies, elbow connectors of old spinning rods, etc. The cases of some types of Cuban cigars are excellent, but the prices for them now are not good for the night. And the actual procedure for making a homemade hinge for a folding shoe tray is as follows:
- We cut off parts from the tube with a length equal to the depth of the hinge socket. Usually - 1/2-2/3 of the thickness of the side wall of the shoe rack, but not less than 10 mm. The walls behind the nest should remain at least 5-6 mm. These will be socket clips, you need 2 of them for each hinge..
- Using a scraper (scraper, reamer), the same one used, say, when installing/dismantling air conditioner pipelines, we remove 0.25-0.35 mm chamfers from the inside of the clips.
- We select bolts for the holders with a round head of such a diameter that they fit into the holder with a gap of up to 0.5 mm. We remove burrs on the heads of the bolts (if the slot is straight) with a needle file. If necessary, you can use sandpaper to adjust the head to the holder.
- Use a Forstner drill to drill holes for the clips; It is advisable to take a drill of such a diameter (or select tubes for the clips) so that the clips fit tightly into the hole.
- We press the clips into the holes. If they fit freely, you can glue them with any metal mounting adhesive.
- We install the bolts accordingly. holes in the petals, tighten with nuts and spring washers - the hinges are ready for assembly.
Storage
It is preferable to store shoes that are not worn for a long time in a stable favorable microclimate (see above). Also, a cabinet or cabinet for out-of-season shoes in another room is necessary if there is not enough space in the hallway. In general, it is undesirable to keep shoes that have not been worn for a long time in the hallway, especially in a private house, where through the open front door you can smell cold or feel damp.
Rack and cabinet
Schemes of an open rack for long-term storage of shoes and a more compact shoe cabinet with hinged doors are shown in Fig. above and below respectively. The rack provides optimal conditions for long-term storage of up to 30 or more pairs of shoes, but requires approx. 0.6 sq. m area. With minimal ergonomics, this rack requires a dressing room of 6 square meters. m. The rack has no back wall; it is attached to the wall with steel corners and 6x70 self-tapping screws in plastic dowels. The material of the shelves and walls is board or chipboard 20 mm and timber 30x30 mm. Shelves, for better ventilation, made of steel mesh on wooden frames.
Schemes and drawings of racks and shelves for storing shoes
Note: this rack is universal. High and low sections can be added to it in width and height without restrictions, as long as there is enough space. Due to the distribution of fastenings, the wall behind the rack may be weak, e.g. a partition made of foam concrete or aerated concrete blocks.
The shoe cabinet is more compact and fits in a passage with a width of 1.5 m. The length of the cabinet is up to 2 m. The shelves are of the same design as in the previous one. case; They are attached to the sidewalls with dowels, corners, in milled grooves or on regular shelf holders. The back wall is ventilated, like a petal shoe rack (see above). An option with ventilation almost like a rack - a cabinet without a back wall with a gap between the cabinet and the wall of 40 mm (the width of the floor plinth). Then assembling the cabinet according to the diagram on the bottom right in Fig. The lining at the back is made from the same board as the shelves with partitions.
Organizers
But what to do if there is no space at all for a shoe closet? In this case, an organizer for long-term storage of shoes that are not currently worn will help out. True, in furniture stores you will most likely be offered a special shoe organizer closet (item 1 in the figure), which, with the doors open, will take up somewhere from 2 square meters. m. But in haberdashery and clothing stores you can find an incomparably cheaper shoe organizer-suitcase made of fabric, pos. 2, fits under the bed. In addition, shoes breathe freely in it.
Shoe organizers
But you don’t even need to buy a suitcase organizer if you have a sufficient number of shoe boxes. They are simply glued together, pos. 3. It is no more difficult for shoes to breathe in such an organizer, and it is easier to push it into the niche of the under-bed drawer. In this case, the soft organizer-suitcase often gets stuck.
A shoe organizer made of cardboard can also be glued together, for example. to the dacha, pos. 4. Designed with imagination, it can be completely in place in the apartment, if there is a suitable niche in the hallway, pos. 5. Then the cardboard shoe rack in the niche should be positioned in a spaced position so that the sides of the niche give rigidity to the entire product. For the same purpose, cardboard blanks are impregnated 2-3 times on both sides with a water-polymer emulsion or PVA diluted 2-3 times with water.
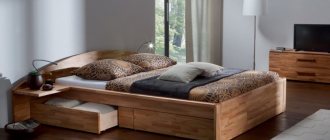
DIY shoe rack made of wood and scrap materials
Strictly speaking, chipboard is not the best option for storing wet shoes. It does not have the required moisture resistance and requires more careful use. Therefore, a shoe rack made of wood, metal, MDF, or furniture board seems a more attractive option for making it yourself.
In addition, wood, plywood and furniture panels provide more opportunities in the design of a shoe cabinet. Hollow and openwork-shaped sidewalls can be used as supports.
Or in a simpler version - using timber as supports.
In general, you can use any scraps and materials at hand to make a shoe cabinet with your own hands.
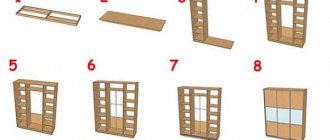
How to make shoe racks
Petalaceae
Shoe racks with folding trays on petals are the most perfect, so let's start with them. The most seemingly complex (and expensive when purchasing a kit at retail) parts - the side petals - can be made with your own hands from sheet metal or hard plastic with a thickness of 4 mm or more. You can also cut the petals out of plywood with a thickness of 6 mm, then soak them twice with water-based acrylic varnish diluted in half. Impregnation is needed in this case to increase the rigidity of the part. The varnish is diluted with distilled (!) water.
Drawings of the petal shoe rack are shown in Fig. below. Each tray is 2-tier (spring-autumn and summer-house). For tall shoes you will have to add a locker, because... shoes with tops and ankle boots do not fit in the trays; This is perhaps the only drawback of petal shoe racks. The total height of one section H is taken from 300 mm. The upper and lower gaps between the tray cover and the front panel of the shoe rack are required to be at least 6 mm for ventilation. For the same purpose, the “sinus” pocket above the top tray should also be ventilated. To do this, a series of holes with a diameter of 40 mm or more are made at the top of the back wall of fiberboard or a gap is left. Ball locks or removable pins are installed in point A of the middle shelf (marked with a red arrow) so that the position of the middle shelf can be adjusted according to the contents.
Drawings of a shoe rack in the hallway
The design and dimensions of this type of trays for storing shoes in a wall niche with a depth of only 200 mm are given in the following. rice. The peculiarity of this design is that the sockets of the rotary hinges (see below) are made simply in the form of holes in brackets made of steel angles, mounted from the inside on the front trim of the niche. The tilting clamps are also attached to them, if it is far from the side walls of the niche. In this design, the front cover of the tray can be as high as desired, so this version of the petal shoe rack can also be made for tall shoes. One condition is that the front trim of the niche must be strong enough, not fragile. Drywall, for example, is not suitable in this case.
Setting up a shoe rack in a niche
Note: how to assemble a narrow shoe cabinet with your own hands, see the master class below.