One of the most common types of furniture in an apartment or house is a wardrobe. It is suitable for installation in the hallway, living room, bedroom or nursery. In order to increase the efficiency of using living space, you should choose not a standard option, but a three-door wardrobe, which is more practical and functional. Inside it fits a lot of different things - from shoes and small accessories to outerwear and sports equipment. And in order for the furniture to fit well into the room, to be as convenient to use and durable as possible, it is worth familiarizing yourself with the main criteria for its selection.
Advantages and disadvantages
A modern wardrobe with three doors differs from conventional furniture in a number of advantages:
- Large capacity. Even bulky items fit comfortably inside and do not wrinkle. The presence of shelves provides enough space for various small items.
- Small area. Despite its spaciousness, a three-door wardrobe takes up relatively little space and can be installed in a small room.
- Variety of models. If desired, it is easy to select or order a furniture option with any content, design and even a suitable price.
- Conveniently opening doors. This allows the cabinet to be installed even in a narrow space and ensures safety. The door will not accidentally press your finger or hit the handles (this model does not have them).
- Built-in structures allow you to hide communications, uneven walls, and open wiring.
- Zoning of space. The closet can be used not only to place things inside, but also as a partition.
Among the disadvantages are problems with roller systems, which begin to work worse over time. You can avoid them if you don’t skimp on door leaves and immediately choose expensive options. Unlike models with 2 doors, three-door coupes do not open completely and require the installation of additional lighting. Another disadvantage is the inability to move the built-in wardrobe to a new location.
Large capacity
Small footprint
Variety of models
Conveniently opening doors
Space zoning
Varieties and materials
By design, sliding wardrobes are divided into two types - cabinet and built-in. The first option is almost no different from ordinary furniture - it also has a bottom, top cover and walls. If necessary, cabinets can be easily moved to a new location. It is possible to transport such furniture without disassembling it, although this reduces its strength. Other advantages include making the most of the space occupied, although they require more space than a built-in wardrobe. Due to the need for additional materials, such a model will cost more.
How to choose components for a wardrobe, useful tips
The height of a built-in cabinet is from floor to ceiling, the width is usually from one wall to another. This increases the efficiency of using the occupied space. The absence of walls and top allows you to save the amount of materials and time for assembly. The disadvantages of this option include the impossibility of moving it to another part of the room. If the built-in wardrobe is moved, cosmetic repairs to the ceiling and floor will have to be made at the former installation site.
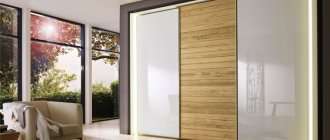
The standard form of compartment products is linear or elongated along the wall, which is suitable for large rooms. In rooms where there is not enough space to install full-size furniture, you can place corner cabinets. A radius model with closed elements made of curved glass would look good in the hallway - but this type of three-door coupe will be the most expensive.
Hull
Built-in
Linear
Radial
Chipboard is most often used for the box and filling of the structure. However, when choosing, the main attention should be paid to the facade of a three-door wardrobe; for its manufacture they use:
- Chipboards - MDF or chipboard. On top they can be covered with films of different colors that imitate natural wood and other textures. They are durable and affordable.
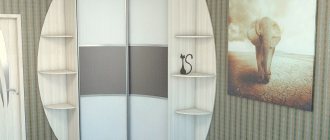
- Mirrors. This facade visually makes the room more spacious. A coupe with a sandblasted pattern allows you to further decorate the interior.
- Glass. Different options are used - matte, colored or transparent. The most impressive look is glass with photo printing.
- Composite materials. Gives the closet a more modern look.
- Natural wood. It is rarely used due to its high cost and heavy weight, but it looks respectable and expensive. A more profitable alternative to a wooden facade is MDF sheets covered with veneer.
Another popular way to decorate the front of a cabinet is fusing. It is a mosaic pattern made from fused colored glass. Acrylic paints are also used to decorate facades, which can improve the aesthetic characteristics of furniture.
MDF
Chipboard
Mirrors
Glass
Composite materials
Natural wood
Fusing
Roller systems
When choosing a three-door cabinet, you should pay attention to the material used to make the roller systems. Steel elements are considered the most reliable and durable. However, they make a lot of noise during operation, so aluminum is usually used instead of steel - such guides move quietly, but wear out faster. They will have to be changed at least every 10 years. It is not recommended to choose sliding mechanisms made of plastic. Saving on rollers right away can quickly add up to additional costs. Plastic elements wear out within 3–5 years of use.
Characteristics of sliding wardrobes with 4 doors, popular models and designs
By design, roller systems are divided into 3 types:
- Monorail. The suspension is located at the top, the rollers move along a profiled pipe. There are no guides at the bottom, but sometimes there may be a stop that prevents the doors from swinging. Monorail systems are the most reliable and expensive.
- Suspension with hook. The most budget option. The rollers are easily suspended on hooks, but this design is not durable, so it is not in demand.
- Support roller. The main part of the structure is metal guides at the bottom along which the rollers move. The upper part is needed to hold the canvas in a vertical position.
Support rollers are a system characterized by an optimal ratio of cost and service life. Popular brands use it to make cabinets. The warranty period for such a mechanism is on average from 10 to 15 years.
Monorail
Suspension with hook
Support roller
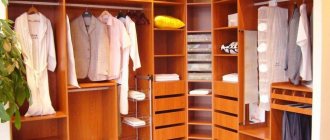
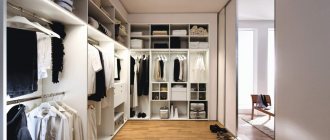
Internal filling
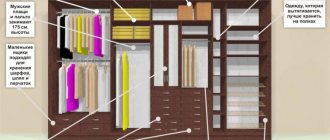
The contents of three-door cabinets can be divided into three parts - the upper shelf or mezzanine, the lower and middle space. The top is usually used to store seasonal or little-used items, from extra blankets for guests to rubber boots or winter hats. The bottom part is suitable for placing shoes, the middle part is suitable for casual wear.
To make more efficient use of the internal space, the following elements are used:
- Barbells. Installed in the middle parts of closets to accommodate clothes of various lengths. Can be located at different heights.
- Pantographs. They are used for the same purpose as rods, but in tall cabinets. They are equipped with retractable mechanisms for lowering to the desired level.
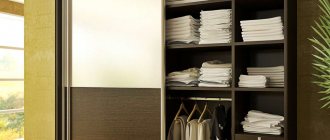
- Shelves. They are usually placed on the sides of sliding wardrobes, at a distance from each other of about 300–400 mm in height. With their help, you can effectively organize the storage of linen and small items. The shelves are made open, semi-roll-out and closed.
- Boxes. Another way to store small items of clothing. Can be pulled out partially or completely.
- Retractable hangers. Often these are filling elements for shallow cabinets. Can be supplemented with hooks or fastenings for clothes.
- Nets for shoes. Placed at the bottom of cabinets along with shelves.
If the furniture is made to order, additional non-standard elements of internal filling can be provided. For example, mounts for an ironing board or plastic baskets in which it is convenient to store useful little things.
Barbells
Pantographs
Shelves
Boxes
Retractable hangers
Shoe nets
Plastic baskets
Ironing board
Assembling a three-door wardrobe with your own hands in 5 steps
Assembly and independent construction of built-in, semi-built-in and cabinet furniture is carried out according to similar schemes; the instructions differ only in the details. Therefore, further I will tell you the general algorithm of actions, and you can interpret it to suit your situation.
I’ll give you some advice right away: it’s better for “green” beginners to order a façade roller system from a workshop, the work is troublesome. In place, all you have to do is screw the guides, insert the doors and adjust the rollers.
Step No. 1. Making a project
It is better for an amateur to assemble a frame from either MDF or laminated chipboard. It only looks easier to knock down a frame made of wooden blocks, but in reality there are more problems. There are programs online that can be used to design and calculate any furniture.
If the option with the program does not suit you, then draw a sketch by hand. When creating a sketch, beginners often do not take into account the thickness of the sheet; do not step on this “rake”. By the way, a sheet of laminated chipboard or MDF for such furniture is taken with a thickness of 16 mm.
Popular frame options with exact dimensions.
When the sketch is ready, you need to make a table with details, that is, write down the dimensions of the slabs for each shelf and drawer. Then take this table, go to the nearest furniture workshop and order cutting and lamination of the ends.
An example of a wireframe with details.
You shouldn’t buy a large slab yourself and take it to a workshop for cutting. It is better to buy the material from them, the price will be the same, since these companies buy slabs in bulk, plus you will also spend money on transport.
Step No. 2. Foundation
It doesn’t matter whether you are making a built-in wardrobe in a niche or assembling a cabinet model, the base is made the same everywhere. I do not recommend mounting the frame and guide rail under the doors directly on the floor.
The fact is that the base is based on adjustable legs and with their help it will be easier for you to align the bottom plate strictly horizontally, and this is necessary for the normal operation of the rollers. Plus, if the floors are wood, an adjustable base makes a good buffer.
Screw the adjustable legs to the base.
The instructions are as follows: take the stove and screw the adjustable legs around the perimeter at a distance of 70 mm from the edge in increments of 500 - 700 mm. There is no need to install the facade strip covering the legs right away; you will install it at the very end, after installing the doors.
Step No. 3. Assembling the frame
We assume that our slabs are already cut to size. The frame can be assembled in two ways:
- The assembly at confirmations will be neater and more beautiful. Here you will need a confirmatory drill and the furniture screws themselves. Just mark, drill and screw in. The video below in this article shows everything in detail;
- It would be easier, but not as beautiful, to assemble the frame on metal corners. There, the corners are screwed with ordinary wood screws directly to the slabs. By the way, with such an assembly the shelves can withstand a large load.
It is easier to assemble the frame on metal or plastic corners.
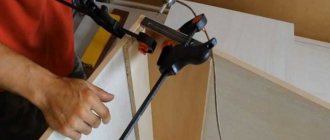
Step No. 4. Installation of guides under the doors
It is not difficult to measure, cut and screw the guides at the top and bottom with self-tapping screws. The problem is that these rails must be clearly above each other and attached to a strictly horizontal base, that is, level. For vertical orientation, a plumb line is used.
The bottom plate is adjusted using adjustable legs. Place a bubble level on the edge of the slab and adjust using it. If the top rail is attached to the laminated chipboard cover and everything is cut exactly, then when the lower horizon is set, the top one is set by itself.
The lower and upper rails are screwed onto self-tapping screws.
If the top rail is attached to the ceiling and the ceiling is not completely level, then you will have to place wedges under this rail. Then the flaws will need to be covered with molding or decorative strip.
Before screwing the bottom rail into it, you need to insert stoppers for the door rollers.
Step No. 5. Installing doors
Now you need to install the doors in their place. To do this, first wind the upper rollers, and then insert the lower ones. Then all you have to do is adjust the lower rollers, for this there is a hole on the side for a hexagon, by rotating the screw you can align the doors horizontally.
Scheme for adjusting door rollers of a sliding wardrobe.
Features of accommodation
The contents and dimensions of structures may vary depending on the installation location:
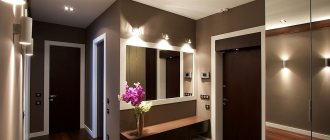
- A closet is often installed in the hallway, covering one of the walls. A mirror facade will help to visually enlarge the space. Inside there must be a spacious middle part with hanger rods. The standard depth is 600 mm, for a narrow hallway - 450 mm.
- In the living rooms you can install cabinets with a niche for a TV and open shelves for storing souvenirs. With the help of such furniture you can replace an entire set - from a sideboard to a wardrobe. The length is chosen according to the location of the doors, the depth is usually standard.
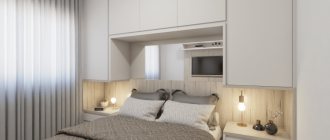
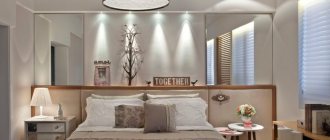
- Wardrobes for the bedroom should have a compartment for bedding. The interior space of furniture for a married couple can be divided into a female and a male part. The depth must be at least 600 mm. To decorate the interior, a sandblasting pattern can be used on the mirror facade. This is the most popular option for the bedroom.
- The wardrobe in the children's room is designed to save space. Open shelves on which toys and books will stand will help improve the usability of furniture. It is advisable to select the design to match the overall interior of the room; the depth may be small.
Methods for repairing wardrobes, step-by-step instructions, recommendations
The three-door wardrobe is also suitable for installation in a study or home library. Inside such furniture you can store documents, office supplies, personal belongings, and install a built-in safe or minibar. The design of such cabinets is usually made in a classic style.
Hallway
Living room
Bedroom
Children's
Library
Materials used to make the coupe
For the manufacture of coupes, all conceivable and inconceivable materials are used. This is why sliding wardrobes are made to order - they are always original.
You can examine and choose a wardrobe with the ideal design only by looking at numerous photos of sliding wardrobes.
Criterias of choice
When choosing a three-leaf wardrobe, pay attention to the following features:
- The standard width of one leaf is in the range of 700–1000 mm. To increase it, you will need to choose a higher quality, more expensive roller system. One way to add length is to insert narrow (up to 150–300 mm) vertical panels on the sides and in the center.
- It is not advisable to choose a depth of less than 600 mm for any room except narrow hallways. It is worth considering that the roller system will already take 50–100 mm of this size.
- The height of the built-in wardrobe coincides with the distance from the floor to the ceiling of the room. For cabinet furniture it is usually in the range of 2–2.2 m.
- The recommended material for the shelves and frame is chipboard. Choosing natural wood will significantly increase the cost of furniture and will lead to the fact that the boards may crack due to different humidity inside and outside. Fiberboard can be used for the back wall of the cabinet.
- To decorate a room, the best solution would be facades with mirrors or photo printing. However, this option significantly increases costs. To save money, it is easier to choose a facade made of laminated chipboard or MDF.
The best quality is found in wardrobes made by well-known global manufacturers. However, its cost will also be high. It is more profitable to order such furniture from local companies, especially since in this case you will be able to choose the content that best suits your individual requirements.
Dimensions
Quality materials
Filling
Design
Manufacturer
Calculation of the dimensions of a sliding system for three doors
I would like to talk more about calculating door sizes. This is a very important point because the cabinet is designed in such a way that when the door is opened, only one section can be accessed, while the other two remain closed.
Therefore, if you want to make drawers instead of shelves, which are adopted in our three-piece cabinet design, and install a pantograph lift instead of a coat rack, you must carefully calculate the width of each door. In addition, the section in which the drawers or pantograph lift will be installed must be smaller than the width of the door (approximately the width of the profile).
To calculate the height and width of the doors, you need to calculate the size of the cabinet opening. So we calculate:
- Opening height: From the cover height of 2400 mm, subtract the chipboard thickness of 32 mm (top/bottom) and the height of the plinth of 100 mm. Result 2400 - 32 - 100 = 2268 mm.
- The width of the opening is calculated as follows: from 1800, subtract the chipboard thickness of 32 mm (right and left posts). We get 1800 - 32 = 1768 mm.
As a result, we get the opening dimensions of our three-door cabinet: 2268 * 1768 mm.
These calculations are quite sufficient; it is enough to provide the overall dimensions of the height and width of each door (in our case they are the same), as well as the dimensions of the upper and lower slats, and the same furniture store specialists will calculate the length of the vertical profiles, the dimensions of the crossbars, etc.
The design of our three-door wardrobe assumes the presence of one door with a solid mirror panel, and two doors with a matte mirror, separated by crossbars. You will need to tell the cabinetmaker that the doors should be divided into four equal parts and they will figure out the size of the inserts and the number of headers.