The question of how to cover a concrete floor to avoid dust may arise in a variety of situations: when creating a wear-resistant and comfortable floor surface in industrial and commercial premises, before laying the finishing coating in residential areas. Regardless of the loads and operating conditions, dust removal is usually carried out using the same methods to achieve a certain result.
Dust removal is the strengthening of a concrete coating using a variety of substances and compositions: these can be impregnations, toppings, paints, grinding and polishing agents. When dust is removed, the concrete floor not only stops releasing fine dispersed dust into the air, but also becomes more durable, hygienic, and wear-resistant.
Many people believe that a floor that is planned to be used as a subfloor does not need dust removal. But this is not so - the concrete floor is also dusty under the coating, which over time can begin to creak and crunch, puff up, and shrink. Linoleum or carpet laid on an untreated floor will also wear out much faster and require replacement than if finished with concrete coated with the correct composition.
Why do you need to remove dust from a concrete floor?
- Improved strength characteristics.
- Increasing the level of resistance to various mechanical loads.
- Extending the service life of the screed.
- The floor is hygienic – it stops generating dust, cleaning is required less often and is easier to do.
- Increasing insulating properties.
- Preventing concrete components from entering into a chemical reaction with each other and with other substances.
- Preservation of the finishing coating and extension of its service life.
- Anti-slip effect - important where the concrete screed acts as the main floor and people walk on it.
- Aesthetic appearance – treated concrete is smooth and beautiful, creating a finished look for the floor.
The choice of composition and method of dust removal is influenced by the operating conditions and characteristics of the screed itself. The modern market offers a large selection of various tools designed to implement a number of specific tasks.
Why does a concrete floor get dusty?
Before moving on to consideration of dust removal technologies, it would be useful to understand the reason for the formation of dust on a concrete floor. It lies in the very structural structure of the hardened concrete.
This is a pronounced conglomerate mixture, which includes completely dissimilar materials that differ not only in size, but also in chemical composition. The silicate crystal lattice, formed during the maturation of cement stone, intersects with large fragments of insoluble sand or gravel filler.
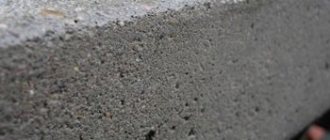
Structure of concrete under a microscope
A look at a section of concrete under a microscope allows you to see its pronounced porosity - from the most microscopic to large pores filled with a gel cement substance, air or water. They also contain a lot of chemically active unbound substances, which, on the one hand, are unnecessary ballast, and on the other, cause erosion processes, especially in the upper, most fragile layers of the screed.
Plus, the process of concrete maturation is always associated with the release of cement laitance to the surface, which, when hardened, forms an extremely fragile layer, which was often the main source of dust formation.
Thus, in order to prevent dust formation, you can either strengthen or remove the upper unstable layer, or bind it with additional crystalline formations or a polymer structure. Hence the three main approaches to solving the problem of dust removal - surface hardening with topping, grinding or treatment with special impregnations. Very often these technologies are used in combination, which gives the most effective results.
Why is dust removal required?
- First of all, if surface erosional processes are not stopped, they will eventually affect the deeper layers of concrete, which will lead to partial or even complete destruction of the screed.
Deteriorating concrete floor
- Cement dust poses a serious threat to human health - it can provoke the development of diseases of the respiratory system, eyes, skin, and cause allergic reactions.
- Dust getting into parts and components of machinery and equipment can cause rapid wear and tear and even quickly fail.
- A dusty floor is very difficult to clean and always looks unkempt.
- Even if you plan to lay a decorative covering on a screed, the formation of dust will certainly make itself known over time with crunching or squeaking. Therefore, experts advise carrying out dust removal on any floors, without any exceptions.
Having understood the essence of the problem, we can move on to considering dust removal technologies.
Rubber flooring in garage
A rubber floor covering will be comfortable and practical. Its disadvantage is the solid price - from $18 per square meter, if we talk about rubber modular coating.
Today rubber coating is available in three versions:
- modular slabs of different sizes;
- rolled rubber coating;
- crumb rubber with a polymer binder.
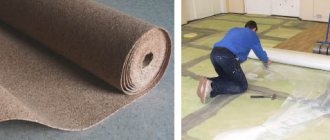
Roll and modular coatings differ in the type of installation and release form. Other characteristics are similar. The installation method is practically the same, only in one case the coating is assembled from fragments, most often square in shape, with edges designed in the form of locks of different configurations. The roll covering is rolled out on the floor. Both types are glued with polyurethane glue. Concrete preparation is standard: repairing chips and dents, removing dust and dirt, priming (with polymer impregnation).
Laying a rubber modular floor - dovetail joints
When choosing a modular or roll rubber covering, pay attention to the thickness of the rubber. It can be from 4 mm to 50 mm. A very thick garage floor covering is not suitable for it, but too thin one can be damaged by wheels. The optimal thickness is 10-15 mm. The price is not very expensive, and the characteristics are more than sufficient.
Crumb rubber or also called rubber asphalt is a two-component coating. The crumb itself comes in bags and is black. There are dyes to give it some other color. They are added to the dry crumbs and mixed until they are completely colored. Then the binder is added. This is usually polyurethane glue. The mass is stirred until smooth. But the process must happen quickly - the hardening time is very short. The crumbs with polyurethane are laid out on a prepared base (leveled, primed, covered with a layer of polyurethane glue), leveled and pressed down with a roller.
Strengthening a concrete floor with topping
To make the meaning of this tricky word immediately clear, we can draw a direct analogy with the well-known “ironization” of a freshly poured concrete screed, when it is sprinkled with dry cement, which is rubbed into the surface layer. Alas, the resulting layer is not durable and deteriorates quite quickly.
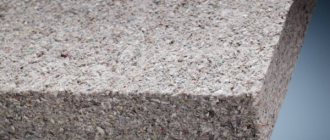
Special compositions - toppings - do not have these disadvantages. They consist of cement, special binding additives and filler in a very fine fraction, which determines both the strength and appearance of the surface.
Packaging with topping
- Quartz sand can be used as a filler. This strengthening is quite suitable for rooms with light or medium load. Often this topping is given different shades - this allows you to give the concrete floor a decorative effect.
- For floors where increased load is planned, it is better to use corundum topping. It will strengthen the screed by approximately 1.8 times, and the resistance to abrasion will double.
- Metallized topping is considered the most durable, but it is used only in industrial construction, where floors experience extreme mechanical or vibration loads.
How to harden with topping
Adding topping is a rather labor-intensive and responsible process that requires, among other things, the use of special equipment. The screed must be properly reinforced, strengthened as much as possible using a vibrating lath. The thickness of the concrete layer must be at least 70 mm, and its grade must not be lower than M300.
Approximate floor layout with topping
- The technology consists of evenly scattering dry topping onto the surface of the poured screed and rubbing it in thoroughly. A special trowel is used for this - the so-called. " helicopter " .
Trowel - “helicopter”
- You can distribute the composition over the surface manually, but it would be better to use a special dosing cart.
- The first application and grouting are carried out 3–7 hours after pouring the screed, so that it has time to initially set (the footprint of a person’s shoes should be no deeper than 4–5 mm). Approximately ⅔ of the calculated amount of topping is added. As soon as the composition begins to become saturated with moisture, it is immediately rubbed down with a “helicopter”. It is important to saturate the composition with cement laitance as much as possible and not to dry out the surface. Additional moistening of the surface with water is strictly prohibited.
- After the first grout, without taking any break, immediately add the remaining third of the topping, and, after complete saturation, grout thoroughly.
- When the floor surface has set so much that the shoe footprint is no more than 1 mm, finish grouting is carried out. All that remains is to treat the screed with a special water-retaining compound, and the work can be considered completed.
This is what the finished surface might look like
Such a floor, once fully matured, will have a durable surface on which dust will never form.
The approximate consumption of topping for rooms with average load is from 3 to 5 kg per 1 m².
Dust removal of floors by sanding and polishing
The essence of this technology is the removal of the unstable, erosion-prone top layer, with the expectation of opening the lower, truly strong layers of concrete. This solves several problems at once:
- The remaining minor defects of the screed are eliminated, it acquires the desired smoothness and evenness.
- Increases surface adhesion to any mortars and mixtures.
- If an old surface is being processed, this will remove areas of dirt or remnants of old coatings.
- The water resistance of the screed increases and dust formation is practically reduced to zero.
- The floors are given an aesthetic appearance.
Sanding is recommended to precede any further actions - pouring polymer floors, installing decorative coatings, painting work, etc. Often, grinding and polishing floors are the final stage - after them the surface will be ready for use.
Sanding can be done dry or wet.
- Sanding on a wetted surface is usually used when installing mosaic floors with marble or granite filling. The resulting surface is characterized by almost perfect evenness, close to polished. The disadvantage of the technology is its high labor intensity and low productivity due to the rapid clogging of abrasive elements with wet sludge, which is very difficult to remove in a timely manner.
- Dry sanding is the most common. It allows you to visually control the process and does not require time for the floor to dry after treatment before moving on to other operations. The only negative is the abundant formation of dust during work. This will definitely require connecting a powerful vacuum cleaner to any sanding equipment.
Dust removal of floors with impregnating compounds
From the point of view of carrying out work independently, this technology is the simplest. Nevertheless, it shows good results, especially in combination with other dust removal methods.
The essence is to introduce special impregnations of various types of action into the porous structure of concrete - mineral or polymer (organic).
1. Mineral compounds (fluates) cause chemical reactions in the upper layers of concrete that neutralize free components and create additional insoluble crystalline glassy bonds, which, intertwined with the crystal lattice of cement, provide a highly durable and dust-free surface.
- Until the recent past, the main substance in such impregnations was sodium silicate. However, such compositions have serious disadvantages: the duration of completion of chemical processes (sometimes up to six months), the need to very thoroughly rub in the composition and the mandatory washing of the surface after complete absorption of the impregnation. If excess composition remains on the surface, efflorescence may form in these places.
Silicate strengthening composition
- Modern mineral impregnations are made on the basis of lithium polysilicate. They penetrate even the smallest pores, and chemical transformation processes take only 10 - 15 days. One impregnation is enough for the entire period of operation of the screed, while applying the composition does not require any effort, rubbing or washing the surface.
2. Organic impregnations fill the pores of concrete with polymer molecular chains, creating additional bonds in the thickness of the material and increasing its strength and wear resistance. They come in several types:
- Acrylic - used on floors where heavy loads are not expected, or the surface will be covered with a floor covering. They can also be used for temporary (1-2 years) dust removal of floors.
- Polyurethane - more versatile and durable. Gives the surface additional water-repellent qualities. The disadvantage is a strong unpleasant odor during the application and polymerization process.
- Epoxy is quite expensive, but very reliable and durable. They are often used where impregnations with a pungent odor cannot be used (for example, when carrying out renovations in one of the rooms of an apartment or house).
Application of dust-removing impregnations
Any of the impregnations, regardless of the component composition, must be accompanied by detailed instructions for preparation (if dilution with water or preparation of a two-component impregnation is required) and the rules for its application. Compliance with these manufacturer's recommendations is mandatory, otherwise the required dust removal and hardening effect may not be achieved.
- Before using the impregnation directly, the floor is thoroughly inspected again. If necessary, minor repairs are carried out using epoxy putties.
- All debris is removed from the surface, and it is thoroughly dusted with a powerful vacuum cleaner.
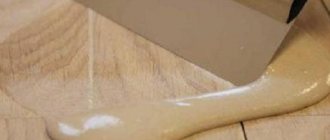
Distribution of impregnation with squeegees.
- The impregnating composition is poured onto the floor in strips, distributed with brushes or squeegees, or applied using a long-haired synthetic padding roller. It is important that the impregnation is distributed as evenly as possible, without leaving areas where the composition can be quickly absorbed, and without the formation of puddles.
Dust removal technologies using silicate and organic impregnations are somewhat different:
- If a sodium silicate composition is used, then the primary impregnation stage should be about 40 ÷ 60 minutes. During this time, the impregnation on the floor should become viscous. It is slightly diluted with water and again distributed evenly over the entire surface. Some types of compositions will also require the use of a trowel or scrubber machine to thoroughly rub into the surface.
- 20 minutes after re-distribution, all excess impregnation is removed using a squeegee or rag. The floor is thoroughly washed with clean water.
- There are fewer complications when using lithium impregnations. They are simply applied to the concrete base at the required rate (it will be indicated in the instructions for use). After the composition has been completely absorbed and the surface has dried, the process can be considered complete.
Preparing the concrete surface for processing
At the initial stage, the top layer of concrete is cleaned of debris, oil stains, peeled and chipped areas. Then the holes and cracks that appear are sealed, after which grinding is performed. Its task is to level the base and improve adhesion to impregnating and painting compounds.
After finishing grinding work, it is imperative to remove cement dust.
To do this, it is recommended to use an industrial vacuum cleaner, which can be rented from a specialized company, as well as a grinding machine. For a small amount of work, an ordinary broom, a household vacuum cleaner and a mop with a damp cloth will be sufficient.
Strengthening the concrete layer
The first option prevents the appearance of cement dust, rather than getting rid of it. It involves strengthening the top concrete layer using a dry mixture, or topping. It is based on cement, to which quartz, corundum, plasticizers and, under significant operating loads, metal particles are added. Additional impurities provide:
- increased wear resistance;
- high strength to mechanical loads;
- chemical passivity;
- insulating qualities;
- hygiene.
Distribution devices are capable of spreading a uniform layer of the required amount of topping over a concrete surface in one pass, which is very convenient. The dry mixture is sprinkled with water so that it gets a little wet, and smoothed using a special paddle machine. As a result, the pores of the concrete are clogged, and the floor acquires an attractive appearance and strength.
What reasons lead to dust formation?
During the operation of a concrete floor covering, its top layer takes on various loads, chemical and mechanical influences, because of this, the destruction of concrete begins, resulting in the formation of cement dust.
- violation of concrete pouring technology.
- improperly prepared mixture.
- adding poor quality components to the solution.
Even if concrete has high strength properties, without proper processing and the use of reinforcing compounds it will be subject to the negative effects of abrasive substances, which will lead to surface abrasion, reduced strength and dust formation. If the concrete is of poor quality, it will be subject to corrosion processes, which also leads to dust formation.
There are other reasons why a concrete floor becomes dusty, but those described above are the most common. However, there is a solution to the problem - treating the surface of concrete floors using special compounds. But why to do this is another question, we will answer it below.
Special compositions for dust removal
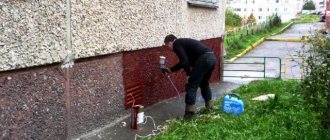
Applying paint
Before treating the concrete floor to prevent paint dust, it is treated with 2 layers of primer.
Enamels group
The concrete surface is coated with classic domestically produced colored enamels (PF-266, NTs-132) and modified modern dyes. A brush or roller is prepared for work. A seamless gloss coating appears on the base. It can withstand medium loads (foot traffic), exposure to chemicals, water, alkaline and acidic solutions.
The advantage of enamels is ease of application and low price (from 90 rubles per 1 kg).
We invite you to familiarize yourself with Coniferous rhododendrons
Modified dyes for concrete surfaces are used in garages. They are produced on the basis of polymer resins: acrylate, epoxy, polyurethane, urethane-alkyd. For example, VEPOX epoxy paint for concrete floors, price RUB 409.00/kg; Polyflex 1101, price 300.0 rubles per kg; Texipol - wear-resistant protective and decorative enamel for 289.0 rubles per kg.
Acrylic enamels are considered durable and affordable. Manufacturers declare a high level of abrasion of compounds on concrete floors in garages; in reality, the coating lasts a maximum of 3 years. It will be updated in the future. Paint for concrete floors Kompozit AK-11 gray, price RUB 435.0/kg.
The level of wear resistance of polyurethane compounds is higher. But the thickness of the covering layer is small and is renewed after 2-7 years. The service life is affected by the intensity of use. The compositions are expensive materials. Polyurethane paint for concrete floors 2-component Duepol (pearl gray) 4 l up to 28 m2, price 8165.0 rubles.
Polymer compositions
This group includes bulk thin-layer dyes that are used both indoors and outdoors. They combine the positive qualities of varnishes and CM.
Compositions with one and two components are used:
- for household use the following series are known: SdelaiFol – Russia, ESP 1615 – Russia, Teknofloor 2K – Finland;
- professional universal compounds for industrial use: PolymerStone - Russia, PG-100 - Germany, Ucrete DP - Germany.
In preparation:
- First of all, it is necessary to remove all debris from the floor covering, clean it of oily stains and peeling surface layers.
- Cracks and depressions that appear on the surface are sealed and polished in order to level the base and increase the degree of adhesion relative to impregnating compounds and paints (for more details: “How and how to grind a concrete floor - instructions for doing the work yourself”).
- After completing this process, you must remove cement dust using a grinding machine. An industrial vacuum cleaner is used for this. But for a small amount of work, you can use a broom and a damp cloth.
One of the options for solving the problem of whether a concrete floor is dusty or what to do is to paint it. As a result, the treated surface should acquire antistatic and anti-slip qualities. The packaging of paint compositions must contain a mark that they are intended for concrete surfaces (for more details: “Painting a concrete floor - how and how best to do it”).
Why do you need to remove dust from a concrete floor?
Those who do their own repairs are interested in the question: why do you need to treat concrete so that the floor does not become dusty? And what will happen if this is not done? In this case, the following problems arise:
- If the top layer of the concrete pavement is subject to erosion processes, then gradually they will reach the deeper layers, as a result of which the screed will collapse.
- Cement dust is hazardous to health.
- If the concrete screed is dusty, it can cause damage to household appliances and equipment, because the dust will get on the parts, which will lead to their rapid wear.
- Caring for dusty floor coverings is difficult.
- If you install a floor covering on a dusty base, then over time this will negatively affect the materials; when walking on the floor, an unpleasant crunch and squeak is heard.
Attention! Thoughtful and well-made protection against dust formation will extend the life of the concrete floor and provide it with an attractive appearance.
Now that we have found out the reasons for the appearance of concrete dust and the possible consequences, let’s talk about how to make sure that the screed does not collect dust.
How to prevent decay and crumbling of concrete?
To prevent the concrete structure from being damaged or altered in the future, you need to use the following recommendations in advance:
Using a plasticizing agent, you can make the material more dense, which will prevent the occurrence of such a problem.
- When mixing concrete, use specialized additional elements that will give the structure a moisture-repellent effect.
- Add a special plasticizer to the concrete solution to reduce vapor formation and increase density.
- Impregnate the poured structure with hydrophobic protective agents.
- Treat freshly poured or old concrete with a moisture-repellent primer.
- Use only fresh cement, without violating the ratio of the components, and carefully care for the product for 14 to 28 days.
- Insulate the external surface using various methods.
You should not save on building materials, since low quality and quantity can in the future provoke high costs for the repair of buildings and structures. As a result, the amount of such costs is often greater than if initially all proportions of elements and stages of the filling and maintenance method were observed. At best, preventive measures are taken to maintain the stability and reliability of the concrete composition so that it does not collapse.
How to remove dust from a concrete floor
The construction market offers a large selection of products that help solve the problem of dust formation in floor coverings. These are toppings and special deep penetration impregnations that protect concrete from the inside. Penetrating into the material, they polymerize, creating crystalline structures in the form of very thin threads, like a cobweb, filling cracks and pores, thereby preventing their expansion.
After such treatment, the top layer of the coating acquires high strength indicators and reliable protection against moisture penetration, and the destructive process stops.
Strengthening impregnations are used in a complex of works if it is necessary to strengthen and remove dust from the coating. Often, after using impregnating compounds, the surface is primed and a polymer coating is applied to it. A good result is ensured by treating the floor covering with Protexil. Its use removes dust from concrete and strengthens it.
Protexil is a liquid composition that penetrates deep into the layers of the screed. It can be used separately or together with other similar products. It penetrates five or more millimeters into the layers, which provides the screed with high strength and long service life.
Protexil will help strengthen the screed and relieve it from dust.
This product is also used when resuscitation of old concrete floors is required. The special composition of Protexil will bring back to life even those coatings that have undergone significant destruction. But before using the product, the surface is prepared. If there are dirt and deposits on it, they are removed.
To get rid of cement dust, the surface is thoroughly cleaned.
Polyurethane mixtures are also considered an effective means of removing dust from screeds. They contain polymers that harden upon contact with moisture. Such impregnating compositions give the best processing results. The main advantage of the mixtures is the ability to penetrate to great depths - 20-40 millimeters.
With such impregnation, a concrete floor will last more than ten years, and this despite the fact that it will constantly be exposed to the environment, temperature changes, high loads, and so on. In addition to the fact that polyurethane mixtures provide good screed strengthening, they are also effective in removing dust.
Polyurethane mixtures eliminate problems with the appearance of dust on concrete surfaces for a long time
But besides the advantages, such mixtures also have disadvantages. They cannot be used if the moisture content of the screed is more than 5%. Therefore, the screed cannot be processed immediately after pouring. You will need to wait some time for excess moisture to come out of the concrete, and only then strengthen and remove dust from the surface.
Considering the characteristics of polyurethane compounds, their cost is somewhat higher than that of other types of mineral impregnations, but they are worth it, because for your money you will get a high-quality result - the floor will not deteriorate and collect dust for many years.
Homemade recipe
An inexpensive way to treat a concrete surface is to apply PVA with liquid, taken in a ratio of 1:8. A homogeneous liquid mixture is prepared. It is recommended to use PVA-k or PVA-m.
The second inexpensive recipe: dilute latex with liquid.
Third recipe: preparing impregnation for concrete floors for dust removal. Pieces of polystyrene foam are dissolved in gasoline or acetone and a small amount of xylene is introduced. The mixture is applied to the concrete. After 3 hours, gasoline (acetone) evaporates. The polymer protects the base from water.
We invite you to familiarize yourself with Bulk floor screed
Traffic light
Sano published a blog entry in Furniture made from slabs, solids, and various differences, September 28, blog entry
Show something different from the tables on the blog, otherwise I haven’t been there for a long time.
Children's themes have recently captivated me in a way that is not childish. They asked me to make various items for the kindergarten.
The first subject is educational, necessary and useful. This is a traffic light, children will use it to learn the rules of the road, an extremely important thing.
Let me make a reservation right away: they also made a pedestrian version with people, but a simpler one made from cardboard.
In principle, they asked me to make this three little eyes as simple as cardboard, but can I really do it without any problems)) I thought about making a reliable educational object right away, and I did it. How long is enough?
The concept of the figure is that it is large enough for everyone to see, stable, durable and with a rotating mechanism, the point is that there are 4 sides, one side shows all the signals for a general understanding of the device.
The other three sides are given one signal, the teacher can turn and show any color out of 3 and ask the children about its purpose.
In general, it seemed to me that it would be right
Initial thoughts about color circles on magnets and other light bulbs had to be canceled; we need a simple, understandable solution that is difficult to break; magnetic circles can get lost, light bulbs and batteries can fail.
I don’t know whether the idea succeeded, but time will tell.
The entire base is MDF, which was glued together with PVA; for temporary tack, I also fastened it with a micropin.
Separately, I would like to note that you can use a circular saw to make circles of different diameters and, most importantly, the same size, using a simple device, first we cut square blanks, and then on the device, rotating the part, we cut off the corners to a polyhedron, and then rotating the part we finish it to a circle.
I glued the box together, the visors are halves of the eyes of the circles, I made a groove under them with a router, so such things cannot be securely glued into the end.
The whole thing rotates on a pipe from the joker system, in my opinion, for shelving, so that the stops do not fall out and fall through, which were fixed by bugs.
The base was made massive and wide from thick layers of MDF; with such a base, the traffic light is not so easy to tip over on its side.
I played the fool and drilled right through the pipe, so I had to put a plate on the return side.
I spray painted everything, then varnished it, the thing is ready.
I didn’t paint the signal circles; they were cut out of self-adhesive paper, which makes it easier to update the display item.
Who finished reading, look at the slides
Bath installation.
steamroller published a blog entry on Blog. Just a blog., November 12, blog entry
What should I do if I don’t know how to install bathtubs? There are 2 options - ask how, or come up with your own. I chose the second one. And I not only liked this option, but really liked it!
An acrylic or iron bathtub requires a frame. I have a thin-walled iron one. I wanted plastic, and a specific one, but I didn’t have time. When I thought about this frame, I felt so sick! Sales designs are somehow crummy and material-intensive. I limited myself to one 20x40 pipe under the edge and two levers.
Tile garage floor
Quite understandable, but not the best choice. Firstly, debris constantly accumulates in the seams. Secondly, the coating is slippery, unless you take special tiles with an anti-slip surface, but they are expensive. Thirdly, falling heavy objects cause the tiles to crack. Nevertheless, they make a tile floor in a garage, because there are also advantages: easy to clean, well-known installation technology.
If we talk about choosing tiles, then the best option would be technical porcelain tiles. It is not as beautiful as a decorative one, but it is also more affordable in price. Its unpolished surface does not slip and is laid using conventional tile technology. You can only try to make smaller seams so that there are fewer problems with them.
Technical porcelain tiles can be used to cover garage floors
There is a very inexpensive option for finishing the garage floor with tiles - buy a brick and make a “mosaic”. True, such artistic work will require more time, but tiles are sold for almost nothing.