Do-it-yourself crushed stone parking at your dacha is the simplest option for a dacha car park. This type of building material does not crack and allows water to pass through perfectly. The only drawback is that it is difficult to clean in winter due to the uneven surface. A parking lot without a canopy will have to be periodically cleared of fallen leaves. Car enthusiasts give preference to it for three reasons:
- it is easy and better than other coverings to be constructed on the site;
- the work is done very quickly;
- the cheapest option for arranging a summer cottage site;
- Suitable for all types of soil.
Knowing how to make a parking lot at your dacha with your own hands, you can significantly save your budget.
Choosing a suitable location for a future site
Parking place near the house
For parking, you should choose the most convenient place, usually this is a plot near the house. The car will receive additional shelter from wind and side precipitation, and it is more convenient to transfer fruits and vegetables grown at the dacha into the car from the premises.
If there is no video camera or dog, then thieves will not risk opening a car parked near the window of your home. The downside is that you will have to take up several meters of garden space. If the dacha plot is guarded, then it is better to allocate a place for a site at the entrance gate. In this case, there is no need to create a wide road to the house; you can make do with paths.
When choosing a parking place, you need to remember that the entrance should not only be convenient, but also have sufficient visibility. The level of the site above the road will have to be raised if it is planned to be built in a low area. Additional soil will be required for elevation.
The dimensions of the parking lot will depend on the number of cars for which this area is intended. For one small car, a length of 5 m with a width of no more than 3 m is sufficient. To park 2 cars, the area must be doubled. At the selected location, dimensions are determined and markings are made.
Making a concrete parking lot
Making a parking lot from concrete.
- Preparatory work.
- Construction of the bottom for the platform.
- Construction of formwork.
- Reinforcement.
- Preparation of the solution and pouring.
To construct a parking lot, it is necessary to know the weight of the car in order to create a concrete structure with the required strength. It is needed so that the monolithic base can withstand the distribution of the load from the machine.
The set of tools for constructing a concrete parking lot includes:
- boards or metal sheets for formwork;
- metal profiles for the construction of lighthouses;
- building level;
- pegs and rope for marking;
- solution container;
- shovel, fittings;
- steel wire.
It is best to take M500 grade cement with frost-resistant additives, sand - river medium fraction; the water must be clean without impurities. Having a concrete mixer will speed up the process of creating a parking lot.
A parking space must be selected based on accessibility criteria. It is advisable to use part of the entrance area to the house in front of the gate or in the yard for the site.
The size of the future parking lot will depend on the number of cars parked. For example, for a car up to 4 m long, the optimal dimensions of the site will be 2.5 x 5 m. It must be remembered that the adjoining of the parking lot close to the foundation of the house is undesirable, since the connection of the blind area and the concrete parking lot can lead to deformation of the buildings due to the expansion of the concrete structure due to exposure to temperature changes.
Taking measurements.
After determining the parking space, you need to mark the area. To do this, pegs are driven into the corners, between which a rope is stretched - this is how the boundaries of the foundation to be poured are indicated.
After marking, debris and weeds are removed from the construction site. Then a layer of soil is removed to a depth of at least 20 cm. Excavation is necessary to remove the rhizomes of weeds, which can subsequently rot and destroy the concrete structure.
After preparing a small pit, you can begin constructing a sand cushion:
- Sand is poured onto the bottom with a layer thickness of 10-15 cm. It should be leveled, slightly moistened and compacted tightly.
- Crushed stone of the middle fraction is laid on top of the sand layer; the thickness of the crushed stone bedding should be at least 10 cm. It is also leveled, moistened and thoroughly compacted.
We invite you to familiarize yourself with the Baths with a gazebo under a common roof
It is recommended to lay a layer of geotextile or agrofibre on the crushed stone - the material will perform a restraining function and will not allow the cushion to creep under the weight of the concrete solution.
Installation of formwork
Before pouring the parking lot, it is necessary to install a removable formwork structure - it helps to form smooth edges of the site. For this purpose, fences are installed at right angles into the pit. They can be fastened together using nails or self-tapping screws.
Edged boards, thick plywood, and metal sheets are used as formwork. You can also arrange the installation of permanent formwork from curb stone, installing it around the perimeter of the site at the edges of the pit. However, in this case, under the sides you will also need to add a base, since the platform must rise above the surface of the earth.
Installation of formwork.
After installing the formwork, it is recommended to install beacons - with their help, the evenness of pouring the concrete mass will be monitored. As beacons, a metal profile is used, cut into the required number of pins. Notches are cut on the beacons, which can be used to guide them to level the surface.
The pins are fastened to slides made of a sand-cement mixture in a 4:1 ratio (sand-cement), prepared in a solution. A cord is stretched between the beacons, which is secured along the marked notches; it is recommended to check the evenness using a level. The step between the beacons should be no more than 0.5 m.
Reinforcement
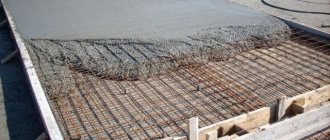
To increase the strength of concrete, it is necessary to reinforce it. The process consists of laying a reinforcement frame on a sand-crushed stone cushion in 1-2 layers.
The frame is made in the form of a lattice of reinforcing bars with a diameter of 8-10 mm, fastened together with wire. It is advisable to connect the rods using a viscous method; welding is prohibited due to the increased rigidity of the mesh: if the rods are completely fixed, the reinforcing cage loses its mobility and can lead to deformation of the concrete coating.
Filling the parking lot
Upon completion of the preparatory work, the concrete mass is poured. The site needs to be filled at one time, so it is necessary to mix the solution in such a volume that it will be used immediately. The thickness of the concrete layer should be from 20 to 25 cm.
The standard mixture for filling the site should contain:
- river sand - 3 parts;
- cement M500 - 1 part;
- crushed stone of the middle fraction - 2 parts.
Water is added in the amount necessary to mix a thick solution, but not more than half the volume of the binder material.
After pouring, the surface should be left for 2 days until it hardens, after making punctures in several places to release air from the mass. Then it is advisable to cut the platform, leaving grooves in several places - this is necessary to prevent deformation of the building due to expansion of concrete due to temperature changes. After 2 days, you can sand the surface, leveling it if necessary.
It is recommended to cover the structure with film and moisten it 3-5 times a day so that the concrete sets and hardens faster, within a week. Complete hardening will occur in a month, at which time the concrete will gain grade strength and will be suitable for use.
Recommendations for arranging a parking space
Arrangement of a parking space
Before parking, you need to choose a convenient site. Work begins with clearing the area and making markings. Parking at a dacha is usually open or equipped with a canopy. A full-fledged closed garage structure is also acceptable.
First, remove the top layer of soil to a depth of 30 cm, removing the root system of existing weeds so that they cannot germinate in the future. Otherwise, the structure of the parking lot surface will be damaged. The order of work is as follows:
- marking the perimeter, marking the corners with wooden stakes, stretching string along them;
- leveling the surface, installing a sand cushion on it with a layer thickness of at least 10-12 cm;
- thorough compaction of the sand embankment, previously moistened with water to increase the degree of compaction;
- laying a concrete or wooden curb to maintain the shape of the parking lot;
- covering the entire area with geotextiles to prevent weed germination;
- backfilling of crushed stone;
- laying concrete slabs on the building material for ease of entry and exit;
- making drainage from plastic or metal pipes to drain water around the parking space if the car is supposed to be washed.
The parking lot should be made only of granite crushed stone; it can be replaced with river gravel. You cannot pour crushed limestone. Once wet, it will turn the parking lot into a dirty mess.
Its lower layer is covered with crushed stone with a fraction of up to 60 mm, and the top layer with a fraction of up to 20 mm. The layers are thoroughly compacted. The upper fine fraction of crushed stone will make it easy to level the surface, and all voids will be filled. It is necessary to provide a slope, which should be 3-4 cm wide from the center to the edges, in order for drainage to take place, but it is better to make drainage.
Compacting the poured layer by hand will help make parking more convenient. The car will not slip, get stuck or create a rut. A substrate made of high-density film or non-woven material, as well as geotextiles, will not allow the soil to mix with crushed rock. The curb will prevent rubble from spreading across the site and will ensure the stability of the parking lot perimeter. But starting off on an area covered with crushed stone is required without slipping. This may compromise the integrity of the surface layer of the coating.
How to make a parking lot for a car at your dacha with your own hands from gravel, crushed stone, concrete
At the dacha, it is not always advisable to equip a garage for transport. A more affordable and easy-to-implement solution is to arrange your own mini-parking. It can be of two types:
- open. This kind of car parking at the dacha is a flat area with a hard surface. This is the simplest solution;
- closed. The site is complemented by a canopy or canopy. Such solutions are usually practiced near any buildings (barn, house, etc.) to which a canopy can be attached.
Arranging your own parking lot at the dacha not only ensures easy entry/exit of the car, but also reduces the degree of pollution and helps protect green spaces. The choice of parking type depends on the characteristics of the site, the number of vehicles in the family, the frequency of visits to the dacha, and the budget allocated for construction.
Eco-parking
Lawn grass is used as a covering. To prevent tire marks and damage to vegetation, geogrid is used. Before making eco-parking on the lawn, the top layer of soil is removed, a cushion of crushed stone and sand is arranged, then a geogrid is laid. The fertile layer is poured into it and lawn grass is sown. Such parking is environmentally friendly, does not disturb the appearance of the green landscape, and looks organically against the backdrop of ordinary lawns.
Crushed stone platform
Before making a parking lot for a car at the dacha using this method, you also need to remove the fertile layer and fill it with crushed stone. On soft soils, it is advisable to familiarize yourself with how to lay geotextiles and use this material to reinforce the soil. Sidewalk curbs are installed along the perimeter of the site, then backfilled with crushed stone (layer thickness - 15 cm or more) and compacted.
Concrete parking lot
It is organized on non-heaving soils. Concrete is poured onto a sand bed using formwork and reinforcing mesh. The concrete layer is about 5 cm (for SUVs - 15 cm), the total thickness of the coating is 10 - 25 cm.
Parking on pavement slabs
Paving slabs are laid on compacted crushed stone or a sand-cement cushion, using a rubber mallet or other similar tool. A sidewalk curb is laid around the perimeter.
www.isolux.ru
Characteristics of crushed stone for a car site
Crushed stone for parking
When arranging a crushed stone parking lot at your dacha with your own hands, you can reduce financial costs to the lowest possible level. When purchasing material, you need to know its exact volume, taking into account shrinkage when compacting the layers. A good bulk material must meet the following parameters:
- Degree of purification. Crushed stone should have good drainage properties and not contain a lot of dust.
- Abrasion. Ruts may appear in places of constant pressure from wheels due to the destruction of fractions, but this is relevant for crushed stone pavement.
- Maximum frost resistance of the material. Experts consider crushed gravel, which has average characteristics, to be the most practical.
Manufacturers produce the following types of crushed stone:
- Limestone. Its bottom layer will very quickly turn into powder, and after rain - into a dirty mass. A parking space filled with such material will soon be overgrown with weeds.
- River gravel. This parking lot cover will not crumble or cake and is highly permeable to water. A fine embankment levels the surface well, penetrating into voids. The bottom layer is filled with fractions up to 60 mm, and the top layer – up to 20 mm.
Formwork or side stone?
There should be a retaining contour along the edges of the crushed stone platform. There are several options for what to make it from:
- priming. In essence, the parking lot is made flush with the existing soil, the edges of the pit keep the sand and crushed stone from moving. Free, but not always possible to use this method.
- board formwork. A good solution for temporary parking. A board of 150 x 40 or 200 x 40 is used, depending on the backfill layer.
- plastic borders. There are many crushed stone parking fencing options on the market, but they are not reliable. We do not recommend installing them.
- side stone. A concrete (colored if necessary) edge stone measuring 200 x 80 is the most reliable way to secure the edge of a parking lot. It can be installed either flush with the crushed stone or 10 cm higher. The height gap will allow in the future to lay paving slabs on the crushed stone and rest against this side stone.
We suggest you familiarize yourself with How to properly water a “dollar tree”?
Calculation of the required amount of coverage
How much bulk material is required can be calculated independently. To do this, you need to multiply the area of the parking space by the thickness of its layer. For average use, 20 cm of crushed stone is sufficient. But you need to make a small reserve. It will have to be replenished in case of possible subsidence of the soil. The remaining part will be useful as a natural filter in landscape design.
Every car enthusiast should know how to make a homemade parking lot in a suburban area. Crushed stone parking for a car in the country will always be durable and strong. The coating guarantees the absence of ice in winter and does not require operating costs.
After the rains or in the spring, arriving from your dacha with a kilogram of mud on your shoes is a dubious pleasure. It is for this reason that you begin to think about the need for parking at your dacha. Full confidence comes after the next rain, when it will not be possible to leave the site the first time. And not even from the fifth. That’s when the desire to make yourself a country parking lot appears. There is nothing complicated about it and you can do it yourself.
Types of country parking areas
Dachas, and everyone’s requirements for comfort are different, and parking a car in a dacha offers more than a dozen options. There are only seven types of coverage, as well as their combinations and the possibility of installing canopies. They differ in operational characteristics and costs. So, the covering for parking a car in a country house can be of the following types:
- Made of crushed stone or pebbles (bulk).
- Lawn or eco-parking.
- From paving slabs.
- Concrete.
While you are not sure that you want one... parking at the dacha might be simpler
- Asphalt.
- Rubber tile.
- Flagstone.
- Parking grid.
The cheapest device, yet easy to use, is a car parking area made of crushed stone or pebbles. When properly installed (using geotextiles), crushed stone does not mix with the soil for many years. Even if geotextiles were not installed (this often happens), adding crushed stone is not a problem. After some time, the lower layer of crushed stone and soil becomes so dense and strong that this process (mixing with soil) stops.
Parking at the dacha: pros and cons of different options
A separate and very important advantage that parking in a dacha made of crushed stone provides is natural drainage. You do not need to build drainage. Water seeps between the stones and goes into the ground, taking with it pollution. But this type of site is not suitable for areas with high groundwater levels. Standing in a puddle on rubble is not the best solution to the problem, although the problem can be solved by creating a drainage system for the entire area.
Green parking has become increasingly popular in recent years. This is not an ordinary lawn, but a special one. A plastic grid is hidden under the grass, which redistributes the load on the ground and prevents the wheels from falling through. Caring for such a parking lot is similar to caring for a lawn - mowing, watering. Weeding is not required, since the preparatory work involves removing the soil, that is, most of the roots go away. The varieties of herbs used are special, and this is the problem: they are expensive. The second disadvantage is the possibility of freezing (the seeds are expensive, and the greens do not grow too quickly). But it's beautiful. And it can be used not only as a parking lot, but also as a recreation area.
Parking grates are not plastic, but concrete with holes for grass
A platform for a car in a country house made of paving slabs is the best option for a hard surface for heaving soils. And the water does not stay for too long - it goes into the cracks between the tiles, and the integrity of the coating does not suffer during heaving. Two more options: concrete and asphalt country parking are reliable and durable, but only if all preliminary work is carried out correctly. Their disadvantage is that they are expensive, and the appearance of cracks is very noticeable.
Construction of a dacha parking area: preparatory work
Despite the different surfaces for parking a car at the dacha, the preparatory work is not much different. The difference may be in the layer on which the coating is laid (for example, you need to pour a layer of sand when paving with paving slabs), but the whole pie and the list of other works are the same.
You can do this... until you get stuck after the rain
General recommendations
The first thing you need to decide on is the location. The parking lot at the dacha is usually located either right next to the gate or not far from it. And it makes sense. But this zone should not be the lowest point, otherwise water will constantly stagnate here, and a height difference here is also undesirable - putting the car on the handbrake and putting on chocks is not exactly what you want.
The best way to compact sand and gravel is to use a plate compactor. If you don’t have one, you can make a homemade tamper. Take a log, attach handles, and attach a strong platform (thick board) to the bottom. By lifting and sharply throwing this tool, you compact the sand/crushed stone
At the same time, solid surfaces such as concrete or asphalt should not be brought to zero level: water after washing a car or rain will not drain away. To prevent it from stagnating, it will be necessary to form a slight slope - from the center to the edges. A slope of a couple of degrees is already good. And the car will stand stable, and the water will drain.
Dimensions
The dimensions of a country parking lot depend on the planned number of cars “living” there. A plot of 3*5 meters is enough for one car, i.e. 15 m². This space is quite enough to not have to think about parking exactly in the center, otherwise you will have to go out onto the lawn, into a flower bed, etc. Parking at a dacha of such an area makes it possible to calmly walk around the car in front and behind.
If space is limited, the length can be reduced by 0.5 m, but with this size you can walk either in front of the car or behind it. Only if you have a large-sized jeep, it is better to increase the width of the platform by at least 50 cm, and even better - by a meter. These machines are large and require more space.
Parking lot sizes: this picture is from SNiP (building codes and regulations)
If you need to park two cars and they are “standard” sizes, the comfortable parking length at the dacha remains the same - 5 m. If there is enough space, we take the same width as 3 meters. That is, to park two cars you will need a site measuring 5*6 m (5 meters is the length). If there is a shortage of space, the width and length can be reduced by 0.5 meters (4.5 * 5.5). But in this case, it will not be possible to open the car doors at the same time and it will also be difficult to walk around the car.
Car entry: water drainage
The next step is to decide whether you need drainage around the parking lot at your dacha or not. If the soil drains water well naturally and the surface is not continuous (tiles, lawn, stone), it is quite possible to do without drainage measures. If at least one of the conditions is absent, drainage will have to be done. There are many options, but there are three simplest ones:
- If the water on the site usually does not stagnate, the perimeter of the site with a continuous coating (concrete, asphalt, rubber tiles) is sprinkled with crushed stone 30-40 cm wide. The water drains, enters the crushed stone floor and gradually goes into the ground.
- If a drainage system is installed on the site, drainage pipes are laid around the perimeter (10 cm below the coating level, cover the top with crushed stone, pebbles, mulch, sand, plant a lawn). These pipes are inserted into the general drainage system (do not forget to make a couple of inspection hatches for cleaning.
Parking area drainage
- Install/fill storm drains around the perimeter and drain them into the storm drain.
When can you not think about draining water? When you have a sandy area or heavy rainfall is rare. Then there are no problems. Another option is a natural slope. In this case, the water will flow away by gravity, but you will still be solving the problem of storm drainage, only on the scale of the entire site.
With or without border
Any covering on the site for a car in the country will last longer if the area is fenced with a curb. In the case of a gravel or pebble parking lot, the curb will not allow the filler to scatter throughout the area. In the case of using paving slabs or stone, the presence of limiters can also be considered mandatory. They are laid on a sandy layer, and the sand can be washed away by rain streams.
Curbs are desirable for aesthetic and practical reasons
This will not happen if the parking lot at the dacha is at the same level or slightly lower than the rest of the site. But in this case, it will always be humid here and the water will not drain away, which obviously will not benefit your car. So the presence of a border is desirable - at least bury a brick around the perimeter, but then natural stone would be better. Or pour the concrete yourself, but it’s less troublesome to use ready-made curbs. For a budget option, you can use reinforced concrete grape columns.
Layers: general sequence
After you have selected a parking space for your car at the dacha, mark out the selected dimensions of the site (taking into account the drainage system). Next we work in this order:
- We remove a layer of soil 30-35 cm deep.
- We remove all the stones, roots, and level it (it’s not necessary to go into the horizon, but there shouldn’t be any holes or humps).
- We take a tamper and compact the soil.
Example of layers for a parking lot made of paving slabs - We spread geotextiles. Its dimensions should be 0.7-1 meters larger than the dimensions of the site, the edges should wrap around the edges of the pit for parking a car. When installing drainage, a drainage pipe is wrapped in “excess” geotextile. And so, the edges can be hidden under the grass, pressed with a border, or sprinkled with a layer of gravel.
- Pour a layer of sand, level it, tamp it down. When compacted, the layer is 10-15 cm. To make compacting easier, the sand is wetted with water.
- Add a layer of crushed stone. It is advisable to use two fractions: large and medium. A layer of coarse gravel (20-40 mm) is laid on the sand, leveled, and compacted. Its thickness is 10 cm when finished.
- A layer of medium gravel (5-20 mm).
Leveled, compacted. Its thickness is also about 10-15 cm. For now, an exotic option for our summer cottages is a rubber coating
In general terms, these are all the rules and features of arranging a parking lot in a country house. More precise layer sizes depend on the structure of the soil and the planned load. For example, for loose (sands and sandy loams) and unstable (peat bogs) soils, to give greater stability, a road mesh can be laid at the bottom of the pit. It will eliminate pushing.
Second example: a layer of geotextile can be laid between sand and gravel. The bottom layer (at the bottom of the pit) is necessary to stabilize the base and also to prevent plants from sprouting. Intermediate layers provide more reliable plant protection and also prevent layers from mixing. In this case, even a heavy vehicle will not leave a rut.
Features of sites with different surfaces
Coarse sand or fine granite chips (1-4 mm) are poured under paving slabs, bricks, flagstones, rubber tiles. Please note that for car parking, tiles need to be at least 50 mm (for paths, you can take from 30 mm). One more point: the smaller the size of the tiles used to pave the parking lot at the dacha, the less noticeable will be the inevitable “game” of the levels of the bricks.
Different coatings for summer cottage parking lots have their own installation characteristics.
Natural stone and concrete slabs
If you decide to make a parking lot from natural stone cut into slabs, it should also be 4-5 cm thick. You should not lay too large pieces: there is a high probability that they will break. They should not be placed closely, but leaving gaps of a couple of millimeters. The gaps are filled with sand, to which you can add abrasion-resistant lawn grass seeds. If you make the same paths, it will turn out beautifully, organically, and there will be no dirt.
With natural stone everything looks very decent
If the grass doesn’t appeal to you (it’s more difficult to clean, you have to cut it somehow), fill the gaps between the slabs with a mixture of sand and cement (1 part cement, 3 parts sand). Sweep it off the stones so that there is nothing on them and water the area (not with a stream, but with small drops, and so that it does not flow). The mixture will turn into concrete. It will take a certain amount of time to gain strength: 7 days at a temperature of +20°C to achieve 50% strength and another two weeks for complete “ripening”. Until the strength reaches 50%, it is advisable that there are no rainfalls during this period, and if they start, cover the area with polyethylene. Water itself is not scary, but streams that can wash away fragile concrete are scary.
This option has only one drawback: the high price of the stone. To reduce costs, you can use ready-made paving slabs in large format: 50*50 cm or so. They are also laid on a gravel-sand bed. Everything is the same, only the slabs are of artificial origin and have a clear geometry.
Concrete
For a concrete site, you will need to install formwork around the perimeter. Then you will need to make a reinforcing frame in the form of a cage from a metal rod. A rod with a diameter of 10-15 mm is taken, a lattice is folded from it in increments of 10-15 cm, and tied at the joints with a special wire (knitting). The resulting mesh is placed on stops so that it is raised above the compacted crushed stone by 3-5 cm, and the layer of concrete on top should also be at least 10 cm (preferably 15).
If a concrete parking lot at a dacha is made for two or more cars, expansion joints will be required. To do this, wooden planks 0.7-1 cm thick are laid edgewise on a grid of reinforcement. The width of the planks is equal to the height of the concrete layer (they can be used as guides when leveling the concrete mixture). They are laid in increments of 2 meters.
Concrete parking for a car at the dacha in the process of being manufactured
In the case of concrete, you will have to wait quite a long time for your parking lot to start using. The concrete must stand for at least 28 days. And this is if the temperature does not drop below +20°C. At the same time, you need to ensure that the surface does not dry out. To do this, you need to water the area, and to prevent the water from drying out quickly, throw matting, old bags, etc. on top, throw a piece of polyethylene on top. This coating helps maintain humidity, equalizes temperature (local overheating is harmful) and protects the surface from drops that are inevitable when watering.
If you can’t wait that long, add an “accelerator” to the concrete. An additive that accelerates the hardening of concrete. The period may be reduced to 7-10 days. But carefully read the features of caring for such concrete.
Green lawn parking
When constructing a green parking lot, special grates are placed on a layer of gravel, the gaps of which are filled with fertile soil and sown with grass seeds. To park a passenger car, and sometimes even a jeep, a grate with a height of 10 cm is sufficient. If heavy vehicles (trucks with materials) are to be placed on the site for unloading, a grate is needed with a height of at least 15 cm.
The difference in the cost of gratings for green parking is significant. But the difference in price is usually justified: some eco-parking lots do not sag and look normal, while others crumple, turning the surface into a mess of soil and grass. Therefore, when choosing gratings, do not go for cheapness.
Lawn parking for cars at the dacha
Taking care of a grass parking lot is not very convenient: the rake gets stuck in the grate, and not every lawn mower can operate safely. Therefore, many owners of such sites are disappointed. But recently, another trend has appeared - instead of soil and grass, medium crushed stone is poured into the grates, and the top is covered with small crushed stone or pebbles. How is this option better than a regular bulk site? The platform is not pressed under the wheels of even a heavily loaded vehicle. This option is ideal for clay soils.
Economy check-in and parking options
Although parking at a dacha made of crushed stone is considered the most inexpensive, its total cost is considerable. If it is not possible to invest the appropriate amount or the visit will be temporary, you can try to get by with more modest options.
The cheapest way is from old sleepers. You can find decommissioned sleepers if you wish, and they ask for very little. Since they are already impregnated with everything possible from rotting, they can be laid directly into the ground. But in order to prevent them from sticking out during heaving, it is better to dig a trench and lay at least 5 cm of crushed stone or construction waste at the bottom. It is also advisable to fill the sides of the sleepers with at least 5 cm of crushed stone.
Budget trip to the dacha for a car
One sleeper is not enough for a race (unless you are a super driver), but two per wheel is quite enough. The option is, of course, temporary, but it is more than suitable for the period of arrangement of the territory.
There is a similar idea in a more civilized version: take concrete paving slabs measuring 50*50 cm or 60*60 cm. Lay them out in two parallel rows - under the wheels. You shouldn’t press them one against the other - it’s better to leave a gap in the soil. To avoid bulging during heaving on clay soils, as in the previous option, make at least a minimal backfill of crushed stone.
Lay the slabs in a row
There are also paved country driveways. Brick and natural stone are used for paving. These options are good if the soil is not clay. The brick will collapse the fastest - it is not intended for such conditions, but as a temporary improvement measure it will do just fine.
Parking for cars from what is at hand
When we go to the country, we want to spend a calm and pleasant time with family or friends. Summer residents don’t need any extra worries. Therefore, you need to think in a timely manner about the question of where your favorite car will be located in order to keep it safe and sound. After all, no one wants to run to the side of the road every hour and check the condition of the car.
In this article we will tell you what the structure of a car platform is and how to make it yourself.
Eco parking lot with grass
The most budget option, which provides the possibility of economically arranging a site for parking vehicles, for its implementation it is necessary to carefully level the site, removing the fertile layer from it, which can be transferred to the garden or vegetable garden.
To cover the area allocated for parking, you can use special rolled materials with lawn grass or artificial plantings, which do not require special care during the intended use.
This is an easy to implement and cheap option in monetary terms. Suitable for all types of soil, including heaving ones.
Scope of work:
- marking the perimeter of the site with securing the corners with wooden or metal pegs along which a strong twine is stretched.
- development of soil to a depth of 30 cm with removal of all weed roots;
- a 10 cm layer of sand is placed on the leveled surface with the sand thoroughly compacted; to increase the degree of compaction, the sand is moistened with water;
- installation of prefabricated concrete curbs around the entire perimeter, this is necessary to hold the crushed stone platform in shape under the weight of the car. The blocks are installed with small gaps through which water flows. Instead of prefabricated elements, you can pour a monolith with formwork, but this will require a technological break while the concrete mixture hardens;
- laying geotextiles to prevent weed germination;
- parking made of crushed stone at the dacha is made only of granite crushed stone or river gravel.
- backfilling of crushed stone to the top of the curbs. The bottom layer is filled with material of fractions of 30...60 mm, the top - 5...20. Both layers are thoroughly compacted. Laying the finer grains will fill all existing voids and allow for easy leveling of the surface. It is necessary to provide a slight slope (about 2 cm) from the center to the edges for drainage;
- for ease of entry into the parking lot ahead, it is recommended to lay a strip of concrete paving slabs on a crushed stone bed;
- If you plan to wash your car in the parking lot, you can lay shallow drainage made of plastic or ceramic pipes with perforations around the perimeter. Pipes are laid with a slope to drain water.
When deciding how to fill a parking lot at a dacha, it is important to know about the inadmissibility of using crushed limestone, which, when wet, gets wet and turns into a dirty mess.
The crushed stone platform is strong and durable; water will never stand on it, which can easily seep through the fine crushed stone. The only drawback is that if it is not covered with a canopy, you will have to periodically clean it from fallen leaves.
Important: it is necessary to move away on a crushed stone platform without slipping, so as not to damage the integrity of the coating.
Arrangement of an open area
The most budget-friendly option, which does not require additional efforts to organize parking, is the construction of an open-type site. Of course, you won’t be able to protect your car from precipitation, but you will save on building a frame for the canopy and covering it.
The main problem of the summer resident will also be solved - ensuring the safety of the car and property when you are on the territory of the holiday village. You can easily enter and exit your property, but only you will have access to the vehicle.
An open area for a car at the dacha is being developed on the territory of the land plot. The place should be level and allow easy check-in and check-out. But moisture should not stagnate there.
If the territory is surrounded by a fence and is guarded, then it is better to park immediately at the entrance gate. This way you won’t need to build a wide and durable driveway to your house.
When the issue of security has not been resolved, then a place is chosen near the house - near the wall. It will provide protection from wind and side rain and snow. The car will be safer, but you will lose some area of land that you could use, for example, for a vegetable garden or flower bed.
Material
This is the simplest option that does not require significant investment. Proper distribution of the material or use under the lowest layer of geotextile will prevent the stone from being pressed into the soil.
Another positive aspect is the lack of need for drainage. Water penetrates deep into the soil in a matter of seconds, taking with it dirt from the top layer.
If there is a high level of groundwater in the area, then it is still worth considering a drainage system, because standing in a puddle on sharp pebbles is not the most pleasant thing to do in rainy weather.
It should be noted that this coating lasts as long as possible, remaining in a clean and well-maintained condition.
To set up the site, not an ordinary lawn is used, but specialized tiles. The cells contain seeds, which subsequently transform the tiles into an eco-lawn.
The thickness of the tiles must be at least 10 cm for passenger cars and jeeps. If you own a freight vehicle, you will need tiles 15 cm thick.
It should be noted that the wheels will not get stuck in the grass, because the system is designed in such a way that the pressure from the machine on the ground is distributed over the entire area.
Such a parking lot will require minimal maintenance - timely trimming and watering. No weeding required. As a minus, we should highlight the possibility of specialized seeds freezing in winter, as well as their high cost.
Arrangement of eco-parking on the site will require cutting off the top layer of soil. If you ignore the rule, then instead of a neat lawn you will see a field of weeds.
This type of coating is recommended for areas with heaving soil. Moisture does not stay long, seeping through the cracks. In addition, both materials will allow you to build your own unique pattern.
We invite you to familiarize yourself with the Dacha as a country house, why I live here all year round
When laying out the path, gaps of about 3-4 mm should be left.
Concrete and asphalt
These types of parking area coatings differ only in their appearance and price. These types of coatings will last for many decades, provided that all the rules of preparatory work are followed.
It should be noted that these coatings require the owner of the summer cottage to install a drainage system.
Otherwise, after several years of operation, the appearance may be spoiled by the resulting cracks or even pits.
When organizing a site from these materials, it is worth organizing a slight slope (about 2 degrees) - this will help the water to drain freely, leaving the parking lot dry and without puddles.
Concreting the site requires preliminary formwork, as well as a reinforcing frame made of metal rods.
Pouring a site for 2 or more cars requires expansion joints. A wooden board 1 cm thick is placed edge-on on the reinforcement grid.
The width of the board should be equal to the concrete layer. For a large concrete site, boards are laid out every 2 meters. This nuance must be taken into account if you do not want to remodel the site soon.
It should be noted that when using any material, it is advisable to purchase an additional border. It will not allow the pebbles to scatter throughout the area and will hold it in one place, and for other types of coatings, under the top layer of which there is often sand, curbs are simply necessary. They will prevent sand from washing out and, as a result, compromising the integrity of the coating.
Use of crushed stone
A more economical and practical option is to fill the site with ordinary crushed stone. First you need to remove the top fertile layer of soil. Instead, sand is laid, installing a curb around the perimeter. It will ensure the preservation of the shape of the structure.
After securing the sidewalk curbs, it is necessary to lay crushed stone on top of the sand in a layer of 15 cm. Moreover, the level should be raised above the ground. To make it easier for the car to move around the site, two strips of concrete slabs are laid in the center under the wheels.
Concrete parking lot
This is a more durable and reliable construction option. However, it will only suit you if the soil is not subject to heaving. The fertile soil layer is cut off, sand is poured in its place, and then formwork is installed.
For strength, reinforcing mesh is placed on top of the sand. The concrete platform is filled with mortar to create a layer of 5 cm. Without allowing the mixture to dry completely, another level of reinforcement structure is laid. 5 cm of concrete is poured on top.
For a heavier car, such as an SUV, the total height of the concrete platform can be increased to 15 cm.
Drainage
Not every site needs a drainage system. If the soil on the site absorbs water well, then the system will not be required. Otherwise, the owner of the site needs to think about drainage.
The recommended thickness is 30-40 cm. This option is suitable if water does not linger on the surface, but the parking lot surface is continuous, namely asphalt or concrete.
We invite you to familiarize yourself with DIY cages for rabbits: drawings, dimensions
Storm gutters
The option is similar to the previous one. Storm drains are also laid out along the perimeter of the parking area.
Drainage pipes
This is a rather difficult option. It is recommended to use it if a system is already installed on the site to which additional pipes can be connected from the parking area.
The parking zone significantly improves the appearance of the site, and also carries a lot of positive aspects during operation.
You shouldn’t put off beautifying your site until later. In the future, it will be much more difficult to allocate precious meters of land to organize a site.
Laying paving slabs
An alternative to concrete can be paving slabs. It will be indispensable when arranging a site on soil that is subject to heaving. Thanks to the gaps between the blocks, the parking surface will not be disturbed. This coating also ensures faster evaporation of moisture.
The tiles are laid on a mixture of sand and cement. You can use tightly compacted small crushed stone as a base. For better grip, the blocks are pressed down using a rubber-coated mallet.
You can evaluate the features of the use of various materials and the appearance of the structure in the photo of the platform for the car.
Preparatory work
Choosing a location near the entrance gate or close to the driveway will allow the car to easily enter and turn around. In addition, natural moisture removal will be ensured.
It is also necessary to pre-calculate the dimensions of the site. For passenger vehicles, an area of 3x6 m is sufficient. But a larger vehicle will require an area of 4x11 m.
At the initial stage of work, you need to use pegs to mark the perimeter of the future parking area. Stretch a string between the pegs. In the marked area, the top layer of soil is removed. In its place, a special pillow is formed from several layers:
- sand – more than 100 mm thick in several stages with moistening and compaction;
- gravel – more than 50 mm.
Place and size
The next stage of budget planning for the arrangement of a parking area is organizing the location and determining the area to be developed.
Parking at a summer cottage is most often organized near the gate. It is important to note that the place should not be the lowest point, otherwise all the water after rain will accumulate on the site.
We invite you to familiarize yourself with How to cook honey mushrooms: simple recipes for dishes made from fresh mushrooms
The size depends only on the number of cars that will be parked. For one car, the most favorable parking size is 3*5 meters.
With such dimensions, the driver will not have to think about the fact that one of the passengers will disembark directly onto the ground.
A standard machine easily takes up a portion of a landscaped space, allowing everyone to stand on a flat, clean, dry surface.
Moreover, the car can be completely bypassed both in front and behind. Owners of a large car, namely a jeep or crossover, should consider a platform measuring 4*6.
If the owner of the site values every centimeter, then the original length can be reduced by half a meter, however, then the car enthusiast will have to go around it either in front or behind. This rule applies to both owners of medium and large cars.
If 2 cars “live” on a summer cottage and they will be parked side by side, then the width should be increased to 4.5-5 meters. If the cars will stand one after another, then the length must be increased to 9-9.5 meters.
Please note that we are talking about standard size cars.
Arrangement of formwork
In order for the concreting of the site to be of the highest quality, it is necessary to eliminate the presence of holes and bumps on the surface. The formwork is made of boards 200-300 mm wide. Metal pegs 400-500 mm, driven into the ground on both sides of the formwork, will prevent it from falling. The pitch of such fastening is about half a meter. At the edges of the boards, they must be securely fixed to prevent the solution from leaking.
Leveling the solution is carried out using a rule, the standard length of which is up to 1.5 m. Since the site itself will be much larger, it is advisable to provide for the installation of additional guides. The embedded elements are aligned in the transverse direction. It is necessary to provide a slight slope in the direction of travel - up to 5 degrees. This will make it easier to remove water from the site.
To strengthen the structure, reinforcement is required. For this purpose, a mesh with wire up to 8 mm thick and a cell size of 100x100 mm is used. It is recommended to raise the reinforcing layer by 250 mm compared to the base or to do two-level reinforcement.
The design for double reinforcement includes a mesh in two layers with fastening by jumpers 80 mm in length. They are installed in increments of 45-50 mm. It is advisable to use PVC clamps for connections.
Concrete laying
All work must be completed in one day, without leaving the solution for the next day. Over the course of a day, the solution dries out and loses its ability to effectively set into new layers.
The solution can be prepared manually or using a concrete mixer. The area under the car is poured evenly, but the concrete must be above the level of the guides.
Work is carried out from the area away from the road towards the entrance. The concrete is laid evenly. The rule is to level it out. The entire volume within the formwork must be filled with mortar.
Upon completion of the work, the site is covered with a polyethylene film. This way you will prevent cracking, and the drying itself will be more uniform. And precipitation and ordinary moisture will not reach the surface of the concrete.
The mixture dries in 5-6 days. The formwork must be disassembled and the pins removed. The edges of the platform are reinforced with metal corners. Such overlays are attached to each other and to concrete rods by welding.
Arrangement of the canopy
To construct a roof, it is necessary to bend the support pipe to the required radius. Such a beam is attached to vertical supports with bolts or using a welding machine. Using a metal gusset will provide greater structural strength.
To attach the frame you need to build a base. Concrete pillars that are fixed in the surface of the site can be used as it. For the pillars, you can create a separate concrete foundation by pouring sand and gravel into the hole.
The frame is installed on the base pillars using corners made of metal logs or profiled pipes. The roof is made of corrugated sheets or polycarbonate sheets. It is attached to the “skeleton” of the canopy. After this, all metal parts must be coated with an anti-corrosion solution and painted.
Wood can be used as a material for making the frame. But the timber must be at least 50 mm thick and treated with protective compounds.
To build a reliable and durable platform for a car in the country, it is worth the effort. You can choose the option that suits you best - arrange open or shed parking. But the benefits from such a solution will be obvious - a car protected from attacks and external influences.
Photo of the platform for the car
Read here How to make swing gates with your own hands - step-by-step manufacturing instructions. 115 photos of options for building various types of gates
Did you like the article?
0