Adobe is still a practical building material, even though there are many other more durable building materials such as cinder blocks and foam blocks. Why do people these days use adobe to build buildings? – There are two main reasons for this:
Adobe is a building material made from clay soil with the addition of straw, dried in the open air.
A house under construction made of adobe. © Vmenkov
Clay is a natural material, and therefore can always be found in abundance.
Well, another component of adobe is straw, also a natural material, and it can be purchased in any quantity. Straw provides thermal insulation to the building. So it turns out - cheap and warm.
As before, you can now buy adobe. But if you have the opportunity to make it yourself, then you need to know some simple technology.
So, how to make adobe with your own hands.
First you need to prepare a site on which the adobe will be made. It is necessary to clear the area of debris and stones, and level out rough uneven areas (hillocks, holes).
Now you need to bring clay to this site and scatter it in a layer of 30-35 cm in the shape of a circle. Make a hole in the center to pour water into.
Ready adobe. © Vmenkov
When this process is completed, the clay should be soaked.
This is done simply - with a regular watering hose. During the soaking process, the main thing is to ensure that the water does not blur the edges of the batch. The clay should be soaked well enough, to the very edges of the embankment.
When this process is completed, you need to knead the clay. Small batches are kneaded with feet, but if the batch is several thousand adobes, then external force is used. Previously, large batches were kneaded by horses.
Currently a tractor. In general, the clay should be mixed to a “thick sour cream” state. Who will do this in what way is a personal matter.
Having completed this work, you should now move on to the next step - mixing straw into the clay. The straw is scattered in a thin layer throughout the batch and mixed.
This process must be done several times until the mixture stops sticking to the feet. It should also be noted that with each subsequent addition of straw, it should be sprinkled with water so that the mixture does not become thick. Thick mixture does not mix well.
Putting clay mixture into molds. © Soare
Having completed the production of the mixture, we now move on to the production of adobe.
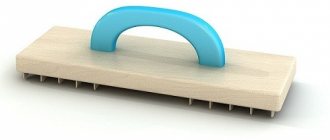
For production, special molds are needed. Wooden ones are usually used. The forms can be ordered from a carpenter or you can buy ready-made ones.
Making adobe is labor-intensive and hard work.
But if you do adobe for yourself, then it’s worth it. The adobe that contains a lot of straw is considered to be of high quality. Such adobe will be light, durable, with good heat dissipation.
To make the adobe itself, next to the batch, the area is sprinkled with straw, on which the adobe will be laid out. Forms are placed on the ground in a row (if there are several of them) and the mixture is poured into them. In this case, the forms must be wet so that they can be easily removed from the finished adobe and do not distort it.
Before each new addition of the mixture, the inside of the mold must be moistened. This can be done with a damp cloth or sponge.
Having laid one row, we move on to the next, so that the handle of the mold is at a distance of 5 cm from the finished row. Since the batch will decrease, the rows should be laid in the direction of the batch. Do not forget to first sprinkle straw on the site of the future row so that the adobe does not stick to the ground.
The ancient adobe city of Bam in southeastern Iran, before the 2003 earthquake. © Benutzer
You can put the mixture into molds with a regular fork, but it will be better if it is a vegetable fork.
The mixture must be compacted well into the filled form and the surface smoothed even with the edges. There should be no emptiness inside the adobe. Adobe with voids will be fragile.
When all the work is finished, you need to pay attention to the weather.
If rain is expected, the adobe should be covered with straw to prevent it from being washed away. In good sunny weather, adobe dries up to 10 days. After this, it can be used in construction.
In the process of dacha construction, we are constantly faced with the question of what materials are best to use for this.
And, of course, we want them to be not only durable, environmentally friendly, have an aesthetic appearance, but also inexpensive. So, for the construction of the walls of a house (read about the walls of a frame house in this article), a barn, any outbuilding, etc. Even for a bath, a very worthy material would be an adobe block made by yourself. It is a mixture of clay, sand and additional binding materials such as straw, grass, twigs, manure, chaff, etc., dried in the open air.
Making adobe blocks
To prepare a mixture for adobe, clay and sand are first mixed, water is added to make the mixture thick. From the resulting mixture, take a small piece of the mixture and roll it into a ball the size of a chicken egg. When you roll the ball in your palms, immediately pay attention to whether it sticks to your hands or not. If it sticks to the palms, then there is a lot of clay in the mixture and sand needs to be added; if the ball does not roll, then the mixture contains a lot of sand - clay should be added. Note: Clay, as a raw material for construction, is, of course, the cheapest option, but its behavior during drying does not have certain parameters, the range between degrees of compression is from 5 to 20%, and the determination of its fat content has a large gap in percentage from 5 up to 35% sand content. So, when working with clay, although there are various tables and methods, the most reliable way to determine the quality of clay, its structure, its degree of compression is a practical, experimental method. Having rolled the ball, let it dry for about an hour and, having thrown the ball higher than human height and dropped it on the ground, look what happened to the ball, if the ball has not changed shape, has not crumbled, and there are practically no cracks - the proportions for the components of the adobe mixture are maintained, if the ball is slightly flattened, there is not enough sand; if it crumbles, add clay.
Fig 4 Kneading and molding of adobe
Place for mixing adobe mixture
When the practical work of checking the correct proportion of the two components of adobe is completed, you can begin to knead the bulk of the adobe mixture. To mix the components of the adobe mixture, it is necessary to dig a small pit, 45-50 cm deep, the width and length depend on how much space allows in the area where the adobe is being made. The optimal solution would be a pit with a width of 150 cm and a length of about 250 cm. In such a pit, approximately 1 m³ or about 60-65 blocks can be prepared in one batch of the finished mixture. In this case, the thickness of the layer for one batch should be no more than 30-35 cm in this method of preparing the mixture, otherwise the components will not mix well and the mixture will turn out to be of poor quality. Before you start laying clay, sand and straw in the pit, you need to line it, for example, with plastic film (photo 4 under letter A), you can also use a tarpaulin. If the soil in the area where the mixing is carried out is dense (clay, slag rocks, etc.), then it is enough to simply compact the bottom and sides of the pit with a shovel and it is not necessary to lay down a film or tarpaulin. First, a layer of clay 20-25 cm thick is placed in the prepared pit and filled with water, so that the clay is completely hidden under water, so the clay remains “overnight.” Overnight, the clay will become properly soaked, the lumps will dissolve and the clay will become more pliable for mixing with sand and straw. Before adding sand to the prepared clay, you need to do a preliminary kneading, walking on the clay with your feet, you will thereby knead the lumps that have become soggy in the water and remove large stones that have fallen into the clay. Usually the adobe mixture is kneaded by walking on it with your feet. But if a large volume of mixture is required for more than 2000 adobe blocks, then they resort to mixing with the help of one horse or two or three horses. It all depends on the amount of work. This process can be represented schematically:
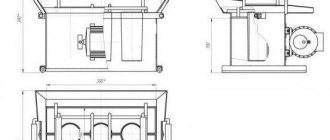
Fig 5 Direction diagram for kneading adobe with the help of a horse
Option I (for a pit with a diameter of 2 meters or more) A – location of the person B – place for mixing the adobe mixture C – direction of movement of the horse Option II (for a pit with a diameter of more than 5 meters) A – location of the people B – place for mixing the adobe mixture C – the direction of movement of the horses (one horse moves in a large circle, the second in a small circle). Of course, at first glance, this method seems more attractive than mixing the adobe components with your feet. But here it is worth paying attention to the following: when mixing the adobe mixture, the horse will always try to stand in the track already left by it, in order to make it easier to move through the mixture, you will have to constantly straighten the horse’s trajectory by shortening the reins and move with it (it turns out that you don’t care You will have to mix the adobe mixture with your feet to some extent). Mixing of adobe components is also carried out using special equipment (tractor, walk-behind tractor). Mixing the components of the mixture for adobe blocks using a mechanized method requires a large area for kneading and drying the blocks, which is not possible in the courtyard of the house. To do this, you need to choose an open area where such production of adobe blocks is possible. But a larger area is not one of the disadvantages of this method of mixing adobe mixture. When moving equipment through the mixture, it will stick to the wheels or tracks; when the tractor leaves the pit, the mixture on the wheels will mix with the ground. When the tractor drives into the pit again, the earth on the wheels will get into the mixture, and this can negatively affect the quality of the adobe blocks. The cutters of a rotary cultivator will become clogged with straw and will have to be cleaned regularly, the same applies to the cutters of a walk-behind tractor. If you want to use a concrete mixer to mix clay, sand and straw, then you should put three or four medium-sized stones (up to 10 kg) in the receiver of the concrete mixer for the adobe mixture so that the clay is better mixed. Otherwise, the clay does not mix well with sand in this version of the batch. In this case, straw is not added to the concrete mixer - the filler is added after the clay and sand are mixed, and the mixture is taken out to a specially prepared place to continue preparing the adobe mixture. So, as you can see from the description, this process is more labor-intensive, and still requires kneading with your feet. So, let’s note the methods of mixing the adobe mixture: with legs, with a horse, with a tractor, or with a walk-behind tractor, with a concrete mixer. Which method is more acceptable for preparing the adobe mixture, everyone determines for himself.
Advantages and disadvantages of adobe blocks.
In terms of their advantages, adobe blocks are very similar to wood concrete blocks, which you can also make with your own hands (we talked about this process here).
The main advantages of adobe blocks are:
Made from environmentally friendly ingredients.
Fireproof.
Excellent sound insulator.
Has good strength.
It has low thermal conductivity, which indicates good heat retention.
Durable.
Maintains normal indoor humidity levels.
Inexpensive cost of this material.
The disadvantages of adobe blocks include:
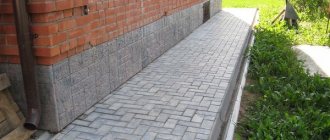
Increased hygroscopicity. Therefore, a structure made from this material requires mandatory external finishing (either plaster or facing bricks) and good waterproofing of the foundation.
It dries for a long time and gains strength.
Various rodents and insects can live in adobe blocks.
Unaesthetic appearance. But this does not matter much, since such a building will still be finished.
Finishing the facade of an adobe house
Another important point that many builders and home owners do not know about. An adobe house undergoes significant settlement during its first year of existence, which in many cases is accompanied by cracks in the walls, which must be carefully repaired. When finishing the façade of an adobe house with siding or facing bricks, cracks will not be visible, and the appearance of such a building will not differ from all others that are built of brick or other wall block products.
Wooden elements are usually used for floors between floors in adobe houses, which ensure lightness of the structure. All wooden structures, from door and window frames to floor beams, must be carefully treated with antiseptic substances, and external wooden elements must be equipped with canopies and reliable ebbs. Along the edges of the house, the roof should extend 50-60 centimeters from the walls and the thickness of the walls of the house box itself should be at least 50 centimeters. In this case, the internal walls usually have a thickness of about 25-30 centimeters.
Bottom line
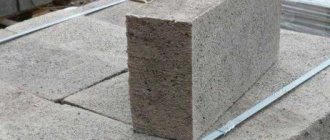
After final drying, adobe blocks acquire a uniform color both outside and inside.
You can check this by breaking it in half. A good adobe brick tightly holds a hammered nail, in no way inferior to wood. It can also withstand being dropped from a height of two meters, and when immersed in water, it begins to disintegrate only after 48 hours.
Excess parts are easily planed with a plane and an ax. As you can see, making adobe with your own hands is quite simple, but it is actually not a quick procedure. Therefore, in the process of dacha construction with your own hands, if you have chosen this material, you need to take care of its preparation in advance.
Fig. 2 Walls made of adobe bricks made by hand
How to make adobe blocks is not a difficult process, but it does require some physical effort. Adobe, or as it is also called clay block, was used in the construction of houses several thousand years ago.
This is evidenced by excavations of ancient settlements, where entire cities were built from this material, which, by the way, have partially survived to this day. In Russia, just recently, literally 40 - 50 years ago, in the southern regions in rural areas, 90% of houses were built from adobe. And in Central Asia, Egypt and other southern countries with a dry climate, residential buildings and fences made of clay are not uncommon in our time.
Clay buildings
But no one is forcing you to make bricks out of it. You may well use it for other purposes. For example, you can turn it back into a clay block, which can also be used in the building process - it will just be a different color, which will suit someone better than bricks. To do this, you will need four units of clay, which you need to join together. This can be done both at the workbench and in the inventory. As a result, you will receive a solid block, ready for use. This process cannot be called unprofitable, as in most cases. More often than not, a natural block will drop less material than is required to recreate it. In the case of clay, everything is different - four units fall out of a natural block, and that’s exactly how many are needed to craft it back.
This is how a person is designed that he constantly wants to strive for perfection. Therefore, when building a house in Minecraft, most players want to have a perfect building inside and out. Clay blocks will help achieve a similar result. They are an ingredient necessary for crafting the required number of bricks or making flower pots (the function is available in newer versions of the game).
Where to start your search?
So, to make clay blocks, and then bricks, you first need to find clay. You can find it in different places. In particular, clay generation occurs at the bottom of rivers, oceans, and swamps. Even in a small puddle, if you look closely, you can see deposits of clay.
How to mine?
You can finish off the clay with the tool you have at hand. True, the easiest way to do this is with a pick or shovel. Moreover, to save time, enchant them with the “Silk Touch” spell - in this case, the player immediately digs up a block of clay. If this is not done, the result of mining will be clay in pieces. In order to turn a piece of clay back into a block, you need to correctly position them in the cells of the workbench. We take four pieces of clay and perform the procedure as follows:
- leave the first row of the workbench empty; — in the second, we fill only the first two cells with clay, the third remains unfilled; — in the third we place the material in the same way as in the cells of the second row.
Clay is one of the building materials in Minecraft. You can get it from clay blocks that are generated at the bottom of reservoirs. Most often, clay can be found in the swamp biome. It can be mined, like land, in any way. The fastest way to do this is with a shovel.
You can make it from clay (Recipes below):
- Clay blocks;
- Bricks;
- steps;
- Stove;
- Flower pots.
When you break a block of clay, it drops 4 clay balls. What’s noteworthy is that even when using a shovel with the “Luck III” enchantment, more than 4 balls will not fall out of a clay block.
In the version of the game without modifications, the use of clay is not so widespread.
Preparing the mixture for making adobe
Preparing the mixture for adobe
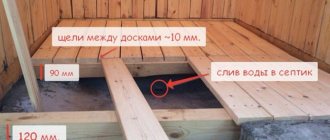
First of all, you need to select and prepare a place where the batch will be made for the production of clay blocks. It is advisable that clay soils and water be nearby, since adobe contains: clay, straw, manure (horse or cow) and water. The area for mixing all these fractions must have a flat bottom, covered with film, and fenced around the perimeter with a board in the form of formwork.
The first layer of manure is placed tightly on the bottom, on which a layer of clay mixed with hay is applied in the same amount 1:1 and the whole thing is filled with water. Some builders give time for all these components to soak and swell, and only then begin kneading, which can be done with a shovel or, if the site is large and there are a lot of people, they do it with their feet, which could be seen many times in old Soviet films. If the batch turns out to be too liquid, add straw or manure to it, but not clay, because from its excess the adobe will crack when drying.
Adobe walls
Place the mixture into molds
The finished mixture is placed in pre-prepared molds and compacted tightly. After which the mold is removed, leaving the finished clay block (adobe) to dry.
The forms are then thoroughly washed with water. While drying adobe blocks, you need to make sure that it doesn’t rain, and if it’s not possible to watch, the adobe needs to be covered with film or roofing felt. Walls made of ready-made adobe are laid in the summer using clay-sand mortar, and in the spring and autumn using a lime-cement mixture, observing the dressing of the seams.
Although it is recommended to build adobe walls in the spring to give them the opportunity to dry well during the summer, because in the autumn, when drying out, mold may form on the surface of the wall and the whole work can be considered a failure. Since adobe has increased hygroscopicity, the walls of the house, both outside and inside, must be plastered.
How to make an imitation of stone and metal from polymer clay
Using polymer clay, you can easily imitate the stains that many natural stones, such as agate, have. To do this, you need to take several shades of one color and roll them into sausages, wrapping one color in another. It is necessary to create not identical sausages, but different ones in color and combination of colors. In this case, you will get a natural pattern, and not an ordinary ornament. Look how great the imitation of red stone is made from different sausages:
Once created, you need to put them together, squeeze them tightly and cut them in the middle with a knife. You will end up with a thick layer of polymer clay with a stone-like structure. You can cut any pendants or buttons from it to your liking. After baking, the clay strips will shift slightly and take on a very natural appearance, almost indistinguishable from the structure of a real gemstone.
Here are some tips for making similar malachite imitation beads from artist Anna Potsar. Take several colors of polymer clay that contrast effectively with each other. Using a rolling pin, roll them out into even layers about 2 millimeters thick. Cut out even circles from them and make columns from the circles. The result will be a sausage that is plain on the outside, but striped on the inside. Take the syringe. Instead of a special syringe for polymer clay, you can use a regular medical disposable syringe, which is sold in a pharmacy. The tip of such a syringe will need to be cut off. Squeeze the columns through a syringe to create a design on polymer clay. Cut the sausage into small pieces that will become beads. Draw out the polymer clay pieces to give them a rounded shape. The design will appear after you carefully remove the skin from the bead, as if peeling a potato. After this, carefully screw toothpicks into the beads so as not to spoil the design. By removing the toothpick you will get holes for threading. After this, the beads can be baked in the oven for 15 minutes. In this example, a professional tool for working with polymer clay, a Makin's extruder, was used to cut out even circles. Mugs like these can be made using many items, such as an aspirin box lid.
If you want to make an imitation of marble, use a combination of polymer clay from several pastel light colors. for example take white, beige, light grey, pink and yellow. Jewelry with imitation marble perfectly emphasizes femininity.
Making metal imitation even easier. you need to fashion a blank from brown (or white if you are making silver). After baking, the clay is coated with gold paints. If during the crafting process you add a shiny bead or rhinestone to the decoration, it will resemble a real jewel. Here's how realistic Egyptian-style jewelry looks, created with small green rhinestones:
The decoration on the right side is very similar to real metal. To paint such clay crafts, nail polish is perfect. Modern cosmetic companies have lines of varnishes with colors that closely imitate gold, copper, silver and steel.
If you are interested in other ways to make beads from polymer clay, check out our instructions: https://www.znaikak.ru/kaksdelatkrasiviebysiniizpolimernoiglini.html
Plastering adobe walls
Plastering walls
You can plaster using a clay solution with straw added to it. This mixture fits well on walls, but achieving an even surface can be very difficult. Therefore, a fine metal mesh is stretched under the plaster, onto which cement plaster can be applied.
Many people attach drywall to the wall, which makes it perfectly flat and makes it possible to subsequently glue wallpaper onto it. Although there is one problem with this option: adobe often harbors all sorts of insects and rodents, which can also grind drywall. Therefore, the owner decides for himself what to cover the adobe walls with.
We come to the question of the disadvantages of adobe:
- Mandatory protection of the wall surface from dampness. Possibility of rodents and insects appearing in the walls. Long drying time for clay blocks.
However, disadvantages cannot exist without advantages, which are the following:
- Very low, almost zero, cost of making adobe with your own hands. Excellent sound and thermal insulation. High natural environmental friendliness of the walls.
When choosing a material for building a house, we try to evaluate all its advantages, but if you are interested in an environmentally friendly house, we recommend the wall material adobe.
Its manufacturing technology is reminiscent of the production of wood concrete blocks. Considering the high cost of building materials, you can save money by knowing how to make adobe. The advice of Workerstroy magazine can help with this, but we will not give bad advice, and many of our readers have been convinced of this.
How to make clay blocks
Balls of clay can be used to create clay blocks that can be fired in a kiln and dyed with dye to your desired color.
Here are a couple of painting recipes:
8 baked clay blocks + 1 (color) dye = (color) baked clay.
Here we got blue and purple fired clay. The recipes for other dyes are identical. And here are all the clay colors available in the game in one photo:
In the future, such blocks can be used as building or decorative material. True, it will not be possible to make half-blocks or steps from them.
What is adobe, its composition, production technology and advantages
When starting construction, we ask ourselves a number of questions - what to build from, what design option to choose and how to save on construction at the same time. The answer to all these questions is the same, and it is quite simple - use adobe - a material that is distinguished by its environmental friendliness and ergonomics - something that is receiving great attention today. In addition, you can save money if you master production technology and understand how to make adobe bricks or adobe blocks with your own hands.
CONTENT:
Composition of adobe and its use
Building a house is a long process and often very expensive, but if you use adobe for this, a building material made exclusively from natural components. This makes it popular in the construction of residential buildings, bathhouses, sheds and other buildings. Its composition necessarily includes clay, some types of sand are used as binding elements, and straw, grass, dry branches, manure and other available materials of natural origin act as filler.
It is important! To make adobe blocks, you need to use coarse sand, but sea and river sand is not suitable in this case!
The process of making adobe blocks, although long, is worth waiting a little, because in this way you can save a considerable amount. In order for the material to be durable, you need to choose the right clay. A simple test will help you find out the strength characteristics: you need to roll a small ball out of clay, place it on a flat surface and press it down.
If the material contains more than 30% sand (lean clay), the ball will collapse. If cracks begin to appear when the clay is compressed by a third, we are dealing with medium clay (it contains from 10 to 15% sand), but if deformation begins after flattening by half, we have fatty clay that can be used, suitable for construction, word, and medium clay. Also, a clay ball can be dried and dropped from a height of two meters - if it does not break, the clay is suitable for us!
How to make adobe with your own hands
Once the choice of clay has been made, it is worth thinking about the filler and binders - the fattier the clay, the more sand and binders you will have to use. Now that the theory is over, we stock up on water, boards for making molds, carpentry tools and move on to making adobe with our own hands. Its composition, as you can see, is not complicated, and you will see that making it yourself is also not difficult if you stay with us.
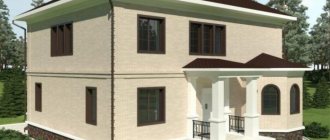
The nuances of building a house from adobe
It is recommended to begin construction of a house made of adobe at the end of April or beginning of May. This is necessary for the entire structure to dry thoroughly before next fall. To draw a conclusion about adobe as a wall material, there is no need to give its exact characteristics, because this material is suitable only for low-rise construction, although in terms of environmental properties it is the best building material for the construction of walls.
ShareLikeClass TweetPinSubscribeWhatsappTelegram
Do-it-yourself adobe production technology
Depending on the type of future building, you must decide how much piece building material will be needed for this.
We would like to immediately warn those who do not know how to make adobe with their own hands that this process is long, so you must prepare it in advance and in sufficient quantity. To do this, you will need a large amount of materials and a considerable area for drying the material. Now we will tell you how to make adobe blocks yourself.
Mixing the mixture for making adobe with your own hands
Depending on the expected production volumes, we prepare a container for preparing the solution - if the area of the site allows, you can dig a shallow hole and line the bottom with thick plastic film. We put clay in the finished container/pit and completely cover it with water - the next day it will be softer and pliable, which is what we are striving for. When the clay softens, you can begin adding the remaining components.
Sand is added first (in the required proportions, depending on the fat content of the clay - see above) and mix the ingredients until a homogeneous mass is obtained. After this, add straw or other binding components, mix thoroughly again and let it brew for another two days.
It is important! It is better to mix the mixture for the production of adobe with your feet, breaking up all the lumps. To produce 1000 blocks you will need approximately 10 cubic meters of clay!
We make molds for future blocks.
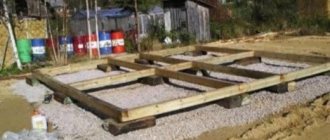
You can make light adobe with your own hands, but you can make large blocks - no one limits you in size, as long as it does not interfere with construction. Just remember that the size of the mold should be 1.5-2 cm larger around the perimeter. To make molds, any flat surfaces are used - the appearance of the material depends on this. We place the molds on a flat surface, moisten them with water, sprinkle with fine straw so that the blocks do not stick.
After this, mix the solution again, add water if necessary, and begin filling the forms. To do this, you will need a shovel, but you can do it with your hands. Now the blocks need to be dried, and here the opinions of experts differ - some say that the blocks should be immediately removed from the molds and dried for 24 hours, and then, turned on their side, dried for another 3 days. Others believe that it is not worth removing the block from the mold immediately, leaving it alone for three days.
It is important! It doesn’t really matter which drying option you choose, as long as there is enough space between the blocks for air circulation!
How to make adobe blocks yourself. Drying adobe
After the specified period, you can check the blocks for strength and water resistance. If it does not break when dropped from a two-meter height, construction can begin; high-quality material should not be saturated with water for two days.
How to make artificial stone.
Making fake rocks is a rapidly growing hobby and profession called Art Concrete. By combining basic construction skills and artistic creativity, it is possible to create artificial stones that are virtually indistinguishable from natural stones. Artificial stones, like natural ones, are used in a wide range of construction, from landscape or interior design, to the manufacture of fences and retaining walls.
In this article we will look at how to make artificial stone with your own hands.
| 1. In order to make the shape of the future stone, you will need a piece of foam plastic and wire mesh. From a piece of foam plastic you make a shape similar to a cobblestone, after which you wrap it with wire mesh. | |
| 2. Prepare a cement mortar, the same one you use when plastering walls. It is best to use tile adhesive when making Art compositions, since it is more elastic than cement mortar, but it is several times more expensive. | |
| 3. Apply the prepared solution to the wire mesh using a paint spatula or a construction trowel. Apply the solution in random layers, giving the appearance of crushed stone. | |
| 4. After you have made the look of cobblestones using the solution, leave it for 15 minutes so that the solution dries a little. | |
| 5. In order for the artificial stone to look like natural stone, use a foam sponge to create a texture in the form of ripples on the water. If you don't have a sponge, you can apply the texture using a plastic bag. | |
| 6. In order to completely produce an artificial stone, it sometimes takes from two weeks to a whole month, since the solution must gain strength and not collapse under direct rays of the sun if you are preparing a stone for your garden. | |
| 7. After you have applied the solution to the mesh, wait 3 days, then use sandpaper to remove the rough edges of the solution, giving the stone a natural look. | |
| 8. Before you start painting the stone, use water to remove dust and grains of sand from the surface. Let the stone dry completely before applying paint. | |
| 9. Use water-based paint. For better application of paint on stone, it is best to use spray paint cans. The paint color should match your taste, from dark to light tones. | |
| 10. Since natural stones have several colors, use a different color to make a second layer, applying it over the first layer. | |
| 11. Using sandpaper, make abrasions, thereby adding realism to the stone. | |
| 12. Rinse the stone again with water and let it dry. | |
| 13. To prevent the stone from fading in the sun and always have the appearance of natural stone, apply a layer of sealant or varnish to it. Repeat the application of varnish or sealant every year, thereby preserving the color of the stone for many years. | |
| 14. Install the finished stone in your garden. |