What is foamiran?
Today, specialized departments for creativity offer a large selection of decorative elements for handicrafts. What is foamiran? This material is made from foam, ethynyl and vinyl acetate. These components provide it with plasticity.
By heating and mechanical action, each part can be given the desired shape and volume. The use of special molds helps to display the texture on the surface of the flower petal.
Foamiran jewelry. About the properties of this material
- The material is very soft, pliable and plastic, especially if you hold a small piece of fom in your hands, it begins to “melt”. But real miracles happen when foamiran is heated more strongly. If you cut rose petals from a sheet, and then apply an iron to the workpiece (heating temperature “linen”), then the foam rubber becomes so plastic that it can be compressed, stretched in different directions, pressed. When heated, the foam contracts and stretches best. Instead of an iron, it is more convenient to use hair curlers. It is enough to pull the blank through the curling iron - and in front of you is a new one, like a real flower petal. In addition to the iron and tongs, you can use a hair dryer, and if you need to work with small workpieces, you can apply them to the heated nozzle of a glue gun (you need to clean the hole from glue in advance).
- Besides stretching and shrinking, foam is very easy to cut with scissors or a knife. The simplest scissors will do. And in order to do the job efficiently, it is advisable to cut the sheet of foam on a special rubberized backing. If you need to make a wavy edge of the workpiece, then you need to use scissors with a curly end, and then slightly stretch the workpiece along the edge with your fingers.
- But this is not all that foamiran is capable of - the thinnest sheets of foam (1 mm thick) can be squeezed out with a figured hole punch, which means that new opportunities open up for needlewomen.
- To prevent the foam sheet from getting stuck in the hole punch hole, you need to place a thin sheet of plain paper (you can even use newspaper) under the bottom along with the sheet of foam. The edges of the workpiece will be smooth and neat.
- Foamiran has many advantages, it stretches easily, you can give the product the desired shape, cut out a shape with scissors or a knife. But what foam does not tolerate is contact with sharp objects. If you carelessly run something sharp across a sheet of foam, marks will remain on the surface. On the one hand, this is a disadvantage, and on the other, an advantage. Because for their work, many craftsmen use templates that can be traced directly onto a sheet of foam material with a toothpick, sharpened pencil or awl.
- Foamiran is a non-toxic material and is easy to clean with water. Even the finished product can, if necessary, be washed under running water and nothing will happen to it! As for the safety of this material for handicrafts, you can safely give the kids leaves of foam so that they develop their imagination and make crafts on their own.
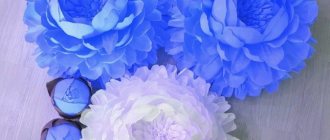
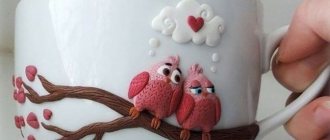
Handmade foamiran jewelry is very popular. You can make stunningly beautiful works from this material:
Neck decoration made of foamiran:
Varieties of foamiran for creativity
Today, in the departments for creativity and handicrafts, there is a huge selection of foamiran. There are several types of this decorative material. In turn, they differ from each other in their density. These include:
Iranian. The fabric is pleasant to the touch with a velvety texture. Parts made from it are durable and easily amenable to mechanical stress. The thickness of this sheet can be from 0.5 to 2 mm.
Turkish. It is fine-grained and elastic. Products made from it are of high quality and durable. After thermal exposure, the elements hold their shape perfectly.
Chinese. Foamiran of this type has a smooth surface and a large palette of colors. The thickness of each sheet does not exceed 2 mm.
After thermal exposure, the foam becomes too elastic. After carrying out this manipulation, it is necessary to quickly give it the desired shape.
Korean. The material is dense and velvety to the touch. The palette of color shades is very diverse. The thickness of the sheets ranges from 0.5 to 1.5 mm. It is used to create thin petals and small details.
How to make autumn wreaths from foamiran
Particularly popular today are autumn wreaths made of foamiran leaves and flowers. To make a wreath, we will need a multi-colored fom (burgundy, yellow, green), curly and regular scissors, floral wire, hot glue gun, iron, foam balls (3-4 cm), olive tape, acrylic paint to match the fom's color, foam sponge, satin ribbons to match the main color of the composition.
Stylish wreaths with beautiful flowers, which you can make with your own hands, remain popular and in demand today among needlewomen.
Making a wreath:
- We prepare the leaves (see the first master class), making cuttings of the same length as the leaf blade.
- We prepare rose petal blanks: we cut multi-colored squares of the same size from foamiran.
- Using curly scissors, we process part of the square with a corner and two adjacent edges and tint it with paint using a sponge (for example, burgundy petals with yellow acrylic).
- We heat the pieces on the iron and shape them with our fingers, crumpling and stretching the edges.
- We string a foam ball onto a wire and overlap the petals onto it.
- We decorate the bottom of the bud with two green petals.
- Wrap the stem of the rose with tape. The flower is ready!
- We cut 50 cm from the wire and make loops at the ends of the piece, which we wrap with tape.
- We begin to wrap autumn elements to the segment: take 2-3 leaves, apply them with cuttings to the segment and secure with tape.
- In the same way, we attach the rose, the rest of the leaves and flowers (about 5-7 roses and 20-25 leaves per headband).
- We thread satin ribbons through the loops (with their help you can securely fix the accessory on your head).
The autumn wreath is ready! Additionally, you can decorate the product with straw, tree branches or vines, spikelets, artificial fruits and vegetables, acorns and pine cones: the more diverse, small decorations, the more interesting and expressive the work will be!
Advantages of plastic suede
There are several positive qualities of this material. These include:
- Plastic;
- Rich palette;
- Does not absorb moisture;
- Excellent mechanical impact;
- Does not lose its qualities during heat treatment;
- Easy to tint;
- Glued with rubber glue.
Professionals and even novice craftsmen will be able to work with it. Foamiran is non-toxic and absolutely safe for humans. It is recommended for making children's crafts. After unpacking the decorative sheets, an unpleasant odor may be emitted, but after a while it will completely evaporate.
Note!
- DIY fruit bouquets - TOP-200 photos with instructions for creating a bouquet of fruits with your own hands. Unconventional ideas with simple diagrams and work overviews
Crocheted flowers: TOP-160 photos and step-by-step knitting pattern, review of finished products with your own hands. Crochet master class for beginners
Paper lily - TOP 100 photos of the best product options. Master class with step-by-step diagrams and drawings for creating an origami lily with your own hands
What is needed for the job?
What tools and materials will you need to create flowers from foamiran for beginners? For this use:
- Scissors;
- A set of simple pencils;
- Acrylic paints;
- Color templates for making;
- Thin wire;
- Artificial stamens;
- Floral tape;
- Rubber glue;
- A set of molds for petals and leaves.
To make large flowers from foamiran, roll material is used. Most often this is a Chinese type of canvas. It is denser and holds its shape well.
Tulips
0
You will need: foamiran in bright colors, green foamiran, floral wire, dry pastel, wet wipes, tape, floral buds, glue, scissors, ruler, iron, cardboard, toothpick.
0
Master class Draw a tulip petal on cardboard, 6 cm high and 3.5 cm wide in the center, then cut out the template.
0
Draw a tulip leaf 25 cm long on cardboard and 3.5 cm wide in the center, then cut out the template. Trace the petal template onto foamiran with a toothpick and cut out 6 petals. Trace the leaf template onto green foam paper with a toothpick and cut it out. Tint the petals and leaves of the future tulip using a damp cloth and dry pastel.
0
Heat each petal by applying it to the iron, then give them a realistic shape by stretching them in width and length. Heat the tulip leaf and fold it in half lengthwise. Glue 3 petals to the flower bud, completely covering it.
0
Glue the remaining 3 petals, placing them in a checkerboard pattern. Glue a piece of floral wire into the leaf. Wrap the stem with tape and attach the leaf. Make a whole bouquet of tulips in the same way. Foamiran tulips are ready!
Toning of plastic suede parts
A varied palette of shades helps you choose the right shade. However, in living nature, petals can contain several shades of colors. That is why tinting is used to create realistic details.
For this use:
Oil paints. This type of coloring composition is considered the most reliable. Tinted parts will delight you for a long time. The only drawback of this method is that it takes a long time to dry after application.
Acrylic sets. These paints are very easy to use. They dry quickly after application. An art brush is used to create subtle drawings. The disadvantage of acrylic paint is its ability to crack after some time.
Note!
- Crochet rose - diagrams and descriptions of how to crochet a rose with your own hands. Crochet technology + interesting craft ideas
- DIY edible bouquets - TOP 130 photos with instructions for creating a bouquet with your own hands. Creative ideas with simple diagrams and photos of finished works
Craft primroses - simple instructions for creating crafts from scrap materials. Schemes of beautiful DIY products + photo reviews
Pastel. These paints are available in chalk form. They are applied using a damp cloth. To create a rich shade, tinting is carried out several times.
Decorative cosmetics. For work, use eye shadow, decorative lip pencils or lipstick. Only an experienced professional can work with such paints.
Making autumn leaves from foamiran
The main element of any autumn craft is foliage. In order to make autumn leaves from foamiran, we will need the foam itself (of various colors in the autumn range), leaf templates cut out of cardboard or tin (you can draw it yourself or find it on the Internet), acrylic paint (green, burgundy, yellow, dark purple ), textured leaf molds, floral wire, tape (olive, brown), toothpick, Secunda glue, regular and shaped scissors, foam sponge, iron.
You can decorate the interior of your apartment in the autumn with interesting leaves, which can be easily and simply made from foamiran.
Let's get started:
- We attach the templates to the shape, trace them with a toothpick and cut out the leaves along the contour.
- Depending on the type of leaf, we process its edges (for example, with curly scissors you can give a natural relief to the leaves of chestnut and birch).
- To make the foliage look more realistic, we break a toothpick unevenly and in some places pierce the fom blanks with it.
- We take a foam sponge, dip it in paint and tint the leaves in random order (you can be inspired by the look of natural foliage or photographs on the Internet).
- Using a lighter, we make an imitation of withered foliage (scorch the edges of the leaves in some places).
- Apply dark purple acrylic to a toothbrush and, using your finger, spray the paint onto the workpieces.
- Place the workpiece on the iron and heat it well (to a temperature of about 60 degrees).
- Press the mold tightly against the heated sheet (so that the middle vein on the mold is located in the middle of the sheet). If there are no molds for chestnut leaves, then you can use a birch mold, applying it to each part of the leaf separately (you also need to warm up the leaf in parts).
- We cut the wire into small pieces (cuttings), bend one end into a loop and glue the other to the leaf.
- We wrap the cutting with tape of a matching color and bend it randomly in any direction to make the product look more natural.
Autumn foliage is ready! Such leaves are perfect for creating autumn ikebana, garlands, panels, hair accessories, clothing decorations, children's holiday costumes, and themed photo shoots.
Templates for creating flower arrangements
Color templates make the process of creating decorative items much easier. A variety of shapes and petals are developed by designers. This allows you to create the most natural products.
These stencils can be downloaded from the Internet or purchased in specialized departments for creativity. After this, the drawn parts are carefully cut out and applied to the surface of the foamiran.
To give texture and volume to the workpieces, molds are used. These structures are made of dense silicone. When exposed to elevated temperatures, the material becomes more plastic and pliable.
Note!
Crafting tulips from paper - TOP-100 photos of interesting ideas for creating tulips from paper + simple instructions for beginners
- Mimosa craft: TOP-160 photos of simple and complex crafts. Master class for children and adults on making mimosa with your own hands
- DIY napkin flowers - a detailed master class with simple diagrams. Non-standard solutions for creating flowers + photos of finished crafts
Ranunculus
0
You will need: red foamiran; scissors; foil; glue gun; wire for the stem. Master class Cut out red petals of different sizes. To make the flower lush, it is better to make as many petals as possible.
0
We twist a small ball of foil or other material and attach it to the wire. Next, we form the flower: starting with the smallest petals, glue them one by one, overlapping. Before doing this, give them a wavy shape. Ranunculus from foamiran is ready!
Professional tips for creating flower arrangements
When working with plastic suede, you need to follow several recommendations that will allow you to create realistic products.
In the process of creating flower preparations, you need to know a few basic secrets:
- Different batches and brands of foamiran may vary slightly in shade. That is why it is important to correctly lay out the templates, taking into account the color shade;
- To create an even punch, it is necessary to place paper under a sheet of foamiran;
- Hot glue from a hot glue gun can burn through a part. When working with a glue gun, it is important to be especially careful;
- Do not heat already formed parts. Repeated heat treatment negatively affects the structure of plastic suede;
- Products made from foamiran quickly fade in the sun.
Poppy
0
Poppy made from plastic suede turns out very bright and beautiful. It is not difficult to create even for beginning craftswomen. For clarity, we offer you a master class on making red poppies. You will need: red and green foamiran; sheet of cardboard; toothpick; black threads; glue gun; scissors; 20 cm wire; bead with a diameter of 2 cm. Master class Draw poppy petal patterns on cardboard and cut them out. You can make several templates of different shapes to make the poppy more realistic. From green foamiran we cut out a circle with a diameter of 6 cm.
0
We insert the wire into the bead and secure it by twisting it. This will be the stem of the flower. Using an iron, heat the circle and wrap the bead in it. The edges are secured around the wire. We wrap the resulting ball with black threads, as shown in the photo. Next, cut out the red poppy petals using the templates. To give the petals a wavy texture, fold them like an accordion and twist them, squeezing them with your fingers. Next, glue the red petals to the stem. It is enough to make two rows to make the flower lush. Cut out leaves from green foamiran. To make the leaves realistic, we make cuts along the entire edge and roll them between our fingers. Cut the wire and glue the leaves. Foamiran poppy is ready!
Master class on creating a children's headband with dandelions
Making flowers from foamiran with your own hands is quite simple. For beginning needleworkers, you need to choose simple floral decoration options. At the first stages of the work process, it is necessary to avoid realistic tinting and the use of special texture molds.
We bring to your attention a detailed master class on creating flowers from foamiran for decorating a children's headband. To work you will need:
- One sheet of yellow foamiran;
- Templates for creating flowers and leaves;
- Thin wire;
- Dark green floral ribbon;
- Sharp scissors;
- Glue gun.
Beginning craftsmen can use patterns for creating flowers from foamiran. It clearly indicates the order of actions, starting from the number of elements and methods of fixing them with each other.
The stages of creating a flower include the following points:
Carefully cut out 8 circles from green foamiran. They will act as a receptacle. We carefully turn the edges into fringe using sharp scissors. We cut out 8 strips 10 cm long from yellow foamiran. We decorate the upper borders in the form of a fringe with sharp scissors.
Next, we attach a yellow strip with fringe to one edge of the floral wire. We begin to carefully twist it while forming a dandelion bud.
At the bottom of the green element we make a through hole and thread a wire with a yellow flower. This way we have a spring flower prepared.
Degrease the surface of the children's headband with an alcohol solution. We wrap the plastic base with floral tape to create a dark green background.
Now we carefully fix the dandelions on the surface of the hair accessory using a heat gun.
Exquisite peony
0
You will need: foamiran in light pink, dark pink and green, scissors, tape, acrylic paints in yellow, green and pink, thick and thin floral wire, glue gun, thread, tassels, foam sponge, foil. Master class Look carefully at the pattern of the flower details presented below.
0
Prepare foamiran and cut out the blanks according to the pattern: A – 10 light pink petals; B – 10 light pink and 5 dark pink petals; C – 10 light pink petals; D – 5 dark pink petals; E – 5 dark pink petals; Z – 3 green leaves; M – 6 green leaves; K and L – 5 green sepals each; F – 1 light pink blank in the shape of a sun.
0
Tint the petals with pink paint. Draw the structure of the leaves using green paint.
0
To give a realistic shape to the petals, take blanks A, B and C. Fold the petal into an accordion, twist and unfold. Do this process with all petals A, B and C.
0
Take petals D and E, then give each of them a concave shape. To do this, place your thumb in the center of the petal and stretch the foamiran along the edges.
0
Fold the sheet in half, then accordion-fold and unfold. The edges can be curled. Give a realistic look to each leaf in the same way.
0
Roll a circle of foil with a diameter of 1.5 - 2 cm. Make a small hole in the balls, fill it with hot glue and insert a thick wire as a stem.
0
Place the sun-shaped blank F onto the stem and tie the rays with thread. Paint the tips of the rays yellow to create the stamens.
0
Glue 10 petals A with a glue gun. It is worth noting that the petals need to be glued in a circle, placing them in a checkerboard pattern.
0
Glue petals B, then C, D and E. Glue sepals L and K.
0
Glue thin wire to all the leaves. Connect the leaves together and secure the tape with tape, making branches.
0
Glue the branches to the stem.
Making a rose from plastic suede
How to make flowers from foamiran so that they are no different from a real plant? To date, hundreds of techniques have been developed that allow you to make petals realistic and textured.
We present to your attention instructions on how to make flowers from foamiran for interior decor. The composition will consist of 5 red roses.
To create roses it is important to prepare:
- Red foamiran 6 sheets;
- Green sheet of plastic suede 6 sheets;
- Sharp scissors;
- Templates;
- Simple pencil;
- Acrylic paints for tinting;
- Thin wire;
- Floral ribbon.
We cut out 15 pieces of different sizes from red suede. Using an iron we add volume. Let's start preparing the leaves. On green leaves we cut out 10 leaves for one flower.
Using acrylic paints we carefully tint the surface of the workpiece. We distribute the coloring pigment to the edges, thereby creating the depth of the pink leaf.
Let's start assembling the bud. We place petals of smaller volume in the center. We distribute large sizes along the edges. We glue all the parts to each other using a heat gun. As a result, the flower turns out to be voluminous.
Let's start assembling the green leaves. Carefully fix the thin wire on the back side. We collect rosettes from leaves. Each should contain 4 sheets.
Let's start assembling the entire flower arrangement. We fix the bud and leaf plates to the wire. We wrap empty areas with floral tape to create an imitation of a stem. Using the same method, we make four more flowers.
creative flowers
0
You will need: textured foamiran in bright colors, glue stick, glue squares, cocktail tubes, shaped hole punch (optional).
0
Master class Cut the foamiran into 12 strips of the same size. Glue the ends of each strip together to form a drop.
0
Glue 12 droplets together to form a flower. Prepare 2 circles of different diameters of foamiran of a different color. For convenience, use a figured hole punch. Glue a larger circle as the core, and attach a smaller circle on top, through a glue square.
0
Glue a tube on the back of the flower as a stem. Seal the place where the tube is attached with a circle of foamiran. Cut out leaves from green foamiran and glue them to the stem. Make a few more daisies in the same way.
Making chamomile from Thomas
To work you will need the following tools and materials. This list includes:
- Two sheets of white foamiran;
- Pattern of chamomile, heartwood;
- Floral tape;
- Scissors;
- Simple pencil;
- Iron to add volume;
- Yellow pastel.
We transfer the flower templates onto a white sheet of plastic suede. To create a chamomile you will need 5 blanks. Turn on the iron and process each petal. When the base of the workpiece warms up a little, give it the desired shape.
We make the core from yellow fom. To do this, cut out a strip 1 cm wide and 8 cm long. Use scissors to make a fringe in the upper part. Glue it to the metal wire and gradually twist it.
Now we fix the white blank onto a metal wire with a core. Carefully form the flower. We will mount the stem from wire. We wrap the metal surface with floral tape.
Tender rose
0
Rose is the queen of flowers. A flower beloved by many women can be made from foamiran; moreover, it will not wither and will please the eye for a long time. You will need: green and pink foamiran; scissors; glue; a piece of foil; thick wire. Master class From foamiran we cut out two types of petals of the future rose, identical in shape. But different in size. You should get 5 petals of each size.
0
Place each petal on the iron and use your fingers to stretch the edges. We make a small ball from a piece of foil and attach it to the wire. Glue a small petal around the ball. So we glue petal by petal in a circle, forming a bud. We make leaves from green foamiran and glue them to the stem.
How to care for compositions?
Proper storage and care of a flower arrangement helps prolong its decorative qualities. To do this, you need to follow a few tips:
Products must not be stored on sunny windows;
To remove excess, you can use a special brush;
You can get rid of contamination by using a soap solution;
The flower arrangement must be dried for 5 hours.