Getting ready for work, a walk or to the store can be overshadowed by the search for keys, and this problem can cost personal time and nerves.
Keys to a house, cottage or car, bicycle lock or mailbox are always lost in the depths of bags and backpacks, and are found in the most unexpected way in the kitchen or bedroom.
To organize the correct and safe storage of keys, a key holder is used; creating such an accessory with your own hands is quite simple.
This accessory compares favorably with a specially designated container, because it can additionally be used to decorate your home or put things in order in your bag.
Types of key holders
Key holders help you discover an original and practical way to store keys, no matter how often they are used. You can make a simple and convenient accessory yourself without buying standard models, because the process itself will captivate the home craftsman.
A beautiful homemade key holder, master classes and ideas we offer in this article, can become a source of pride and for this it is enough to choose a certain type of product:
- wall-mounted open;
- wall-mounted closed;
- mini-safes for home;
- portable key holders.
A separate classification offers a division of such accessories and their models depending on the material of manufacture and decoration technique:
- metal and forged key holders with an elegant design;
- made of solid wood, plywood or fiberboard with finishing;
- key holders made from scrap materials and their original combinations.
Among the interesting and quite original ideas, you can choose key holders made of leather or thick fabric, convenient to carry in a bag.
Products with a magnetic base deserve special attention, for which you can choose elegant metal keychains that ensure a strong fixation of the keys.
Additional hooks on regular photo frames will help expand the functionality of standard models, and you can decorate such models with embroidery and photos, painting and stickers using templates.
How to make a wall-mounted key holder with your own hands
What is needed to make a wall key holder? First, understand what you could make it from. It can be classic wood, plywood, or completely unexpected things, for example, a children's unnecessary construction set or old cutlery. There are actually many options.
You can make your own key holder.
The main thing is to equip yourself with a place before starting work:
- Well lit
- Preferably separate so that you are not disturbed during the process
- All kinds of tools must be in place to eliminate the possibility of injury
Made from plywood or wood
In order to make a wall-mounted key holder from plywood with your own hands, you will need, first of all, the material itself - plywood. The huge advantage of this type of wood board is that it can be given any look using a jigsaw for this purpose.
Plywood is cheaper than wood, but less durable and strong.
But first of all, of course, you need a drawing, which you will transfer to a sheet of plywood using carbon paper. There is an option that if you are excellent at drawing, then you can apply the drawing directly to the material. Then we give the required shape with a jigsaw, make the surface smooth by sanding it with coarse, medium sandpaper and begin decorating at your discretion.
The jigsaw is universal, is in great demand and is available in a large number of models.
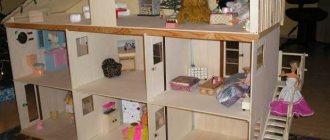
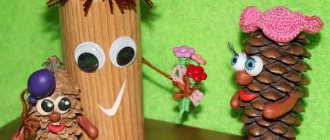
A key holder carved in the shape of a house, with separately cut out human figures that serve as keychains, is popular among many. When loved ones come home, the voids in the house are filled and you can see who is in the apartment and who is absent.
A key holder in the shape of a house is a popular option
You can start from another option. Find a suitable wooden block, sand it in the places you want to level, treat it with stain, and then either apply a design or coat it with a clear varnish.
To hang the key holder on the walls you need to attach fasteners.
The key hook simply screws into the surface. This way you will get both a natural wall decoration and a useful item.
From scrap materials
Independently choosing materials for a key holder does not always bring successful ideas. Ask your loved ones, maybe they know about some things in your home that you have no idea about.
A wall-mounted key holder will not only become a permanent meeting place for all your keys, but will also decorate the hallway.
Many people make key holders with their own hands from a variety of available materials, but they look original and, of course, are unique.
From a picture frame
An interesting do-it-yourself key holder can be made from a frame from a painting or photograph. This will not be difficult to do, because you already have a structure frame. You can select various backgrounds (pictures, photographs and even embroidery) and decorate it in accordance with the design of your hallway.
A key holder made from a frame is a good option.
Based on the master’s idea, key holders can be screwed onto both the inside and outside of the frame.
From the thread
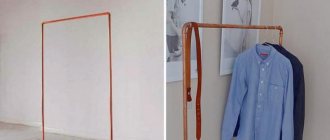
The now fashionable ecological style can inspire you to decorate your key holder using an ordinary branch. We find one that suits us and dry it well. We use stain, sandpaper to sand if necessary, a drill to create holes, nails or purchased hooks.
A key holder made from a branch will be unique.
Whether to varnish or decorate with drawings, it all depends on your desire.
Very important: treat the material to kill possible bacteria and insects
Leather
Wall key holders are less often made of leather. But making a pocket leather key holder is quite simple.
A high-quality leather key holder is an elegant fashion accessory.
The order of execution is as follows:
- We find a small piece of skin the size of a ligament
- Making a pattern
- We fasten with a thick thread with a lining (if required) and a fastener
- We attach a carabiner to the inside for attaching keys
- You can decorate with decorative details, but this is not necessary.
A DIY leather key holder is a necessary and convenient accessory.
Materials for making key holders
In specialized stores, prices for key holders can be very surprising, and with a wide assortment, it is difficult to choose a model with an exclusive design.
It is this parameter that plays an important role when choosing a key holder, which is designed for storing keys and decorating the interior.
That is why it is better to make a beautiful and non-standard key holder with your own hands, using materials of different texture, strength and processing methods:
- natural wood lends itself well to processing, retains its unique wood texture and pleasant color shade for a long time;
- plywood allows you to create elegant structures thanks to sawing technology; it is easy to paint or decorate in other ways;
- Thick fabric or genuine leather are used to sew key holders with bright designs; they are often used to store keys in a bag.
A separate category includes key holders made with your own hands from scrap materials and according to an individual project.
For such products you can use old furniture, photo frames and mirror frames, shelves made of wood and metal, magnetic boards and leftover building materials.
In order to decorate the created structures, painting and burning techniques, decoupage and hand painting, pasting with films or stamping are used.
Cardboard key holder
To make such a model, it is better to take thick beer cardboard or use corrugated cardboard with several internal layers. It is important to ensure the integrity of the finished structure, and to do this, you can fasten elements pre-cut from one piece of fabric together with glue.
A sketch is applied to the canvas; it can be several houses and a car; a blank or several blanks need to be cut out and decorated.
After the cardboard key holder has completely dried, several hooks for keys are screwed into the lower part, and all surfaces are varnished.
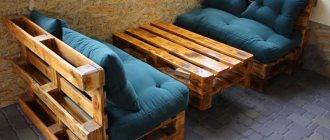
Key holder made of wine corks
If there are about 15-20 wine corks accumulated in the house, you can combine them into a key holder. In addition to them, for the work you will need a photo frame, PVA glue and hooks.
The corks must be placed tightly in the photo frame, leaving no gaps. Pre-coat each of them with glue; you can also pour glue into the joints between the plugs. Leave the workpiece to dry for several hours, preferably overnight. Screw the hooks into the corks.
Both the frame and the plugs can be painted or varnished as desired, or they can be left in their natural form.
Note!
- Bamboo in the interior: 145 photos of the best ideas for using bamboo in various interior styles
- Wooden decor - ideas for the best uses of wood in interior decoration
- Mirrors in the interior: 115 photos and video description of how to choose a stylish and original mirror in the interior
Key holder in decoupage style
Designing a key holder is very simple, but to decorate it you can use any available techniques, such as decoupage.
To do this, you need to select an interesting pattern on a multi-layer napkin and carefully cut it out; the surface to be applied is first cleaned and sanded.
It is best if a wooden surface is used to apply the design, it must be covered with a thin layer of PVA glue.
A cut-out design is applied to the treated area, after drying it is covered with another layer of adhesive, and then varnished to preserve the brightness and richness of the decor.
Why do you need a key holder?
Surely, each family member has his own set of keys, as well as keys to work, to the dacha, to the car, to the mailbox. And all this weighty bundle needs to be stored somewhere, and preferably in such a way that there is quick access to it at the right time.
On the Internet you can find a huge number of photos of key holders for any hallway - small, spacious, modern and in Provence style.
If you still doubt its necessity, here are some undeniable reasons:
- you will no longer have to rush around your apartment looking for your keys before work
- it will be a great addition to the interior
- a wall-mounted key holder in the hallway can perfectly disguise defects (a driven nail or the hole left from it, the result of a child’s painting, or an accidentally torn piece of wallpaper
- add functionality - choose an option with an additional board for notes, or simply attach stickers with “reminders”
- This is a great gift for anyone.
Wooden key holder
When wondering how to make a key holder out of wood, you should not start working on a complex project.
A simple diagram is quite suitable for this, and for such a key holder you will need two elements (side walls) and cardboard for the wall base, which need to be processed before fastening.
Furniture hooks are glued or screwed to the cardboard sheet, and to secure the side fittings it is better to use special fittings.
The corners will help firmly fix the structure; it can also be supplemented with lower and upper crossbars, glazed doors or several shelves for small items and glasses.
What types of key holders are there?
There are two ways to classify key holders.
The first is by design:
- Open . These are usually made by hand because they are easier to make. They are any kind of hooks on which you can hang keys driven into anything. Board with nails? Open. Branch with twigs? Open. Leather cut with pockets? Open.
- Closed . These are more difficult to make - some carpentry skills will be required. They are a cabinet that is closed by a door. The door will have to be hung on hinges, otherwise it will quickly fall off. They allow you to hide what exactly is inside and protect the keys from prying eyes. You can build in shelves for useful little things, hang a mirror on the door and otherwise expand practical use.
A convenient way to avoid losing your keys
The second way is based on the materials that were used.
- Cardboard . Cheap and easy to process, it has low strength. It is easy to work with and is well suited for the first key holder made with a child. But it wears out quickly, plus it doesn’t look too solid.
- Plywood . The material is also cheap, but more difficult to work with - scissors are no longer enough, you will need a large knife or jigsaw. In addition, plywood is bound to crack if you apply too much force. And if it is done in violation of technology, it will smell unpleasant. Plywood is easy to decorate; it withstands temperature changes and humidity. Lit.
- Metal . There is not enough home equipment to work with real thick metal sheets, but it is quite possible to make a key holder from thick wire or a thin layer of metal. The metal looks beautiful, can serve for decades, and is impervious to mechanical stress, temperature changes, and high humidity. But it is difficult to get, difficult to decorate.
Multifunctional option
- Tree . A beautiful, pliable material that can also last for decades if treated with stain and varnish. Suitable for most interiors, plus the search can be carried out in nature - you can pick up a branch in the nearest park, for example. Burns, sensitive to moisture. It may dry out and become infected with parasites.
- Leather _ It wears out over time and does not provide much room for imagination. But it is easy to process and will appeal to those who like to sew more than sawing with a jigsaw, working with a knife or large scissors. Does not require additional processing. Lit.
Model with door
Wine bottle corks can be considered a type of wood - they can also be used to make a beautiful key holder. But you can’t make it out of paper - it will wear out too quickly. It also won’t come out of glass or stone - the material is difficult to find and even more difficult to process.
Advice When choosing a material, focus on three indicators: what will be easiest for you to work with, what will fit best into your hallway, and what you will definitely be able to get. Once you have decided, proceed.
Plywood key holder
Flexible and thin plywood is ideal for creating different designs, but for this you will have to master the cutting technique. Thanks to it, you can make a key holder in the shape of a family tree or a beautiful cobweb, silhouettes of all family members or home, and even a car.
A simple key holder made of plywood is shaped like a box, inside of which there are one or several rows of hooks.
For exterior finishing, you can use the technique of singeing and varnishing, apply paint and create the effect of an aged surface, and decorate it with bright designs.
Lego key holder
If your house has accumulated a lot of assorted Lego pieces that can no longer be assembled into the original sets, they can be given a second life. To make a key holder out of them, you need:
- assemble a flat panel - a “base” for keys; put some drawing or inscription on it;
- put a designer part on all existing key rings as a keychain;
- attach the “base” to the wall.
When returning home, all you have to do is attach your keys to the key fob on the “base”. Such a key holder will feel harmonious in the interior of a hallway where there are already some children’s things or drawings.
Note!
Window decoration: 185 photos and video examples of how to decorate windows beautifully and originallyClocks in the interior: 140 photos of ideal combinations and original design options for rooms and offices
Closed key holder
A simple and convenient key holder made of leather, which you can sew yourself, will help keep your keys inside your bag or backpack.
Thanks to this product, the lining will not be damaged, and the entire bundle will easily fall into your hands without getting lost individually or getting lost at the bottom of the accessory.
The key holder is closed using a zipper sewn around the perimeter or thanks to a special and lightweight magnetic latch.
For sewing, you need to choose a durable and high-quality material, and sew a special ring inside to secure the bundle, so that such a product can be easily used at the right time.
Key holders-safes, which are a tightly closed box made of opaque material, deserve special attention.
It’s very easy to make them; standard drawings are used for this; you can store spare keys in them and it’s better to place such products in a secluded corner of the house.
Key holder in the hallway
1. Unity. The family keeps several keys. At a minimum, from the door from the street, the intercom, the landing, the apartment itself, the mailbox, the car. This set often includes keys to the garage and cottage. If you hang them in one place in the hallway, there will be no need to look in the rooms and living room, under pillows and clothes. You will stop asking who took them last. The time it takes to get ready will decrease, and the reasons for quarreling will disappear;
Housekeeper. Convenience for a large family.
2. Clarity. It is easy to get confused among the above mentioned multitude. For example, take the keys to the garage to the dacha. Considering that the summer residence is often located far outside the city, such a mistake will be costly. You'll waste hours on the way back, money on gas, and the nerves of your family members who are ready to relax. When the keys hang on separate hooks, you definitely can’t confuse them. Especially when it is signed above each one, why they are;
Key holder without hooks
A wall-mounted key holder in the hallway that has no hooks at all looks interesting, because in a hurry adults or children can get their clothes caught on them.
For ease of use, a children's key holder located at the bottom of the wall can be supplemented with design elements, the second part of which is fixed on a keychain.
To brightly decorate your own home, you can use a magnetic base to make a stylish and modern key holder.
A magnetic knife stand will cope with this task perfectly; it can be easily decorated with beautiful fabric or painted with paints.
Another option for a key holder without hooks is an organizer with separate volume-type pockets.
They are sewn onto the canvas; you can use transparent material to make it easier to see which keys are stored in the pocket or a plain one, having previously applied embroidery or a design to it.
Making a key holder with your own hands
Before you start making your own key holder, you need to determine its location. The appearance of the key holder and the material for its manufacture are determined. Below we will consider options for making key holders with your own hands.
Wooden key holder
In order to make a key holder out of wood with your own hands, you will need several accessories: sandpaper, a jigsaw, needle files, varnish or paint, glue, nails or screws. First of all, you need to present the finished design. Then, having selected the source material, you should proceed to processing the component parts using the above tools.
After processing the component parts, they need to be coated with varnish or paint. For a more refined finish, you can use a wire brush to remove soft fibers in advance and reveal the wood grain. Another option is to process the wood using a soldering iron, which will add contrast and color to the details.
The parts are assembled into a finished product using glue or connecting elements. Then hooks for keys are installed and the key holder is mounted on the wall.
Key holders with additional elements
In addition to keys, many people may have various small things scattered on their closet shelves and walls - combs, hair ties, lighters, etc. In order to get rid of this clutter, you can make a key holder with a small shelf that is suitable for storing small items.
It is not difficult to build a wall-mounted wooden key holder with a shelf. The manufacturing process differs little from the above. The key difference is the presence of a shelf, which you need to succinctly fit into the key holder and carefully make with your own hands.
Another interesting option is a key holder with magnets to hold keys. The key holder is a shelf with magnets attached to the bottom. The disadvantage of this design is that it can only be used for metal keys.
Plywood key holder
Unlike wood, plywood is a pre-processed material and does not require careful preparation. You can make a variety of key holders from plywood. For example, take a couple of sheets of plywood and cut them into the required shape.
Then carefully cut grooves of a characteristic shape in the lower part of one sheet. Figures cut from grooves can be used as key chains.
Then you need to attach a second one to this sheet from the back side. The result is a key holder with grooves into which key fobs are inserted.
Key holder without hooks
In order to place keys, it is not necessary to have hooks. A system of holes sawn in a single piece of wood is implemented.
Special cuts are made on the front side. A figure of any shape can be placed on the keychain, the main thing is that it does not fit into the hole. The figurine is attached to the keychain using a rope that passes through the cuts into the hole. The finished key holder should be sanded and coated with varnish or paint.
Key holder made from unnecessary things
If you have unnecessary musical instruments (guitar, violin), you can make a very beautiful key holder. You need to cut out a specially shaped hole and place the hooks inside the musical instrument.
If you have old panels from appliances lying around at home, you can also try turning them into a key holder. The main thing is to approach it wisely, carefully handle and secure the parts.
Key holder with shelf
A key holder made of wood or made of other materials is most often placed in the corridor or hallway.
It is also common to store other accessories here that make it difficult to maintain order in the room or force you to waste precious time looking for them before leaving the house.
Additional solid shelves can be used to store cosmetics and perfume, gloves or hats. If you make a thin shelf that does not fit tightly to the back wall of the structure, then it is convenient to hang belts on it and secure a pet’s leash.
A slip pocket made of cardboard or thin plastic, molded leather or fabric is used to hold mail and newspapers.
Additional hooks fixed above the shelf or directly on it allow you to conveniently place several models of sunglasses at once.
You can decorate the finished key holder at your own discretion; rhinestones and natural materials, Lego toys and various techniques are suitable for this.
It is important that the key holder remains a convenient and compact design, which is used not only for organizing space, but also as home decoration.
All proposed ideas can be implemented independently and, if desired, complemented with bright designer decorations, completely transforming their appearance.
Homemade key holders for the hallway
The choice of materials for making a key holder is very diverse, and the design is limited only by the imagination of the master.
DIY wooden key holder
Wood is very often used to make homemade key holders.
The simplest option would be a figured board or a piece of plywood, treated with stain, varnished or painted.
Homemade plywood key holder
The form is limited only by the imagination of the master: several vertical planks installed vertically, a traditional key made of plywood, a house, a tree, a car, an umbrella, images of animals, a cartoon character, there are a lot of options.
You can put some kind of drawing or inscription on a rectangular board, attach a large souvenir key, or make a small shelf. A key holder with a shelf will also be convenient for storing folding car keys.
One of the traditional shapes is a key holder with a door. It is easy to make using a photo frame as a door.
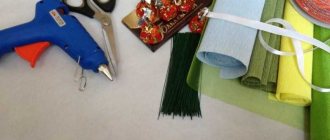
To work you will need:
- Frame,
- two pieces of fiberboard, the size of which corresponds to the size of the photo frame,
- wooden blocks measuring 20 by 40 mm,
- furniture hinges, hooks, furniture magnetic latch.
Tools that will be useful are a jigsaw, a hammer with small nails or a furniture stapler with staples, a drill, a screwdriver, a tape measure, and a pencil.
Pencil and tape measure
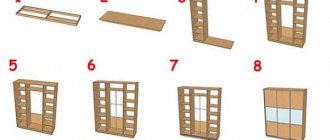
The technology for making a key holder with a door is no different in complexity. After careful measurements, you need to saw off four blocks of the required size for the walls of the product and fasten them together. It is better to use self-tapping screws to fasten the bars. A back wall made from a piece of fiberboard is attached to the resulting rectangle.
After this, you need to cut out two pieces of timber the length of the transverse dimension inside the resulting box. They are needed for attaching hooks and are secured in the body using staples.
Then furniture hinges and a magnetic lock for the door are attached to the resulting structure. A piece of fiberboard is attached to the back of the photo frame; it can be attached with staples.
Processing the part with sandpaper
The halves of the furniture hinges and the second part of the magnetic furniture lock are attached to the door. The door is installed in place by connecting the hinges. Assembly is complete.
The product can be treated with sandpaper, stain and varnish. Can be painted after sanding. The design of the door must be thought out in advance.
You can insert an original photo of the appropriate size, a drawing, a collage, an applique made of paper or felt into a photo frame, or make an original stained glass window from glass and self-adhesive film for insertion; there are many different solutions.
Taking this form of a key holder as a basis, you can get creative and make the product in the form of a wall clock, a stylized house, a birdhouse, a mailbox, a safe, with or without a door.