General principles and rules
Despite the fact that flowers are made from corrugated paper differently, the principles of operation are the same. Here are some general rules that will help you make paper flowers with your own hands that are very similar to real ones.
Cut out several petals of the same size at once. To do this, fold the paper in several layers.
Petals are usually made in different sizes. Roses, for example, have at least four different ones, while daisies have 2-3. In general, you can follow the rule - the more petals a flower has, the more different sizes there are.
Don't try to make the petals and leaves perfectly even or exactly the same. In nature they are different and unique. The same should happen for you.
When twisting the petals onto the stem, press the wrapped part well with your fingers, twisting the paper around the stem.
The more tightly you press, the more tightly the petals will fit one to the other. By adjusting this force, flowers of different sizes and appearances can be obtained from absolutely identical petals.
- Coat each petal wound onto the stem with glue.
That, in fact, are all the rules. And one more thing: the stem is cooked first. It uses wire or sticks of different thicknesses, which are wrapped in a long thin strip of green corrugated paper.
The tape can be coated with glue and then screwed onto the base.
You can twist it dry and secure the edge with a drop of glue. One more point: if you are going to assemble a composition from flowers, leave the lower 1/3 of the stem without decoration - it will be easier to compose a bouquet.
Application of crepe flowers
Corrugated paper flowers can be used in a variety of areas:
- Bouquet as a gift for the birthday girl.
- Craft for a school exhibition.
- Volumetric applique on the wall in the living room.
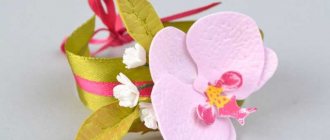
- Miniature buds made of crepe are used to create original beads and pendants.
- Interesting flower figures can be used as details for hairpins, brooches and rings.
Crepe flowers will never fade and will stylishly decorate a windowsill or chest of drawers in the bedroom.
poppies
Poppies from corrugated paper are very easy to make. It is important to find the right shade of scarlet. You will also need a small piece of black for the core.
But, if you don’t have it, you can use any dark one and then paint it black.
We make a poppy from corrugated paper like this:
Fold a small square from paper napkins of any color. We wrap it in black corrugated paper. If you don’t have black, take any dark one, then we’ll paint it.
- We cut out two or three petals of different sizes from scarlet paper: small, medium and large.
- We collect the petals all together (do not put them in a neat pile) and crush them into a ball.
- We disassemble the ball into petals.
- We take the core and wrap the first small petal around it from left to right.
- The second small petal partially overlaps the first, followed by the middle one, also overlapping it.
- The second middle and two large petals form the second row. They are located so that their central part overlaps the junction of the previous row.
Having collected everything together, we insert the wire into the base, wrap the base with thread, and glue it. Wrap in green paper.
Poppy is one of the easiest flowers to make yourself from crepe paper.
At the same time, he looks very good. You can use them in a campaign with other flowers, or make a bouquet of poppies only.
Even such a simple flower can be made in different ways. First of all, you can change the middle. In the master class described above, the core of the flower is very simple. It can be made more like natural.
We use the same technology to make the middle, but from white paper.
- And from black (can be painted) we cut out a strip about 1 cm wide and 4-5 cm long.
- On one side we cut it into thin strips (a couple of millimeters wide).
- We twist the resulting “noodles”, obtaining thin stamens.
- We wrap the stamens around the core, and then proceed according to the same algorithm.
Miniature roses made of crepe
Figured buds are quite often made to decorate homemade jewelry. These can be roses made of crepe, original snowdrops, a sprig of lilac made of corrugated paper. Instructions on how to make voluminous paper flowers with your own hands:
- It is better to work on creating miniature buds using the method of twisting paper strips.
- For one rose you will need a crepe ribbon in pink, white or yellow.
- A continuous stitch should be sewn in the middle of the prepared tape.
- Gently pull the thread, gathering the ribbon into small folds.
The crepe blank is rolled into an original bud. Hem the edges of the tape to fix the inflorescence in the desired shape. For additional decoration, you can cover the rose with acrylic varnish.
Snowdrops
You will need: white and green corrugated paper, cotton wool, scissors, corn grits, glue gun, wire, polystyrene foam.
Master Class
- Prepare a piece of wire 25 cm long.
- Wrap cotton wool around the tip of the wire, apply a drop of glue and dip it in corn grits.
- Cut out 6 oblong petals from white paper and 3 leaves from green paper.
- Form the core of the snowdrop from 3 rectangles of white paper and do not forget to fix it with glue.
- Give the stem a curved shape.
- Cut a long, thin strip of green paper, then wrap it around the wire, securing it with glue periodically.
- Glue the leaves and petals.
- Make the required number of snowdrops in the same way.
- Insert snowdrops into foam and decorate to your liking.
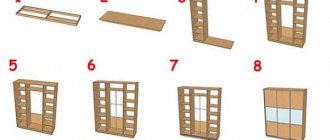
Schemes for creating flowers from corrugated paper
Making flowers with your own hands from corrugated paper is quite simple; even a child can do it.
And if you make not one, but many flowers, you will get a real flower arrangement.
If we consider schemes for creating flowers from corrugated paper, they can be divided into the following types:
- Wrapping objects with corrugated paper;
- Formation of petals;
- Rolling corrugated paper;
- Eversion;
- Twisting tubes;
- Adding volume to a flat base.
We will consider detailed instructions on how to make flowers from corrugated paper for each described scheme in more detail.
Delicate rose made of corrugated paper
For those who want to decorate their home with small flowers, we recommend starting with roses. They are not too difficult to make, which is ideal for beginners. If desired, you can make a rose with candy inside.
Then the flower can be used as a gift.
We will prepare the following materials:
- corrugated paper;
- thread or elastic bands;
- scissors;
- candies;
- floral wire;
- glue gun;
- wand.
- In order for the flower to be lush and moderately voluminous, you will need at least 8 petals. First, cut a small rectangle of corrugated paper.
- Fold it in half and trim the edges, as in the photo.
- Gently stretch the top edge of the workpiece with your fingers.
- We also slightly stretch the middle of the workpiece, put the candy inside and wrap it tightly enough. Secure the bottom edge with thread or elastic.
- We cut off the bottom edge of the bud and insert a small piece of floral wire inside. Fix it with a glue gun and leave it for a few minutes.
- Let's start preparing the petals. Cut 4 rectangles from corrugated paper. We slightly adjust them at the top and bottom, as in the photo.
- Using a stick or pencil, twist them from the top side. We also stretch the middle of each of them a little.
- Glue the prepared petals around the bud.
- Cut out 4 more rectangles from light pink corrugated paper. We prepare them in the same way as the previous ones.
- Glue each petal to the flower.
- Cut a green square.
- We cut it as shown in the photo. We tighten every detail.
- Cut a long strip of green paper.
- Attach the stem to the rose bud with a glue gun. We wrap the wire with a green strip and secure it with glue.
- Using the same principle, we make a small rosebud.
An incredibly beautiful rose made from corrugated paper is ready!
Bright daffodils made of crepe
Daffodils are a symbol of the coming spring, along with tulips and snowdrops. The inflorescences are made of bright yellow crepe, and the stems are formed on a solid base (metal wire). Instructions on how to make a paper flower with your own hands:
- The inflorescence of the narcissus consists of six curly petals and a small inner corolla.
- The whisk is made of cream-colored corrugated paper. To do this, cut out a small square. After processing with a hot iron, its edges are folded towards the center, leaving the figure in this form.
- The petals are prepared from yellow crepe, and it is not at all necessary to give them a wavy shape.
- The corolla and petals are glued to the stem, on the top of which it is necessary to place a circle of cardboard (the base for the petals).
A bouquet of daffodils can be placed in a beautiful vase so that the bright inflorescences will delight the apartment owners even on the frostiest day.
Large life-size corrugated flowers for hall decoration
Corrugated paper makes beautiful life-size flowers, which serve as a wonderful interior decoration. They are very often used to decorate shop windows and festive rooms.
Whatever, such a “handsome man” will look very unusual at home.
Necessary materials:
- Glue gun;
- Corrugated floral paper in green, pink and white colors;
- Cardboard (a box for equipment will do);
- Stationery knife or scissors;
- Metal-plastic pipe for the stem;
Subsequence:
- In this work we are making a growth peony. To create one flower you will need 3 meters of corrugated paper. Cut a piece of the desired size and fold it in half along its entire length.
- From the edge of the folded paper, measure a piece 5-6 cm long and fold it 3 times, as shown in the photo:
- We cut, not reaching the edge of the paper 3 cm.
- We cut the “separated” piece of paper on both sides, again without reaching the end.
- And give it the shape of a petal (about 20x8 cm).
- In this way we work through the entire amount of paper we have.
- The size of the petals on the second meter should be 22x10 cm.
- On the third - 24x12.
- Now, still without separating the petals, twist the free end of each of them into a flagellum:
- And then straighten it, giving it a slightly concave shape, like peony petals.
- Cut a circle 30 cm in diameter from cardboard.
- Cover it with pink paper on all sides. And using a glue gun, start planting petals in the center, going from smallest to largest.
This is the kind of peony you should get.
- Now twist a barrel from a metal-plastic pipe into the same shape as in the picture below.
- And cover it with green corrugated paper.
- Once planted on cardboard as shown in the photo instructions, attach the stem to the base of the peony.
- Disguise this unsightly part with pink paper, making a “skirt” out of it.
A life-size flower made of corrugated paper is ready. If you wish, you can attach green leaves to the trunk with wire or leave it as is.
These flowers can be used for a photo shoot:
And they just look attractive in the interior.
They often decorate rooms for various special events.
- For example, weddings or birthdays.
Looks quite interesting.
This is what it might look like at a party:
Corrugated paper peonies (with patterns)
For peonies, you need yellow corrugated paper for the core, green for the foliage, pink, cream, crimson for the flower itself. A wire or thin stick is suitable for the stem. You will also need PVA glue.
These are the beautiful flowers you can make from corrugated paper
A peony made from corrugated paper is a rather difficult flower to make. It has many different petal shapes. You can't do this without a pattern. But there are many varieties of peonies, so there are several patterns. Let's give two options. The first one can be printed, cut out and used as a template - it is given in a full-size image. The second option can be drawn with your own hands according to the cells.
Pattern of life-size peony petals
Pattern of peony petals, which you can draw yourself on a checkered sheet
Step-by-step manufacturing process with photos:
- From yellow paper, cut out a strip 4-5 cm wide and 10-12 cm long. Fold it several times, cut into thin “noodles,” leaving about 1 cm of uncut edge.
- Roll the resulting tape into a tight roll, using the entire edge for this. Lubricate it with glue and twist it. The result is a shaggy yellow core around which the petals will be attached. We fix this center on a stick/wire, which will be the stem.
Let's start making a peony from corrugated paper
- Cut out petals from paper. The minimum quantity is 20 pieces (all types), but the more, the fluffier the flower will be. On the second pattern the number of petals is indicated on each; on the first one some explanation is needed. There are numbers there too. This is the required number of petals.
- Stretch each petal in the middle without touching the edges, giving them a convex shape. Don't try to make them the same. This is not required. During the process, you can still stretch or tighten it a little.
- We start folding the petals from the smallest ones. We place them around the existing center. We place the first small petals only slightly overlapping their edges. Coat the base with glue.
Making leaves that grow from the bottom of the flower cup
- Next we take the middle petals. We lay them with a slight overlap of one on top of the other.
- Then we lay the large ones and lastly the very large leaves. We coat each layer with a small amount of glue at the base.
- You will also need leaves. We cut them out of green paper. On one side we compress them, forming a petiole, on the other we straighten them in the middle, giving them a curved shape (similar to a boat).
Peony leaf pattern
- We attach the leaves under the bud and bend them down.
- You can also make leaves like a peony, but this will require a thin wire and several cut out shaped leaves.
Veins cannot be made on corrugated paper, but they can be marked with paint. What might happen - We glue each leaf to a wire, wrap a thin strip around the petiole, then attach it to the stem.
The assembly process is a creative exercise - Take a long narrow strip of green corrugated paper (about 1 cm wide, 20-30 cm long - depending on the length of the stem). We wrap the base of the flower, then smoothly move to the stem. Finally, secure the edge of the paper with a drop of glue.
The corrugated paper peony is ready. Usually they are used to make a bouquet. When you make the next ones, don't try to make them exactly the same. All flowers in nature are unique. Yours should be different too.
You can make this bouquet of paper peonies with your own hands.
You can play with the size and number of petals, mixing petals of different shades that are similar in color. You can try using paint to make the petals at the base darker. In general, there are a lot of options.
How much time do you need to spend
Very relevant, due to the current busyness of everyday activities. We hasten to reassure you - this process will not take too much time.
If you have never carved from a zhmakanka, then making one artificial plant will take you from 30 to 40 minutes, of course, taking into account the preparation of tools and necessary materials.
Over time, as you gain practical experience in this matter, you will be able to reduce this time by half, that is, one will take 20 minutes of time.
This information gives some food for thought - whether to start your own business producing artificial decorations for banquet halls, but that’s a completely different story.
Making a masterpiece with your own hands is not at all difficult. All you need is a little patience, a lot of desire and follow the instructions.
Formation of petals
The most common method for creating DIY crepe paper flowers is to shape the petals.
Depending on the size of the petal, large flowers from corrugated paper can be formed using this method.
If you shape the petals in different shapes, you can get different flowers:
- The round petals form roses;
- Of elongated and pointed petals - lilies, peonies, chrysanthemums;
- From wide rounded rectangles - poppies, carnations, gladioli.
Corrugated paper water lily
If you want to make an unusual decoration, a voluminous applique or an elegant flower for a gift box, then use these recommendations. Anyone can simulate a delicate pink version, having only corrugated paper of a suitable color on hand. E
This is an excellent craft option for children’s creativity, and also the activity of creating bright flowers can become a favorite hobby.
What you need to prepare for creative work:
- Corrugated paper in bright pink and bright green colors;
- Scissors;
- Cardboard circle base;
- Glue (anything that will stick paper together);
- Golden half beads for the middle or another suitable option.
- You need to cut small fragments from the corrugated paper, which will later become the petals and leaves of the flower. You can use the most ordinary glue in a pencil, which will perfectly glue the workpiece.
- Using the proposed principle, you can make any flower; the delicate coral color will look beautiful in the finished product, and we can assume that the resulting product looks like a lotus or water lily.
- Cut out a circle from any cardboard. Make several blanks for green leaves. Cut a piece of green corrugated paper into rectangles. Then stack them all and use scissors to cut out oval petals.
This way, all your pieces will be the same size. Next you just need to attach them to the base.
Stretch each petal to the sides. This can be done in bulk at once, stretching the entire prepared pile. Or process each leaf separately with your fingers.
After stretching, each part will acquire volume, becoming like a concave cup.
This is what we need to achieve, because the flower should be lush and elegant. On the underside (at the base), carefully coat each petal with glue. Glue it to the circle around the circumference. A total of 5 or 6 leaves will be enough.
Prepare the pink petals for the flower in a similar way. Also cut out a portion of rectangles, round and sharpen on both sides with scissors. Do everything at once, stacking the blanks in a stack. Stretch the petals to form an indentation.
You need to make more pink petals to be able to form several layers of a lush flower.
- Glue 3 or more layers of flower. Glue the petals around the circumference, lifting the tips up.
- And glue half beads inside the flower or come up with some other option for the middle. The inner part is a must, it immediately makes the product complete and elegant.
This is such an easy-to-make craft made from corrugated paper.
Corrugated paper roses: step-by-step manufacturing algorithm (2 methods)
The good thing about corrugated paper flowers is that they can be made in different ways. The material is very plastic and easily changes shape because there are several ways. Some people want to achieve more “naturalness”, while for others speed is important.
1 way (natural look)
For corrugated paper roses, it is better to choose paper of two or three very close shades. This will make the flower look more natural. For example, for the flower in the photo, white and crepe paper was used. The number of petals of different shades is arbitrary, as is their placement in the bud.
This is what you should get: very beautiful flowers made of corrugated paper
The manufacturing procedure is as follows:
- Cut out 8 small, 10 medium and large petals, and 8 more super-large petals. The quantity of pure white and crepe is halved.
- From green paper we cut out a long ribbon to wrap around the stem, several (4) leaves - long and narrow, which in real roses are located at the bottom of the flower.
- Use your fingers to give the petals a rounded shape. We straighten it from one edge, even turning the edge back a little. On the other hand, on the contrary, we twist it.
DIY flowers from corrugated paper: making a rose
- We wind the tape on the wire. If flowers will be used in the arrangement, leave about 1/3 without ribbon - this will make it easier to insert them.
- We take the smallest petal and twist its lower edge around the wire. It should wrap the stem completely. The petal will be almost curled. Apply glue to the bottom part and glue the next small petal. Approximately half press one to the other tightly. From the second row, the force can be slightly weakened - the bud gradually opens.
Final Steps
- Next, using the same technique, add all the other petals in order: medium, large and very large. When we glue large petals, each of them covers only half of the “stem” with the petals twisted onto it.
- Glue the leaves last.
As a result, we get a beautiful rose made of corrugated paper. In this design it looks like a real flower. There is an easier and faster way (pictured below).
Method 2 (simple and fast)
We cut out a strip of paper 7-8 cm wide. You can make it uneven - narrower on one side, wider on the other. We fold it, starting from the narrow edge, like an accordion. The width of the “accordion” is 3.5 -4.5 cm. Cut out petals from the resulting stack at 2/3 of the height.
We wind the petals onto the wire (you don’t have to wrap it with green tape yet) starting from the narrow edge. As we roll, we give them shape with our fingers - stretch them on one side, press them at the stem. Having installed all the petals, we secure them with a thread (simply winding a certain number of turns). We adjust the petals, forming a bud.
You can quickly make a rose from corrugated paper
From green paper, folded like an accordion, we cut out long and narrow petals. Please note that their ends will need to be twisted, so they should not be so narrow (approximately 1 cm). We wrap the cut out petals at the bottom, under the petals, twist the leaves with our fingers, and then shape the stem.
DIY corrugated paper roses step by step
The rose is a noble flower and at first glance it may seem that it is very difficult to create this miracle on your own.
We will show you simple master classes on making roses from corrugated paper with your own hands step by step, and you will be convinced that this mission is not only doable, but also very enjoyable.
You can make such a rose together with your child.
You can get larger and more lush roses with this simple master class:
- You need to cut a fairly long strip from corrugated paper (the larger the strip, the larger the bud will come out).
- We wrap the paper around the wire - this will be the base of the bud. When winding a bud, each layer must be wrapped with glue.
- We cut out the petals of our future rose from paper - different in size and shape, so that the rose seems natural.
- Glue the petals to the base, apply glue to the underside of the petal.
- We use green paper to make sepals, which we will glue to the base of the bud.
Workshops on creating flowers
Among the huge variety of paper bouquets, the most interesting for a gift are:
- Bouquet of spring tulips in a basket.
- Bouquet of crepe and Raffaello sweets.
- Saturated daffodils.
- Corrugated paper roses for homemade hairpins.
Each presented option is accompanied by detailed instructions on how to make a paper flower.
Photo ideas: flowers made from crepe paper
Basic techniques for making large flowers from corrugated paper
You can make realistic buds using different methods. If you are just starting to master this needlework, choose a simple method for yourself. Using it, you will also get a very beautiful product.
To make three-dimensional flowers from corrugated paper, the following techniques are most often used:
- Rolling.
- Layering.
- Flower on a flat base.
- Folding petals like an accordion.
If you set a goal and include a bouquet of large flowers made of corrugated paper into the interior, you can make it truly original and unique.