Polystyrene foam is a popular building material, which is widely used for insulating balconies, facades, basements and rooms from the inside. Installation of polystyrene foam is carried out using dowels and is complemented by “planting” the material with glue. Tight fit of foam sheets is the key to effective thermal insulation and durability of the structure.
In the article we will describe what types of glue are applicable for working with polystyrene foam, and provide practical recommendations for choosing an adhesive composition and gluing “frozen plastic” to various surfaces.
What features of polystyrene foam should be taken into account when choosing an adhesive?
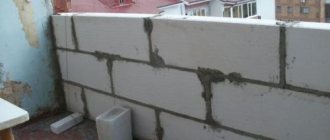
Foam plastic is in great demand in mass and individual construction due to its high technical and operational characteristics. The material has low heat and vapor conductivity, practically does not absorb moisture (0.4-4%), is resistant to mold growth and has a long service life - up to 30 years.
The main volume of “foamed plastic” is occupied by air - this determines the low weight of the foam sheets and allows the material to adhere well to the surface being covered. On the other hand, such a structure reduces the contact area and adhesion of the materials being bonded.
When choosing an adhesive for gluing foam plastic, the following points must be taken into account:
- the adhesive should not contain solvents (gasoline, acetone, etc.) - they can react and “burn through” the foam;
- location of repair work (outside or inside the building);
- type of covering surface (concrete, metal, wood, etc.);
- For gluing foam boards together, dry or “wet” type glue is suitable.
Types of glue for foam plastic: pros and cons of use
Dry adhesive mixtures
Dry mixtures are used for both internal and external insulation work. Most often they are sold in 25 kg bags. Before applying glue to the foam, you need to prepare a working mixture, following the instructions on the package.
All dry adhesive mixtures for foam plastic can be divided into two groups:
- Foam Adhesive
- Apply to the foam board just before gluing it to the roof or wall. - Reinforcing mixture
- applied over foam plastic to the installed reinforcing mesh. As a result, a layer is formed that protects against mechanical damage and serves as the basis for subsequent wall finishing.
Advice! It is better to buy dry mixtures in pairs (glue + reinforcement). For example:
- Cerisit - CT83 and Cerisit - CT85;
- Kreisel - 210 and Kreisel - 220;
- Master Termol and Master Super
Before purchasing dry glue, you need to check the date of its manufacture and the storage conditions of the product. The shelf life of the adhesive composition is no more than 12 months. The glue must be stored in a dry, closed area. It’s definitely not worth buying bags on the street.
Important! The bag of dry glue needs to be checked. There should be no stains from moisture on the packaging, and the presence of stuck together or hardened lumps of dry mixture inside is unacceptable.
Advantages of glue based on a dry mixture:
- affordable cost (you can buy foam glue for 200-400 rubles per 25 kg);
- low consumption (about 6 kg per m2).
Disadvantages of dry mixes:
- the need to “tinker” with heavy bags and prepare the solution yourself;
- not suitable for gluing foam plastic to metal surfaces and concrete;
- Fastening with dowels can only be carried out 24 hours after applying the glue.
Polyurethane adhesive foam
Many builders note that the best adhesive for polystyrene foam is polyurethane foam. This adhesive aerosol is used to work with different surfaces indoors and outdoors.
The advantages of polyurethane foam include:
- convenience and speed of application;
- good adhesion of polyurethane foam adhesive to the surface to be coated;
- the moisture resistance of the foam is higher than that of dry substance-based glue;
- low consumption (a container of polyurethane foam is enough to treat 10 m2).
The disadvantage of this gluing method is the need to purchase a mounting gun (450-2500 rubles). Thanks to this device, the convenience and efficiency of gluing increases significantly, and the gun itself can be used for other repair and construction work.
The cost of polyurethane foam adhesive is about 500 rubles. The price depends on the composition and manufacturer.
Liquid Nails
Liquid nails can be used to cover small surfaces with foam. When choosing them, it is very important to evaluate the composition of the adhesive substance. It should not contain solvents.
Liquid nails are considered not a reliable enough method of gluing, so they are often combined with another, more durable glue (dry mixture or polyurethane foam).
Reliable fixation is ensured by spot application of the adhesive composition in the following proportion: 1/3 of the surface - liquid nails and 2/3 of the surface - glue based on a dry mixture
This combination is completely justified. Liquid nails set very quickly - and there is no need to install supports to fix the foam sheets, and the solution from the dry mixture will provide a strong adhesion.
The cost of liquid nails is about 150-200 rubles per 300 ml.
Review of glue from different manufacturers
Adhesives for polystyrene foam are available in a wide range. Among all the abundance of goods, glue from such manufacturers is in particular demand: Cerisit, Knauf, Master, and Titan.
Ceresit
The Cerisit company has developed a whole line of adhesive compositions for gluing foam plastic. The most popular types of glue are:
Video: using Ceresit glue for foam plastic
Knauf Klebespatula
The Knauf company produces adhesive for foam plastic. Klebespatel is used as an adhesive or reinforcing solution for laying sheets of foam plastic/extruded polystyrene foam. The adhesive contains a special additive (a combination of fillers and binders), which gives additional strength to the adhesion of the foam to the base.
Characteristics of Knauf Klebespatel:
- Drying time for one layer of glue is 24 hours;
- consumption time of the prepared solution is 2 hours;
- the “standing” time of the reinforcing layer is 3 days;
- the temperature of the base and air should be +5°C and above;
- material consumption - 8kg/m2;
- the cost of 1 bag (25 kg) is about 250 rubles.
Master
Master-Termol
has the following properties:
- wide range of operating temperatures - gluing can be done at temperatures from -5°C to +30°C;
- excellent adhesion to brick, concrete and cement-lime surfaces;
- possibility of adjusting the laying of slabs (50 minutes);
- You can “dowel” the foam 12 hours after gluing;
- operating temperature -50°С/+70°С (28 days after application);
- mixture consumption - up to 5 kg/m2.
An additional advantage of Master-Termol is the affordable cost of foam glue (price for 25 kg - 230-250 rubles).
Master-Super
- a universal building mixture for gluing foam plastic or creating a reinforcing layer. The solution has high adhesive strength (1MPa), plasticity and is modified with polymer additives.
Master-Super is vapor permeable, so it is recommended for indoor use. The mixture allows the walls to “breathe” and maintains a favorable microclimate in the house
Technical characteristics of Master-Super:
- time to use the finished composition - 30 minutes;
- permissible base temperature during gluing and reinforcement +5°C/+50°C;
- material consumption 6 kg/m2 - gluing foam, 5 kg/m2 - installation of a reinforcing layer.
Tytan Professional
The Polish company Tytan Professional has released the universal adhesive foam Tytan Styro 753. The aerosol adhesive is compatible with all types of external thermal insulation systems that use sheets of foamed polystyrene.
The use of Titan adhesive for foam plastic significantly reduces installation time - adhesion to the base occurs 5 times faster compared to dry mixtures. Foam sanding and fastening with mechanical anchors can be carried out 2 hours after gluing
Technical and operational characteristics of Tytan Styro 753 adhesive:
- application temperature - from 0°C to +30°C;
- adjustment time - 15 minutes;
- cylinder temperature during operation +10°С/+30°С;
- complete hardening time - about 30 minutes;
- consumption of 1 cylinder (750 ml) - 10 m2;
- the cost of the cylinder is 350-400 rubles.
Preparation of glue from a dry mixture
To prepare the adhesive solution you will need the following tools and materials:
- clean container (a large plastic bucket will do);
- water without foreign impurities;
- construction mixer/drill with an attachment for mixing solutions;
- dry mixture.
Pour water into the dry mixture (the proportions are indicated on the package). To dilute 1 kg of dry Cerisit ST 83 glue you will need 0.24 liters of water. Mix using a low-speed drill or mixer until a homogeneous mass is formed. Let the solution sit for 5 minutes, stir again and get to work.
Advice! When mixing, the blades of the drill or mixer must be completely immersed in the mixture. This is done to ensure that air bubbles do not enter the solution, otherwise the quality of the glue will sharply decrease
Here are a few tips to help you properly glue insulation boards:
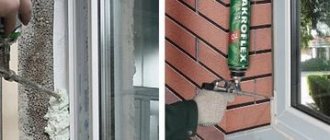
Polyurethane foam is a popular building material. All types of work require a stage where this material is used. For example, this is the installation of plastic windows or doors, installation of partitions, and so on.
Polyurethane foam has a lot of positive properties - it glues surfaces and adheres to most other materials. Due to expansion, even a small volume fills any hole, gap or crack. With its help, a high-quality fastening is created and the element is fixed at the desired point.
Polyurethane foam is also relevant for working with penoplex.
Penoplex is used as a soundproofing material, and polyurethane foam is used to blow in the seams between the plates. At the same time, it qualitatively seals the seam. Another useful function offered by foam is gluing the foam board to surfaces, even vertical ones.
Even an inexperienced builder can do this kind of work. The slabs are glued unnoticed, however, the penoplex is securely fixed and they proceed to the next stage.
Application of foam with penoplex
Using this product instead of glue will help save money, applying the foam is much easier and requires less time to dry completely than glue. The use of foam is in no way inferior to specialized glue in terms of adhesive properties. Why do they buy it to simultaneously use it both for gluing penoplex and for blowing in seams and joints.
How to choose foam for work according to method of application
The polyurethane foams that are offered in markets and stores today are no different. They are easily used in working with penoplex. The difference lies in ease of use, as well as temperature conditions.
First of all, foam is divided according to the type of operation:
- Pistol. This foam offers high efficiency and low cost. However, to use such cylinders, you need a specialized gun - a tool into which the cylinder is installed. Using a gun is much more convenient than a regular household cylinder, since the flow rate is controlled and regulated. With a gun it is easy to blow out points that are located inconveniently or in hard-to-reach places;
- Household foam will not require the user to purchase additional devices - after purchase they are immediately used. This foam is distinguished by its lower cost than professional foam, but the volume of work that is performed with its help is smaller.
Simply put, the same volume of professional foam will require much less than household foam (number of cylinders), which leads to savings.
Range of species
In addition, if you plan to attach penoplex using polyurethane foam, then it is better to use a professional option. For gluing, use a smaller layer than for sealing seams. The professional version involves adjusting the flow of the substance, while the household version does not have such a function.
There is a definite difference in this material depending on the manufacturer - cylinders are produced in different sizes, so it is worth paying attention to this. The difference in price is 10%, and the difference in materials is 20%.
Foam selection by season
It is necessary to take into account what time of year they work, or in what room. If there is a large temperature difference with the street, this is also taken into account. The difference is in the foam - some types are purchased if work is to be done in summer, others are suitable for work to be done in winter.
If you glue penoplex in the summer season, then purchase appropriate foam, which works at temperatures from 5 to 35 degrees above zero. The advantage of this choice is that summer foam does not contain toluene, which destroys foamed polystyrene.
Winter foam is used at temperatures no lower than 10 degrees below zero and no higher than 35 degrees above zero. Work is carried out even when it is frosty outside, or the room itself is cold (when working on the balcony).
Work on the balcony
They work with off-season (universal) foam at any time of the year, but it contains toluene, with which penoplex is incompatible. Such foam cannot be used.
Pay attention to the presence of this substance in the composition of the material - toluene. If it is, choose another foam, otherwise it will lead to disastrous consequences.
The degree of expansion also deserves special attention. Foams increase in volume by 60%, or are used at lower rates. For sealing seams, as well as for better fixation, they prefer the first option, characterized by a higher expansion rate.
Pay attention to the information on the packaging - it indicates the pressure inside the cylinder, the mass and yield of the foam, i.e. its efficiency and supply volume.
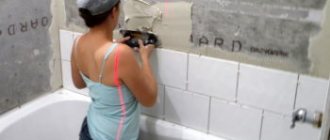
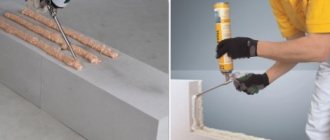
How to glue foam plastic correctly?
Gluing foam plastic is not a difficult task,
You don’t need any experience in finishing work here; even a beginner can handle it.
The walls must be cleaned in advance,
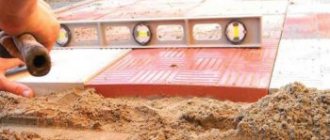
if necessary, they are leveled. Next, the wall surface is primed. Using a level, a starting strip is installed on the base, which will support the slab while the glue dries.
Dilute the glue according to the instructions. Apply the adhesive base using a spatula.
If the wall is made of brick or concrete, then glue is applied from corner to corner on the foam and partly on the wall.
The slab is placed on a plank and pressed firmly against the wall surface.
. It is necessary to measure the laying of the slab by level. The first row of polystyrene foam is laid horizontally, and then in a checkerboard pattern.
The glue must be allowed to harden overnight.
and then using dowels they strengthen the insulation.
There are two types of mixtures that can be used depending on the temperature.
So at what temperature can you glue foam plastic outdoors? It depends on the time of year:
- For summer use (temperature parameter from +5 to +35 degrees).
- For winter use (at temperatures from -10 to +5 degrees).
Do you know how you can insulate a brick house from the outside? Read in this article.
Taking these indicators into account, it is possible to glue foam plastic to the facade of a building both in winter and in summer.
However, a better option would be to carry out work in the summer than in the winter, when the weather is dry and warm.
After gluing the foam, it should not be left in the sun for a long time.
. Therefore, after fixing it, it is necessary to begin finishing work within 1-2 days.
How to apply glue to polystyrene foam: video instructions.
[Click on photo to enlarge]
For the installation of the most common thermal insulation material - polystyrene foam, a special adhesive foam is increasingly used, which has sealing, adhesive, heat and sound insulation properties. Unlike dry cement glue and umbrellas, it greatly simplifies the process of insulating buildings.
Main properties and advantages of polyurethane foam for polystyrene foam
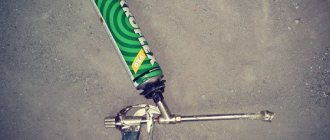
This type of foam glue is usually stored in a metal container and applied using a special gun. It allows you to quickly install thermal insulation, as it does not require kneading, using dowels, or drilling holes. The seams between the foam sheets are also sealed with foam, which also improves the quality of installation.
Reasons for choosing polyurethane sealant
When purchasing foam, it is once again checked for the presence of toluene, a substance that leads to permanent damage to the penoplex.
Even if it is not indicated on the cylinder whether it is present in the composition, they give preference to another option, where the composition is detailed and you can make sure that there is no toluene in it.
The best solution and choice is polyurethane sealant. This type of foam is better combined with penoplex and does not harm it in any way.
The advantages include high-quality sealing of gaps and cracks that invariably arise during the cutting of penoplex slabs.
The same substance will not lead to even partial damage to the foam boards, and gluing with its help is easy and simple. It will be more expensive than if you use specialized glue.
It is not worth saving on the purchase of foam, which is used to seal cracks, otherwise it will not lead to positive results. If the first sealed seam does not give the desired results, the foam is changed. They choose well-known and well-established brands - cylinders from popular manufacturers, whose quality you cannot doubt. In this case, calculate:
- For good adhesion between various materials, including foam boards;
- For high levels of thermal insulation and sound insulation;
- Using a gun, applying foam is convenient and precise, which will lead to less consumption of the substance.
Applying foam with a gun
High-quality foam prevents the penetration of moisture, moisture, mold or mildew. Provided that the seams are insulated from exposure to ultraviolet rays, which lead to the destruction of the polyurethane foam.
How to apply foam and how to work with penoplex
To fix penoplex sheets to the surface, using polyurethane foam as glue, apply it around the perimeter of the sheet and in the center. If a pistol is used in the work, it is better to minimize the supply of the substance. If you use a regular household cylinder, then apply foam quickly. Next, the penoplex is pressed against the surface and held in this position for several minutes. Then start attaching the next sheet. Pre-prepare the sheets - trim them for ease of installation.
The installation of the slabs is carried out in a checkerboard pattern, from bottom to top - this minimizes the gaps between them.
Next, start filling the gaps. If the distance between the sheets is large, then fill it with small wedges from the foam itself. If you use foam, it will cause cracks. Carefully blow out small cracks, not forgetting to hold the already fixed sheets. Do not overdo it; excess moves the sheet and disrupts its fixation. Remove what comes out.
Finished work
It is better to use foam when laying penoplex on the floor. When sheets are attached to the wall, glue is preferred. A specialized substance will provide more guarantees of high-quality fixation, although there have been no obvious complaints from builders regarding the foam. Many people use polyurethane foam instead of glue and no negative consequences have been noticed.
Usage
The process of using TechnoNIKOL adhesive foam comes down to the following steps:
- Place the container with the adhesive on a flat surface so that the valve points upward. Remove the protective cap from the valve and carefully connect the cylinder to the seat of the mounting gun. Shake the can several times.
- Before installing polystyrene or XPS boards on the surface, you need to secure the starting fixing profile. It will become a kind of support for the first row of slabs.
- Apply foam adhesive using a gun, with the can directed upward. And there should be a distance between the gun and the tile for comfortable application of glue.
- When installing expanded polystyrene slabs, you need to apply glue at a distance of 2 cm from the edge of the slab. Once the product has been applied, you need to wait 5 minutes for the foam to fully expand. Then you can attach the insulating board to the surface.
- When the plate has been applied, press it lightly and wait until the glue sets. The fastening material must occur closely butt-to-butt, without allowing the seams to separate.
The space between the insulation should not be higher than 2 mm. - The position of the slab can be changed within 5-20 minutes after its installation. But the exact time depends on the humidity and temperature of the environment.
- To protect the surface from the formation of cold bridges, it is necessary to densely fill the large space between the insulation with the remains of the heat-insulating material and glue-foam.
- After it dries, remove excess glue with a knife and sand it.
The video shows the use of TechnoNIKOL foam adhesive for polystyrene foam:
Rules for use in case of fixing penoplex and blowing seams
The crucial moment is the choice of foam. The presence of toluene in it will lead to damage to the building material and the need to purchase a new batch - and this is a serious expense. Therefore, it is better to spend a little more time in the store to choose the right option.
Before starting work, perform some manipulations with the cylinder.
Heat it up, no matter what season - winter or summer.
To heat, take a small container and fill it with warm water. Do not use hot under any circumstances. The cylinder is placed in a container - a low saucepan or a small ladle, so that the warm liquid reaches no more than the middle. This heating is sufficient for 5-10 minutes.
Then the same amount of time is needed to thoroughly shake the contents of the container. In this case, it is guaranteed that all the material is used. Moreover, this procedure is relevant not only for professional cylinders, but also for ordinary household ones.
The next stage is a small check. More often, a special substance is used in the cylinder, which is squeezed out before starting work. If everything is fine, start using it.
The new cylinder gives greater efficiency at the beginning of work, it decreases as the material is consumed (pressure drops). Therefore, at the beginning of a new cylinder, the substance is consumed sparingly and in small doses.
The gun should be cleaned after each cylinder replacement.
If you take a break, rinse the tube through which the mixture is supplied, or the nose of the gun, to remove any remaining substance so that it does not harden. Otherwise, the nozzle will have to be cleaned, and this is a waste of time that is avoided.
Updated:
2016-08-09
Foam adhesive for expanded polystyrene is a modern type of mixtures designed for fastening slabs made of this material. Let's look at its features in more detail, and also tell you about the nuances of application.
Photo of the process of using foam adhesive for polystyrene foam
If you decide to opt for adhesive foam for installing polystyrene foam boards, the decision is completely justified. This fastening material has many advantages, including:
- Easy to use. You don't need to be an expert to learn how to use foam glue. Just read the manufacturer's instructions and you can get to work;
- Significant time savings. It takes less time to glue each slab than when using traditional dry adhesives or ready-mixes;
- Resistant to damp environments. The composition of foam adhesive includes components that contribute to the acquisition of moisture-resistant characteristics after drying;
- Adhesive foam is not susceptible to mold and mildew;
- This type of glue does not age over time and retains its properties throughout its entire service life;
- It has low thermal conductivity. This means that heat will not escape or penetrate inside the house through the slabs and foam;
- Minimal extension. After applying foam adhesive, you don’t have to worry that it will expand and disrupt the initially even arrangement of the slabs;
- Excellent adhesion to various types of surfaces;
- Economical. 1 bottle of foam glue is enough to install slabs on an area of about 10-12 square meters;
- Wide temperature range for application. You can work with adhesive foam when finishing surfaces with polystyrene foam boards at air temperatures from 5 to 35 degrees Celsius. In this case, the mixture can survive short-term exposure to temperatures reduced to -20 degrees, but not more than a week;
- Long shelf life. Incompletely used cylinders with adhesive foam can last another 12 months after the cap is removed. This will allow, if necessary, to replace damaged plates without purchasing a whole new cylinder.
How to perform insulation using foam glue
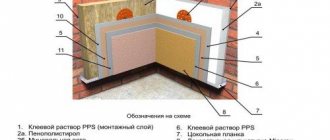
How to glue foam to the wall? The technology differs little from insulation using conventional adhesives. The work is carried out in dry weather, the air temperature is checked with the permitted temperature range of the glue. Main stages of work:
- Preparing the base before attaching the foam to the wall;
- Fastening the plinth strip;
- Applying glue to the slab, leveling and fixing to the wall;
- Fastening the insulation with dowels, trimming corner joints, decorating the corners of openings;
- Application of plaster composition and installation of reinforcing mesh;
- Finishing of the facade.
How to prepare a facade
preparation includes cleaning the area where the insulation will be glued from the old paint layer, stains, and mineral paint; checking the adhesion strength of the plaster to the base. If necessary, the old plaster layer is repaired and strengthened with repair primers. The evenness of the outer surface is assessed, and the uneven façade is plastered. The load-bearing capacity of the wall is assessed experimentally: foam cubes measuring 10x10 cm are glued on, and after 2-4 hours they are torn off. The base is suitable for insulation if the fracture occurs in the foam.
Adhesion test video of adhesive-foam foam
Attaching the plinth rail
The plinth strip is attached to the wall of the house so that its load-bearing plane is several centimeters below the junction of the wall and the plinth; in the corners it is cut at 45° or attached with an overlap, cutting off the vertical part of the plank protruding beyond the corner. Then you can glue the foam.
Let's figure out how to glue
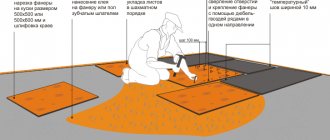
Polyurethane adhesive foam is applied to the polystyrene foam with a gun along the perimeter of the slab with an indentation of 2 cm from the edge and a line in the middle of the slab parallel to the long sides.
The slab is installed in place, checking the building level. The seams between the plates should not exceed 2 mm; large joints are filled with foam cuttings and/or foam. The next rows of polystyrene foam are attached staggered.
How to dowel
After the foam has hardened (∞2 hours), dowels for polystyrene foam thermal insulation can be attached using so-called fungi. A reliable fastening for polystyrene foam gives 5-6 dowels per slab. The dowel caps are recessed flush (the dowels should not stick out) with the surface of the slab.
The corner outlets of the slabs are trimmed, and the slopes of door and window openings are insulated with foam plastic about 30 mm thick. Fastening for foam plastic on slopes - 3 dowels per strip (optional). The outer corners of the slopes and walls are protected with plastic corners. Mesh strips are glued to the corners of the openings at 45°.
Reinforcement
We apply the plaster-adhesive mixture with a comb with an 8 mm tooth onto the glued insulation and level it with a spatula, while simultaneously pushing down an alkali-resistant plastic mesh with cells no larger than 5x5 mm. After the first layer has dried, another layer of the mixture is applied to a height of 2 m from the ground, embedding the 2nd layer of mesh. Then the entire surface of the wall is puttied without a mesh.
The so-called anti-vandal belt, which is more difficult to damage mechanically.
Finishing
The final finish depends on the architectural design of the building; it can be decorative plaster or painting, which allows the facade to “breathe”.
How to choose the right one
Using foam adhesive for polystyrene foam
In order for the slabs to be fastened to the highest possible quality using foam adhesive, you will first need to choose this material wisely. Considering the current range of goods of this kind, there should be no problems with the purchase.
- High-quality mixtures should not be liquid. This parameter can only be determined by directly squeezing it out of the cylinder. At the store, you have the right to ask for a test cylinder. Many sellers deliberately leave samples, from which the buyer determines the most suitable foam adhesive option for polystyrene foam boards.
- Vapor tightness and density. These criteria are determined during direct operation. If the glue density is low, it will require more consumption. Therefore, instead of 2-3 cylinders, you will have to buy 4-5 units. And this is a noticeable difference in the final cost.
- Adaptability to low temperatures. You never know exactly what the weather will be like tomorrow. Therefore, it is recommended to choose foam adhesive that is designed for use in low temperature conditions. But if the renovation is carried out in the summer, make sure that the mixture can withstand temperatures of about 25-35 degrees Celsius.
- Manufacturer. The best way to choose high-quality adhesive foam for gluing polystyrene foam boards is to pay attention to the products of leading manufacturers. There are quite a lot of them on the market, each of which has gained the trust of consumers.
Manufacturers
Let's say a few words about manufacturers of adhesive foam intended for installation of expanded polystyrene boards.
- TechnoNIKOL. TechnoNIKOL foam adhesive for polystyrene foam has excellent sealing and adhesion properties. For one cylinder the price is about 300-350 rubles. A high-quality diversified manufacturer whose products are in good standing with professional builders;
- Widely used for fastening facing slabs made of expanded polystyrene and extruded polystyrene foam. The composition is not afraid of moisture, does not age and is not susceptible to the negative effects of mold. Often used as an exterior adhesive, although it was created as an adhesive for interior polystyrene foam;
- Along with TechnoNIKOL, there is another leading manufacturer whose adhesive foam is distinguished by excellent thermal insulation characteristics and resistance to moisture. It is equally widely used when finishing polystyrene foam boards outside and inside buildings.
Application area
TECHNONICOL FOAM GLUE is intended for fastening slabs of extruded polystyrene foam and expanded polystyrene to the base when installing thermal insulation of external and internal walls of a building, roofs, basements, foundations, floors in both new and reconstructed buildings.
TECHNONICOL FOAM ADHESIVE for polystyrene foam is used for:
- Fixing XPS and EPS boards to vertical surfaces indoors when insulating walls, interior partitions, balconies and loggias
- Fixing XPS and EPS boards to vertical surfaces when insulating facades
- Fixing XPS and EPS boards to vertical surfaces when insulating plinths and foundations
- Sealing gaps between thermal insulation boards
- Bonding XPS and EPS to various materials
Installation
If you choose foam adhesive to attach polystyrene foam boards, even a beginner can learn how to work with this material. The installation technology does not imply anything complicated, but we will look at the step-by-step process.
- Make sure that the air temperature when starting work is not less than 0 and not more than 35 degrees Celsius. This is the temperature range at which foam adhesive maintains its highest technical characteristics.
- Insert the valve cylinder upwards into the special gun, having first removed the protective cap from it.
- After inserting the adhesive foam canister, shake it vigorously about 20 times.
- Step back approximately 20 millimeters from the edge of the expanded polystyrene or polystyrene board and apply the compound around the perimeter of the product. You will also need to draw one diagonal line along the tile.
- Apply the slab with adhesive foam to the surface to be tiled. Wait about 5 minutes. This time is necessary for the foam to fully expand and not damage the masonry. Press the tile down, but do not apply too much force.
- Make sure the tile sits evenly. If during the cladding process you notice that some polystyrene foam products are installed crookedly, you can correct them. The foam dries for about 20 minutes, which gives time to adjust their position.
- Maintain a certain gap between polystyrene foam tiles. It should not be more than 2 millimeters. Special crosses and joint spreaders, which are used when installing ordinary ceramic tiles, will help you here.
- In order not to create gaps and cold bridges, fill the space between the plates where 1-2 millimeters could not be maintained with pieces of expanded polystyrene or fill with polyurethane foam. Once dry, the excess can be trimmed off using a sharp knife.
- To increase the adhesion strength of polystyrene foam to the surface, you can use expansion dowels. This is not a mandatory requirement. But if you decide to use additional dowels, you should begin installing them only after 2 hours after completing the installation of polystyrene foam products.
Foam adhesive is not the only way to install insulation boards made of polystyrene foam. But its technical characteristics make it possible to achieve excellent adhesion results and avoid additional installation measures for strong fixation of the insulation.
Expanded polystyrene insulation is used so often that it can already be included in building standards. Indeed, almost every third house in any holiday village will be insulated with foam plastic in one way or another.
Its popularity is explained by its exceptional characteristics, which make it possible to create excellent thermal insulation while spending a minimum of effort and money. However, how you install polystyrene foam boards also plays an important role.
This is the point we will now discuss in this article. By the way, we recommend it.
Adhesive compositions for polystyrene foam
There are various extruded polystyrene foam adhesives available in the market that can be used to secure the expanded polystyrene foam. The most popular are the following:
- Tytan Styro 753 is a one-component foam adhesive for fastening polystyrene foam. It is made on a polyurethane base. The use of such glue ensures high installation speed. After gluing, after 2 hours you can sand the material and then secure it with dowels. The cost of such foam glue in stores varies from 380 to 405 rubles per can.
- Ceresit ST 83 is another high-quality composition that is characterized by rapid hardening. This foam adhesive is made on the basis of mineral bases. Standard packaging weighs 25 kg. The finished adhesive foam must be used within 2 hours. The price tag for this adhesive composition varies from 410 to 540 rubles. per package.
What adhesive is suitable for indoor foam?
When it is necessary to thermally insulate a room and carry out finishing work in it, most often they resort to using rolled foam. To securely fix it, it is best to use gypsum-based compounds . In stores they are offered in powder form. Among the materials in this group, the most popular are the following:
Gypsum Perlfix - it is offered in 30 kg bags. This composition is intended for gluing the material to brick, foam concrete, and plaster. Note that it is not necessary to level the surface before fixing the foam. If it is attached to foam blocks, then it is first necessary to treat the surfaces with concrete contact to increase adhesive properties, after which the glue itself can be extruded.
Volma-Montazh is a dry foam adhesive on a gypsum basis, which, when used, provides high adhesive properties and excellent moisture retention. There should be normal humidity in the room during work. With this foam adhesive, foam can be attached to substrates made of various materials.
How to glue foam to the ceiling?
Nowadays, it is common to decorate the ceiling with decorative polystyrene foam tiles . For reliable fastening, use gypsum mixtures or use putty based on gypsum with special additives. Liquid nails or polyurethane adhesive and foam for universal use are also used. Experts recommend using Tytan Styro 753 adhesive. Thanks to it, completion times are reduced. One of the features of this material is its rapid hardening. You should be aware of this and when carrying out work, the tip of the gun must be cleaned of glue every 15 minutes. The valve cover must close.
How to optimize glue consumption when working with foam plastic?
If you want to minimize the consumption of adhesive composition when carrying out work, then you need to extrude the glue in compliance with the following recommendations:
- The base, which will be decorated with foam elements, must be cleaned of dust and other contaminants. There should be no traces of paint on it. If part of the plaster has crumbled, then the surface of the ceiling must be cleaned of it, and then a new layer must be applied. The surface must be primed.
- Irregularities on the finished surface larger than 5 mm must be excluded. Correction is carried out by applying starting putty and plaster. If the insulation will be located on top, then it is necessary to cover the ceiling using plasterboard. Alignment is not necessary, the main thing is that the foam sheets adjoin each other without gaps. Most foam compositions allow you to attach the material to brick even without prior preparation. However, if you carry it out, you will ensure a reduction in glue consumption during operation.
- Particular attention must be paid to preparing the adhesive composition. It must be diluted with water in the amount specified in the instructions. If the adhesive composition has hardened, there is no need to dilute it. It's better to throw it away and make another one. The consumption of the adhesive composition depends on the gluing method.