Bricklaying has its own difficulties, but you can cope with them if you use a homemade device for laying bricks with your own hands. It will not only allow you to lay the blocks evenly, but will also make it possible to control all stages of the bricklaying process, from choosing the right tools to adjusting the overall height of the cement mortar. This will reduce the time required to complete individual operations, save mortar and make the mason’s work easier.
Drawing of a device for laying bricks.
Special hacksaw for aerated concrete
A hand saw for aerated concrete is very similar to a saw for wood, the differences are in the teeth, which have a different shape, size, and wear-resistant coating. A hacksaw for a gas block is very justified on private construction sites, where the volume of work is small and the number of cuts is small.
With the help of such a tool, additional blocks are cut, holes are made in the wall, and window and door openings are adjusted.
Note that for smoother and more convenient cutting and fitting, auxiliary tools will be useful, such as a special corner and aerated concrete grater.
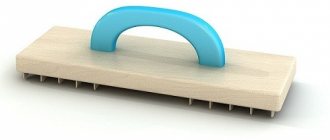
Do-it-yourself grater for gas silicate blocks
Gas silicate blocks used in modern construction are endowed with the correct geometry, but allow small errors in surface and size. Such unevenness and discrepancies complicate the laying process, since this causes differences in the laid rows.
If standard brickwork can be leveled using mortar, then aerated concrete is used for installation. At the joints, its layer must be very thin, only 1-3 mm, in order to preserve the thermophysical properties of the material. But no matter how carefully the blocks are laid, small discrepancies may still be present. An aerated concrete plane will help to cope with this problem and eliminate all discrepancies.
Scope of application of the device
Professionals are familiar with this tool not only as a plane for aerated concrete. Its other names are also known: scraper, grater.
With the help of such a tool, all errors that gas silicate blocks have are smoothed out and leveled out. After all, cutting them, as is done with wood, will not work, since they have a porous structure.
Attempts to remove a thin layer will lead to the appearance of new grooves and nicks, which will increase the amount of work.
You should not use a jointer, semi-jointer or carpenter's plane for these purposes. They are designed for wood density, which differs from the characteristics of aerated concrete. Therefore, you should only use a tool specifically designed for this purpose.
Using a plane for aerated concrete blocks, errors are effectively removed and the surface is leveled. During construction, each row has to be processed to ensure high-quality pairing of construction elements. You can start using the tool after.
Dull teeth can be sharpened with a file as necessary - this will ensure a good level of processing.
Important!
To be fair, I note that the leading manufacturers of aerated concrete have learned to make ideal blocks. Therefore, leveling the surface when laying the next row may not be necessary. But the plane will still come in handy when making additional blocks.
This is when you need to lay a cut block into a wall according to certain dimensions. By the way, here is an article about.
The surface along the cut line will help to polish the trowel.
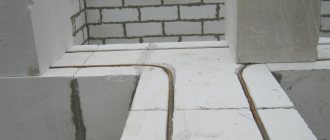
As already written above, for gas silicate a tight fit is important so that “cold bridges” do not appear through which heat will escape.
Tool Features
Based on the principle of operation, at first glance, a plane for aerated concrete bricks resembles something between a kitchen shredder and a carpenter's grater. Like many devices, you also need to feel it in order to properly align the blocks. Professionals advise beginners not to purchase a ready-made plane, but to make a device for themselves.
The planer for gas silicate blocks consists of:
- a durable base made of wood or plastic, to which a handle is attached;
- galvanized nail plate or other cutting surface.
It usually consists of several sharp rows located in different directions. At one edge of the body there are 5 or 6 parallel rows of blades tilted in one direction. On the other edge there are the same cutting lines, only tilted in the other direction.
Due to this design, extra millimeters can be removed from the surface of the block while simultaneously grinding the material.
The type of handle and its fastening does not matter. Here, each person selects or makes one that will be convenient for him to work with.
The material for the base does not play any role, since both plastic and wood have a sufficient margin of safety.
Self-made device
Industrially produced aerated concrete planes are not always on sale. Yes, I also don’t want to spend a considerable amount of money, especially if this tool may no longer be needed. But such a device is available for self-production at home.
Reciprocating saw
An electric reciprocating saw is an excellent assistant for cutting aerated concrete, which saves effort and time. The cost of such a saw is reasonable, and for private construction its purchase is completely justified, especially since it can also cut wood.
The principle of operation of a reciprocating saw is in a replaceable blade, which very quickly makes rotational and translational movements. The length of the blade can be different, and for more convenient work we recommend blades longer than the thickness of the block.
Advantages of a reciprocating saw: good speed, cutting accuracy, minimal groove width, reasonable price.
Manual wall chaser
The most common tool for cutting aerated concrete is a regular wall chaser, which is a tube with a handle. The principle of operation is to press hard on the aerated concrete and pull in the desired direction, while selecting pieces of aerated concrete. For a more even cut, it is worth using a guide block made of wood, which is temporarily secured with nails or self-tapping screws. Among the important advantages, we note the absence of dust and noise during operation.
Grinder and electric wall chaser
There are special attachments for the grinder, which are two metal disks that leave behind two even grooves.
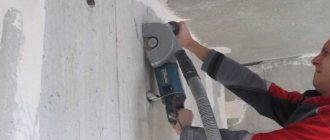
There are also specialized grinders, the so-called electric wall chasers, in which you can adjust the width and depth of the groove. After cutting, the aerated concrete itself must be selected using a chisel and hammer. Among the advantages, we note the high speed and evenness of the cut, and among the disadvantages, there is a large amount of dust, which will require connecting a vacuum cleaner.
Types of wall chasers for aerated concrete
Aerated concrete belongs to cellular concrete, its density is 4–5 times less than that of ordinary concrete. Therefore, for its processing and gating, you can use not very powerful tools (and even manual ones with success).
All devices for making grooves are divided into electric and manual. Now on sale you can find a huge variety of different electric wall chasers (single, double, multi-disc, milling) at prices ranging from 4,000 to 40,000 rubles from different manufacturers. Almost any model is suitable for cutting grooves in aerated concrete.
However, given that aerated concrete blocks are quite easy to process, many builders have come to the conclusion that a manual wall chaser for aerated concrete is quite suitable for making grooves. Manufacturers of hand tools: Petrotech, Aeroc, H+H, Remocolor, KSMI. The price for these products is quite affordable and ranges from 450 to 850 rubles. There are two types of furrow machines for working with aerated concrete:
- Hand-held devices designed for making grooves on horizontal surfaces. They have a shorter and curved handle and are designed for cutting grooves for laying reinforcing rods.
- Products designed for cutting grooves on vertical wall surfaces. These devices have a longer and straighter handle.
On a note! The division of manual wall chasers is very arbitrary; everyone chooses their own convenient tool to use.
Both types of manual wall chasers have common advantages:
- low price;
- light weight;
- simplicity of design and reliability in operation;
- minimal dust formation and noise during work;
- durability;
- energy independence (that is, they are not afraid of power outages: and this is very important in suburban construction).
How to make a grater or plane for aerated concrete with your own hands - step-by-step plan
More and more buildings are being built using aerated concrete, despite the fact that the cost of aerated concrete is high compared to other materials. With large production volumes, defects may occur; tools for processing aerated concrete will help correct the situation. Simple carpenter's planes cannot be used for this.
Homemade wall chaser for aerated concrete
Having some plumbing skills, you can make a wall chaser for aerated concrete with your own hands without much difficulty and with little investment.
Manual wall chaser
The simplest device can be made from a piece of ordinary metal fastening perforated tape. Using a hacksaw for metal, we cut a strip 40÷45 cm long, bend it in half, form a scraper at the bend (we choose the configuration and dimensions depending on the desired width of the groove), connect the two free ends together and wrap them with several layers of electrical tape (that is, we get something like a handle), saw off the excess. We get a cheap, but quite practical wall chaser for aerated concrete blocks. Having pressed our device along the aerated concrete several times (usually no more than 4÷5), we get a neat furrow. If desired, you can make a handle, for example, from a wooden block.
Do-it-yourself planer and grater for aerated concrete
Aerated concrete blocks are produced with precise adherence to dimensions and geometric shapes, but with large volumes of production, rejection is inevitable, which ends up on sale, and here the question arises of leveling the surface of the block or giving it the desired shape if the object under construction has complex local configurations.
For these purposes, an aerated concrete planer has been developed - a hand-held construction tool that resembles a regular grater. It is often called a grater, since the working surface of the plane cuts off thin layers of aerated concrete when the blade rubs against the blocks.
Its design is very simple, so anyone can make it with a minimum set of plumbing tools.
Hand and power tools
The maximum amount of work is occupied by laying blocks during the construction of walls. This includes applying an adhesive composition, adjusting defective planes, and cutting. To perform masonry, the most popular device on a construction site is used - a trowel. With its help, the solution is applied and leveled, and the excess protruding from the seams is intercepted. Structurally, trowels are made according to the width of the blocks used - from 5 to 37.5 cm. A carriage, which is selected according to the width of the wall, serves the same purpose, applying glue. Its use allows you to apply glue in an even layer up to 3 mm thick along the entire length of the masonry.
A useful device is a sanding board, which allows you to smooth out uneven blocks and masonry defects. After the walls are erected, they are modified for electrical wiring; for this purpose, a wall chaser is used - a hand-held cutter for cutting grooves for wires and for installing fittings.
After the building is built, the next stage of work begins: laying heat supply lines, sewerage lines, adjusting door and window openings. Then it’s time for a power tool - its tasks include drilling, sawing, cutting, chiseling. Here it is advisable to use high-quality products: drill bits for drills, grinder wheels, drill bits for hammer drills are chosen only from the list of professional tools.
So far we have talked about the devices that are used when doing masonry, but there are other works on the construction site - less noticeable, but no less important. They also require devices, for example, a simple construction cord, which is easy to make yourself: a reel rotating on a handle, filled with a cord with a cross-section of 1-2 mm and a length of 20 meters. It is pulled along the pegs during the initial marking, and during installation, when laying, it serves as a guide to a straight line.
How to make a plane for aerated concrete?
Installation of gas silicate blocks, like other building materials, includes a certain amount of tools. The construction of buildings is a labor-intensive and complex process that requires considerable effort and money.
Experienced builders have a full arsenal of tools, but as for novice workers or summer residents who want to equip a house with their own hands, it is more difficult for them in this regard.
Construction work involves the use of many different tools, which not everyone can afford to purchase. There is a way out - you can make the instrument yourself.
What is a plane needed for?
An aerated concrete planer (also called a grater) performs the function of leveling the protruding parts of aerated concrete blocks. The advantage of a planer is its ability to give the material a flat surface, which is especially important for subsequent stages of installation. When in contact with wood, the plane performs the function of planing, cutting off the top layer, which is not suitable for aerated concrete.
If gas silicate (aerated concrete) is used in the work, the plow must have a different design so that it can be used for grinding and scraping. You cannot remove a large layer from the surface: such material is considered defective and it is prohibited to work with it.
In professional planers for aerated concrete, the design resembles a kitchen shredder with a construction grater, which allows you to scrape and sand the material at the same time.
Sometimes correction of the gas block is necessary.
Graters have different areas of application. The planer is used for planing surfaces; it is also used for chamfering and cutting grooves. In general, there are different types of graters:
- sherhebel;
- zenzubel and folded gobel;
- double plane with a false blade;
- semi-jointer;
- double jointer;
- small plane;
- bear
Typical design
Planes for aerated concrete are designed to level the top layer of blocks, and consist of a handle with a body on which rows of blades are fixed vertically opposite each other.
One side has five rows of knives that are parallel and angled to the body. The other side looks the same, only the rows are directed towards each other.
The material for the case is plastic and wood, although it is not so important what it is made of - the main thing is that it is durable and comfortable.
How to make it yourself?
To mount a plane on aerated concrete with your own hands, wooden and plastic materials are used. To make a tool from wood, take a block 0.5 cm thick and 11 cm wide.
The handle is also made of wood, and it is sanded well until it is smooth, so that later the remaining chips do not get into the leather when working. The blade is a file with a density of 500 kg/cub.m.
Next, the aerated concrete planer is glued together with a reliable adhesive.
Preparation of materials and tools
Planer design for aerated concrete blocks
Before making a planer for aerated concrete, the following materials are prepared:
- wooden board, which has a thickness of 50 mm;
- glue that is suitable for gluing wood to wood and wood to metal;
- blades;
- pen.
To make a plane for aerated concrete use:
- ruler;
- hammer;
- grinder;
- electric jigsaw;
- calipers;
- chisel;
- brush;
- hacksaw;
- grinding.
Marking
Mark the future holes with a marker or pencil on the side of the board. After that, cuts are made from different edges (5 pieces each). The segments should be at an angle relative to each other. They also mark the place where the handle is attached, which should be located in the middle of the board.
Segment
Using a file, make cuts half the thickness along the previously marked lines. The block is processed with sandpaper, the blade blade is broken into pieces of the required length. The resulting segments are vertically inserted into the grooves.
Gluing
In order for the aerated concrete float to be solid and strong, you need to glue the cuts with reliable glue and let the product “rest” for several hours. To glue a plane, it is better to use Moment glue or the one you are confident in.
Additional accessory
The additional design is needed for workers with little experience working with a gas silicate planer. The device is made in the form of a box that limits the deepening of the blades into the blocks. It turns out like a guide for a plane, while the height of the recess is set by the slats of the box.
An additional design can be made by yourself. For this you will need:
- two wooden boards with a thickness of at least 0.3 cm, one side of which must be well sanded;
- bars with a length equal to the width of aerated concrete blocks. They should be laid one on top of the other, after which a plane for aerated concrete is used and the ends of the boards are leveled.
Recommendations for use
You need to plan on your own.
When installing aerated concrete walls, they use a tool specially designed for this work - an aerated concrete planer. There is nothing complicated in its design, so it can be made by hand.
However, when working with aerated concrete coating, you need to be careful not to remove a large layer of material and thereby render it unusable. The movement of the plane occurs by moving the base of the tool parallel to the working surface.
Planing is directed away from you, and you don’t need to apply a lot of force, just make jerks with a slight movement of your hand.
A plane for aerated concrete is used only for this material; it is not recommended to use a tool intended for another type of material. Using wood planes can damage the tool and aerated concrete structures, since wood tools are designed to remove a thicker layer. At the end of the planing work, you need to remove the working surface from any dust and particles of matter that have formed. The planer is also cleaned.
To ensure quality grater work, it is important to avoid mistakes:
- Improper fixation of the tool may result in a convex surface. To prevent this from happening, watch the position of your hand and the force applied.
- Don't rush and do the work faster; the chips will be thick and the surface will be rough.
- The direction of the fibers should be in the direction of the plane; a reverse move will lead to roughness and scuffing on the surface of the material.
- To avoid flakes, planing begins from the edge to the middle of the board, achieving a flat, smooth surface.
Horizontalness is checked using a building level.
Source: https://kladembeton.ru/montazh/prisposoblenia/rubanok-dlya-gazobetona.html