When carrying out renovations in your home, you have probably encountered the need to change the location of sockets and switches. There is no way to do this without chipping concrete walls. It seems that such manipulations are not difficult, because all you need is to purchase or have special equipment and a reserve of time. But, in fact, you need not only to become familiar with the technology of carrying out the work, but also to begin by drawing a diagram of where the new wire will pass. It is also important to know the old wiring, this way you will eliminate many problems.
Requirements and standards for grooves
Grilling is not just a certain stage of repair. This is also a process that, if approached incorrectly, can cause unpleasant consequences. Before cutting a wall for wiring, you need to familiarize yourself with certain rules. The first of these is that it is not recommended to horizontally groove if the work will be carried out close to the overlapping slabs. The retreat should be 150 mm. It is also important to know where the gas pipes are located. There should be no vertical furrows near them. The retreat should be 400 mm minimum. You also need to provide a certain distance from windows and corners, which is 150 mm.
In a concrete wall, the groove should be located only vertically or horizontally. Excessive bending should be avoided. In some cases, it is acceptable for the wiring to be located at an angle, but it must run along the wall. This exception is true for the attic floor. One furrow should not be made too long. This value should not be made more than 3 m, while you can go deeper by 25 mm. This figure is also relevant for width. Electrical wiring in a concrete wall should not be located with turns or slopes.
The end point should be rotated at one angle, with the exception of joints with a horizontal surface. It is prohibited to work with load-bearing walls. There should not be horizontal grooves there. This rule must be observed for buildings in any region. Before starting work, you need to ask the management company if this is possible at all. If you have a panel house, this limitation applies to all its walls.
Before you begin work on a concrete wall, you must determine the position of the wiring and know where the terminals are located. Only after this can construction work begin.
Preparatory work
Even before starting electrical installation work, it is necessary to schematically mark on paper the places where the cable lines will pass. All sockets and switches should be marked here. To this end, you need to first study the rules for the distribution of electrical equipment in order to do everything correctly from the very beginning.
Requirements for grooves:
- Horizontal grooves should not be located further than 15 cm from the floor slabs.
- It is not recommended to make vertical furrows near gas pipes. A minimum distance of 40 to 45 cm must be maintained. There must be at least 15 cm from corners and window openings to grooves.
- The grooves on the walls can be exclusively vertical and horizontal. Transitions are made vertically or horizontally, at right angles.
- One continuous furrow should not exceed a distance of 3 meters, with a width and depth of 2.5 cm.
The installation of horizontal grooves in load-bearing walls is strictly prohibited. This rule applies to all buildings. In panel houses, all walls fall under this ban. Compliance with these rules ensures safety, as well as optimal placement of wires, sockets and switches.
Scoring methods
In brickwork, the groove is done quite simply. You need to form a horizontal recess using a hammer and chisel, placing the wire there. With a vertical direction, you will have to use turns or punch through. In general, such a wall can easily be chipped by hand, which means you can refuse to use power tools. If concrete walls are available, they are highly durable. A special power tool will be simply necessary here.
When choosing the main algorithm for carrying out work, you must understand what you have available, as well as what skills you have. The simplest solution is to use a hammer and chisel. You can add a drill to the last tool. Separately from all this, a grinder is used. If you have a hammer drill, the work will go much faster, but if you have a wall chaser, then you can completely cope with this in a matter of minutes. Another issue is that not everyone has such specialized equipment.
Grooving using a hammer drill or drill with vibration mode
- Suitable for chipping: brick, foam concrete, soft stone, concrete (long enough)
- Not suitable for high-strength concrete (with a lot of crushed stone)
- Dust : some
This method requires basic skills in working with power tools. Dust is generated in small quantities. Various types of chisels are produced especially for such work: point, flat, blade.
When grooving, a channel chisel is also used in conjunction with a hammer drill.
The use of such attachments significantly speeds up work, including on concrete walls. When purchasing, you need to clarify whether the nozzle needs sharpening. The manufacturer strengthens some chisels by shot blasting, and sharpening them yourself will damage the protective coating.
When working, you need to know how to properly tap walls for wiring with a percussion tool. The drill or hammer drill should only be supported; additional physical effort does not speed up the work.
First, the boundary channels are worked out, then the grooves are sampled, and only along the channel.
Choosing a tool for wall cutting
The oldest approach is the one that uses a hammer and chisel. This option, however, has one important advantage, which is the absence of costs. You can hammer a wall without power tools, because such devices can be found in every home. But in the end you will pay with loss of strength, as well as the formation of a large amount of debris.
Chasing concrete walls for wiring can be done with a chisel and a drill. Although this approach is more effective, it cannot be called the most convenient. Every meter you will have to drill holes and then connect them into a single line using a chisel. Initially, you will need to make markings according to which you will act. The time and effort required here will be much less, but you will have to spend a lot of time on the work, and there will be much more dust than if you used, for example, an angle grinder.
In the latter case, it is better to enlist the help of another person who will additionally remove dust from under the instrument using a vacuum cleaner.
What is suitable from the home craftsman's arsenal?
Until recently, an angle grinder was a rarity for the amateur craftsman. Today, the grinder can be found in almost every home. If you have it in stock, it is perfect for gating walls. The equipment will need to be supplemented with a diamond disc; this will be all the costs, except, of course, time and power. The process will go faster, and the contours of the groove will be smooth.
Although a disk designed for making grooves will allow you to work efficiently, it will only allow you to make a groove in two approaches. This lengthens the marking process. Another disadvantage is that you will not be able to work in a corner with a grinder, and the whole process will be accompanied by a high noise level, which means you will have to work quickly, excluding weekends. It is these disadvantages that quite often force craftsmen to refuse to use this power tool. It is used for gating extremely rarely.
In order to lay one small wire into a new wall, you can use a hammer drill. You will have to purchase or use an existing suitable nozzle. The instrument will need to be used in impact mode. They need to walk along the designated lines. The disadvantage of this approach is the curve of the groove, but at home a hammer drill is used quite often.
When renovating premises, home craftsmen quite often also use a wall chaser. This option is the most effective and allows you to cut through the wall smoothly without creating dust. There won’t be as much noise generated, and you can additionally connect a vacuum cleaner to the tool, which means the room won’t be so dusty after the process is completed. In general, this tool for laying wiring is the most effective and safe.
A simple power tool to help manual labor
If you want to achieve a good result while saving time, it is better to use an electric drill. But if you work with a concrete surface, this tool will manifest itself by burning drills, so you need to familiarize yourself with some nuances before starting the process.
First, you need to make markings on the surface, and then use a tool with an 8 mm drill. Several holes of a certain depth are made along the line, a step of up to 1 cm must be maintained between them. The drill must be positioned perpendicular to the surface, otherwise it may bend and break. If the groove should be quite impressive in width, the holes should be staggered. If it is necessary to carry out the same work in brickwork, you need to use the tool at low speeds. You should stop periodically to let the drill cool in the water. It is important to prevent liquid penetration into the structure. Using a hammer and chisel, the next step is to knock out the gaps.
Professional equipment for quick installation
The first thing that comes to mind is a wall chaser. It is he who allows you to complete the task with a minimum of effort and time. If desired, you can put two disks on the tool at once, thanks to this the groove will turn out perfectly smooth, and a second approach will not be needed.
The circles are covered with a casing, where there is an outlet for a vacuum cleaner. It is good if the design provides the ability to change the distance between the disks and provide the required depth of the future groove. This method has one main disadvantage, which is the cost of the equipment. If you don’t have one, then purchasing it for a single repair will be impractical. An alternative solution would be to rent a device.
How to groove a concrete wall for wiring
You can make grooves in the wall for wiring in different ways. The most popular tool is a hammer drill, which allows you to perform work quickly and without significant material costs. At the very beginning you need to prepare the walls. First of all, check for the presence of old wires. For this purpose, special devices are used to locate wiring.
After this, you can begin to directly mark the wall. All lines must be drawn from the central distribution box and drawn to the locations of sockets, switches, and lighting wires. After the preparatory stage, the main steps are performed. Small holes are drilled along the marked line with a hammer drill. They are located at a distance of about 1.5 cm from each other. Then, depending on the bit or drill used, the drilled holes are connected. This method allows you to get a perfectly straight line.
Often, grooves in concrete walls are made using a grinder, the real name of which is an angle grinder. This tool, depending on the interchangeable attachments used, is capable of performing different functions, including wall chiselling. Typically, concrete walls are cut using a diamond blade.
First, two parallel strips are cut on the marked area at a distance of approximately 2 cm from each other. After this, the concrete between the cuts is removed using a hammer drill or other tool. Wiring is laid into the resulting openings and covered with plaster mortar.
To groove concrete walls, you can use a wall chaser equipped with built-in diamond wheels. It also has a vacuum cleaner that keeps dust inside the casing. Thus, you can groove a concrete wall for wiring in different ways, each of which has certain positive and negative qualities.
Features of working with various materials
Before you drill a wall for wiring, you need to figure out what you plan to work with, as well as what material is used. For example, if you have a brick wall in front of you, and the products are laid on a mortar of cement and sand, horizontal grooves can be made in the easiest way using a hammer and chisel. The main condition for this is to get into the seam.
Grooves in concrete and brick
For a vertical groove in a brick, a power tool is suitable; here the following will come to the rescue:
- wall chaser;
- perforator;
- angle grinder.
You may be interested in the question of how to shingle a wall if the masonry is covered with plaster. In this matter, manual equipment comes to the rescue, but you need to be prepared for the fact that the process will take a lot of time. Do not be afraid that the wiring will need to be laid in a concrete wall. Although it is quite strong, grooves can be made in it with almost any tool. The only exceptions are a chisel and a hammer.
Experts say that the best solution is a hammer drill, but when working with it, the evenness of the grooves will not be ideal. A hammer drill with a tool attachment will allow you to deal with the concrete surface, and all defects in the work will be corrected by the plaster layer. Dust clouds will not hang in the room, this is what distinguishes a hammer drill from an angle grinder. And an additional advantage is that you won’t have to get rid of any leftover material inside. If necessary, you can use a drill and a hammer drill to make round holes.
How to work with wood and aerated concrete
If you need to install wiring in a bathhouse or wooden house, you need to remember that such work in such buildings is prohibited by fire safety standards. For such cases, external wiring is provided; it is subsequently hidden with decorative materials in imitation of the original coating or decorative products.
As for aerated concrete, you can work with it using a wall chaser, making grooves only vertically or horizontally. The indentation recommendations mentioned above are also true for this material.
Nuances with load-bearing walls
Load-bearing walls should not have grooves. After all, they contain reinforcement, which is responsible for the strength of the structure. If a groove is placed there, it will damage the steel frame and disrupt the main characteristics of the wall. This will pose a danger to the residents of the house.
Methods
There are four ways of gating walls:
- With a hammer drill (clean, fast, but the groove does not come out too smooth).
- Grinder (fast, but very dusty).
- Wall cutter (clean, smooth, but very expensive).
- Hammer and chisel (dirty, dusty, but cheap).
It should be noted that when using any of these tools, the sequence of actions remains almost the same. Let's look at all the methods in more detail.
Hammer
You can hammer concrete and brick walls with a hammer drill. You will need two wide drill bits and a spatula.
Next comes the process itself:
- make 25 mm indentations every 10-15 mm on the intended line;
- use a spatula to create the furrow itself (do not place the spatula across the furrow, otherwise you may break off a piece).
This is the fastest way, but its aesthetic side leaves much to be desired.
Bulgarian
You can use a grinder to grind brick, concrete and plastered walls. However, this requires purchasing a diamond disc that will help overcome any obstacle.
The whole process will look like this:
- Make two parallel cuts that will be located along the entire length of the line marked on the wall. The distance between the cuts should be equal to the groove width you have chosen.
- Next, use a hammer drill or chisel to make the indentations.
This method helps ensure that the furrow is much smoother than when using only a chisel with a hammer or only a hammer drill.
Please note that when working with an angle grinder, your main enemy is dust. During operation, such a quantity may appear that it is impossible to do without a vacuum cleaner. And it’s better if it’s an industrial vacuum cleaner. In this case, you will also need an assistant who will hold the suction pipe next to the cut.
Wall chaser
The wall chaser option is an improved and modified method of wall scoring with a grinder. This device already has two diamond wheels, the distance between which can be adjusted. Diamond wheels are protected by special covers that cover them and make contact with the wall impossible.
Related article: Method of growing seedlings at home
The positions of the casings can be changed at your discretion: change the depth to which you need to cut through the wall. Usually the casing is equipped with a special outlet, which is used to install the vacuum cleaner pipe. Thus, wall gating is done easily, quickly and without dust. After you have cut the edges of the groove, also remove dust, dirt and remaining materials with a hammer drill.
The most important and main disadvantage of repairs using a wall chaser is the price of this tool. For home renovations, it is extremely expensive.
Chisel and hammer
These tools should not be used if the wall is concrete. In cases where the wall is brick, proceed as follows:
- Use a chisel to mark indentations along the edges of a particular groove (width: one or two chisel points);
- place the chisel across the groove and knock out a part deep into the wall;
- remove the top layer along the entire length, then deepen to 25 mm (but you can deepen it immediately).
Please note that when you have finished punching the grooves, you must clean them with a broom or vacuum cleaner. Then it should be well primed. Then you can start laying and securing the cable. After this comes the stage of sealing the grooves. Here you can use plaster, gypsum and putty, which can be applied in a certain layer.
Finally, I will say that the choice of tool depends on your walls and financial capabilities. In any case, following the instructions, you will be able to groove the walls and install electrical wiring in the house with your own hands.
It should be noted that in some cases it is impossible to ditch the wall (for example, when there is old hidden wiring or it is simply a pity to spoil the brand new wall decor). In this case, it is better to opt for open wiring. Of course, a cable mounted on top of a wall may not match the design of the room. However, today you can choose a suitable method of attaching the cable, for example, a modern European plastic plinth, which looks very aesthetically pleasing and reliably hides exposed wiring.
Related article: French cross stitch patterns: knot with video, designs on how to do, books with bulldogs, France theme and poster
Step-by-step description of the gating process
Before trenching a concrete wall, you should ask what algorithm for carrying out the work is used. You should find out whether there is hidden wiring inside, as well as what route it is laid along. Special instruments are used for determination. Markings should be applied to the surface; when lining, you need to move from the distribution box. You need to move towards the points where sources of consumption will be located. A hammer drill will help make indentations along the line of future wiring. Using a spatula, the next step is to make a furrow. You need to be prepared that the groove will not be very even.
What does the workflow consist of?
To carry out the work correctly, you need to know the requirements of SNiP 3.05.06-85 “Electrical Devices”; it specifies the basic requirements for cable laying. It is also important to choose a tool for gating and organize the work process correctly. We will consider all these aspects below.
Proper wiring is essential for system safety.
Preparation and planning
Wall gating must be carried out taking into account the following requirements:
This diagram shows the basic requirements for the workflow
- The grooves must run parallel to the main structures of the building. That is, they can only be done in the horizontal and vertical directions. Under no circumstances should you lay wires diagonally;
- The distance from the ceiling to the wiring line must be at least 150 and no more than 400 mm;
- The distance to doorways and wall corners must be at least 100 mm. There must be at least 400 mm to gas pipes;
- In load-bearing walls made of concrete, the depth and width of the gates should not exceed 25 mm, damage to the reinforcement frame is excluded;
- The grooves must have a minimum number of turns. Ideally, there will be one, that is, you lead the wire in a straight line, and then lower it up or down or run it to the side to the connection point. It is forbidden to conduct wiring in steps .
This is the ideal arrangement of the grooves, everything is very smooth and clear
When you know the basic requirements, you can begin marking work, and for this you need a certain set of tools, the list of which is given in the table below.
A wiring alarm will help prevent damage to communications.
| Tool | Description |
| Wiring indicator | You can use either special devices called a hidden wiring finder or a regular indicator screwdriver. The main thing is to have a tool at hand with which you can find the cable lines in the wall with your own hands and not damage it when you do the gating |
| Level | With it you can draw vertical and horizontal lines. You can use both a regular construction option and a laser level; with its help, work is generally carried out in a matter of minutes |
| Tape measure and pencil | A tape measure is needed for measuring distances and indentations, and a pencil is needed for drawing lines in the future locations of the grooves |
The level will allow you to make precise markings
The instructions for marking are very simple:
- To begin with, it is worth considering the layout of all elements: distribution boxes, switches and sockets. You should be guided by the standards set out above and considerations of convenience, because the arrangement of furniture in the room may be different . Below is a diagram according to which it will not be difficult to make a wiring project. It is best to lay grooves along the brown lines; sockets and switches can be located where convenient;
Here's a simple cheat sheet for planning your wiring layout.
- First you need to check all surfaces for hidden wiring. Take a device that you have on hand and use it to identify wires in the wall, if any. The tool is easy to use; in the place where there is wiring, the indicator will light up;
First of all, make sure that there are no wires running where you plan to carry out work.
- The easiest way to horizontally mark walls for electrical wiring is to use a building level. Just draw a line at the desired level, making sure it is strictly horizontal. Below or above another line is drawn, which will determine the width of the future groove;
The level allows you to quickly draw horizontal lines
- Vertical lines can be made using the same level, or you can use a plumb line. With this simple device, marking will not be difficult.
A plumb line allows you to draw vertical lines
Carrying out work with a hammer and chisel
If you need to perform chiselling on soft surfaces: plaster, foam concrete and aerated concrete blocks, etc., then you can use a simple set of a hammer and chisel.
The workflow in this case looks like this:
This set is suitable for soft surfaces
For work, it is better to use a chisel with a protector, as in the photo above. This way you won’t hurt your hands, which is important, because you’ll have to hit the device a lot, and the risk of injury is very high.
- First of all, you need to pierce the surface along a line on both sides to a depth of 5-10 mm. It is important to set the line of the future groove so that during work the top layer is not destroyed and is removed strictly within the specified boundaries;
First, a line is broken on both sides
- Next, the chisel is placed at an angle and the top layer is knocked off. A small furrow is made, which will be our guide during the work;
Such grooves are not very neat
- Next, the furrow should be deepened to the size we need. Here everything is carried out in the same way as in the first case: lines are punched on the sides so that large pieces do not break off from the surface, after which the excess material is knocked off. The work is carried out until you achieve the required result;
- If you need to arrange boxes or switches, then knock out squares slightly larger than their size. The depth is determined depending on the type of structure you are using .
Recesses for boxes are so desirable
Using a hammer drill
This is the most popular tool for tapping walls for wiring. The advantage of this option is the ease of operation, fairly high speed and low dust formation.
Among the disadvantages, it is worth highlighting the noisy work process and the not very neat final result, although if the walls are to be finished later, then this aspect is not important.
The hammer drill allows you to drill concrete and other hard materials
In this case, in addition to the hammer drill, the following equipment is needed:
- Drill 12-20 mm thick and up to 200 mm long;
- Flat or semicircular blade for removing grooves.
Semicircular blade is good for scoring
The workflow in this case goes like this:
- Along the line of the future recess, holes are drilled every 1.5-2 cm to a depth of 2.5-3 cm. For simplicity, you can stick electrical tape on the drill to control the depth;
Holes make further work easier
- Then a spatula or lance is put on and a groove is punched. It won't be very neat, but you'll get the job done quickly. In addition, subsequently the recess is still sealed with mortar;
It’s easy to punch through the holes using the drilled holes.
- In this case, the holes for the boxes are made using special crowns with pobedit tips. With their help, you will quickly make recesses of the required depth, and they will have the ideal shape . The main thing is not to get on the fittings during work;
The crown allows you to quickly make a hole of the desired diameter
- If you are chipping brick walls, try to draw horizontal lines along the seams and align vertical lines with the joints so as not to weaken the structure.
Carrying out work using an angle grinder
This option differs in that you can get even grooves. But the amount of dust in this case will be such that you will hardly be able to work without a respirator and glasses.
The workflow consists of the following steps:
The workflow is quite simple
- First, you need to purchase a special disc for concrete. If there is a lot of work, then it is better to buy 2-3 products at once, since they tend to wear out with active use;
The concrete disc allows you to work with any hard surface
- The disc is placed on the grinder and work begins: the lines are cut to the depth you need. The process is very dusty, so you can try to involve an assistant with a vacuum cleaner to reduce dust formation. It is important not to cut too deep into the surface so as not to weaken the wall;
It is important to cut the surface to the desired depth
- Then a hammer drill with a pick is taken and the excess material is knocked out of the groove. Thanks to the cuts, the groove turns out smooth and neat;
The material can be easily selected along the cut line
- The holes for the boxes are selected either with a crown, or the outline is cut out with a grinder, and then everything is selected with a hammer drill or chisel.
The contour is made with a grinder, then the work is completed with a hammer drill
Carrying out work with a wall chaser
There is a special tool for chipping concrete walls.
It is called a wall chaser and is most often used by professionals, in which case the workflow looks like this:
This device contains two discs for concrete
- First of all, the required width and depth are set. It is important to remember that concrete surfaces cannot be chipped to a depth of more than 25 mm;
- Next, the tool is started, placed on the line and the groove is cut. Everything is simple and fast here. The presence of a casing to which you can attach a vacuum cleaner allows you to get rid of most of the dust during work . When working with aerated concrete, it is not necessary to use a vacuum cleaner;
It is very easy to work with this device
- After cutting the groove, the material is knocked out of it with a chisel or hammer drill. It is also better to make holes for sockets and boxes using a hammer drill and a crown.
Holes for boxes are best made with a crown
Carrying out the work yourself allows you to save significant money, since the price for gating walls varies from 300 to 700 rubles per meter. If the volume of work is large, then you will save tens of thousands.
I recommend that you use the option with a hammer drill, this is the simplest and fastest solution. In addition, during operation there will be no column of dust formed, as with an angle grinder.
After laying the wires, the grooves are sealed, and the surface can be plastered or puttied
How to disguise grooves with wiring
Decoration is usually carried out with the following materials:
- gypsum plaster;
- plaster cement mixture;
- gypsum glue;
- ready-made compositions.
Gypsum plaster is suitable for rooms with high humidity. The laid layer will dry within a day. Plaster with a traditional recipe composition based on sand and cement is excellent for work. If you don’t want to prepare the composition yourself, you can purchase “Rotband” or “Stop.” It's even easier to work with gypsum glue.
Useful tips from the experts
If you need to connect two nearby points, then the groove can only have one turn, because in this case the wire will bend, which will cause overheating. When there are more than 2 such points, overheating can provoke a dangerous situation. The groove can be cut with a maximum width of 30 mm, and the depth should be 25 mm maximum. You will need to retreat 400 mm from the heating radiators, although experts recommend making a retreat of 500 mm or more. From the highest and lowest points of the room you should start ditching with a deviation of 10 mm.
In premises, load-bearing walls should not be chipped under any circumstances. But from the outside, the load-bearing wall can be grooved, even if the depth of the groove is maximum, this will not negatively affect the structure. But you need to obtain special permission to manipulate the partitions. This rule must be strictly observed when gating is carried out in a panel house. On the first floors, gating must be carried out with extreme caution, since in addition to the roof, the walls support the entire structure.
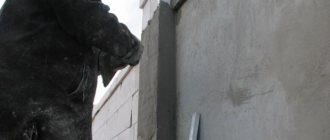
Using a wall chaser.
On construction sites, a wall chaser specially designed for these types of work is used for gating floors and walls, which has two disks for concrete and allows you to adjust the required depth and width of the cut groove. With its help, smooth grooves are quickly and efficiently cut out in floors and walls from any type of building materials. And thanks to the vacuum cleaner that is connected to it, almost all the dust released during the operation of the wall chaser is removed.
After the grooves are cut, all that remains is to cut out the groove using a hammer drill and a special chisel or a pick for it (as shown in the topmost figure).
But due to the high cost of a professional wall chaser, it is rarely used when working in a private house or apartment. Another option is to use a grinder with a disc for concrete, but there is a lot of dust and you will have to go through the grooves on both sides twice. To reduce dust, you can ask a second person to pour a small stream of water from a bottle onto the cutting area, but this will wear out the disc faster and cause more dirt. I recommend watching our video tutorial using a wall chaser.