For those who do most of their construction work with their own hands, it will be useful to know how to lay tiles on steps. Such instructions will help make this section of the staircase structure less dangerous. Laying tiles is relevant even if the rise is low. High-quality finishing of the steps not only ensures increased operating comfort, but also significantly decorates the entrance area.
Criteria for choosing tiles for steps
The first important task that will need to be solved is the correct choice of tiles for laying on the stairs. Manufacturers offer a wide range of finishing materials for both indoor and outdoor facilities. Therefore, the first criterion for choosing a tile is the question of what type of work it is intended for: internal or external.
One of the common mistakes homeowners make is choosing tiles as a facing material for indoor stairs. This should not be done, since this type of tile has a low level of wear resistance and does not have sufficient strength. It should be understood that tile is a rather fragile material and is not suitable for laying on steps.
The best choice for interior spaces is clinker, artificial or natural stone, porcelain stoneware. The same materials are suitable for external work, but in this case you need to choose tiles with higher wear resistance, frost resistance and moisture resistance. An important selection criterion is the presence of an anti-slip surface.
The most expensive tiles for cladding stairs have special slots and protrusions and a textured surface. All this provides an anti-slip effect and a pleasant appearance. There is such a category of facing material as steps, plinths, corner elements, designed for laying on stairs of certain shapes and sizes.
But most owners choose a more economical way to decorate the steps and buy regular tiles that need trimming. Therefore, before starting work, you need to stock up on the appropriate tools. You can use special tile cutting machines or a grinder with a circle for working on stone. As a last resort, a glass cutter will do, but it will not make the work so much easier as it will complicate it.
Cutting tiles with a tile cutter.
Information about the parameters and technical characteristics of the finishing material can be obtained from its markings and relevant documents. When choosing ceramics, you need to know that the color of the markings is important. For goods with a UNI certificate, the classification is as follows:
- red - 1st grade;
- blue - 2nd grade;
- green - 3rd grade.
Manufacturers from Russia and Belarus mark their products in a different way: the grade of tiles is not marked on each product, but on the packaging. The letters and numbers printed on it indicate the following:
- grade;
- permissible quantity of defects;
- permissible dimensional error.
For outdoor work, the main selection criteria are frost resistance and moisture absorption. Therefore, you need to buy tiles whose packaging has a “snowflake” sign and Roman numerals III, IV, V. If you decide to purchase tiles, they can only be used for interior work.
Video about tiling porch steps:
Laying granite tiles
The installation technology is extremely simple if you follow the correct order of work:
Production of polymer sand tiles and laying technology
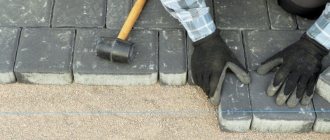
- Place the granite element on the sand so that the edges of the form touch each other. Laying should be followed by adjustment with a wooden hammer. If the tiles do not lay out correctly, they can be trimmed.
- Now lift the covering and place concrete mortar or adhesive composition for granite street tiles on the sand. You need to make a sand mixture with cement, observing the proportions: M3 = 1:4, M4 = 1:4, M5 = 1:5. Recommended parts of sand for 1 part cement. Enough water is added to create an adequately thick liquid for laying out the elements. Now put the granite or marble element back and level it with a hammer.
Advice! If the material is massive, it can be installed without mortar, well sunk into a sand cushion. This will reduce the cost of laying granite tiles outdoors without the risk of elements moving. But if the coverage area is high-intensity, it is better not to save money - the additional cost of the investment will be repaid by a longer period of flawless operation of the road section.
- Fill all the tiles with sand, fill the seams and tamp the coating well so that it lies tightly. The direction of movement of the vibrating plate is from south to north, and then from west to east.
- Installation is completed by cleaning the elements from sand and filling the seams with sealant (polymer).
This way you can lay the covering in front of the office and in your own yard. The main thing is that independent laying of marble tiles on the street is carried out in compliance with the stages of work, in this case you can get a good result.
Tiling technology for steps
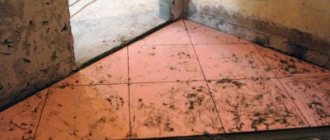
Laying tiles on steps is not an easy process. The master must simultaneously take into account several nuances: the horizontality of the cladding, hiding defects in the surface of the steps, the evenness of the cuts. The size of the tile should either match the width of the step or exceed it.
If the staircase is located along the wall, it will be most convenient to lay the tiles on the steps from the outer corner of the upper landing to the wall.
If the tiles perfectly match the dimensions of the steps, you can start working from the wall. First of all, all horizontal surfaces are covered. Only after this do they begin finishing the vertical (risers).
Scheme for laying tiles on the stairs.
Placing tiles correctly on the steps of a spiral staircase is much more difficult. Craftsmen recommend initially performing dry installation. That is, cut the tiles and place them on the stairs, taking into account the desired seams. This will ensure that the preliminary stage is completed without errors.
The adhesive composition for laying tiles on the steps is chosen depending on the type of work to be done: indoors or outdoors. In the second case, it is necessary to use frost-resistant glue with a low level of moisture absorption. For interior work, you can use inexpensive compositions such as Ceresite. In order to make the seams more durable, grouting is done not with dry mixtures, but with a moisture-resistant sealant.
Video about tiling staircase steps (Part 1):
Order and stages of work
- If the work is carried out outdoors, protect the stairs from possible precipitation: increase the roof overhangs, make canopies from waterproofing material.
- You cannot use a cement-sand screed as a binder, as it will certainly peel off soon. A reinforcing mesh is attached to the concrete steps and after that they begin to level the steps. A chain-link with a wire cross-section of 2-4 mm is used as a mesh. It is embedded in the screed and the solution is allowed to dry. The mesh is secured using dowels or U-shaped brackets. The optimal step for installing fasteners is 20 cm.
- When leveling, the screeds provide a slope from the inner corner of the step to its edge. It is necessary for the free flow of rainwater. After a few hours, it is recommended to grind the concrete surface.
- Cut and lay tiles on steps along the entire length of the stairs. It is important to take into account all the seams. If no errors are found in the cutting, proceed to lining.
- Glue is applied to the screed. A layer thickness of 1-2 mm is sufficient. A similar layer is applied to the back side of the tile.
- In order for the masonry to be of high quality, it is recommended to prepare a special template for aligning the edges of the cladding at the ends of the steps.
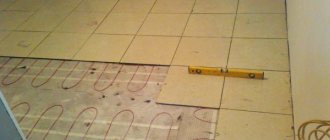
- We lay the tiles correctly: taking into account the slope, the presence of which is checked using a bubble level.
- For a tighter fit of the finishing material to the concrete, use a rubber mallet.
- The grouting of the tile steps is done the next day after installation.
- Wash off the remaining grout and wipe the surface of the stairs dry.
Video about tiling staircase steps (Part 2):
In interior spaces, laying tiles on steps is much easier. There is no need to carry out preliminary work to protect the stairs from moisture; there are no such strict requirements for the presence of a slope. Since it is easier to lay tiles in interior spaces, this work can be done by any owner who does not have special skills.
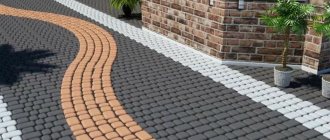
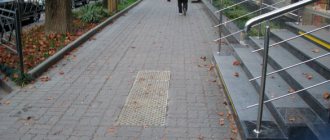
For pedestrians
Please note that porcelain tiles are ideal for outdoor use, they are reliable and durable, but if they are encased in concrete, all these properties will deteriorate greatly. To make a walking path, you need to create a paving cushion no more than 15 cm thick from coarse sand, which must be watered with water before starting work to ensure complete shrinkage. When the pillow dries, it is covered with a new layer on top, this time with a dry mixture of cement and sand. Next, the tile is driven into the pillow in the most usual way using a rubber hammer.
Features of laying granite tiles on the street
If tiles are laid outdoors in winter, the temperature cannot be lower than -7-10 degrees.
At lower rates there is a risk of solutions freezing. And you will have to use not the usual sand-cement mixture, but a frost-resistant adhesive composition. It will provide better adhesion and will not grab tightly in the first minutes of work. In addition, when calculating the size of the seams, they need to be made slightly larger than the depth of the element (take into account when arranging the pit). When installing the covering on the street, you should be attentive to the stages of work - incorrect execution of the step can lead to a shift in the pattern and rapid failure of the flooring.
Types of mortars for laying tiles
Based on pure cement
This is the simplest mortar for tiles; it consists of cement diluted with water to the consistency of a thin dough. Used for covering concrete base floors with ceramic tiles.
To do this, pour water onto the floor, add dry cement and press the tile into the resulting “dough” according to the drawing. This composition of cement mortar for tiles successfully competes with the next option.
Based on cement and sand
When laying tiles on a cement-sand mortar, in addition to water and cement, clean sand (preferably river sand, sifted through a sieve) is added to the solution. Similar solutions (with different ratios of sand and cement) are used for laying:
- paving slabs,
- ceramic cladding of floors and walls.
For example, stone, ceramic or glass tiles can be laid on a composition consisting of 2.5 parts sand, one part dry cement and 0.4 parts water. This is an approximate recipe - we will determine it more specifically depending on the conditions and characteristics of the tile.
To increase the plasticity and strength properties, PVA glue is often added to the mixture. More modern additives are acrylic or latex (available in liquid form). You can replace part of the water with this additive to improve the quality of the solution. If natural stone is placed, then it is advisable to add bitumen and a plasticizer to the cement-sand mortar.
Dry adhesive mixtures
They go on sale in bags in the form of a ready-made powder, diluted with water according to the recipe. In most cases, the basis for them is cement (less often, gypsum). When the powder is diluted with water, the effect of the special modifying additives included in the mixture is manifested.
The following can be used as additives:
- catalysts (hardening accelerators) or, on the contrary, hardening retarders;
- polymer substances that enhance the adhesive ability of the solution (latex or acrylic);
- hydrophobic substances that increase water resistance;
- dyes.
It is much more convenient to use ready-made dry mixtures than homemade cement mortar. But they are more expensive and also require careful leveling of the facing base. The most popular brands: Atlas, Sopro, Yunis, Vetonit (Optirok), Ceresit, Kreisel.
Ready-made viscous mastics
- Packed in plastic buckets, like dry formulations, they require a flat base (preferably plywood or plasterboard).
- Apply in a thin layer.
- Made from latex or petroleum products with the addition of glue and other additional components.
- They are convenient to use, but do not hold the tiles as tightly as cement-based compounds.
- Mainly used for ceramics.
- Can't stand heat.
Surface preparation
Also, when laying tiles outdoors, it is important to comply with the requirements regarding the surface being tiled. If we are talking about paving slabs, you need to provide a depression in the soil with a slight drainage slope, and also fill in a compensatory cushion of sand and crushed stone.
When it comes to porcelain stoneware and similar materials that are mounted on mortar, it is best to prepare a perfectly flat surface by pouring a concrete screed. It is important to remember that you can lay the tiles only after the base has completely dried, this can take from 7 to 28 days. If you are building a horizontal platform from scratch, you must use reinforcing mesh and rods to strengthen it. For surface screed, it is enough to use a liquid mixture.
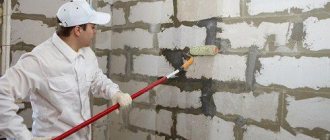
As for vertical surfaces, in order for the tile to be firmly fixed to it, in addition to removing serious flaws, a metal mesh should be fixed over the plaster. With its help, it is possible to improve the adhesion of the cladding to the base.
The reinforcing mesh will give you an additional guarantee of reliable fastening of the tiles
For street work, it is important to provide waterproofing. This is especially true for the porch floor and areas adjacent to the foundation of the house. To do this, you can use sheet roll materials or bitumen mastics.
Suitable materials
Not every tile is laid outdoors. If there are no special restrictions on the use of tiles in the interior decoration of the house, it is important to choose the appropriate material for the exterior. The best option is clinker and porcelain stoneware. If the load is insignificant, select a particularly durable type. For sidewalks and parking lots, it is better to give preference to stone or standard street tiles.
In order not to make a mistake with your choice, check that the product you like meets the following criteria:
- moisture resistance;
- low porosity;
- resistance to temperature changes;
- immunity to frost;
- resistance to abrasion, pollution, shock;
- high degree of strength and maximum permissible load;
- no negative interaction with ultraviolet radiation.
Tiles are laid in different ways. The further acquisition of auxiliary materials depends on the chosen technique. For sidewalks, cement and sand are sufficient. If we are talking, for example, about porcelain stoneware, make sure you have a strong and high-quality adhesive mixture. The basic requirements are based on almost the same parameters:
- immunity to frost;
- resistance to thermal fluctuations;
- moisture resistance;
- strength;
- withstands exposure to ultraviolet radiation.
Pay attention to ductility, adhesion and other properties that are important for tile mortar.