Dimensions and secrets of screwing screw piles
Today, manufacturers produce foundation screws with a diameter of 47 to 108 mm. Small ones (47 - 76 mm), as a rule, are used for installing fences or strengthening old foundations. When laying a one-story frame house, piles with a diameter of 89 mm are used.
Screw posts with a diameter of 108 mm will allow you to withstand a load of up to 3,500 kg. To build two or three-story wooden, Canadian or light artificial stone (foam, aerated concrete) houses, these screw piles are screwed in.
The length of the foundation supports should reach at least the depth of soil freezing. The smallest height of these structures used in Rostov-on-Don is 1.5 m. Most often, developers buy piles 2-2.5 m long.
Screw piles can be screwed into any soil except rocky ones.
Driving screw piles from RUR 12,000. per shift
Driving screw piles as a method of constructing a foundation is not new, contrary to the prevailing opinion in certain circles.
Its advantages include:
- Wide applicability to many types of structures;
- No strict soil requirements. One of the few limitations is the lack of peat soils and rocks.
- High speed of work. There is no so-called refractory period necessary for shrinkage and hardening of the foundation.
- Possibility of installation at any time of the year.
- Long service life - more than 100 years.
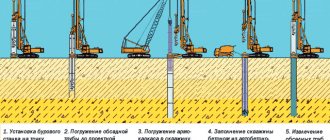
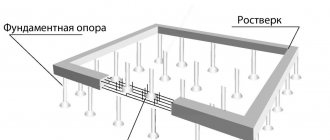
However, the above does not mean at all that it is possible to drive piles in Moscow and the Moscow region in the absence of experience, without carefully familiarizing yourself with the technology for carrying out the work. As a support, piles are used, made from straight-seam metal pipes, at one end of which there is a tip and blades intended for drilling and compacting the soil, and at the other there is a platform for convenient installation of the foundation of buildings. Their size and steel parameters vary widely depending on the tasks being solved: diameter - up to 325 mm, length - up to 11.7 meters with the possibility of extension, wall thickness - from 4 mm. So, let's look at the process in more detail. The tightening of screw piles is characterized by preparatory and working stages.
Preparatory – includes:
- Analysis of the construction site to exclude areas of rock and peat soil, determination of the freezing depth (through test twisting).
- Selection of pile diameter in accordance with the design load. So, for example, 54 mm is suitable for fences, and 133 mm for houses made of brick and block. Remember that the approximate load-bearing capacity of one screw pile is from 3.5 to 20 tons.
- Inspection of building materials for mechanical damage and rust.
- Preparation of equipment and devices.
- Site marking.
Worker – consists of:
- Direct tightening of screw piles;
- Trimming to level or building up;
- Extracting excess soil;
- Concreting the internal space of the pile;
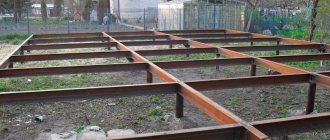
- Straps.
It must be remembered that construction requires special attention to detail from its participants. In particular, a deviation of 2 degrees or more is unacceptable. It is also important to observe the direction of screwing - even the slightest rotation in the opposite direction can deprive the pile of support from the compacted soil. Thus, tightening a screw pile is not an easy job, especially in the absence of professional tools and a hole drill. has no shortage of experienced specialists or reliable equipment. The pile-screw foundation in our design will show all its best qualities - it will become a reliable support for your structure. Do you want to know more about our capabilities and attractive offers? Leave a request and the manager will definitely call you back.
Tools for driving screw piles
The final quality of the installation directly depends on the choice of tool for installing screw posts. If you intend to carry out manual installation of screw piles, you will need:
- shovel (for leveling the area under the pile);
- 30 cm level on a magnet (attached to a pole to control the verticality of installation);
- hydraulic level (at least 15 m, for setting a horizontal mark);
- 20 meter tape measure (for measurements);
- meter-long reinforcing bars with a diameter of 12 mm (for marking the installation site of piles);
- metal scrap (it is put on the pile into the hole in the upper part for stringing lever pipes onto it);
- two pipes with a diameter of about 5 cm and a length of 2.5 m (to create a lever);
- hammer or sledgehammer (for hammering in reinforcement);
- garden drill (smaller in diameter than the pile);
- grinder (for cutting already *screwed-in screw piles* to level).
Next, after marking the location of each column, you need to hammer in the reinforcement and you can begin the main action.
Pile installation stages
To install screw piles, it is recommended to find several assistants; the main stages of the work being carried out are described in detail below.
Pile field marking
The construction site on which the piles will be installed is first marked:
- To mark, you can use wooden pegs that are driven into the ground.
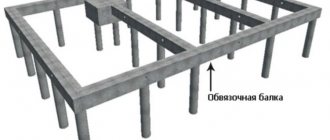
- It is important to correctly determine the distance between the piles; it should not exceed 3 meters. Otherwise, the foundation will not be strong and reliable enough, and the strapping beam will begin to sag in certain areas.
Setting the perimeter
Another important preparatory stage is setting the perimeter; for this, you first need to calculate the diagonal indicators.
This is done as follows:
- The formula for calculating the diagonal is: a2+b2=c2.
- Indicators a and b are the length of the main and side sides of the perimeter.
- Calculating the diagonals allows you to accurately determine the location of the corners around the perimeter of the house; pegs should be installed in these places.
Driving corner piles
This stage is carried out with the obligatory implementation of the following basic rules:
- The corner parts of the structure are twisted strictly in the center of the beam.
- In the case where the dimensions of the building are given along its edges, half the width of the beam is subtracted from each side.
Driving the remaining piles
The remaining screw piles are screwed in accordance with the following algorithm:
- Initially, a small pit is prepared and dug in a previously marked place.
- The recommended pit depth is half a meter, sometimes it can be increased by 20 cm.
- The minimum depth for screwing screw piles into the ground is 1.7 meters, otherwise they may begin to crawl out during severe frosts.
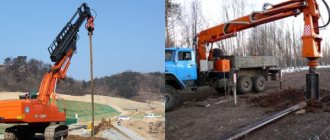
- The screwing process is carried out manually, but to simplify it, you can use special equipment.
- At the end of each pile there is a hole into which you need to insert a crowbar.
- A metal pipe with a large diameter is placed on each side of the crowbar, which allows you to create a lever.
- The magnetic level is mounted directly to the screw pile; during installation, you need to ensure that the tilt level is no more than 1.5-2°. Otherwise, the loads will begin to be distributed unevenly, which will lead to deformation.
- Twisting is carried out using the created lever.
Trimming
After curling is completed, trimming should be done in accordance with the following rules:
- A grinder is used for pruning; this process uses a hydraulic level.
- The cutting length should not be less than 10cm, since this indicator corresponds to the depth of the hole into which the crowbar was inserted to create a lever.
Concreting
Immediately after trimming, concreting should be carried out; for these purposes, it is recommended to use cement-sand mortar maki M150. This procedure is a prerequisite aimed at eliminating oxygen from the pile shaft, which is the prevention of corrosion.
Installation of heads
At the final stage, the heads are installed; this process consists of the following steps:
- The caps are placed on top of the screw piles.
- Welding is carried out using a welding machine; this must be done carefully, not forgetting about ensuring your own safety.
- The seam remaining after welding is thoroughly cleaned, after which it should be treated with a special anti-corrosion agent.
All stages described in the article must be given special attention and not skimping on consumables. Such a foundation, built in full compliance with technology, will reliably serve for decades.
What is the real cost of the service
The initial cost of the pile driving service is set at 800 rubles. The final price can only be determined by a specialist after inspecting the place where the piles are driven and studying additional details. The main factors influencing pricing are:
- Type of installation. The supports can be installed mechanically or manually.
- Difficulty in performing the work. It is easier to tighten a screw pile on an empty construction site than with an already formed landscape. Therefore, the price of the service will vary.
- Support dimensions. Of course, a pile of smaller diameter and length is immersed faster and easier.
- The location of the object in relation to the location of the construction team.
If we talk in general about the cost of the foundation, then it will be influenced by: the number of supports, area of the site, type of grillage.
For what soils is a foundation on screw piles suitable?
To construct a pile foundation, geotechnical surveys are required. They must be carried out for any construction, but in the case of installing supports they are especially important. By extracting soil cores and then analyzing them in a laboratory setting, a set of data is obtained that is important for subsequent project development.
Geologists can provide accurate information about the depth of groundwater, as well as the characteristics of this water - this is important for assessing the negative impact of chemical elements on supports.
What soils are suitable for screw piles
Pile foundations are suitable for any type of soil, which makes them a “leader” in comparison with strip and monolithic counterparts. The construction of screw supports makes it possible to reach any depth at which, according to geological data, there is a layer of soil that has the necessary bearing capacity.
When developing a project, the economic component of construction implementation is assessed, which determines the transition to work.
The final decision to what depth to screw the screw piles is determined by the project architect, who must have a detailed picture of the underlying soils and the characteristics of the future structure.
Operating principle of an automatic device for installing screw piles
Obviously, to replace manual labor when driving a pile, you need to have some kind of mechanism that converts electrical energy into torque. Since the electric motors in use usually have a huge rotation speed, it is necessary to have a gearbox for them that reduces it. To connect the power unit with the body of the pile, some adapters are also needed. And you need to somehow keep the structure upright. Moreover, usually the piles are long - up to 3-4 meters, and there is a need to create some kind of holding device for the mechanism.
Thus, the automatic installation should contain:
- Power mechanism (electric or diesel motor)
- Mechanical gearbox
- Adapter from motor to gearbox
- Adapter from gearbox to pile
- Support arm
Automation of the pile driving process
From the elements of such an improvised installation listed above, you can easily understand the principle of its operation. The motor of the power mechanism transmits rotation to the gearbox, which reduces the rotation speed and, being rigidly connected to the body of the pile, rotates it at the frequency necessary for smooth turning of the pile.
In this case, a long lever holds the structure in a vertical position.
This installation can be done alone
What to do if the pile cannot be tightened
Pile damage
If it turns out that the pile has fallen not just into dense soil, but into stone, then it is necessary to stop work, unscrew it and understand the situation.
If you continue screwing in, there is a high probability of damage to the blades, which will make the structure unsuitable for further use. There may be several possible solutions:
- If an ordinary stone gets in, the matter is resolved by simply removing it from the well in any convenient way.
- If the calculated depth is reached, then it is recommended to screw the pile back in and it will provide sufficient strength and performance characteristics.
- If you hit a rock formation, further work will require the involvement of a drilling rig that can break through it and provide the possibility of further deepening. The second option is to shift the construction site to a side where such a layer presumably does not exist. It is recommended to do this only when all the piles have been screwed in, except for the intermediate ones.
- You can take a risk and try to deepen the pile, assuming that the dense layer has a minimum thickness. However, damage to the blades will be guaranteed and it is not a fact that it will be possible to deepen it further, but it will definitely have to be changed or, at least, straightened.
We invite you to familiarize yourself with the Infusion of thyme with vodka
We recommend watching a video of the process of installing a pile using a lever.
How long will it take to install
The time period from submitting an application to delivery of the finished object to the customer is on average 2-3 days. The speed of execution largely depends on the availability of a ready-made project from the customer, the promptness of calling a specialist to the site, and the client’s willingness to provide complete information. After agreeing on the price and conditions for driving the screw piles, an agreement is signed between the contractor and the customer. From now on, the team begins installation. In some cases, just one day is enough to deliver the finished foundation to the customer. Our specialists work quickly and efficiently, as anyone who chooses our craftsmen to build the foundation can see.