It is better not to lay linoleum directly on a concrete surface due to the unevenness of such a base, because even a smoothed and rubbed concrete floor after pouring is far from ideal. Before laying linoleum on concrete, it is necessary to carry out a whole complex of rather troublesome preparatory measures, and there are many schemes for preparing the concrete coating, depending on the type of linoleum chosen, as well as the requirements for the room. As a rule, the main preparatory work is laying concrete on concrete, i.e. screed
If you do the floor screed yourself, you should remember that for quality work you need a level.
Materials and tools
It is quite possible to work with concrete without a concrete mixer, but it can significantly save your time.
In order to put concrete on concrete, you need to buy a ready-made dry mixture or prepare it yourself in the following proportions: cement - 1 part, sand - 3 parts, gravel (crushed stone) - 3 parts, water - half of the total mass of the dry mixture. To perform work related to concrete screed, you will need the following tools: a measuring container, a shield with shovels or a concrete mixer, a laser level or hydraulic level, usually a ruler level, a knife, a tape measure, a concrete trowel, a spatula, screwdrivers and screws, pliers and wire , trowel, joint cutter, trowel, metal mesh, rope, profile for beacons.
Preparatory work
First of all, before you start laying linoleum on a concrete floor, you need to check the horizontalness and curvature of the floor using a two-meter level.
If you want to check the floor for unevenness, then the best test option is to check with a large level; such results will be more accurate.
If the differences in surface heights exceed 20 mm, it will not be possible to do without a leveling screed. Work begins with the installation of lighthouse metal slats at a level at a distance that is 17-20 cm less than the length of the applied rule. The length of the rule is selected depending on how many craftsmen will lay the screed. It is quite difficult for one person to work with a rule longer than a meter. Installation of lighthouse slats is carried out on cakes of gypsum quick-setting glue, located 27-30 cm along the slats. After this, using a level, you need to achieve horizontality in all directions of the plane in which the slats will be located. When the gypsum glue has set, you can begin to pour the cement-sand mortar onto the floor between the previously installed lighthouse slats. Using the rule, using zigzag movements along the slats, excess mortar is pulled towards the exit to create a flat surface. The floor must be left to dry for a long time. Linoleum is placed on a concrete floor only after it has completely dried, because this type of surface is characterized by very low vapor permeability, and if the concrete base does not dry completely, the linoleum will simply begin to rot.
The use of a toothed roller when laying polymer-cement mortars significantly increases the quality of the future floor.
If measurements of the horizontal surface show normal results, then instead of a traditional screed, special polymer-cement mortars, known collectively as self-leveling floors, are usually installed. Before laying linoleum on a concrete floor, it is necessary to place the calculated amount of self-leveling mortar on the surface and quickly roll it out using a long-handled toothed roller (you may have to use special waterproof shoes for this). You can also lay a traditional screed on a self-leveling floor if, for some reason, it was not possible to achieve a perfectly flat surface. When applying a rule two meters long, the gap between it and the surface, according to building codes, should be no more than 2 mm. Before laying linoleum on a concrete floor, it is better to lay down an intermediate layer of particle board, gypsum fiber sheets or fiberboard sheets. It is also recommended to glue these sheets onto bitumen mastic. If you use uninsulated linoleum, you can put an insulating polystyrene foam layer under the sheet material. This will be the best option for how to properly lay linoleum on concrete.
Enemies of concrete sites
We are sure that you have seen more than once how a concreted courtyard becomes covered with cracks, then the stone crumbles, grass grows through it and soon the site has to be dismantled. And only 3 unaccounted factors help destroy the work of concrete workers:
- Frost heaving , which is traditionally present in our latitudes and acts differently at different points in your area. Somewhere it will raise the slab by 5 centimeters, and in another place - only by one. As a result, the slab breaks like a dry branch over the knee.
- Difficult terrain aggravates the situation, because if the working plane of the coating is located not only in the horizontal, but also in the vertical plane, then it will be much easier for soil movement to destroy it.
- Thermal expansion is the last popular factor that sofa makers forget about. Meanwhile, concrete, like any material, expands when heated in the sun. And even if this value is insignificant and reaches only 0.8 mm per linear meter of the site, but if these very meters are under 30 or 60, the movement of concrete can contribute to self-destruction.
The technology we described for concreting a site for a car takes these nuances into account, and therefore nothing will threaten your yard. Now let's move on to the instructions.
Concrete layer on old concrete
If you need to level the floor on a large surface, it is better to do it with a grinding machine.
Sometimes a layer of concrete mortar has to be placed on an old, already set layer of mortar. Then, before you start laying the concrete mixture, you must thoroughly clean the old surface using special steel wire brushes. Grinding machines or sandblasters are used to clean large areas of concrete. If there are sinkholes or other defects in the old concrete, the surface of the old coating must be cut down without disturbing the reinforcement. The exposed reinforcement must be well cleaned of adhering particles of old concrete and rust, after which the surface of the old concrete is generously moistened with cement milk. Only after this can a new layer of mortar be laid. Make sure that the grade of the new concrete is not lower than the grade of the old building material.
When pouring a floor with a self-leveling layer, you need to take into account the strength of the base and the self-leveling material; ideally, their strength should be equal.
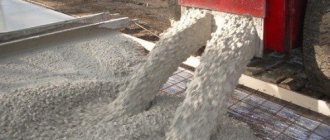
Often concrete has to be delivered to the site of use from a great height. If this height exceeds 2 m, concrete can be lowered into the formwork using specially prepared inclined gutters or trays with canopies. If the height of the concrete supply is more than 3 m, then inclined pipe trunks are installed at an angle of 27-30 degrees. Sometimes the concrete mixture has to be fed into formworks located within a radius of 10-15 m. In such cases, the construction mixture is supplied using metal vibrating robots. If a liquid floor is used, the entire pour must be completed in one step, and it is better to work as quickly as possible. This makes it possible to prevent the edge of the previous strip from drying out, therefore, the resulting surface will actually be smooth. Concrete-on-concrete placement can be done in several different patterns. You can lay the strips, starting from the far corner of the room and gradually connecting them to each other. Or you can lay several large platforms, the distance between which will later be filled with concrete. The new concrete layer is allowed to harden for 12 hours, after which it must be sprayed evenly with water for several days. This is done to slow down the drying of concrete. This will give the screed more strength. The final leveling of the frozen floor - grinding - is carried out using a trowel.
Procedure for laying concrete
Concrete is laid sequentially, in continuous horizontal layers in one direction as each layer is laid. The thickness of the layers is selected depending on the height of the concrete structure and the type of vibrator. The working part of the vibrator can be from 35 cm in length and above, the thickness of the layer should not be more than 5/4 of the length of the working part of the vibrator.
The next layer of concrete is laid only after the previous one has been vibrated, but no longer than it takes for the concrete to begin setting; this time depends on the type of concrete and hardening conditions and can vary from 40 minutes to 2 hours.
Continuous concreting of the foundation is one of the main conditions for its future reliability. All working, or cold, seams are weak areas and places of deformation. In order for the foundation to be strong, concreting must be started and completed without interruption, in one shift, and force majeure is extremely undesirable.
But if force majeure does occur, you need to take measures to minimize this trouble.
If you need to make a working (cold) seam, then it must be done perpendicular to the longitudinal axis of the structure, but not at 45 degrees, as is often done. This is an error; the surface of the seam must be perpendicular to the axis of the plane and be minimal. The location of a cold seam in the tape is allowed only in its minimally loaded part - this is the middle third of the span. It is unacceptable to make seams in the corners, joints and junctions of the tape.
It is possible to resume concreting after installing a working joint only after the concrete has gained strength of at least 1.5 MPa (15.3 kgf/cm2), otherwise the dynamics of laying may disrupt the structure of already hardened concrete, and its strength will not be restored. The time to gain strength of 1.5 MPa or more depends on the hardening conditions; under optimal conditions - relative humidity 90-100% and air temperature +18⁰С this time is about 7 hours.
The working seam must be cleared of cement film; it can be washed with water or blown with compressed air. Metal brushes can be used – with care. Notches or grooves on the surface of old concrete will also increase adhesion, but they should also be done very carefully. Old concrete is covered over the entire surface of the seam - both horizontally and vertically - with a layer of thick (1:1) cement-sand mortar 20-30 mm thick. In some cases, additional reinforcement of the cold seam zone with reinforcement is required.
Compaction of concrete mixture
Vibration compaction of a concrete floor is not a complicated process, the main thing is to choose the right tool.
Compaction of the building mixture is carried out using vibrators. Air bubbles are forced out, resulting in a decrease in concrete volume. The vibrator is immersed in the concrete mixture smoothly, with a slight inclination. Upon completion of vibration in one place, the instrument is removed and inserted into another place. Using a vibrator, it is necessary to compact the entire area occupied by the solution, otherwise voids (sinks) will form in the concrete mixture. When processing a newly laid layer of building mixture, the tool is immersed in it in such a way that the vibrator does not reach the underlying layer of the mixture, as this can lead to disruption of the concrete structure. Vibration is carried out at a distance of about 10-12 cm from the walls of the formwork. The construction mixture is considered compacted if cement laitance appears on its surface and around the vibrator platform.
Protecting concrete from destruction on the street
- Primary protection. It is carried out by adding chemical modifiers to the concrete mixture and vibrating the poured structure. For example, additives with lignosulfonate help avoid cracks that appear under the influence of sulfates and significantly increase the corrosion resistance of reinforced concrete products. Additives containing silica increase the durability of concrete, electrolytic additives form a durable surface by accelerating the set of hardness, the additive - soap naft significantly reduces water permeability, and the sulfate-yeast additive GKZh-94 significantly (manifold) increases frost resistance;
- Protection of horizontal external surfaces: blind areas, paths, driveways and other similar structures. As practice shows, the simplest, most inexpensive and most durable method of protection is the usual “ironization” of the top layer of a freshly poured structure with clean cement and water. As a result of ironing, a strong hard crust is formed, similar to the cementation layer of steel products. In this case, the basic rules should be strictly observed: concrete should be reinforced immediately after pouring, do not skimp on cement and do the work carefully and accurately;
- Secondary protection of concrete by treatment with special materials is carried out either during repairs or after construction of the structure. Basic “protective” materials: mastic, paint or varnish, special film, biocidal liquids, hydrophobization, impregnation with special solutions;
- Protective finishing of concrete consists of installing the following materials and structures on the surface of the structure: “good old” plaster, thermal insulation materials (foam plastic, expanded polystyrene, stone wool, penoizol, slag wool and glass wool), suspended ventilated facades, siding, artificial or natural stone, porcelain stoneware and ceramic tiles.
As we can see, the range of methods for protecting concrete from destruction on the street is quite diverse and wide. Therefore, the decision on which method to use is made in each specific case, depending on the type of concrete structure, its operating conditions and the financial capabilities of the developer.
The exception is the ironing method. At this point in time, this is the most optimal option for protecting flat horizontal surfaces working in conditions of external atmospheric and other harmful factors.
Cutting and filling expansion joints
When the layer of concrete laid on top of the old one begins to harden, cracks may form in it. Even during use, a concrete floor can crack due to deformation of the entire structure of the house. To prevent this, it is necessary to avoid rigid adhesion of the screed to the partitions. For this purpose, seams are made around the columns and along the perimeter.
It should be remembered that, in general, sealing joints in a concrete floor is possible when the concrete has dried as much as possible; the drying period is approximately twenty-eight days.
There are several methods for high-quality cutting of seams. They can be done using a seam-forming strip in a base that has not yet set, or they can be cut after the mixture has hardened. This is done 8-12 hours after the final grouting of the concrete floor. Such seams must be straight. They are made 1.3 cm wide and 1/3 of the thickness of the screed. The place for the seams is marked using rope and soap. Around the columns, the seams are laid in a square. Even if the floor cracks under pressure, it will appear precisely in the area of the expansion joint. Cords are first laid in the prepared expansion joints, after which they are filled with polyurethane sealant.
Acceleration of the hardening process
To speed up the hardening process of concrete, it is vacuumized, i.e. suction of excess water and air from a freshly laid building mixture using special vacuum chambers. Vacuuming allows you to speed up the hardening process of the mixture by almost half and increases its strength by 20-30%. After the concrete has acquired the necessary strength, it is freed from the formwork. It should be remembered that premature stripping can cause damage or even destruction of the structure. The side formwork of columns, beams, foundations and walls can only be removed when the edges and surface of the corners of the concrete structure are not disturbed during stripping. This means that the surface has acquired the necessary strength and stripping can continue.
In summer (at a temperature of about 15-20 degrees), the stripping of walls and vertical surfaces of purlins can be carried out after 2-3 days, at lower temperatures - after 4-5 days. The demoulding of vaults and slabs with a span of up to 2 m is carried out when the concrete reaches at least half of its design strength. Stripping of bottoms and beams with a span of up to 8 m can be done when the concrete reaches at least 70% of its design strength. Follow all the rules and you will get a reliable monolithic base for any floor covering!