- home
- What do we build from?
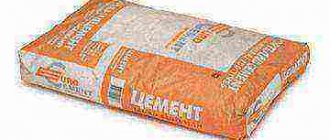
- Aerated concrete-Twinblock
Twin block (otherwise known as gas block) is a type of cellular concrete. Twin block is a relatively lightweight material (one block ~ 23 kg), but it is very strong and durable, and has good thermal insulation. It is significantly lighter than a block made of ordinary concrete, reinforced concrete or traditional brick. The reduction in the mass of the material occurs due to the air bubbles with which it is filled. Low drying shrinkage guarantees the durability of walls and partitions, the integrity of the plaster and/or finishing layer. The cost of building a house from a twin block is much lower than traditional brick, while the construction period of the house itself takes only 3-4 months.
Twin block (gas block) is the optimal material for building a house.
House designs made from twin blocks allow you to implement almost any architectural and planning solution. A garage or bay window fits harmoniously into the project concept. Unlike houses made of wood, there are no restrictions on the size of the premises and the glass area. Over the past years, house designs made from twin blocks have become increasingly popular. Based on a combination of characteristics: environmental friendliness, fire safety, sound insulation, heat transfer resistance, this material is a leader in the construction market. By choosing a twin-block, you get a house with the highest characteristics in terms of environmental friendliness and durability, at a fairly low cost.
Twinblock TB 300 has a large size, precise geometry and a comfortable hand grip, as shown in the picture.
Twin-bolts are also manufactured with other geometric parameters, shapes and physical and mechanical characteristics, without a tongue-and-groove upon request.
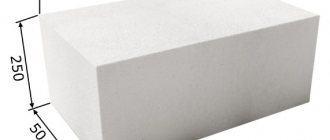
Twin block sizes:
Height: 250mm; Thickness: 300mm; Length: 625mm; Twin block weight (dry): 23.44 kg; Col. on a pallet: 24 pcs; Volume on pallet: 1.125 m2.
Thermal insulation
The good thermal insulation of twin blocks is due to their porous structure. Enclosing structures made of twin block are 3-5 times warmer than brick ones. In winter, they prevent significant heat loss, and in summer they help avoid too high temperatures, that is, they create a favorable microclimate. During the operation of such structures, energy consumption is reduced by 25-30%. Using an adhesive rather than mortar for laying twin blocks increases the thermal resistance of the wall by 20%. The high frost resistance of twin blocks allows them to be used even during construction in the far north.
Advantages of Twin Block
Compared to other systems, wearing Twin Block in orthodontics gives fairly quick results. It is usually used in the first stage of treatment, which lasts about 8 months. Next, the device is usually replaced with braces. The following advantages can be highlighted.
- Can be worn continuously even while eating.
- Rapid physiological and psychological adaptation of the patient by maintaining normal mobility of the cheeks, lips and tongue.
- Easier transition to non-removable equipment.
- Minimal interference with the normal functioning of the dental system.
In orthodontics, the Clark appliance is used to correct the bite. The best results are achieved when treating adolescents from 9 to 14 years old during the period of active jaw growth. For girls, the recommended age is slightly lower - up to 13 years.
Treatment with braces
After correcting the position of the lower jaw, metal Victory braces (3M) were installed. The installation of braces is carried out in two stages - first on the upper jaw, and after two weeks - on the lower jaw. This makes it easier to get used to braces, and the process of installing braces is quite labor-intensive and time-consuming. To maintain the required bite height, overlays, which are made of the same material as fillings, are installed on the distal chewing lower teeth. As treatment progresses, the overlays are gradually removed.
Braces are installed on the upper jaw:
Braces are installed on the lower jaw:
One month after installing braces:
Three months from the start of treatment with braces:
Situation six months after fixing braces:
One year from the start of treatment with braces:
Treatment with braces took 13 months. The teenager visited the orthodontist once a month. During visits, the doctor changed the arches, introduced additional elements, and monitored the treatment process.
With the help of braces, gaps between teeth are eliminated, teeth are aligned, and the upper and lower teeth are properly connected.
Selection of twin blocks and foam blocks
Criteria for choosing foam blocks
When choosing this building material, first of all, you need to pay attention to the appearance. Signs of quality material are:
- Light gray or dark gray color.
- No black grease on the surface. Its presence will interfere with plastering of the walls.
- A high-quality block does not sink in water.
- Foam blocks must be in plastic packaging. Otherwise the block will dry out and crack.
- Availability of a quality certificate.
- The price should not be too low.
- No cracks on the surface of the material.
Twin block selection
When choosing twin blocks, the risk of purchasing low-quality material is practically absent. First of all, this is due to the presence on the market of an extremely limited number of manufacturers, and all of them are known. There are simply no semi-handicraft producers. The reason is the huge cost of technological equipment. The production of twin blocks requires investments in excess of 2 billion rubles . For comparison: the price of equipment for the production of foam blocks is from 100,000 rubles .
Today, all construction specialists, when choosing the type of masonry blocks, advise using twin blocks. This building material quickly gained popularity and took a leading place in construction. Yes, its cost is higher than that of a foam block, but this disadvantage is fully compensated by the quality of construction.
How to lay blocks with your own hands + step-by-step instructions +
How to lay blocks with your own hands + step-by-step instructions
So, after the foundation has been poured, a rather important stage begins, namely laying blocks, which is not as difficult to do with your own hands as it might seem. Today we propose to consider this very topic, and we will talk about low-cement blocks.
Before you start, you should prepare all the necessary tools. The first tools you may need are buckets, shovels, and a hammer. Next, arm yourself with special devices, namely a mason’s pick, a trowel or trowel, a plumb line and a building level. To break the walls, you may need a strong thread called a “chalka”, as well as a tape measure.
It is best to buy thread on a handle, from the company Stauer, because it fits perfectly in the hand and is bright yellow, which is clearly visible even at dusk.
Tools
As for electrical tools, you may need a hammer drill, a grinder (to cut off reinforcement or corners to create jumpers). To mix the solution, it would be nice to have a concrete mixer on hand, as well as a barrel of water (can be made of metal or plastic).
To create jumpers from corners you will need a welding machine.
If you plan to lay two or more floors, then it is better to carry pallets with blocks along the floor not by hand, but to use a cargo trolley, which you don’t have to buy, but rent at a tool rental point.
Materials
Directly for installation you will need low-cement blocks, cement mortar, water and sand. The lintels that will be located above the door and windows require metal - reinforcement, angle or channel. As a rule, a lintel made of reinforcement is used over the doors, the diameter of which is from 1 to 1.4 cm in several rods, and for windows it is better to use corners.
For garage doors, the best option would be to make a lintel from channels - much will depend on the weight of the door and the width of the opening. Beacons may require a wooden batten, as well as dowels; For scaffolding, use boards and pallets, and you can fasten it all with nails. If you have a construction goat, then that's even better.
If you live in seismic regions, then you will need a masonry mesh, or A240 0.6 cm reinforcement. But it will be much easier to find the mesh and use it, and it is better not to use fiberglass reinforcement as wall reinforcement. if you plan to cover the entire house with facing bricks, you will need a notch for the outlets that will be embedded in the seam.
This is where you can use fiberglass reinforcement.
Wall markings
Any work begins with the need to clean the base from debris and dust. If we are talking about the first floor, then you should remove it on the foundation, and if you are laying the second and higher floors, then we will start with the ceiling.
All you need to do is sweep the walls with a broom.
As was previously done when laying out the foundation, now it is necessary to correctly break the corners of the building so that they turn out straight everywhere, because this will be the last moment when it will be possible to correct everything, since otherwise errors in geometry will crawl out onto the ceiling and roof. The best option to solve the problem would be to call a surveyor who will cut right angles with an accuracy of 0.3 cm, but this will cost several thousand rubles, and usually such a master is called only to break down a building or to overly long houses.
Small houses can be demolished without outside help. To do this, you will need a roll of rope and a construction tape, preferably made of metal. The technology is quite simple - place the blocks dry and take measurements of the diagonals of the resulting rectangle. The accuracy will be within 0.3-0.5 cm.
You should take into account the fact that a metal tape measure does not stretch, but a thread or cloth tape measure will stretch, and quite a lot. If you do not plan to do cladding, then you can extend the block or brick beyond the vertical border of the plinth to approximately 1/3 of the brick/block.
BUT try not to abuse this, especially if the buildings are higher than 1 floor. When the main corners of the building are exposed, it will be possible to simultaneously expose additional ones, if any.
At the same time, it will be possible to put up partitions, especially if there are no columns, so that they can be laid at the same time as the outer walls.
Laying blocks with your own hands in the first row
Before starting the laying of the first row, it is necessary to check all the vertical type marks on the foundation, because the first row is the most important stage. If you do not level the base with mortar or there are large differences, then there is a high probability that the walls will crack.
The check is carried out with a regular spirit level or a laser level, which was set during marking. If deviations from the horizontal are up to a maximum of 2 cm, then you can level out the unevenness with a solution. If it is more, then it is better to fill the belt with reinforcement and make sure that the horizontal level of the concrete is normal. The first row should be laid on roofing felt, cut the roll in half and laid directly on the foundation.
This is done in order to cut off capillary moisture from the blind area and the ground.
In seismic areas where the standard value is higher than 6, such waterproofing is prohibited! During a seismic wave of a lateral type, a building can be moved from its foundation and completely collapse. For this reason, waterproofing is made from mortar if roofing felt cannot be installed.
So, before starting masonry, check the base again for debris and wet the base. The mortar is placed on the first corner stone and the second on the opposite corner with the holes down, and you also need to carefully monitor the height of the masonry.
Be sure to check the side edges and ends of the blocks by level so that everything is only vertical.
When all the blocks stand exactly horizontally and vertically, you should stretch a cord between them and align them along it. Now, in the same way, make a perpendicular wall - this technology is called “bringing corners.” While you are making the second and third corners, on the first floor the solution will have time to lose its mobility, and the block will lie tightly.
Once this has happened, you can begin laying the first row further. If we are talking about a seismic region, laying in a wasteland is prohibited. We are talking about work when only horizontal rows are placed on the mortar, and the vertical rows are not filled with mortar.
Thus, masons often try to save time, and then plasterers will have to tinker a lot and seal the cracks.
For this reason, apply two portions of mortar on the end side of the next block where the block on the foundation/slab will be laid out and carefully place the block, almost touching the thread.
With a light tap of a pick or trowel, the block should be tapped to the first block and then aligned with the thread so that the block touches it slightly. When everything is finished, check the side edge for verticality.
We do the same for the rest of the wall.
Wall laying and mesh reinforcement
The second and all other rows will hardly differ from the masonry of the first row, but the main difference will be that the corners, in addition to the level, will need to be checked with a plumb line. The more rows, the greater the accuracy of the plumb lines, because the level has quite large errors. Typically, plumb lines are bought in stores in the form of metal weights, to which you must attach a rope yourself.
To mark the load, you should make a conical hat in order to know exactly the point where it will look. For masonry and plastering, it is best to use Armenian plumb lines rather than store-bought ones. It was invented by builders to do work accurately and quickly, and not be distracted by anyone.
Yes, to lay aerated concrete and other blocks with your own hands, you will need an Armenian plumb line, which is shaped like a spinning top, and not a thin nylon thread is inserted into it, but a thick rope.
At the second end of the rope there should be a pipe where the rope is threaded in the middle. Inside the hole, the rope will pass with force, and behind the pipe it will be tied with a knot.
It will be the same size as the plumb line.
To measure, you can easily measure the required length of rope, and attach the end of the tube to the block, and release the plumb line down. A light touch will indicate verticality, and other deviations can be easily noticed and corrected in time.
It is unlikely that you will be able to buy such a plumb line, but you can make it yourself.
In addition, it would not be superfluous to lay a mesh for “resistance from vandals,” because in most crime reports you can often see cases of theft from stores in a tree without signals, where the store was broken into by breaking the wall.
Banding masonry in a block wall
As a rule, external walls are placed in a block, and internal ones in half. Bandaging of the partitions should be at least 30% of the block in the run. It is unlikely that we will be able to come up with something new here. External walls can be bandaged in different ways.
Lintels in a block wall
In a block wall above the opening of windows and doors, it is necessary to install lintels, and in load-bearing external walls, a depth of embedding into the wall of 0.2 meters is allowed, and with an opening width of more than 1.5 meters, at least 0.25 meters is allowed, for other cases the optimal figure is 0.35 meters.
You can pour all the concrete, but it is inconvenient and time-consuming. To implement it, you will need to install formwork, reinforce it with a spatial frame and fill it. In this case, the laying will be suspended.
If you do everything yourself, then you can use this method - although it is the most labor-intensive, it is also the cheapest, and nothing will stick out from the wall.
Ready-made lintels are heavy and are placed in several pieces per row to match the thickness of the wall. This method is much faster, but it will be difficult for 1-2 people to do it while standing on scaffolding. During private construction, reinforcement and a corner are most often used as a lintel.
In partitions, you can use 1-1.2 cm reinforcement, 4 pieces each, which will be embedded in the masonry, and pull up the board from below, and then spread it with a stand, and apply mortar through the rods. When the cement becomes less mobile, the blocks can be laid.
But for external walls, which are much thicker than partitions, corners are used. To do this, cut it to size and weld the reinforcement together through the strip in several places. Next, prime the metal to prevent rust and install it on the block.
Apply the solution to the shelves and install the blocks with the holes facing up. This will be the most expensive method, but very reliable and fast.
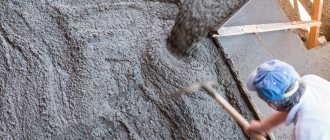
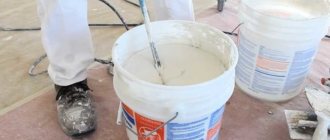
Masonry mortar
A typical concrete mixer, which is capable of producing in a home/factory environment, contains about 10 buckets of materials. One mixer will require half a bag of M500 cement, 8 buckets of sand and approximately 1.5-2 buckets of mortar. As a result, we get an excellent 1 to 5 solution with excellent strength.
You can use any sand, but it’s better to wash it, because it has practically no shrinkage. To prevent the solution from settling, you need to add liquid soap to it. If it is good, then 0.8 liters will be enough for all the given proportions, but there are soaps of such quality that you have to pour up to 2.
5 liters – it’s better not to use it.
The mixing technology is as follows:
- Lay 2 bricks and place reinforcement between them. A bag of cement should be placed on top of it in front and leveled in the middle. Using a trowel, cut the bag on one side, and then lift the bag using the reinforcement. The cement should be carefully divided in half, cut and use one half.
- Pour 1.5 buckets of water into the mixer.
- Then carefully pour in the cement and start the device.
- After 1 minute of work, sand begins to be poured in little by little.
- When everything is finished, add water or sand to adjust the fluidity of the solution.
Please note that it should not be liquid and not dry - not roll on the trowel, but not clump.