A lamp and a chandelier in the kitchen are not the same thing
Now the concept of “chandelier” is attributed to all lighting fixtures on the ceiling. But in fact, a chandelier is a multi-lamp device, and single-lamp devices are lamps. For example, a classic lamp of 4 or more lamps will create general diffused light, i.e. will illuminate the entire kitchen. A single-lamp lamp suspended above a table has a directional luminous flux, i.e. will only illuminate the dining table.
A chandelier is a multi-lamp device for general lighting. The lamp is a single-lamp lamp with a directed luminous flux to one point.
buybuy
An example of a multi-lamp chandelier. Favorite Ultra pendant chandelier
buybuy
An example of a single-lamp lamp. Favorite Ultra pendant lamp
One chandelier in the kitchen is not enough
The kitchen is the most functional room in the house: work surface, sink, kitchen island, dining table and all this needs to be illuminated. Therefore, as the main source of light in the kitchen, a chandelier is a bad idea. It is better to combine a chandelier and work light. For example, a multi-lamp chandelier is general diffuse lighting, single-lamp lamps on a “leg” under a kitchen island or dining table are accent lighting, and ceiling light spots above work areas are task lighting.
A chandelier cannot be the only source of lighting in the kitchen.
Diagram of how to arrange lamps in the kitchen
Diagram of how to place a lamp above the dining table in the kitchen
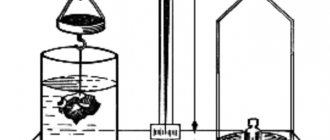
Light level
To do everything wisely, you need to calculate the rated power of the lamps. Any type of light bulb can be used as a light source: LED, fluorescent, halogen and even incandescent lamps.
Note! All light sources differ from each other in the parameters of the emitted light flux. These differences are shown in the table below.
Power ratio of different lamps
To create optimal lighting for a kitchen or bathroom, light sources of 12-20 W are needed (data are based on incandescent lamps). Lighting standards for different rooms are specified in SNiP. It is worth remembering that each light bulb has both pros and cons. Therefore, before purchasing a light source for your home, be sure to familiarize yourself with all its advantages and disadvantages, so that you do not regret your choice later.
Chandelier in small and large kitchens
Classic chandelier for large kitchens - from 15m2
Long and/or wide chandeliers on a “leg” of three or more lamps, made of crystal, copper, glass, etc. Suitable for spacious kitchens or kitchen-living rooms. In large rooms, such a lighting composition will not eat up the total area and ceiling height.
TIP: Remember that chandeliers with complex designs will require special maintenance when cleaning and replacing bulbs.
Classic multi-lamp chandelier in a large kitchen photo
Ceiling chandelier for small and standard kitchens - up to 12 m2
Such chandeliers are attached directly to the ceiling without a “leg”. For example, for a very tiny kitchen, a lamp with a “plate” shade with one light bulb is suitable, and ceiling chandelier models with 2-3 lamps will fit into the size of standard kitchens.
Ceiling single-lamp chandelier in a small kitchen
IMPORTANT: To change the light bulb in the dish lamp, you will have to disassemble it. Also, before purchasing, check that the lamp has metal diffusers. They reflect the emitted light not onto the ceiling, but onto the floor and do not heat the ceiling (if it is suspended).
LED strips and their types
LED strips have a very wide range of applications, so they are produced in different types depending on the purpose and installation location.
According to the purpose of the tapes there are:
- Open (eg IP33).
They are not sealed, that is, they are not protected from moisture. Such tapes are not suitable for use in the kitchen and other rooms with high humidity. They can be mounted under a suspended ceiling in the living room or bedroom or used to illuminate interior items.
Floor and ceiling lighting in the hallway
- Single-sided (eg IP54).
Such strips are protected with silicone only on the LED side.
It is possible to use single-sided tapes in the kitchen where there is no direct contact with water
- Double sided (eg IP68).
An ideal solution for the kitchen, as the tape is completely sealed. The possibilities for their use are practically unlimited. They can be dipped in water and even frozen.
Double-sided tape can be safely used in the kitchen
In addition to the type of strip, when purchasing, you should pay attention to the power, type of LEDs, as well as the type of lamps themselves.
LEDs
The quality of the backlight largely depends on the correct choice of the type of LEDs in the strip. The most popular: SMD5050 and SMD3528.
SMD5050 and SMD3528
SMD5050 is much brighter than SMD3528, so it is advisable to use them specifically for lighting. The second type is great for decoration (for example, illuminating display cases and shelves).
Power
The power of the strip is measured in W; it directly depends on the number of LEDs per linear meter. For example, an SMD3528 strip with 60 LEDs has a power of 4.8 W, with 240 – 16.8 W. For example, to illuminate the work area in the kitchen, it is better to use high-power strips.
Lighting the work surface of a modern kitchen
Important! When purchasing, check exactly how many LEDs are in a linear meter, since sellers often indicate their number in a whole segment (usually 5 meters).
First the furniture plan, then the lighting plan
It is better to choose lighting fixtures for the kitchen based on the layout of furniture and functional areas. So, having placed the light on the diagram, it will immediately become clear that the chandelier/lamps are in place, but there are no light spots above the sink. And the indicated furniture dimensions and ceiling heights will help you install accent lamps above the dining table at such a height so that you don’t hit your head on them later.
Composition of three lamps on a leg above a table in the kitchen
Chandelier in the kitchen: ergonomics
- The standard distance from the dining table top to the lamp is 71-89 cm.
TIP: Pay attention to the size and shape of the table. So, if the table is round and large, install a multi-lamp chandelier at a maximum distance of 89 cm. For rectangular long tables, kitchen islands or bar counters, choose three bottom-lamp lamps, placing them in a row a meter from each other.
Lamps above a rectangular table location option
If there are no wall cabinets above the work surface, then the distance from the work surface table top to the lamp is 71-86. And the distance from a person’s head to the lamp is 46-70 cm.
TIP: The standard color temperature of light bulbs for lamps/chandeliers in the kitchen is warm 2700-3000 K. For task lighting - neutral (4000-4100 K). We talked in detail about lighting and color temperature here.
Lamps above the work surface location option
Choosing lamps
Since the bathroom and kitchen differ from each other in their surroundings, the selection of lamps for each room will be different. Let's consider each option separately. Bathroom lamps. The following types of lighting fixtures can be installed above the sink in the bathroom:
- wall sconces. This option is considered one of the best, as it allows you not only to obtain the required level of illumination, but also to beautifully decorate the area around the mirror and sink;
Note! Wall sconces with a switch today have a variety of designs and can be made in various styles (classic, country, nautical, modern, etc.). Therefore, they will fit perfectly into any interior.
Wall sconce in the bathroom
Built-in light in the mirror
- Spotlights. They can be built into the surface of a mirror or mirror shelf. Sometimes they are mounted directly into the wall. But here you need hidden wiring, which is carried out only before tiling. This option is not used very often in the bathroom, since doing it yourself is quite problematic and expensive. The best solution would be to buy a mirror with built-in lights;
- LED strip. For a bathroom this would be a pretty good solution, since such lighting can easily be done with your own hands. By attaching a ribbon around the perimeter of a mirror or shelf, you will get high-quality and original lighting for the sink and the entire space adjacent to it.
LED mirror lighting
Illumination of the sink with spotlights
Lamps for the kitchen. Here things are a little different than in the bathroom. In the kitchen to illuminate the sink you can use:
- Spotlights. Today, kitchen units (wall cabinets), as well as hoods, are sold with already built-in spotlights. This greatly simplifies the creation of the required level of lighting. But if you make the lighting yourself, you will need to correctly cut the holes for the devices;
- LED Strip Light. The simplest and most effective solution. Installed in a similar way to a bathtub.
LED lighting for sink
At the same time, lighting fixtures for the kitchen or bathroom, so that with their help you can create high-quality and complete lighting with your own hands, must meet the following requirements:
- high degree of moisture protection. In order to function normally in conditions of high humidity, the moisture resistance index must be at least IP 65/66;
- availability of protection from mechanical damage;
- The device body must be able to withstand cleaning with aggressive cleaning agents. This is especially true for lamps used in the kitchen.
Focusing on the right things will help you choose the right fixtures to illuminate your kitchen or bathroom sink.
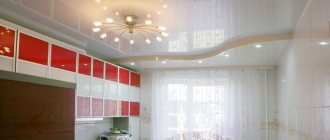
Location of chandeliers and lamps in the kitchen: diagrams and errors
Kitchen lighting scheme
Combined lighting (Fig. 4) is the most convenient lighting option in the kitchen. And the chandelier in the middle is the most useless (Fig. 3).
Kitchen lighting scheme with a fluorescent lamp
Kitchen lighting scheme with lampshades
Kitchen lighting scheme with central chandelier
Ideal kitchen lighting scheme
Mistakes in placing a chandelier in the kitchen
A multi-lamp chandelier in the center of a large kitchen-dining-living room is a good option from both a decorative and practical point of view. And the central location of the chandelier in small spaces, where the table is moved towards the wall, is a pointless idea. So, the chandelier will eat up the space and at the same time illuminate the center of the kitchen, where there is usually nothing to illuminate, and the table and work area will remain unusable. The solution is to install several single-lamp lamps above the dining table. Or even take a closer look at the sconces.
- Lighting in a rectangular narrow kitchen
A good example. A single-lamp compact lamp does not take up the width of the kitchen, it is shifted towards the table, light spots are above the work surface, and there is nothing in the middle
Bad example. In the absence of daylight, a chandelier in the center of the room will not be enough to illuminate the functional areas
- Lighting in a square small kitchen
A good example. A multi-lamp chandelier is shifted towards the table, due to the larger width, 3 lamps are possible, the chandelier is shifted towards the table, light spots above the work area, there is nothing in the middle
Bad example. A multi-lamp chandelier in the center illuminates the middle of the room, while leaving the kitchen table and work area in the shade
Think several times before hanging a chandelier in the middle of your kitchen.
- A composition of three lamps above the dining table and light spots above the work area;
Lamps above the dining table are a good location option
- Single-lamp lamps above the kitchen island and sconces above the work surface;
Photo of how to conveniently arrange lamps and sconces in the kitchen
- Instead of a chandelier, there are latticed spots around the entire perimeter of the kitchen, and a large sconce above the dining table.
How to conveniently place sconces above the table in the kitchen
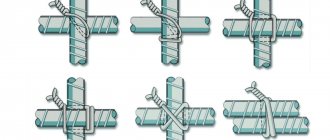
Installation of LED strip under kitchen cabinets
Before installing the LED strip under the kitchen unit yourself, it is important to plan the location of the structural elements.
The aluminum corner in the photo acts as a reflector, not a cooler.
Typically, manufacturers produce diodes that emit light at an angle of 120 degrees. Wave stripes appear on the wall, which can ruin the entire kitchen design. To avoid this, turn on the lighting before installation and place it under the cabinet. And see where this wave will form. It is desirable to achieve a result in which this strip is projected into the corner between the wall and the working surface of the headset. Light sources must not be installed near the exhaust area.
Narrow light sources are mounted on the edge of the cabinet, since the light will not reach the wall surface. Optimal light distribution can be achieved using aluminum profiles protected with reflective film.
Do-it-yourself under-cabinet installation can be divided into 5 points:
- First, we make a hole in the back of the cabinet to hide the cable routing.
- Dry the bottom surface of the cabinet thoroughly. We install light emitters only on a clean surface.
- If the backlight has an adhesive layer, then simply apply it to the headset and press it tightly. If this layer is missing, use double-sided tape. To hide the tape, you can install a hanging profile painted in the color of the cabinet. Also, the backlight can be immediately placed in a profile housing, but to do this, we first connect it to the power terminals.
- Then comes the installation of the power supply with a switch. It is better to place it in places with low temperatures. We make a wiring arrangement, which we secure with tape or special clips.
- After connecting all the lighting elements, you need to check the wiring for a short circuit. This can be done using a tester. If there are no problems with the circuit, then you can connect it to the network.
The power supply is hidden next to the lighting at the bottom of the module
Chandelier in the kitchen interior: which one to choose
It is difficult to say clearly which chandelier suits which interior. For example, chandeliers as art objects can be a bright accent in a kitchen in a minimalist style. The main thing to remember is that the size of the chandelier should be commensurate with the kitchen. Large structures in spacious spaces, laconic models in small ones. But there are also proven patterns that you can follow.
Designer multi-lamp chandelier in a bright kitchen
Glass, crystal for classics and neoclassics in the kitchen interior
Velvet French armchairs, glossy furnishings, dark wood, massive furniture - long, massive chandeliers with an abundance of details will suit such an interior.
An example of a chandelier for a classic interior of a large kitchen
An example of a golden chandelier for the classic interior of a large kitchen
Forged metal parts and cylinder lampshades in Provence and country kitchens
Country and Provence interiors love decor from many parts - small forged parts, a large number of lampshades, colorful prints, etc. The chandelier in this case is no exception.
An example of a chandelier for a country kitchen interior
An example of a chandelier for a Provence kitchen interior