What are plastic panels
This is a type of finishing material made of PVC in the form of thin panels 2.4-3 m or 6 m long. The standard width is 25 cm, although different variations of this parameter can be found on the market.
So, why are plastic panels so popular today:
- They are made of plastic, which is considered an environmentally friendly material, although artificial. Today, plastic is used in large quantities in everyday life, and there is no harm from it. This is confirmed by hygiene certificates.
- Plastic is a monolithic material, that is, without pores, which means there is no condition for the emergence and spread of harmful organisms. Therefore, sanitary and epidemiological services recommend panels for arranging ceilings in any premises.
- Plastic panels are easy to keep clean. Typically, household chemicals or ordinary soapy water are used for this. At the same time, the finishing does not lose its aesthetic properties.
- The ignition temperature of polyvinyl chloride is +350C, note that chipboard and OSB begin to burn at a temperature of +250C. That is, plastic is a good alternative to wooden coverings in terms of fire safety.
- Since the panel ceiling is a suspended structure, there is no need to repair the base ceiling. And this is a good saving of money.
The base ceiling does not need to be repaired Source trotuar199.ru
- Many can say that a plastic ceiling is a structure that does not allow air to pass through itself. Condensation often forms on it. And it is true. But the problem can be solved quite simply - ventilation of the house. And this engineering system is present everywhere in private housing construction today.
- By installing plastic panels on the ceiling, you get a finished surface in terms of aesthetic design. And the advantage here is that this finishing material is presented in a huge assortment on the market, specifically in terms of appearance design.
- Easy to install. A master alone can close the ceiling of one large room in one working day.
As for the disadvantages, PVC panels cannot withstand heavy loads, especially impact loads. But this happens extremely rarely on the ceiling.
A huge variety of plastic panels Source strport.ru
Where can you finish the ceiling with PVC panels?
PVC panels are almost universal and are suitable for finishing the ceiling in any residential and even commercial premises, as they are not at all afraid of the cold:
- living room - any models can be used;
- bedroom - here they prefer to choose a softer color scheme, which, of course, does not limit the choice; the mirror ceiling in the bedroom can be made of plastic panels;
- children's room - the decorative and hypoallergenic nature of the material makes it quite suitable for decoration;
- kitchen – for this room, plastic finishing is the best solution, the material is not afraid of steam, grease stains, dyes, soot and is very easy to clean;
- bathroom - the ceiling can be finished to suit every taste, but it is better not to use mirrored or metallized slats;
- corridors, hallway, utility rooms - any type of finishing is allowed.
The choice of ceiling cladding in any room is limited only by style requirements and personal preferences.
Ceilings made of PVC panels in the hall: photo
The photo shows plastic ceilings of all types. In the living room, the decoration is selected only according to style:
- finishing with 3D effect;
- combination of laying in different directions;
- ceiling with a picture;
- photo printing on the ceiling.
Finishing with plastic ceiling panels in the bedroom
In the bedroom, PVC slats are used no less often:
- paneling in pastel colors;
- mirrored ceiling in the bedroom;
- ceiling niche.
Sometimes a multi-level combined ceiling is performed.
Ceilings made of plastic panels in the kitchen: photo
In the kitchen, plastic trim is indispensable. Performed in the following forms:
- imitation wood;
- three-dimensional drawing;
- in the photo there is a plastic two-level ceiling.
It is worth considering style and preferences.
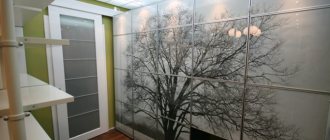
Finishing ceilings with plastic panels in the hallway: photo
In the hallway panels help to visually change the configuration of an uncomfortable room:
- laying across the room;
- use of mirror panels;
- imitation stone.
With this material you can solve many problems.
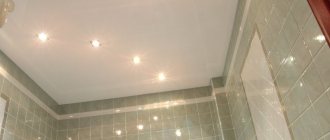
Ceiling made of plastic panels in the bathroom
Stone finishes are the most popular, and not without reason:
- imitation marble;
- onyx panels;
- ornamental decoration.
A mirror ceiling is often used.
Types of plastic panels
All goods, products and materials have a certain classification. PVC panels have the same thing. This material is divided into four characteristics:
- density;
- dimensions;
- type of connection of panels to each other;
- external design.
The first sign depends on the raw material and manufacturing technology. Typically the density is indicated on the certificate. And the larger this parameter, the stronger the panels, and accordingly they are more expensive, but at the same time the service life of the ceiling increases.
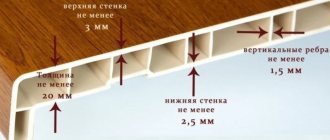
As for the sizes of ceiling panels, most often on the market you can buy material with a length of 2.7, 3, 4 and 6 m. Width - 10, 20 and 25 cm. Standard thickness - 5-8 mm. The thicker, the more expensive, but more durable. Please note that there are thicker panels on the market up to 12mm. This is a wall option.
Standard sizes of PVC panels Source stroyka-nn.com
Now about the type of connection of the panels to each other. There are two options: the ceiling will be solid or with visible gaps between the panels. It is clear that it will not be possible to achieve a complete monolith, like drywall treated with putty, but the seams can be minimized. As for finishing with gaps, manufacturers today offer a variety for lining. A ceiling finished with this material is a cladding with visible gaps between the panels, like a regular lining.
And now about the external design. Here is the richest palette from plain to panels with various patterns. But manufacturers offer two structure options. These are varnished, which are coated with a special varnish that adds shine, and unvarnished, which have a special coating that protects the material from the negative effects of ultraviolet radiation.
Attention! Ceiling panels made of plastic easily withstand changes in humidity without changing their structure, as well as moderate temperature changes. But at very low and high temperatures the material begins to warp. Some models are cracking. Although today manufacturers offer more stable panels.
Plastic panels with tongue-and-groove joints Source kursremonta.ru
How to make a ceiling from plastic panels
When purchasing PVC slats, you will also need finishing profiles - moldings - with which you decorate the ends and joints. Their choice depends on the configuration of your room and on how exactly you are going to make the ceiling. There are two options: make a suspended ceiling or attach the plastic directly to the main one.
Types of profiles for installing plastic panels
Suspended ceiling made of plastic panels
On the one hand, a suspended ceiling allows you to covertly lay communications without having to drill walls. On the other hand, it “eats” some height. It will take a minimum of 3 cm. But this is the case if the lamps are installed with ordinary ones, and not built-in ones. To install a built-in lamp, the false ceiling must be lowered from the main ceiling by 8-12 cm. You will not find smaller lamps, except furniture or LED ones. If you put them in sufficient quantities and separately illuminate the mirror, then there should be enough illumination.
Suspended ceiling made of plastic panels
Assembling the frame
When installing a suspended ceiling, a frame is assembled from guides. Most often, profiles are used for working with drywall. If you are making a ceiling in a bathroom or kitchen, take galvanized profiles and fasteners. In drier rooms this is not critical. They also assemble a frame from wooden blocks of 30*30 mm or larger cross-section.
First nail the planks or profiles around the perimeter, placing them all level. Then, intermediate guides are attached to standard hangers (there are two types) or wooden blocks in increments of 50-60 cm. They are also aligned so that they are in the same plane as the previously installed ones (it’s easier to do if you stretch the threads between the already installed ones and align them).
Ready-made frame for a suspended ceiling made of plastic panels
If you decide to make a minimum indentation, just to lay the corrugated hose - 3 mm, then the planks are nailed directly to the ceiling. If necessary, the level is leveled using pads - pieces of plywood, wood wedges, etc. In this case, the frame looks something like this.
In order not to lower the ceiling, the gap can be kept minimal
Installation of starting strips
After the frame is assembled, you can begin installing the plastic panels. It starts with setting up a starting profile. In the case of a ceiling, ceiling molding is also used.
First, one of these profiles is attached
It is attached close to a profile or strip fixed around the perimeter of the room. The edges are filed at an angle of exactly 45°. The length must be measured very accurately: the slightest discrepancy leads to the appearance of gaps. Against the background of a white ceiling and white profiles (or colored, it doesn’t matter), the cracks turn black very clearly. If they are small, it will be possible to cover them with putty, but it is better to cut them off clearly: exactly along the length of the wall or with a slight spacer of 1 mm.
The cut strip can be glued or screwed with self-tapping screws. It is better to glue ceiling molding (with liquid nails). This way the joint turns out perfect: when gluing you press the bar tightly, when screwing it onto the “bugs” you cannot achieve this effect, since it is twisted forward a little.
On the side that goes to the wall, apply a thin strip of glue in a zigzag. The surface of the wall is degreased (you can use 646 solvent). After drying, the piece is set in place, pressed tightly along its entire length and torn off. There should be some glue left on the wall. Leave it to dry for a few minutes (4-8 depending on the viscosity, the bar should not float, and the glue should stick well) and then put it in place. To be sure that the plank is level, take a rule, a ruler, an even block and check the level of the glued starting profile. If necessary, until the glue has completely set, the bar is adjusted.
Installation of starting profile for plastic panels
Having glued the starting profiles on three sides (letter P), they are left to dry, otherwise, when installing the planks, they can be moved from place. After 8-12 hours the glue will harden and installation can continue.
If during gluing “liquid nails” are squeezed out somewhere, do not clean it. Wait until it is completely dry, then pry it off with a sharp knife. The glue will simply break off and there will be no traces left. If you try to remove it liquid, it will only smear and stain everything around.
Installation of plastic panels on the ceiling
After the glue has dried, you can begin installing the plastic panels themselves. Measure the size from one joint of the already installed skirting boards to the other, add 1.5-1.8 cm to this value. Cut the panels to this length. There is no need to make them across the entire width or length of the room - they will not appear in profile. If the geometry of the room is ideal, you can cut a lot at once. If there are deviations in size, make several pieces at a time, adjusting the length as you go. You can cut plastic with a jigsaw or grinder.
The first panel fits into the previously installed molding on three sides. It is placed with the spike forward - in the bar. Sometimes, if the trim profile is made of soft plastic, the top part (mounting flange) will sag, making installation difficult. To reduce the deflection, this edge can be secured with self-tapping screws. This will make it easier to insert the plank, otherwise you will have to correct it with a spatula, putting the panel in place. It should fit into the plinth or starting profile exactly along its entire length. The inserted strip is secured to each guide with a self-tapping screw. To attach to a wooden frame, you can use a stapler with staples (if you are installing it in a bathroom or kitchen, then take stainless steel or galvanized staples).
Installing the first strip of plastic panels on the ceiling
The installation of subsequent stripes is the same. They are installed first with one edge - into the molding (it goes into the baseboard by 6-7 mm), then insert the other edge. After that, the bar is leveled by lifting the middle with your hand and eliminating the deflection, tapping the edge with your palm, driving the lock into the groove. It doesn't take much effort, just to make sure it fits tightly. From below you will see that there is no gap at the junction, which means the strip is normal.
If you have an assistant, he will support the installed panel so that it does not fall out while you are attaching it to the screws (staples). If you work alone, you can eliminate the sagging by gluing small pieces of double-sided tape to the profile. They will hold the bar until you secure it. This is how you assemble all the panels.
During the installation process, do not forget to cut holes for installing lamps. You can do this with a ballerina or a ring attachment, you can try with a jigsaw, but if you are good with the tool and can make a round hole. As it turned out, you can make a hole with a regular drill with a thin drill bit... how? Watch the video. There are a couple more good tips there.
Having installed the strip or strips in which there is a hole for the lamp, you immediately mount it, connect it and check it. If this is not done right away, problems may arise later: how can you connect the wires if the entire ceiling is already assembled? Just disassemble part of it. What if you put the last strip on glue? We'll have to break it. That’s why we install and check its functionality right away.
Installing the last panel
The most difficulties arise when installing the last strip. It usually has to be trimmed. Measure the actual distance on one side of the ceiling and on the other. The difference can be several centimeters. There is nothing unusual or complicated about this. But then there are two options:
- Simply insert the trimmed strip into a pre-glued starter profile or plastic plinth. If the panel width is sufficient, this is possible. But then you need to subtract about 5-7 mm from the measured distance and cut off the strip. Otherwise you won't insert it. And so you have to carefully adjust it with something thin (a steel spatula) so that it falls into place. After several attempts, it still works out... But besides the installation difficulties, there is one more drawback: after a while, since the strip is a little shorter, it moves away (sinks more into the molding) and a small gap appears in the ceiling.
- The second option is to glue the strip. Then, cutting off the last panel, set aside the previously measured distance on the ceiling as it is. And not from the beginning of the panel itself, but from the thrust bar. Then it is glued in its pure form onto “liquid nails”. Only the glue is applied not to the strip, but to all the guides. Both the one along the wall and the one perpendicular to the installation (to which they were attached with self-tapping screws). Further, the technology is the same: they applied it, pressed it down, set it aside for a few minutes, and then finally installed it. The disadvantage of this method is that this strip is not removable. It will need to be broken if necessary. Therefore, leave one more in reserve - just in case.
The installation of a plastic ceiling made of PVC panels is almost complete. It remains to install the last plastic plinth. First, the mounting strip on it is cut off: you leave only the baseboard. Afterwards, you also cut it at the corners at 45°, try it on, and cut it exactly. After trying it on again “dry” and making sure that the size is correct, apply glue to the plinth, only on both shelves: the one that will be glued to the ceiling, and the one that will stick to the wall.
Installation of the last plank
Sealing cracks with acrylic
Actually, the installation is finished. But sometimes another operation is necessary: covering all the gaps with white acrylic. This operation is not necessary if you bought high-quality panels that have ideal geometry - French and Belgian. After their assembly there is no need for correction: there are no saggings that form due to the fact that the panels are uneven. Otherwise, we take acrylic sealant, insert the tube into the mounting gun, and fill all the cracks and gaps. Usually these are joints and corners, as well as the junction of the plastic baseboard with the ceiling. Often there are so many cracks that you have to go through the entire perimeter.
Fill the cracks in small sections of 30-40 cm, removing all excess and leveling the seam. Acrylic is well leveled until it sets, and this is a matter of seconds. Therefore, they smeared the piece and corrected it. If everything is fine, continue to apply. You can remove excess acrylic with a soft cloth, but sometimes it’s more convenient to use your finger - for some reason it turns out smoother. Having covered the piece, take an object with a sharp and even edge (a small spatula) and a damp sponge. Excess putty is cut off evenly with a sharp corner of a spatula, then rubbed with a damp sponge until it is clean, otherwise you won’t be able to wipe it off later. So go through the entire perimeter and leave to dry for 8-12 hours.
Fresh acrylic wipes off well
After the acrylic dries, it can be drawn into the seam. You have to take the tube again and fill the cracks that appear, rub it in, remove the excess and wash off the smudges. This second time is usually the finishing time. After this layer dries, streaks remain on the plastic ceiling. Wipe them with a damp, clean sponge and then gently rub with a soft cloth until shiny. Now the ceiling made of plastic panels is ready, and after installing the lamps, the repair can be considered complete.
How to attach to the ceiling
If the ceiling is already level and does not need level correction, plastic panels can be attached directly to it. The procedure is the same: first the starting profile, then strips cut to size are inserted into it, securing at least every 50 cm.
You choose fasteners depending on the material from which the ceiling is made. You can hit wood with nails or staples from a stapler. It’s more difficult with concrete: self-tapping screws won’t work, and you’ll have a hard time drilling a hole for a dowel for each fastening. Then it’s better to assemble the frame with a minimum distance from the ceiling and then assemble everything as described above.
Frame with minimal indentation
Another option is to glue it on liquid nails. The technology is well-known, but its disadvantage is that such a ceiling made of plastic panels turns out to be non-removable and will have to be completely dismantled if something happens.
Criterias of choice
So, you came to the store to choose plastic panels for the ceiling. What you need to pay attention to:
- On the thickness and weight of the product. But here we need to take into account the design of the material. It consists of two panels, between which several rows of transverse ribs are installed. So the outer panel should be thick; it is this that can be subjected to loads. Because even the smallest crack on the front side is the penetration of moisture into the panel, causing the formation of colonies of microorganisms.
- Now pay attention to the number of ribs. The more there are, the stronger the cladding. But you need to pay attention to the location of the ribs. They should be positioned perpendicular to the panels. If the location is inclined, it means that the finishing material was stored incorrectly, for example, the packs were lying on top of each other in high stacks. That is, the upper ones squeezed the lower ones. Hence the strength of the panels is too low.
- The tongue-and-groove joint must be tight.
- Price. You should not expect that you will get high-quality material for little money. Therefore, my advice is to buy from the middle price segment.
And one moment. If you have no experience in installing ceilings made of plastic panels, then it is better to use an expensive option. It's easier with him.
Features of plastic ceilings
Polyvinyl chloride is used for their production. However, it is worth noting that there is a huge difference between the panels that are used to finish the walls and ceiling, so it is absolutely not permissible to replace them with each other.
The panels used to decorate the ceiling are lighter in weight, so they do not have the mechanical strength that is necessary for their use in wall decoration.
After some time, they will begin to become deformed and will need to be replaced. As for the ceiling made of plastic panels intended for walls, it will definitely cause excessive load on the frame. This is completely unsafe and therefore unacceptable.
Plastic sheathing is installed on the frame, which was secured using special hangers. It is worth noting that although the frame requires wooden slats, it is also permissible to use a metal profile. The shaped profile and plinths serve as fastenings for plastic panels.
If you are wondering how to make a plastic ceiling, we recommend that you pay attention to one subtlety of installation. The fact is that although simple materials that belong to a lower price category can be used to make the ceiling itself, the appearance of the product will directly depend on which panels were chosen.
For example, when choosing glossy surfaces, you can be sure that the joints on them will be almost invisible. At the same time, such a product has a rather attractive appearance and looks very original.
But if you decide to use matte panels with various patterns, then you will not be able to disguise the seams; they will be visible quite clearly. Therefore, think about everything in advance before purchasing.
- Ceiling with wooden beams
Types of suspended ceilings - which one to choose?
Options for finishing the ceiling in an apartment: advantages and disadvantages
After all, a beautiful plastic ceiling does not have to be made of patterned panels; designers note that glossy surfaces look more original and fit into any interior.
Technology of ceiling finishing with plastic panels
First of all, you need to calculate how many plastic panels you need to cover the ceiling with them. Here only two dimensions are required: the area of the ceiling and the area of one panel. Calculating both is not a problem; you need school knowledge of geometry. Next, divide the ceiling area by the panel area to obtain the amount of material. We add 5% to this indicator - just in case.
But these are not all calculations, because a suspended ceiling made of PFC panels is a frame made of a galvanized profile and two types of self-tapping screws. The frame consists of a guide profile that is laid around the perimeter of the room. It is attached to the walls with self-tapping screws and plastic dowels. A grid of ceiling profiles is placed between the perimeter. The size of the grid cells is 60x60 or 80x80 cm. The profiles are fastened to each other using self-tapping screws.
Self-tapping screws “bugs” for metal Source krepezhinfo.ru
See also: Catalog of companies that specialize in the sale of finishing materials and lighting.
Some craftsmen use wooden blocks for the frame. A budget option, but with one drawback. Wood does not withstand changes in humidity and temperature. Over time, the bars begin to warp and crack, reducing the strength of the ceiling structure. The gaps between the panels are increasing.
So, if everything is determined with the material, then you can move on to work. It is recommended to slightly repair the base surface of the ceiling. Namely: repair cracks and other defects, prime them. The goal is to prevent particles of the material from which the ceiling is made from peeling off and falling onto the suspended structure. Optimally, treat the ceiling with an additional antiseptic composition. And lastly, you need to immediately remove the electrical wiring for the lamps.
Electrical wiring under a suspended ceiling Source prodomostroy.ru
Frame installation
First of all, the lowest corner in the room is determined. To do this, the height of the ceiling is measured in the corners. In this corner, 5 cm descends from the ceiling surface. And from this point, using a laser level, lines are laid along the walls along which the guide profile will be mounted.
The perimeter has been drawn up; now we need to connect and secure the sections of the ceiling profile to it. The latter is cut to the width of the room and laid from the wall across the room. Here we must take into account the fact that plastic panels are mounted along the room. That is, perpendicular to the wall where the window is located. This is how you can avoid the visibility of joints between panels.
If the room is large, then first markings are made on the ceiling for suspensions. They are installed and secured to the base ceiling with self-tapping screws and plastic dowels. After which the profiles are mounted strictly horizontally. The photo below clearly shows how this should be done.
Installation of suspensions and profiles on the ceiling Source kitchenremont.ru
The main task of the work manufacturer is to assemble the frame in one horizontal plane. In this case, the galvanized ceiling profiles must fit into the guide profiles with their ends.
If the frame is ready, you can proceed to installing plastic panels on the ceiling.
Advantages of glossy PVC ceilings
Compared to competitive matte products, gloss has both a number of serious advantages and significant disadvantages. Let's start with the first ones.
- Gloss visually expands the space, and therefore the lowest ceilings covered with such PVC lining will visually appear higher. However, this feature of reflective surfaces should be used with caution. Thus, it is strictly not recommended to use mirrored ceilings in narrow corridors.
- You will be pleasantly surprised by its gloss and ease of use. It washes simply wonderfully, just one swipe with a damp sponge is enough, and the panel looks like new.
- And a suspended ceiling made of PVC panels can boast a variety of ready-made patterns; in this regard, plastic can only be “outdone” by collectible wallpaper, but those are simply not applicable for ceilings in bathrooms.
- If we choose not a pattern, but a certain color or shade, then plastic has no competitors at all. On display you can find products from the entire visible spectrum of tones and halftones. And what is pleasantly surprising is that they produce their own fittings for any color. But until recently, joining strips and corners could be chosen from two, maximum three shades
Video description
At the end, we suggest watching a video on how to make a ceiling from plastic panels using a frameless method:
Today, manufacturers offer plastic guides that are used instead of a galvanized profile. First of all, it's cheap. Secondly, the service life of these building elements is much lower than metal. Thirdly, the process of assembling the frame is not complicated.
If wooden blocks are used as frame elements, then the panels can be fastened using a construction stapler. This increases the installation speed several times.
And the last thing on the topic is the plastic ceiling. There are several options for decorating the ceiling surface with plastic panels. This refers to installation options. The usual one is, as described above, along the walls. There is a diagonal option, which requires special skill in cutting the material and arranging it correctly on the ceiling. This method is quite expensive, because up to 20-25% is sometimes spent on pruning, and therefore waste.
You can assemble it using geometric shapes; this material is used to cover multi-level ceiling structures or to use it as inserts with other materials. For example, the photo below shows an option for laying PVC panels on the ceiling in the form of a square.
Ceiling made of plastic panels Source potolokjournal.ru
Briefly about the main thing
Plastic for the ceiling in the form of long panels is an opportunity to quickly and efficiently finish the ceiling. This material meets all sanitary and hygienic standards.
This material is divided into ceiling material with a thickness of up to 8 mm and wall material with a thickness of 9-12 mm.
On sale there are plain models and with patterns, coated with a special varnish and without it.
The panels are connected to each other using a tongue-and-groove lock.
There are two installation technologies: frame and frameless. The first is a frame made of galvanized or plastic profiles; you can use wooden blocks. The panels are attached to it with self-tapping screws. The second is the emphasis on starting rails or ceiling plinths with additional fastenings to the base ceiling surface.
Ratings 0