Is it possible to use screenings in the mortar for laying shell rock walls when building a two-story residential building? Or is it not worth the risk and it’s better to use sand for safety?
Last edited by Bombardier; Crushed stone screening can be used; less cement is added to it than to sand. However, there is one “but”! The crushed stone screenings will have to be sifted into a fine sieve to avoid small stones getting into the solution. Otherwise, when laying, it will be difficult to achieve a complete fit between the block and the mortar.
Anatoly View Profile Forum Posts. I seriously doubt it's cheap. Granite screenings are much more expensive than sand.
Topic: Is crushed stone screening suitable for mortar for masonry walls of a house?
You were advised above to sow - I support this advice. Nurali View Profile Forum Posts.
Notice board Forum rules Active topics Forum help Contacts. Shown from 1 to 5 of 5. Topic: Is crushed stone screening suitable for mortar for masonry walls of a house? Topic Options Printable Version Subscribe to this topic…. My neighbor used crushed stone screenings instead of sand to build a garage, and he says that it turns out much cheaper.
Of course, you can use crushed stone screenings to prepare masonry mortar, and it actually costs less than river sand, but you will have to sift it to prevent large particles and pebbles from getting into the mortar. Moreover, the solution obtained from it is much stronger than from sand.
If the recipe calls for the use of additives, it is better to dissolve them in water before loading the cement.
After half an hour of mixing, the resulting mass can be taken for testing. Better in small portions in kg. The rest is stored in a mixer and stirred periodically to prevent the mixture from separating.
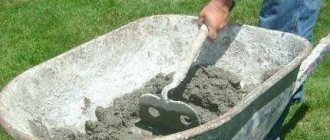
The main loading window of the concrete mixer and the container with the solution must be covered with film or tarpaulin in hot or damp weather. Manual mixing of the solution is more difficult - the physical load is higher, you need to maintain a certain sequence and method of mixing the components. First of all, the cooking container must be clean and dry.
Consumption of plaster per 1m2.
The simplest way to decorate a room is to level the walls with plaster. To determine the amount of money spent and the volume of material required, it is necessary to correctly calculate the consumption of plaster per 1 m2. However, to determine this amount, you need to know the factors that affect the consumption of plaster, and there are only two of them:
1. Firstly, this is the curvature of the walls themselves, since the amount of material that will be needed to level the walls with plaster will depend on the vertical and horizontal deviation of the wall.
2. Secondly, this is the type of plaster, since the rate of plaster consumption will depend on what type will be used.
3. So, in order to calculate the required amount of plaster, you should calculate the required layer thickness, for which you need to set beacons on the level on a thoroughly cleaned wall, i.e. hang the wall, and then in several places determine the points at which it is necessary to measure the deviation of the wall. Next, you should take measurements from the plane, add up all the results and divide by the number of points. The result obtained will be an indicator of the average thickness of the plaster layer, which will allow you to plaster the entire wall evenly.
4. For example, it is necessary to plaster 10 square meters of a wall, which is evenly covered by 5 cm. At the established three points, the deviations are 1, 3 and 5 cm. We sum these indicators (1+3+5=9) and divide by the number of points (9: 3=3), thereby obtaining an average layer of plaster over the entire surface of 3 cm.
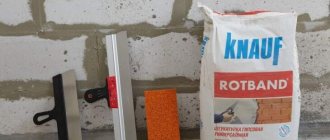
5. Next, you should determine the consumption rates of plaster per square meter. Typically, manufacturers indicate this consumption on the packaging for a layer of plaster of 10 mm. For example, the manufacturer of plaster Knauf Rotband indicates that 8.5 kg of dry mixture will be needed to plaster 1 square meter with a layer thickness of 10 mm.
6. To determine the consumption of the above dry mixture for plastering one square meter of wall, with a previously determined layer thickness of 3 cm, the specified consumption rate (8.5 kg) should be multiplied by the average thickness (3 cm). The resulting result of 25.5 kg will indicate the mixture consumption per 1 sq.m.
7. It is necessary to plaster a wall of 10 square meters with this plaster, and therefore the result obtained (25.5 kg) should be multiplied by the area of the wall (10 sq.m.). The result (255 kg) will indicate the required amount of plaster for the entire required wall area.
8. To determine the number of bags of the mixture, this result (255 kg) should be divided by the volume of one bag of the mixture (usually 30 kg). Makes 8.5 bags. This figure should be rounded up (9 bags), since the actual consumption of the mixture is usually greater than the calculated consumption. This is exactly how many bags of dry mix you need to purchase to plaster 10 square meters of wall.
9. At the same time, different types of plaster have different consumption rates per square meter. For example, the consumption of gypsum plaster, with a layer thickness of 10 mm, is 9 kg. For cement, the consumption of this material will be 17 kg per square meter, and 8 kg will be enough for decorative plaster. The consumption of bark beetle plaster, with a layer thickness of 1 mm, is 3 kg per square meter, and one and a half kilograms of vetonite will be enough.
Preparation of mortar for plastering walls
It is necessary to mix the components dry; for this it is better to use a shovel with a wide and flat bayonet. The drier the sand, the easier it is to mix the solution. After the stirred mixture becomes homogeneous and no individual traces of sand are visible against the background of darker cement, water is added to the mixture in three parts, without ceasing to mix the solution with characteristic chopping and stretching movements.
Mixing the solution requires careful mixing of the mixture to level and distribute all components and, most importantly, high-quality moistening of the cement base.
The batch should not contain lumps of dry material or unevenly moistened cement-sand mixture.
Tools for plastering walls about lighthouses
Depending on the brand of cement and air temperature, the mass dries from 10 to 20 hours. Within about half an hour, the cement base of the batch reacts with water, and the viscosity of the plaster solution increases sharply. Hydrate bonds and intermediate strength bridges begin to form in the sand-cement mixture.
The solution sharply increases its viscosity, it becomes more difficult to mix, and there is a desire to add water. For durable plaster walls, the problem of waterlogging is very serious. Plaster achieves maximum strength with strict adherence to proportions and materials.
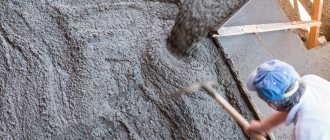
Most often, sand is used to prepare concrete solutions. But it can be replaced with screenings - finely crushed rock. An even more economical option is screening, represented by the recycling of various building materials. Contents Collapse Types of screenings Features of preparing the solution.
If the filler is not natural river sand, but crushed products of slag processing or stone screenings, the characteristics of the solution, including the fluidity and strength of the plaster mass, can change dramatically. In this case, it is necessary to make test calibration batches to check the strength of adhesion to the base. Register Login. Mail replies. Questions - Leaders The foundation slab is poured.
Buy cement plaster from the manufacturer in Moscow from 95 rubles. / 50 kg with delivery
It is most profitable to buy cement-sand plaster directly from the manufacturing company in Moscow. After all, this way you save on cost by purchasing products without store markups. Moreover, you can be confident in the quality of the purchased plaster mixtures.
For the convenience of the buyer, our plant of dry building mixtures "ZOF" delivers building materials throughout Moscow and the Moscow region. The guarantor of the quality of our products is our own laboratory, whose employees monitor compliance with the correct formulation and dosage of components. We use only high-quality components in the production of dry building mixtures.
Types and prices
You can buy a standard 50 kg bag of cement plaster mixture from us for only 95 rubles. Such packaging is convenient and profitable, especially during repair work over large areas. For use in small volumes of construction work, the plant produces 25 kg packages.
Our factory produces several types of plaster mixtures:
- Universal.
- Masonry.
- Cement plastering.
All types belong to different cost categories and differ in the additives used in their production and their ratios. Accordingly, this also affects the properties of cement plasters.
The ZOF enterprise produces several types of plaster:
- "Dry plaster mixture M-100" for universal use. It is widely used for plastering facades and for interior finishing work. The plaster composition developed at the factory is suitable for use in rooms with high humidity or in unheated buildings. Thanks to good adhesion, the mixture is perfectly applied to brickwork and concrete surfaces. During the preparation of the working solution, no lumps are formed, and the walls are leveled quickly.
- The Makplast mixture is ideal for leveling walls and is suitable for machine application. It is used for vertical and horizontal surfaces. The plaster adheres well to concrete, brick, natural or artificial stone. Walls covered with McPlast plaster are resistant to humidity and frost. The water-holding capacity of the mixture is at least 95%.
Plastering concrete walls with your own hands
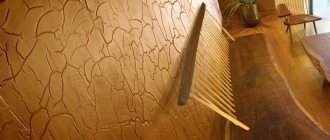
Concrete walls in houses are very strong and durable. However, such a surface has a significant drawback - it is not smooth, and therefore requires special plastering. In this article we will look at a topic such as plastering concrete walls with our own hands. Concrete surfaces are treated not only to level them, but also to protect them from moisture, extremes, and also to improve sound insulation. To finish a concrete surface, you need to know some of the nuances of this process.
There are several methods for finishing internal surfaces: applying a dry or wet mixture, using ready-made compounds, etc. The wet method of applying the solution is considered the best, despite the fact that this process is labor-intensive.
Advantages
- Concrete plaster perfectly protects walls from moisture;
- Allows walls to breathe and tolerates any temperature conditions;
- You can create different textures if desired;
- This coating can protect the building from radiation;
- Does not allow street noise into the room;
- Has thermal insulation properties;
- Not susceptible to mechanical stress.
Preparing for work
Before you begin plastering, the concrete surface must be prepared according to all the rules. Otherwise, you will not get an even and durable coating that will serve you for many years. If you are cleaning the walls of a new building, the first step is to remove any existing projections, residual resin and form release agents, as well as greasy areas and dust.
This work can be done using simple tools and various available means. You can also use the method of cleaning with compressed air and washing the walls with water under pressure.
And remember that plastering of concrete surfaces begins only after they have been completely cleaned and subsequently moistened.
Surfaces with old coating must be cleaned especially carefully. To do this, remove wallpaper, paint, and weak putty. After this, fill all problem areas on the wall with mortar and level it. For better adhesion of the concrete surface to the plaster, you can make notches using an ax or other sharp tool.
To protect electrical fragments, you can use special plugs or foam. It is also better to cover system pipes with film so as not to contaminate them during plastering of the walls. It is advisable to check the old coating over the entire base area. This can be done using a hammer by tapping the surface. If a dull sound is heard, it means that the plaster is holding firmly. A ringing sound tells you that there is a weak layer of coating in this place. In this case, it needs to be knocked down and a new layer of mortar applied.
Primer
Soil is applied to the walls to ensure their strength and durability. In addition, it helps to improve the adhesion of the plaster layer to the concrete base. The primer can also protect walls from dampness, prevent the appearance of mold and other negative aspects.
Today, manufacturers produce a unique primer called concrete contact. This type of primer is an excellent option for finishing concrete surfaces. Concrete contact perfectly stabilizes it and increases the quality of application of the mixture several times. This is a fairly strong material, but requires complete and high-quality cleaning of the surface for its application.
Net
It happens that at the joints of a concrete surface with some other material, the plaster coating begins to crack. This happens due to the fact that the materials have different structures and their drying rates are different. As a result of uneven setting of the solution, it cracks. In this case, a special mesh is used to plaster the concrete wall, which is applied to the joints. You can watch the process of using the grid in the video.
Fiberglass mesh is also used if, to level the surface, it is necessary to apply a layer of plaster with a height of 20 mm or more. In addition, thanks to this device, the coating will not crack as a result of mechanical stress, as well as during sudden temperature changes and high humidity. If you use metal mesh as reinforcement, you must paint it before use to prevent corrosion.
The last stage of preparation
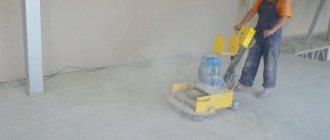
Finally, you need to check the walls for evenness horizontally and vertically. To do this, the surface should be weighed using special tools. After this, beacons are installed to level the walls. If the surface is smooth, you can start cleaning it from dust, stains and other unnecessary elements. Concrete walls are ready for the plastering process. However, first you need to prepare the desired mixture.
Plaster for concrete walls can be different. Typically, a cement-based mixture with the addition of sand or lime is used to cover such surfaces. You can use a dry mixture purchased at the market or store. The cost of this product is high and not everyone can buy it in sufficient quantities. You can prepare the solution yourself, especially since it is not difficult to make. In this case, you can save your budget.
Types of plaster
- Cement-lime mixture is the most common material for covering concrete walls. It contains cement - 1 tsp, milk of lime - 2 tsp. and river sand – 7 hours. This mixture must be prepared sequentially: dilute lime with water, separately mix cement and sand well, then combine everything. To get the consistency of sour cream, you can add either water or sand;
- The cement composition contains cement and sand in a ratio of 1: 2. In some cases, 3 parts of sand are added, but no more. The fact is that if there is an excess of this component, the solution reduces its plasticity. It is worth noting that this mixture hardens quickly, so it is not recommended to prepare it in advance;
- Previously, a lime-clay mixture was widely used for finishing concrete surfaces. Nowadays, this composition is also used by some builders. First you need to prepare the clay mixture and lime mixture separately. Then combine these two batches and add sand in a ratio of 1: 0.4: 3.
Plaster on concrete must be applied in three layers. If you are going to plaster the walls yourself, you need to become familiar with their sequential application.
First layer
As a rule, a mixture of liquid consistency is prepared for spraying. The concrete wall is covered with the first layer of plaster up to 5 millimeters thick. To fill all the recesses and cracks with mortar, you need to throw it onto the wall using a trowel. Moreover, the swing should be only with the hand, and not with the whole hand.
Second layer
Surface priming should begin after the first layer has completely hardened. The soil is prepared to the consistency of dough, and its thickness can reach up to 10 millimeters. The technique for applying primer is the same as for spraying. Use a rule to level the surface. Be sure to fill the resulting voids with solution. The surface must be leveled horizontally and vertically with a trowel.
Third layer
The final layer of covering also has the consistency of dough, but its height is 2 mm. This layer needs to be given special attention, as it is considered finishing. Its purpose is to remove all flaws and errors in the primer. It must be applied by first moistening the surface with water.