Selecting panels for further use
In order to avoid possible mistakes that may be made when purchasing plastic panels, you should familiarize yourself with their characteristic features and varieties before visiting stores, since their huge variety can turn your head. The first step is to purchase certified material, since low-grade products have a fairly low level of strength and are suddenly subject to burnout.
The advantages of plastic panels include a number of the following qualities:
- Easy to attach.
- Fire safety.
- Long period of operation.
- Increased resistance to the negative effects of moisture.
- Hygiene.
- Resistance to various microorganisms.
The disadvantage of this material is its low shock tolerance, which is why great care must be taken during transportation and installation work.
Depending on the type of coating, they can be matte or glossy. Based on the application technology, images are divided into printed and film varieties. Their standard dimensions are:
- length – 2.7-3 m;
- width – 20-35 cm;
- thickness – 8-10 mm.
The strength of plastic panels depends not only on their thickness, but also on the number of stiffeners that are located inside them. To determine the strength level of the material, you need to press its surface with your finger. The appearance of a dent indicates that its service life is short.
In addition, you should avoid purchasing material that:
- deformed or has damaged stiffeners;
- with scratches on the surface;
- differs in tone color;
- has a fuzzy or blurry pattern on the outside;
- varies in size.
Advantages of PVC panels
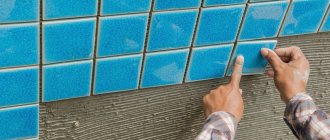
Why have PVC panels for finishing bathrooms become the number one competitor to tiles? It's all about ease of installation. Laying tiles even on the most even base is beyond the power of a person who has never done this before. The services of a specialist will be required to level and strengthen the base, mark the wall and lay the tiles row by row, observing the levels and width of the tile joint. In addition, cutting the tiles itself, if necessary, requires special tools and certain skills.
With PVC panels everything is much simpler. They have a lot of advantages:
- Light in weight : their transportation to home and installation does not cause any difficulties.
- There are several installation methods , from simple wall stickers to lathing systems, each of which can be handled even by a non-professional.
- The panels are biologically stable and during operation the appearance of fungus on them is excluded.
In addition, we can note such advantages of plastic products as moisture resistance , hygiene , durability and low cost . Of course, they also have their own characteristics. For example, despite the presence of stiffening ribs in the design of the product and the fairly large thickness of the plastic from some manufacturers, the panels are a fairly fragile material and can break if there is an unexpected strong point impact. Therefore, when purchasing, you need to choose the most durable products from European manufacturers.
However, if the lining is of good quality, then when swimming, for example, you can lean on it as much as you like: it has sufficient flexibility and elasticity to support the weight of a person.
When choosing products, you should look at such technical characteristics as:
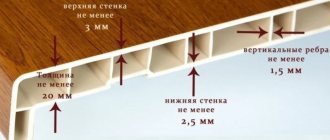
- plastic thickness (the more, the more reliable);
- presence and number of stiffeners;
- when looking at the front plane under artificial lighting, the transverse ribs should not be visible;
- the surface must be intact, undamaged, not scratched, the film on the front surface must not be damaged;
- The plastic at the ends should not have burrs or microcracks.
There are several types of PVC panels, differing in size and other parameters
Table 1. Types of PVC panels.
| Name | Peculiarities | Dimensions |
| Ceiling | Thinner up to 5 mm thick | width 15-50 mm, length 90-300 mm |
| Wall | Thicker and more rigid up to 10 mm thick | width 15-50 mm, length 90-300 mm |
| Rack and pinion | Narrow planks with shaped edges, similar to lining, have a tongue-and-groove locking connection | width 13-50 mm, length 90-300 mm |
| Leafy | Large rectangular sheets with a relief or pattern on the outside | width 50-122 mm, length 30-98 mm |
| Tiled | Tile | width 30-98 mm, length 30-98 mm |
| Sandwich | Double-layer, with a heat-insulating layer, thickness can reach 4 cm | width 90-150 mm, length 300 mm |
The width of standard wall panels is most often 25cm and 37cm , length - 2700cm, 3000cm . Different manufacturers may produce products in different sizes. The difference in price depends on various factors: the quality and thickness of the plastic, the type of decor printing, its complexity, etc.
PVC panels are divided into several types based on their coating. They are:
- single color;
- colored, with dye added to the mass;
- mirrored;
- with an image pasted on thermal film;
- with a pattern applied in offset;
- with one image divided into several panels, forming a panel.
Depending on the method of joining, products can be seamless or with a recess. Of course, when seamless panels are joined, the seam still remains visible, but hardly noticeable. If the products are chamfered, then the seams are more prominent and create a certain geometry of the room.
In addition, we offer a large selection of fittings for fastening elements: starting and F-shaped profiles, internal and external corners, connecting profiles, skirting boards. The use of fittings allows you to give an aesthetic appearance to the joints, and of course is used for more reliable and simpler fastening.
Find out what types of MDF panels are used for interior wall decoration, and also read the step-by-step instructions for finishing in a special article on our portal.
Prices for popular finishing wall panels
Preliminary calculations of the amount of material needed
In order to avoid purchasing surplus and repeated visits to the store, the first thing you should do is determine the optimal number of linings needed for finishing. The material can be mounted in a vertical or horizontal position depending on personal wishes.
In the first case, calculations are carried out as follows: the elongation of the room along the perimeter is measured, from which the width of the openings is subtracted, and the resulting indicators are divided by the width of one plastic panel. To the resulting number you should add 2-3 products as spare ones.
When performing a horizontal installation, the area of the room is measured with the openings of windows and doors taken away. The resulting number must be divided by the area of 1 panel. In this case, at least 10% of spare products should be purchased, since the amount of scraps increases. In addition, it is necessary to count the number of slats that will be used for arranging the sheathing and as fasteners. First of all, the height of the walls must be divided by the pitch of the frame. Basically, this figure reaches 50 cm, after which it needs to be multiplied by the perimeter of the room. The resulting value indicates the length of the slats in linear meters. By measuring the height of the corners and multiplying the resulting number by their number, the full footage of the corner profiles will be obtained. To this indicator you should also add the perimeter of the openings of windows and doors.
Types of decorative panels
Decorative wall panels today are made from a wide variety of materials, which ensures their wide range. Thanks to innovative technologies, such panels used for wall cladding are made from the following materials:
- wood (the material used is laminated wood, as well as solid wood);
- gypsum vinyl;
- chipboard;
- plastic (polyvinyl chloride);
- aluminum;
- fibreboard, which has different densities (such products are made from MDF, fiberboard and HDF);
- cork;
- acrylic glass;
- polystyrene;
- textiles and leather.
Let's consider each type separately.
Panels based on wood. Such wooden products for wall decoration are made from various types of wood. The most commonly used types of wood are: cherry, ash, oak, beech, pine, alder, and cedar. This is an environmentally friendly material, so wooden panels are suitable for finishing walls in any residential premises (for example, a bedroom, an office).
Gypsum sheet products. They are based on plasterboard and gypsum vinyl. Such gypsum products are often used for cladding internal partitions and walls. Gypsum panels are not afraid of moisture, so they can even be installed in the bathroom. In addition, gypsum sheets are resistant to mechanical stress. You can use different detergents to wash them.
Decorative panels made of composite materials containing aluminum have a beautiful holographic appearance. To create them, special processing technology is used. They have the form of a structure that consists of two layers of aluminum sheathing and a sheet of monolithic polyethylene located between them. This design is similar to plasterboard sheets, but with a different filling.
Chipboard. Here the base contains wood, or rather sawdust. The binder in this case is resin. Such products are obtained by using the hot pressing method. The material is less reliable than wooden boards. Used for finishing walls in insulated and dry rooms. These carved panels come in different varieties. They have different densities: MDF (medium density) and HDF (high density).
Article on the topic: How to make a shed at the dacha: and organize the storage of things (22 photos)
Plastic panels. They are made from polyvinyl chloride. They are in greatest demand. These plastic products have a long service life, high humidity (suitable for finishing bathrooms), easy maintenance and excellent hygienic properties. Plastic panels can be installed in any room: bathroom, living room and even in offices.
Decorative cork. Cork, like wood, is a natural material with a long service life and easy maintenance. Such sheets are not subject to deformation, do not absorb moisture (suitable for installation in the bathroom), odors and dust, and do not burn. Any dirt can be easily washed off from them.
Acrylic glass products are made from synthetic resins. Various methods and approaches are used to decorate them. The surface of acrylic slabs can even be decorated with semi-precious stones.
Polystyrene. This is a type of plastic sheet. They have a special protective film layer. Their surface can be mirror-like, rough or smooth. Carved panels have different thickness parameters. They also produce products made from foamed polystyrene. This type of sheet has a rigid base and a reinforced layer. They have a high degree of noise, hydro, and thermal insulation. In addition, they are characterized by moisture resistance, so they are suitable for finishing the bathroom.
Fabric and leather panels. These products have different parameters of shape, texture and degree of softness. They are used to create a bright and unusual accent in rooms. You can even print photos with various images on such decorative sheets.
As you can see, there is a huge variety of decorative panels for wall decoration. The choice from the available variety (gypsum, plastic, etc.) must be made based on what properties of the finish you need, as well as where it will be used (in the bathroom, kitchen, bedroom or office).
Methods for installing plastic panels
There are 3 methods for fixing slats on walls:
- Place on glue. This method is intended for fastening on perfectly flat and smooth surfaces. The composition used is a special glue for PVC or universal “Moment-montage”, as well as liquid nails. The use of this method allows not only to reduce costs during installation, but also to facilitate it, eliminating the need to build a frame. The disadvantage of fastening the panels with glue is the impossibility of replacing damaged lamellas, as well as the difficulty of dismantling them during repair work.
- Self-tapping screws. When fixing using these fasteners, it is not necessary to have a perfectly flat surface. To carry out installation, an over-the-top screw is required, which allows you to significantly increase the speed of work. The disadvantage of using it is that self-tapping screws are best screwed into wood sheathing, which requires additional time to cut the timber and treat with an antiseptic.
- Staples or clamps. The most optimal options. Staples and clamps are quickly and easily attached to the frame and securely connect the slats to the surface of the walls. The installation of the sheathing is carried out from metal profiles, the assembly of which does not take much time and does not require much effort. In case of damage, any element can be replaced without any difficulty with a similar new one. Dismantling of the material is also done quite quickly.
Preparing walls for finishing
Before installing plastic panels, it is necessary to clean the surface of old material, seal all cracks and level out visible defects, and also treat the walls with a product that prevents the occurrence of “fungus.” The application of this composition eliminates the possibility of dust accumulation and mold, which negatively affects the room microclimate. When installing the lining on the sheathing, it is not necessary to level the surface.
The process of attaching plastic panels
The following describes step by step how to properly attach plastic panels in order to avoid any shortcomings that could negatively affect the service life of the material.
Wall marking
When installing the frame, it is necessary to use a building level, which will make it possible to eliminate the possibility of distortions. In order not to measure each slats, you need to make markings on the walls. The lower part of the frame should be 1-2 cm above the floor covering. At this height, you should draw a point on the wall surface with a pencil, after which, using a level, you need to draw a horizontal strip along the entire perimeter of the room. A similar line must be drawn along the border of the finishing material or under the ceiling if the sheathing is not at full height. Next, you need to measure upward 0.4-0.5 m from the strip marked below, install the beacon and continue this procedure to the top line. Through the beacons you need to draw strictly parallel lines along the length of all the walls, which are the final stages of marking.
The panels must be fixed to the frame perpendicularly, which is why the horizontal sheathing is finished vertically and in the opposite direction. In the case of drawing a vertical structure, the first strip must be drawn in the corner from the ceiling to the floor using a plumb line. Next, the second corner is marked, after which other lines are drawn with an interval of 0.5 m.
Fastening the frame
When constructing lathing from wood materials, all its components must first be opened with an antiseptic. Using a hammer drill, holes for dowels are drilled along the drawn strips at a distance of 0.5 m. Next, you need to attach the slats, align them horizontally and fix them on the wall surface. In areas of unevenness, wood wedges should be placed under the frame. The wires running along the wall must be hidden under the finishing, which requires taking measurements, drilling holes in the surface and securing them with clamps so that there is no peeking out from behind the plane of the frame.
Fixing plastic panels
Installation of the first lamella should be carried out from the corner of the room farthest from the entrance, which is considered the most noticeable. Next, measurements are taken, and if necessary, the lining is cut to length using a hacksaw. One side of the lamella is installed in the molding on the side, which leans against the corner and is secured to the frame from the back side.
The second panel must be inserted into the fastening groove of the previous one, pressing the joints tightly and fixing them to the wooden elements of the sheathing. To increase the tightness of the joints, the edges should be lightly coated with silicone before installation. All further panels are attached in the same way.
For switches for lighting elements and sockets for electrical appliances, appropriate holes should also be cut in the lamellas as work progresses.
Upon completion of installation, these areas must be covered with plastic boxes. The edge panel mainly needs to be cut in width, so the first step is to apply it to the wall surface, mark strips corresponding to the dimensions of the opening using a pencil, along which the lamella is then cut with a hacksaw.
Fastening moldings
Upon completion of the installation of all panels, the walls should have a monolithic and even appearance, with no gaps on the surface of the seams and in other areas. To hide them, all existing joints and corners are closed using plastic moldings. The design of these products makes it possible to neatly fit onto the edges of the slats on both edges, giving them an attractive appearance.
Lastly, along the length of the ceiling, decorative moldings are installed, and floor skirting boards are fastened to the floor.
What sizes are there?
Decorative panels for walls vary depending on the size of the sheets. They come in the following types:
- Tile products. They are produced in the form of square sheets. Their standard size is 30x30 cm or 90x90 cm. Having these dimensions, they are suitable for laying out mosaics or panels. They come in a variety of colors and patterns. This square is equipped with special mounting grooves to simplify the installation process. Square carved panels (gypsum, plastic, etc.) are used to decorate various rooms;
- Rack (typesetting) sheets. They are produced in the form of slats or planks. They are characterized by different sizes: length from 0.9 to 3.7 m, width up to 30 cm, thickness does not exceed 12 mm. The slatted panels are attached to a pre-prepared sheathing; fastening to the frame is carried out using clamps (special metal brackets). Lath panels (gypsum, plastic, etc.) are installed close to each other. Visually, this cladding is very similar to lining;
- Sheet panels. Such sheet panels have the form of sheets. They are characterized by a width of 122 cm, a height of 244 cm, and a thickness of no more than 6 mm. Sheet products are convenient in situations where it is necessary to avoid the formation of a large number of seams and joints. Due to their size, carved sheet panels are quickly installed. Sheet products are made from recycled wood (for example, fiberboard, MDF), aluminum, PVC, plasterboard, and polystyrene. Such sheets have a decorated front side, which has water-repellent properties. Installation here is also carried out on a specially prepared sheathing.
Related article: How to properly putty plasterboard structures
Features of installing PVC panels on the ceiling
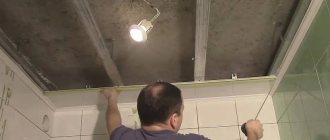
Before attaching plastic panels to the ceiling, you should determine the distance between the slats and it. This distance directly depends on the type of lighting installed. When installing built-in lamps, the gap should be at least 100-150 mm, behind which passing wires can be completely hidden. Before installing plastic panels, you should draw the locations of the lighting fixtures on them using a pencil and cut out the corresponding holes. Next you need to insert the lamp bases.
After this, you can proceed directly to the installation of the plastic panels themselves, the installation of which on the ceiling is carried out in the same way as on the walls. If the surface is flat, then the sheathing does not need to be erected. Before attaching the plastic panels to the ceiling, you also need to install ceiling skirting boards on three walls. To install the lamellas evenly, you must use a building level.
Note! When installing plastic panels in a room with an increased level of moisture, you should fill the gaps in the ceiling with silicone sealant, which will allow you to achieve full waterproofness.
PVC panels - what is it?
PVC panels are a finishing material made from polyvinyl chloride, a plastic that does not burn well and is chemically resistant. Now let's look at the design of PVC panels.
PVC panels for ceiling
They consist of two thin sheets of plastic connected to each other by many stiffening ribs. Along the length of the PVC panels, on one side there is a large mounting shelf, and on the other, a small mounting shelf. The first is used to attach the PVC sheet to the ceiling frame, and the second is used to connect the installed sheets to each other.
So why have PVC panels become so popular? Below is a list of the advantages of this finishing material.
- PVC panels are resistant to moisture . Has the plaster started peeling off the ceiling due to dampness? This will not happen with plastic plates! Do you live in a multi-storey building where there are frequent problems with the plumbing, and you are afraid that the neighbors above may flood you? For PVC panels this is not a problem - after a local flood they can be taken, dried and simply installed back.
- Durability. High-quality PVC panels themselves can last for decades . And replacing damaged or worn-out panels will not be difficult.
- The ceiling made of polyvinyl chloride panels is easy to care for - you just need to regularly wipe it from dust with a sponge dipped in a soap solution. But it should be remembered that to clean such material you cannot use products containing abrasive particles or strong alkalis and acids.
PVC panels
PVC mirror panels
Useful recommendations for installing plastic panels
During use, installation work and when caring for PVC lining, many owners may also find the following tips useful:
- When attaching lamellas without constructing sheathing, glue is used, which must be applied in even lines in the form of a grid directly to the surface of the walls, avoiding leaving empty spaces.
- When cutting and drilling holes, the panels should be positioned with the front side up. For cutting you need to use a hand saw, a hacksaw or a construction knife. When using them, it is imperative to ensure eye protection by wearing special glasses.
- When driving nails, you should avoid the possibility of the hammer hitting the surface of the panels themselves, as this will cause dents.
- Cleaning PVC slats is required using a soap composition. Under no circumstances should abrasives, hard sponges or solvent-based mixtures be used to clean the panels.
Having understood how to attach plastic panels to the wall and having carried out exactly all the steps described above with your own hands, you will be able to qualitatively decorate the room and transform it beyond recognition, but in order for the material to last for many years and not lose its appearance, it must be handled with care and maintained in proper form , occasionally performing wet cleaning.
Required Tools
Before attaching plastic finishing material to the wall, you will need to prepare the following tools:
- electric drill;
- scissors;
- hacksaw for metal;
- roulette;
- building level;
- marker or pencil;
- ladder;
- wood hacksaw;
- screwdriver or screwdriver;
- hammer;
- stapler
Using a tape measure, measure the working surface, this allows you to correctly calculate the required amount of material for finishing the walls. The wall surface must be cleaned of wallpaper. If the panels are attached with glue, then the wall or tile must be cleaned of paint and dust.
Before attaching PVC panels, they should be kept for about 30 minutes at room temperature. It is not advisable to immediately remove the protective film before finishing the work; it will preserve the presentation of the finishing material.
Installation of PVC panels can be carried out using the following methods:
- Mechanical fixation of finishing building materials to the sheathing, using staples, screws or nails. A fairly reliable method, and most importantly, very simple. This type of fastening is not recommended for apartment rooms in which large temperature changes are observed, since a PVC panel limited by a rigid fastening will not be able to expand and contract under the influence of different temperatures, and this can lead to slight warping of the coating and, as a result, its damage after a while.
- Fastening PVC panels to wooden or metal slats using clamps, which are fixed with nails, staples or self-tapping screws. This method allows the panel to change its physical dimensions due to temperature changes, since the clamp does not rigidly fix the material to the rail.
- Fastening with clamps is similar to the previous method, but on plastic slats. This installation method makes it very easy to fasten the “board” to the sheathing and also simply dismantle the entire cladding if it is necessary to move it to another room.
- Installing PVC plastic panels directly onto a concrete base using glue. This method of attaching panels requires a flat wall surface. Accordingly, before starting the installation of the base material, it is necessary to level the surface of the wall or ceiling by treating it with a cement-sand mixture, putty and primer. Despite the fact that preliminary preparation is required, it is a very simple method and, importantly, does not interfere with the dimensional fluctuations of the plastic.
- Fastening PVC panels to the sheathing slats using glue. The lathing fulfills its intended purpose, as if leveling the surface, and the PVC trim is mounted to it using glue.
Only you can choose the panel installation method, but still take note of some nuances:
- Temperature conditions in the room.
- High quality surface condition.
- Weight of building materials.
[adsp-pro-25] Considering the nuances, before you begin finishing work, think about what might interfere with the normal installation process.
Adhesive for plastic panels
To install the material on glue for PVC panels, you need to choose it correctly. There are several conditions for the composition:
- Water resistance.
- Viscous consistency of the composition.
- Resistant to temperature changes and ultraviolet rays.
- Environmental safety for biological organisms.
- Preferably a slight odor.
All these conditions are successfully fulfilled by the following adhesive compositions:
- Liquid Nails.
- Titanium.
- Moment.
