Lighting Features
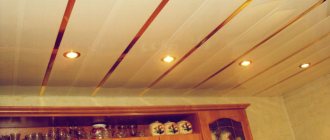
It is with the choice of lamps that the planning of all work begins. For slatted ceilings, built-in spotlights are used, which can have different sizes and require the use of different types of light bulbs.
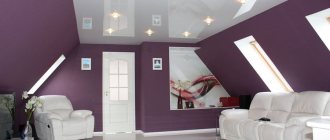
Ideal design option for a country house
Type of light bulbs used:
- incandescent lamps;
- glow plugs;
- halogen;
- LED;
- luminescent.
Light bulbs differ in power, energy consumption, and level of luminous flux . Modern light bulbs provide lighting close to natural and have low energy consumption. I will not dwell on a detailed description of the options; this is the topic of a separate article.
Modern light bulbs provide illumination close to natural
However, only after choosing lamps with suitable lamps can you begin to calculate their quantity.
Based on the room's need for light and the performance of specific light bulbs, you can calculate how many lamps are needed. A good lighting store will help you make calculations on the area of the bathroom and the height of the walls.
When the number of lighting points and the required installation height have been calculated, you need to draw a diagram of their location. Here you can either turn to a designer for help or figure out on your own where the lamps should be located. Electrical wiring is laid in special cable channels before installation of the suspended elements begins.
When assembling the ceiling, you will need to cut holes in the slats to suit the width of the lamps, taking into account the lighting scheme. Therefore, it is especially important to ensure that lighting points do not appear at the junction of two levels.
Minimalism style
Tip Try to arrange the lamps so that each is either exactly in the middle between two panels, or in the center of one.
To make this possible, the width of the selected slats must be known before drawing up the lighting scheme.
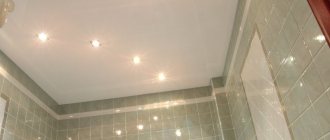
Slat ceiling design in the bathroom
In order to choose “your” design, it is worth considering three main parameters:
- Element color.
- Complexity of design.
- Direction of slats.
Provence style
The beauty of a slatted ceiling is that no matter how complex its design may seem, installation remains quite simple. Therefore, you can safely choose any option you like and bring it to life.
Color of visible structural elements
When buying slats, you can find an incredible number of colors . There are even quite a few shades of white, from snow-white to milky. Metallic shades are often found, from golden to steel. You rarely see gray, beige, black. But if you wish, you can even find yellow, red, green slats.
Different colors can be combined by using two shades of panels and laying inter-slat inserts of a different tone. I want to talk about the most common combinations that have repeatedly proven their viability in real life.
Luxurious option for the bathroom
White color
A simple white ceiling is good because it matches any wall and floor decoration and visually slightly increases the volume of space. The versatility of this solution can hardly be overestimated. Moreover, you can make it either a seamless fabric or with inter-slat inserts of different shades.
Popular inserts in metallic shades:
- chromium;
- silver;
- steel;
- gold.
This decor looks bright, but goes well with plumbing elements and can be used in different compositions. However, the volume effect that occurs when transitioning from white to darker stripes is only suitable for rooms with ceilings of at least 2.7.
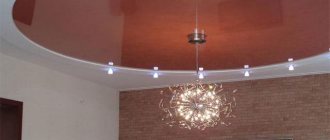
Dark base
A black ceiling, shades of dark gray, and metallic look stylish and respectable in combination with the dark decoration of the room, chrome parts, and glass. For a modern bathroom this is a bold but interesting solution. With a well-designed interior, the bathroom will evoke a feeling of peace and tranquility.
If the room is small, preference should be given to a glossy ceiling. The matte dark surface will press, emphasizing the size of the room. The matte surface with glossy metallic inserts looks stylish.
A brown ceiling will suit almost every design
Contrasting solutions
If bright tiles are used in the bathroom: red, orange, green, blue, then inter-slat inserts of the same shade on a white background look impressive. Such experiments within the framework of modern style allow you to make the bathroom interesting and breathe life into it without unnecessary decor.
White inserts look unusual on a dark or mirrored steel background . White visually evens out the glare surface, lightens the structure, preventing the ceiling from looking gloomy. With their help you can emphasize the height of the walls.
Original bathroom design
In complex structures, two different basic shades can converge at different levels and even in the same plane. Combinations that look good:
- white with silver;
- white with gold;
- white with steel;
- black and chrome.
For a large bathroom, you can use all the colors of the rainbow, complementing them with white. Contrasting combinations require consultation from a designer, since it is difficult to independently select the right amount of two different colors.
Soft color combinations
Light, muted shades of any color can be combined with a white base or light inter-slat inserts. Mint, olive, beige, blue, lilac ceilings look beautiful and correspond to a modern, classic style . You can experiment more boldly with them, since soft transitions from light tones to white are not striking.
Cozy room in rustic style
Combinations of different shades of gray, black and dark gray, also look calm. An unusual dark ceiling with a combination of two shades looks more voluminous and interesting. The soft transition here ensures the visual lightness of the design.
Use of complex structures
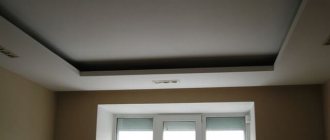
A slatted suspended ceiling can be multi-level if the height of the room allows. The frame for such a structure is not much more complicated than a single-level one, but the design becomes more interesting . In addition, a two-level solution allows you to close the volumetric part of communications, or layout flaws.
In a spacious bathroom, using two levels, you can visually divide the room into domestic and procedural parts. You can experiment with lighting by placing light sources between levels (for example, using LED strips).
Wood decoration
The second level can go in a “wave” and can have strict geometric shapes. But an important issue in its formation will be the location of the slats relative to the first level. So, the slats of both levels can go in the same direction if the shape of the room is rectangular and it is necessary to visually expand it.
But there are options where slats of two levels go perpendicular to each other, or even at a certain angle.
It is important to be careful not to get a feeling of chaos and disharmony instead of an unusual composition.
Direction of slats
The simplest option is to lay the panels in one direction. As a rule, installation is carried out in width so as not to create the effect of a narrow room. However, you can safely compose more complex compositions.
Create a wave effect using panels
So, the surface is divided into two parts, using two colors of slats. Their direction is perpendicular to each other. This move makes the drawing more complex, thereby visually smoothing out the feeling of disproportion of the room with a poor layout.
Tip By laying two rows of slats perpendicular to each other, you can separate them with a smoothly curving insert. With this touch you will remove the feeling of severity and rudeness of the decision.
There are more complex options when the pattern involves up to 4 directions of the slats. However, such creativity requires space, that is, a large bathroom. Despite the complexity of the work, the result may not be as attractive as we would like.
Small, cozy room in white colors
Guide profile
The main element of the slatted ceiling is the guide profile. It is called a stringer or traverse. They have different shapes, but U-shaped options are most often used.
The downward facing shelves have teeth. With their help, the ceiling slats are subsequently fixed. Holes are made at the top of the profile to secure the hangers.
Installation work
This ceiling can be installed with your own hands without special equipment. Supplies you will need:
- Laying profile, which is mounted around the perimeter of the room.
- Stringers, hangers to support the structure in the center.
- Slats, inter-slat inserts.
- Dowel-nails, self-tapping screws.
To work you will need:
- drill;
- screwdriver;
- perforator;
- a set of metal scissors and a knife;
- marker;
- roulette;
- ruler.
- pliers;
- scotch.
Hunting lodge
The marking is done so that the surface is strictly parallel to the floor. A U-shaped profile is installed along it, which will become the basis of the structure. Then the hangers and stringers are attached at the same level.
The slats are cut so that they are 3-5 mm shorter than the distance between the profiles. They are installed sequentially. The gaps are closed with inter-batten inserts after the panels are installed, or during the process.
Useful tips
When the materials are selected and the layout of the lamps is outlined, a sketch of the location of the slats is made, it becomes clear what the final design will be. To ensure you are satisfied with the result, pay attention to a number of useful tips.
If the ceiling turns out to be too bright and attracts attention, then you should show moderation in decorating the walls and decorating the room. Overall, the idea of the top becoming the centerpiece of the bathroom is quite interesting.
Tip When using a combination of white and bright colors, make sure that the bright details are no more than 30%. Otherwise, the design will visually press and distort the proportions of the room. The combination of white with dark gray, steel, and black also requires caution.
Such experiments are carried out only in large rooms with high walls.
The surface can be made unusual using various techniques: choose a non-standard color for the slats or intermediate inserts, make two tiers, lay the slats at an angle relative to each other, combine contrasting colors.
You should not use all these techniques at the same time, otherwise the solution will be too flashy. It is better to choose only one way of unusual decoration.
You will be pleased with the variety of colors and textures of slatted surfaces
VIDEO: How to install a slatted ceiling in a bathroom?
Slat ceiling
Step by step guide
Attaching suspended ceiling slats
In the first option, small gaps form between the slats. This design is used in rooms with a large area where gaps will not be noticeable.
With a closed slatted ceiling, the slats overlap one another. As a result, no gaps are formed. Such designs are the most common.
In the gapless version, the slats are mounted tightly to each other. As a result, no gaps are formed between them.
The slats themselves are selected depending on the type of ceiling. But besides this, there are differences depending on the country of origin. Thus, German companies produce slats of strictly rectangular shapes. Italian manufacturers have them more rounded.