Types of woodburners
There are not so many different schemes and designs of rooms for storing firewood, but there is nothing wrong with that. In fact, everyone who built wooden woodsheds for their dacha with their own hands chose the simplest, most convenient and reliable schemes. Beauty is not particularly required here, the main thing is reliable storage and a convenient way to store and select firewood in winter. And, of course, simplicity is important so that you can build quickly, and not sit in the evenings and plan step by step the construction of a firewood shed with your own hands, as if it were a house and not a shed.
Typically, firewood storage structures are divided according to storage method into several main types:
- A portable or small firewood rack, used for storing small logs and logs stacked in one row. There is no roof or sides. In essence, this is an improvised rack made of timber and boards, on which a small supply of firewood in the country is laid out for drying;
- Freestanding woodshed. It is built according to the same scheme as the barn. Despite its apparent complexity, this type of firewood maker can be made by yourself without any problems;
- Wall-mounted firewood burner, often used in dachas with sheds. In this case, the woodpile is laid out in one row across the entire width and height of the wall.
Important!
It is believed that this installation method will serve as additional insulation and thermal insulation for the walls. Many dacha owners prefer to build a woodshed with their own hands according to this scheme, which is not always justified. The woodshed looks unusual, but such a design is noticeably more hassle than it’s worth. Firewood brings garbage and pests into the yard. In fact, with this arrangement, the firewood dries only on the sunny side of the dacha; the rest of the woodpile picks up moisture in winter and often freezes. Therefore, experienced summer residents prefer to build a firewood shed at their dacha with their own hands in a free-standing version. It’s more hassle, you have to go farther to get firewood in winter, the quality of the fuel is much better.
It is best to place the woodshed on poles at a distance of at least five meters from the cottage
For summer dachas, it would be correct to make a portable type of woodshed; the supply of firewood is usually small, and most often it is necessary to store it under the porch or next to the stove. In this case, any available material is used for construction, from old boards to metal corners, roofing scraps, barrels, slabs and timber.
We build a woodshed with our own hands
Before building a woodshed, the developer will have to answer a number of questions:
- Size of the structure.
- Choosing a location to place the structure.
- The optimal type of wood burner.
- Design of the structure.
- Selection of necessary materials.
Let's consider the solution to some issues in more detail.
Dimensions and capacity
If the supply of firewood is intended to be used not for seasonal heating of the house and cooking, but only from time to time for lighting a fire or barbecue, then very little firewood will be needed.
In this case, you can limit yourself to the construction of a free-standing shed or a small shed, which will perform two functions at once: a warehouse and a utility unit. If you plan to fully heat a country house, then you should build a larger structure located not far from the house.
To determine the dimensions of a future building, it is enough to know the volume of fuel consumed.
The second way to determine the dimensions of a woodshed is the availability of the material that is planned to be used for its construction.
Choosing a location on the site
The dimensions, purpose and type of future construction will be decisive when choosing the location of the structure:
- If you plan to use firewood exclusively for lighting a barbecue, then the best option would be to build a woodshed with your own hands with a pitched roof, located in the recreation area.
- As a rule, a building for storing firewood is not an architectural masterpiece, so the best option is to place it in a corner in the backyard of the site.
- When designing such a structure, one should take into account the possibility of a free approach and the presence of a path with high-quality coverage. This will ensure access to the woodpile during rain and winter.
- The place for storing firewood should not be located in a low area where moisture accumulates.
- The building will inevitably create shadows, which may interfere with the growth of green spaces. Choose a place free of vegetation for the woodpile.
Despite the fact that a woodshed or shed is located on your own land and is not qualified by law as a permanent structure, you should not place this structure, guided only by your own preferences. If the building interferes with the normal use of the adjacent plot, the neighbors can go to court and demand that the nuisance be eliminated, including moving the building, which is associated with additional financial costs.
What material to build from?
If you need to build a firewood shed of normal quality, then it is best to purchase lumber, angles, screws and roofing in advance. If you plan to build a firewood shed with your own hands, then it is better to use wood, it is more convenient to process, forgiving of mistakes and shortcomings in marking, the material is simply difficult to find.
If you plan to assemble the woodshed with your own hands step by step, you will need to purchase:
- The beam has a cross section of 70×70 or 90×90 mm, the size is selected depending on the height and area of the frame. For a small dacha, you can use seventy, in other cases you will have to purchase a more massive beam;
- Boards for covering the floor; material with a cross-section of 20×150 mm is suitable; they are also used for laying sheathing under the roofing;
- Wooden slats 40×40 for internal struts and frame struts. There should be plenty of such goodness at the dacha; if you want to save money, then it is quite possible to dissolve the remains of the slab.
In addition, you will need to bring cinder blocks to the dacha, at least 8 pieces, they will be used to build a columnar foundation. For the roof, you can use roofing felt, roofing felt or bitumen shingles, remnants from the roofing of the dacha, or buy several sheets of metal tiles or corrugated sheets.
A small but high-quality shed for firewood can be built entirely from a twenty board
Any substitutes in the form of plastic film, fabric or tarpaulin, plastic cannot be used, otherwise the fuel supply at the dacha will very quickly rot from moisture and sunlight.
Where is the best place to build?
The rules for placing a woodshed on a personal plot are approximately the same as in the case of drying lumber after unraveling the log. Firstly, you cannot place the firewood shed in an open, well-lit space. On the one hand, it is simply a pity to use the territory of the dacha for storing firewood; on the other hand, this method of storage often leads to the woodpile being washed out and burned out. The fuel can dry out, as a result, the wood in the dacha stove burns out in a matter of minutes, all the heat evaporates with the draft. In winter, such woodpile becomes damp to such an extent that organizing heating of the dacha becomes a huge problem.
The storage location should be moderately illuminated by the sun and have a draft.
Secondly, when planning even a simple firewood shed for a summer residence, it is absolutely forbidden to build it with your own hands in places where water is drained from the roof of the house or next to drainage gutters. A large amount of splashes will cause the lower layers of firewood to rot.
An acceptable option for placing the woodshed would be a site not far from the cottage, in a small draft and preferably under the canopy of a large tree. In addition, if you plan to cover the canopy with bituminous tiles or roofing felt, then you will need to take the firewood away from the possible emission of sparks from the chimney of the nearest cottage stove or summer kitchen.
Types and advantages of wood burning for a bathhouse near it
The combination of the development and landscape of the land plot, the wealth of the owner, and the appearance of the bathhouse determines the type and location of the block for storing a supply of logs.
There are many options for the placement and design of firewood racks near the bathhouse: each steamer brings his own vision of the convenience of using the sauna to the standard design.
exist .
Attached to the wall
The attached woodshed is arranged in the same style as the bathhouse. Particular attention is paid to the roof . It is important that the drain does not leak into the adjacent storage area. Isolation of logs from the log wall should prevent the penetration of wood pests into the structures of the main structure. Fire danger is a significant disadvantage of this arrangement.
Under the same roof
A firewood storage and a bathhouse under a single roof are arranged when logs are the main type of fuel for the steam room.
This option is a special case of constructing a complex structure for a utility block and sauna in accordance with the project developed before construction.
In order for the bathhouse with firewood to fit organically into the design of the buildings on the site, the combination must be planned at the stage of working out the placement of the object.
Carefully! Fire safety with this storage location is given special attention.
Autonomous
The woodshed near the bathhouse is an autonomous woodshed. It is a covered space protected from rain and snow on all sides. The logs are isolated from contact with the ground by a gap of ≥10 cm. The walls should not be too dense - air circulation is carried out through them to dry the firewood in the woodpiles. A positive point: the ability to store brooms prepared for the winter for the steam room.
Portable
The portable firewood holder for a bathhouse has compact dimensions, which allows you to carry logs in your hands for 1–2 fireboxes.
Such storage belongs to the short-term category, for the period of warming up the steam room.
The supply of firewood and logs from the mobile basket is consumed quickly; it is not considered as a way to save from precipitation.
Serial with accessories
Serial firewood for logs and bath accessories is offered by many manufacturers at a relatively low price: from one and a half to 5 thousand rubles. This is not only a means for placing firewood, a poker and a scoop near the firebox, but also a thing with artistic features that can enliven the interior. Models of firewood racks made of forged metal are especially attractive.
Each of the listed types of wood burning for a bath has advantages and disadvantages. But under some circumstances, the disadvantages become advantages.
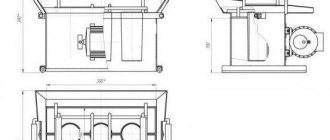
Drawings for making a woodshed for a summer cottage with your own hands
The selection of a firewood shed construction scheme is determined by the location and capacity of the firewood storage. For a small stove installed in the hallway of a dacha, you can build a simple shelving unit from wooden slats nearby.
Case dimensions 145 cm wide and 130 cm high
The design allows you to stack firewood to a height of up to 120 cm, which is more than enough for a small dacha, however, the firewood rack is unstable. Therefore, it can only be installed against a wall.
The street version of the firewood rack is shown in the drawing below.
This is one of the most popular and popular models of sheds for storing firewood in the country. It already contains all the most important elements of a real woodcutter:
- Sloping roof with drip strips, thanks to which rainwater does not flow inside the storage facility, but drips onto the ground next to the building;
- The walls are made of boards or lining with a mandatory ventilation gap. As a result, the interior space is perfectly ventilated, and the firewood for the dacha remains dry throughout the entire season;
- The structure of the woodshed is installed on columnar supports, which ensures normal ventilation of the plank floor.
Important! In dacha conditions, it is recommended to install all free-standing firewood sheds on columnar supports.
This not only protects the wooden structure from rotting, but also makes the process of laying and selecting firewood for heating the dacha more comfortable.
If the volume of firewood harvested for a dacha exceeds 4 m3, then the woodshed will need to be built using a frame structure from timber and boards, approximately the same as in the case of building utility rooms for a dacha.
One such option is shown in the diagram below.
In fact, a large wood shed is the same shed, the walls of which are not completely sewn up, but with ventilation gaps. In this case, it does not make much difference what material the walls will be covered with; it can be lining, remnants from cutting the slab, or ordinary lath. Sometimes there is no suitable material at the dacha, and the walls are tied with vines.
Wood shed
The easiest woodshed to make is made from timber and boards. In terms of its design, it looks like a small shed with a pitched roof, but with “slitty” walls.
The construction algorithm is as follows:
- Site preparation. They select a place on the site, remove vegetation, carry out markings, and determine where to install the pillars for the foundation.
- Installation of a columnar foundation. Remove a layer of fertile soil at the site where the pillars are laid. The bottom of the pits is compacted, a sand and gravel cushion is filled in, pillars made of building blocks are installed and leveled. If the soils are wet, then folded pieces of roofing felt are placed under the blocks.
- Installation of the lower trim. Sheets of roofing material folded in half are laid on the blocks, on top of which a lower frame made of timber with a cross-section of 100x100 mm is laid. For proper installation of the strapping, use the simplest type of corner connection of the beams - into the wood floor. For greater reliability, each beam can be secured to the blocks using anchors.
- Installation of racks. The racks can be made from timber 100x100 mm or 100x50 mm. The front and rear pillars are made in different lengths. For an extension, the front pillars are made shorter than the rear ones; for a detached building, vice versa. The racks are aligned vertically, each is fixed with a pair of temporary jibs, then attached to the lower frame using metal corners and screws.
- Installation of the top trim. First, grooves “into the floor of the tree” are pre-selected on the ground on each beam of the top trim. As for the lower crown, a beam with a section of 100x100 mm is used here. First, the strapping elements are fixed to posts of the same height - for this, a temporary fastening in the form of a perforated metal strip is used. Then the transverse elements of the strapping are fixed. Check the angles and levels, adjust if necessary, and finally secure the top trim to the racks with corners and self-tapping screws. Remove the jibs and temporary fastenings.
- Installation of additional racks. These are stiffeners that take part of the load from the roof. They are also necessary for attaching the fence, and, if necessary, for installing the door. Typically, the spacing of elements should be at least 500-600 mm, but in each case it depends on the length of the fence board. For additional racks, use a beam with a cross section of 100x50mm. Fastening to the harness is carried out with metal corners and screws.
- Installation of a pitched roof. First, the rafters are installed - the load-bearing elements of the roof. To do this, use a beam with a cross section of 100x50 mm. The length of the rafters should provide the required roof overhang (one way for an extension, two sides for a free-standing structure). Typically, such an element is installed on an edge so that the roof does not sag under its own weight and snow. But if the woodshed is narrow, in one or two stacks with a total width of 1 meter, then the timber can be laid flat. Then the roof sheathing is installed. The type of sheathing (solid or row) depends on the type of roofing materials. For a metal roof, roll waterproofing must be laid on the sheathing. The simplest type is roofing felt, rubemast or similar materials made of fiberglass impregnated with bitumen. For slate or ondulin, there is no need to install waterproofing.
- Laying the floor. Usually this is a classic wooden floor on joists, but with gaps between the floorboards (they are necessary for ventilation and drying of firewood). If the woodshed is narrow and there is no need to walk inside it, then the boards are laid across and attached directly to the beam of the lower frame. For a “full-fledged” barn, it is necessary to lay logs, the pitch of which is chosen depending on the thickness of the board.
- Installation of fencing. For cladding, use a regular edged board 20 mm thick. As an alternative, you can use ready-made panels from used pallets (Euro pallets).
- Treatment. All wooden structures outdoors, including the woodshed, must be treated with an antiseptic. And in order for a firewood shed to last a long time, it needs to be painted.
What tools will you need?
To make a firewood box, you will need to stock up on a standard set of carpentry tools:
- A jigsaw is for small structures; for a frame firewood cutter you will need a circular saw. Most of the work can be done with a hand hacksaw, but the construction time at the dacha will drag on for several days;
- Measuring tools – tape measure, construction and hydraulic level. Despite the simple design, assembling a woodpile by eye is a risky task, since the mass of firewood inside reaches one and a half tons and can easily collapse the woodpile under unfavorable circumstances;
- A tool for cutting roofing, it can be metal scissors, a punching attachment on an electric drill, or a regular hacksaw.
The specific selection is determined by what material the walls and roof will be built from; in addition, it would be nice to make your own drawings with dimensions or at least a sensible sketch in advance. Much depends on whether the dacha has the opportunity to connect to electricity. For example, it will be quite difficult to make a metal frame without electricity; you will have to cut and weld the parts in a garage, after which the set of blanks can be transferred to the dacha and assembled.
Choosing the type of wood burner
Before you make a woodshed with your own hands, you must decide on its design features. First, it is important to calculate your budget. This will eliminate some of the options and limit the flight of fancy. The cheapest and most accessible material is wood. The woodshed may have a frame covered with timber or boards.
The new building must fit into the site. A fairly good solution is to add an extension to an existing house. The amount of work here is reduced, and you don’t have to rack your brains over the design of the building. The structure must be located in a dry place. It is desirable that this be the shadow side. In order for the firewood to dry well, it must be ventilated, and direct sunlight is contraindicated for it.
When the woodshed is located against a wall, it must be built on the north side. The following materials can be used for cladding:
- Polycarbonate.
- Slate.
- Profiled sheeting.
When covering walls with such materials, it is necessary to leave gaps to ensure natural ventilation. You can make the woodshed look elegant by painting it with colored polyurethane varnish. Climbing plants can be planted near the side walls, which will give the structure an unusual look.
Before you make a woodshed with your own hands, you can think about its design features. Among other solutions, we should highlight a building made from tree cuts with grass growing on the roof.
How to make a woodshed for storing firewood with your own hands
Regardless of what scheme you use to build the storage facility, first of all you need to plan the site on which the supply of firewood for the summer house will be placed. It is clear that in this case we are not talking about building a foundation or digging a pit. But, before installing the frame, you need to make sure that the platform and the columnar supports installed on the ground are aligned in the same horizontal plane.
The same applies to portable structures, even if it is a small rack or a frame firewood box, it will be possible to install it in the countryside next to the stove only after the floor has been checked by the building level and, if necessary, leveling pads have been laid. Otherwise, all this may collapse one day.
Portable woodcutter
The simplest frame structure made of timber for half a cube of firewood can be assembled, as they say, on your knees in a couple of hours. The easiest way is to make a woodshed for your dacha with your own hands, photo, in the form of a wall frame.
First of all, you need to assemble the base of the rack. Since the woodshed will be installed directly on the floor of the dacha, there is no special need for an additional foundation.
We cut out two long and two short sides of the base, and sew it all together with self-tapping screws.
In a similar way, we make side posts, install them on the base of the woodshed and fix them with self-tapping screws. You will definitely need to install struts at the bottom.
The next step is to cut in the internal spacers.
The result is a U-shaped structure that can be easily moved inside the dacha and removed if necessary at the end of the season.
Detached building
Of all the things you can think of, this is the best solution to the problem of storing firewood in the country. If you have a little free time and a small supply of building materials, then it is best to immediately build a firewood shed with your own hands from boards and timber. Such a construction will take at least three days of intensive labor, but in addition to a full-fledged room, you get obvious advantages:
- The stacking method provides the best possible storage for the firewood;
- In summer, the building is used as temporary storage for crops or equipment;
It is clear that it will not be a full-fledged replacement for a barn at the dacha, but the room until it is loaded with firewood is often used for the most unexpected purposes, sometimes even for germinating seeds and hatching chickens.
In the absence of firewood, the shed can be used to store equipment at the dacha
We build the foundation and frame
The first step is to assemble the foundation for the building. We mark the contours of the future room for storing firewood, install one cinder block in the corners, as well as in the center. To level the supports in the horizontal plane, you will have to remove part of the turf and pour a cushion of sand and gravel. By adjusting the height of the pillow, it is possible to align the supports in one plane.
The next step is to assemble the lower trim, install the racks and perform the upper level trim with two parallel beams.
Roofing
The most important part of a good firewood shed for a dacha is the roof covering, therefore, as soon as the walls appear, we immediately move on to laying boards for the counter-lattice and sheathing under the roof.
For the roof we use corrugated sheeting, but with the same success you can lay any roofing material left at the dacha, with the exception of plastic or bitumen shingles. The edges of the slopes must extend beyond the perimeter of the base of the woodshed, otherwise water will flow into the room.
To prevent drops from blowing under the roof, we sew on a cornice strip; if you have parts of an old gutter lying around at your dacha for draining rainwater, you can install that too.
Finishing
The last step is to sew on the wall cladding. You will need quite a lot of material, so you will need to bring it to the dacha in advance. Alternatively, you can cut rods and poles in a forest near your dacha.
Important! Ideally, the firewood can be opened with oil varnish or drying oil. Wooden walls and roofs should not be left unprotected, otherwise pests, of which there are always a lot at the dacha, will sooner or later eat the wood of the canopy and posts.
One of the options for building a woodshed with your own hands is shown in the video:
Woodshed attached to another building
Using the same technology, you can assemble a small extension to the house in which firewood will be stored, albeit in small quantities. Typically, craftsmen do not recommend making storage for wood supplies narrow and high. But sometimes at the dacha there is simply no convenient site next to the house, so you have to make an exception to the rule.
The depth of the frame is small, so for its manufacture you can use relatively short slats and boards, in other words, any lumber available at the dacha. The rear posts will definitely need to be secured with dowels to the wall of the house; this is done in order to avoid the woodshed from tipping over.
Woodshed from barrels
A firewood storage can be built from almost any material, the main thing is that it is durable and reliable, and preferably not far from the cottage. If you can use old barrels, they will make an excellent firewood rack. Large barrels can be cut in half and stacked in two vertical rows.
For small-sized containers everything is even simpler: just cut out the bottom and lay it in a pyramid. True, in this case the barrels will have to be covered with wire or metal tape.
Metal woodshed
For those who like to work with metal, we can recommend a storage structure made from a metal profile. It will be enough to fasten a horizontal crossbar to the cornice hem, and lay another similar profile on the gravel bed.
All that remains is to install vertical posts made of metal pipes and secure the mesh to keep the firewood from falling onto the ground. In general, the design turns out to be very capacious, which is why such firewood burners are used for major winter projects in summer cottages.
Firewood from pallets
A good option would be to use old pallets at the dacha; they can be completely disassembled into boards or the upper and lower parts can be adapted separately. Usually, owners bring pallets to their dacha as firewood, but whole parts can be used to make a firewood box.
The diagram of such a storage is shown below.
The base or panel floor will need to be knocked down from boards 245 cm long; making the wall will take at least 3 boards of the same length. For each of the side walls you will need two meter and three 60 cm boards. On the lower tier you will need to lay 7 pieces of 60 cm slats.
The design is simple, and installing it next to a summer house will not be difficult. True, when storing firewood, the firewood shed will need to be covered with a tarpaulin or a cape made of synthetic fabric.
A large firewood shed can be assembled at the dacha from whole pallets A large woodshed can be assembled at the dacha from whole pallets
Woodshed combined with another building
One of the most popular ways to store firewood at the dacha is to make a woodshed directly on the porch or next to the front door under one shed.
Using such a storage facility is very convenient, especially in winter, but to equip the woodshed, you will need to rebuild the area in front of the front door, install additional supports and extend the canopy over the porch. The back wall is covered with boards, leaving 3-5 cm gaps between them.
Do-it-yourself woodcutter: drawing up a drawing and preparing tools
Preparing a preliminary drawing is required if you decide to build a woodshed. This design is suitable not only for storing logs, but also for storing tools and other things. Drawing up a diagram simplifies the determination of the area of the future structure. Video materials will help you correctly design a woodpile for firewood with your own hands. Photos of various installation stages also help to understand the principles of assembly.
The supply of firewood is a value that is determined by the individual needs of the owners of the site. In order to provide heating for a residential building with an area of 100 m², approximately 1.9 m³ of dry wood will be required. It is important to remember that different tree species have different degrees of heat transfer. For example, if you use pine logs, they will need 0.2 m³ more, and birch logs, on the contrary, will need 0.2 m³ less.
Drawing of a wooden woodshed.
If necessary, you can take as a basis a ready-made drawing of a woodshed at your dacha with your own hands. It is recommended to choose the size with a slight margin, since it may always be necessary to prepare a larger amount of firewood. The structure for storing freshly cut logs should be approximately 2 times more spacious than the structure for dry fuel, since the heat transfer of wet firewood is 50% lower.
When choosing the dimensions of the wood burner, you should also take into account the characteristics of the stove. The efficiency of these devices can vary greatly. For example, for high-tech modern units this figure reaches 80%. Such stoves process one batch of firewood in about 8-10 hours, which significantly reduces the need for wood fuel.
After drawing up the drawing, you need to prepare all the necessary tools for assembling the woodpile:
- drill (for columnar structure);
- stepladder;
- regular hammer;
- hacksaw;
- plumb line;
- pliers;
- twine thread.
After drawing up the drawing, you need to prepare all the necessary tools and materials for assembling the woodshed.
Note! Dry firewood is logs whose moisture content does not exceed 20%.
Step-by-step instructions and video materials will help you answer the question of how to build a woodshed with your own hands. The purchase of the necessary raw materials is made after determining the type of woodshed and drawing up a drawing. The diagram must contain all the necessary dimensions and estimates, taking into account the amount of wood, polycarbonate or metal.