Mosaic floors are a combination of monolithic concrete and marble chips. Glass, processed wood, metal particles, sea shells and much more are often used as additional components. The variety of floors is provided by concrete painted in different colors.
mosaic floors can be of different shapes
- Types and features of mosaic floors
- Rules for laying mosaic floors
- DIY mosaic on the floor
- Necessary materials
- Mosaic floors made of marble chips technology
Main characteristics of mosaic floors:
- waterproof;
- decorativeness;
- wear resistance;
- resistance to mechanical stress;
- Dirt-resistant;
- ease of care.
With high intensity of use of tile floors, their structure is destroyed, which is why the material quickly wears out and becomes unusable. That is why mosaic floors are laid in bathrooms and toilet rooms, the vestibule, the hall - rooms for short-term stays of people.
Types and features of mosaic floors
Laying mosaic floors occurs only at the finishing stage. The base of the floor is a concrete floor. The main requirement is a perfectly flat and durable surface. What can you use to make a mosaic with your own hands? There are several types of mosaic floors:
- Natural stone: lapis lazuli, marble, slate, onyx, etc. are used for flooring. Due to the original pattern of the stone, the floor acquires a unique appearance. Often the material is sanded or polished to achieve a higher shine. The stone can be given different shapes: oval, square, circle, rectangle.
- Glass or mirror mosaic: quartz sand mixed with tint ingredients looks truly impressive after processing. The most common mosaic shape is the square. The area of application of glass coating is the bathroom, swimming pool, living room. Mirror mosaic is mainly used as wall decoration.
- Metal mosaic on the floor includes steel, pieces of aluminum, bronze, and copper. More luxurious decorative elements: gold, platinum, silver. Places for laying such a coating are not limited, since the level of strength is very high.
- Ceramic mosaic tiles: The most common type of mosaic flooring. The color palette is very wide, and due to the durability of the mosaic surface, you can select any texture: relief, cracks, stains, etc. Excellent for finishing swimming pools and living spaces.
- Wooden mosaic: walnut, birch, cherry, ash are used to fill the floors. Wooden elements add a warm tone. The mosaic is coated with water-repellent impregnation, so it can be used in the kitchen and bathroom.
Rules for laying mosaic floors
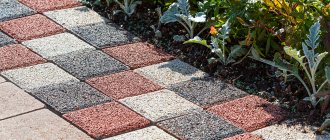
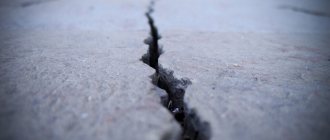
Mosaic floors have a unique, varied pattern that changes depending on the arrangement of the mosaic elements . The coating is highly wear-resistant and durable. Non-slip floor surfaces are not suitable for the growth of fungi and mold.
mosaic floor
Laying mosaic floors requires careful preparation and proper application of the material:
- The laying base is concrete or ceramics.
- If there are uneven surfaces, it is necessary to apply an additional base - cement overlay.
- The optimal ratio of cement and mosaic chips is 1 to 2.
- Any type of cement: white, silicate, simple, etc.
- The minimum diameter of marble particles is 0.5 mm, the maximum is 12 mm. It is important that the strength of the crumbs is the same.
- To make the mixture more plastic, it is necessary to add lime milk and water (10% of the amount of cement mass).
- Cement dye should not exceed 15% of the total mass.
- The thickness of the mosaic composition should not exceed 20 mm.
- When compacting the mass, it is necessary to control the release of laitance, which indicates the readiness of the installation.
- The best compactor is a hand roller, a steel blade, or a pneumatic vibrator.
- To form a pattern on the base, you need to attach metal strips (the shape is arbitrary) with anchors. The mosaic mixture should be laid in these cavities.
- After laying the mass, you need to wait more than 12 hours, and then cover the entire floor area with sawdust. The composition must dry within 7 days. After this, you need to perform grinding work.
Concrete mosaic floor technology
Self-leveling marble chip floors consist of a cement-sand base and a layer of mosaic mortar, the thickness of which is 20-25 mm.
When arranging floors from marble chips - the technology is quite simple - the following steps are followed:
- preparing the base for a mosaic floor;
- installation of dividing veins and slats;
- preparing the solution;
- filling the floor;
- sanding and finishing of mosaic floors.
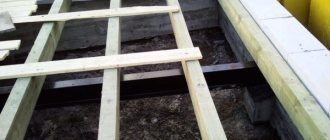
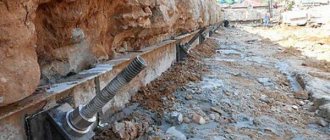
Preparing the base
Suitable bases for floors made of marble chips are reinforced concrete floor slabs, a concrete base, and a cement-sand screed. Before pouring, you need to make sure its strength and carry out preparatory measures:
- the surface should be cleared of debris;
- eliminate serious defects;
- seal holes near pipes and various equipment;
- treat the surface with an electric brush or other method to roughen it;
- remove dust;
- immediately before applying the mixture, moisten with water.
Before you start laying the mortar, you also need to determine the floor level and apply the corresponding marks to the walls around the entire perimeter of the room.
Installation of dividing veins
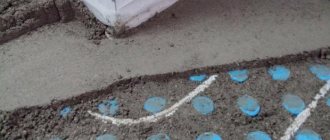
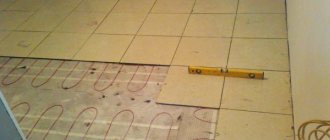
When installing a single-color floor, beacons (slats or gas pipes) are laid on the base every 1-1.5 m. If a multi-color coating is planned, then you will need to mark the future pattern on the floor and install dividing veins made of glass, brass, aluminum or polymer materials along the contour, securing them with cement mortar or slightly recessed into the screed, which is done before laying the mosaic layer. The top of the vein should be level with the expected floor level.
A multi-color floor is obtained using dividing veins made of glass, brass, aluminum or polymer materials
Preparation of mosaic composition
To prepare the mosaic composition, cement, stone flour, sometimes pigment, water and marble grains of different sizes are used: MK - large chips 10-15 mm; MS – average 5-10 mm; MM is small, 2.5-5 mm, which ensures its uniform distribution over the entire surface. For concrete floors with marble chips to look their best, it is necessary that after grinding, 75-80% of the floor area is occupied by stone aggregate, and 25-15% by mortar. Prtland cement of gray or other colors of grade M400 and higher is used as a binder. Sometimes the required shade is obtained by introducing whitening additives; most often they take marble flour, ocher, chromium oxide, ultramarine (15-30% by weight of cement, depending on its brand).
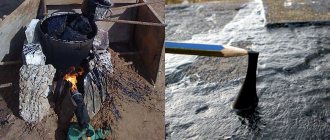
Before preparing the mixture, the marble chips are washed to improve their adhesion to the solution. All components are thoroughly mixed dry, and then water is gradually added, preferably using a watering can. The solution should be hard and inactive.
The scope of application depends on the fraction of marble chips
The approximate composition of the solution may look like this: cement - 1 part, marble chips MM - 1 part, MS - 1 part and MK - also 1 part, water - 0.5 parts. As for water, its quantity must be adjusted depending on the moisture content of the crumb; excess moisture does not benefit the solution, worsening its quality.
Stages of floor installation
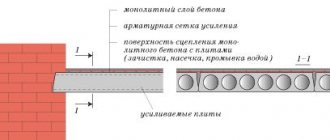
The construction of marble chip floors begins with the bottom layer; it is made of cement-sand hard mortar or low-grade concrete, which is laid in cards and leveled with trowels. After setting, but before the mixture hardens, lay the mosaic mortar, compacting it using trowels, vibrating screeds or light tampers weighing at least 10 kg, to the level of the dividing veins.
Cement laitance accumulating on the surface must be removed with rubber scrapers to prevent the formation of a cement film. After compacting the solution, the surface must be carefully leveled and smoothed. Remove the beacon slats and fill the furrows with solution. For 5-7 days, during the hardening period of the floor, you need to keep it moist, moistening it once a day with water, covering it with film, mats, matting or sawdust.
Sanding and polishing the floor
After the solution acquires sufficient strength (after approximately 5-7 days), proceed to the next operation - grinding.
The polished mosaic floor looks amazing
First, a rough grinding is carried out using a grinding machine with carborundum stones. In front of it, the floor must be sprinkled with wet sand. After completing the procedure, the sand is removed, the floor is inspected, and potholes are repaired if they appear. Next, rough and fine grinding is performed using abrasive stones No. 60-80 and No. 230-325. And the final gloss is applied using felt wheels and polishing powder. For more detailed information, we suggest you watch the video:
DIY mosaic on the floor
Floors made of marble chips are convenient to install in large rooms with large crowds of people. What can be made from marble chips? A good option would be to use rock filler, namely granite, gabbro, basalt.
The coating of this composition is called terrazzo mosaic floors. This composition can be prepared at home, experimenting with enhancing the dark or light shade.
Necessary materials
To install a mosaic floor with your own hands, you will need:
- colored and white paper;
- scissors;
- markers;
- a simple pencil;
- tiles, glazed coating;
- porcelain shards;
- black ceramic tiles;
- white ceramic tiles;
- carving tool (tile length);
- adhesive impregnation;
- spreader (toothed with a wooden handle) – a tool for applying adhesive;
- contact paper;
- cotton fabric.
What are marble chips?
In general, the name “marble chips” can often be heard from the lips of a non-professional; officially, this material can be called “ground marble”, “marble crushed stone”, “marble flour” or “marble dust” - the name depends on the size of the crumbs (fraction) themselves. Initially, this material is a by-product obtained from the extraction of marble. Also, low-quality marble slabs that are not suitable for use in construction can be used for its production. The marble is crushed and sorted by fraction size. The result is:
- marble crushed stone with an average size of 5-20 mm (larger crushed stone, the size of which can even reach 70 mm, is less common);
- ground marble measuring from 2.5 to 5 mm;
- marble flour ranging in size from 0 to 2.5 mm;
- marble dust, the size of which fully corresponds to the name - that is, its individual pieces are close to 0 mm in size.
Even natural marble chips are quite diverse in color - depending on the type of soil and minerals accompanying marble, white, pink, gray, black and even red marble chips are obtained. And the addition of various dyes allows you to expand the color gamut to almost limitless limits.
Mosaic floors made of marble chips technology
floor preparation
Do-it-yourself mosaic paintings are a long but interesting activity:
- On colored paper you need to draw any pattern for a mosaic with your own hands, which will later be made from tiles.
“The main thing here is to choose a simple image, since it is very difficult to cut out small, sinuous details from ceramic.”
The picture must be identical in size to the area of the floor on which the mosaic will be laid.
- Next, cut out the elements and attach them to white paper. You can get creative by arranging the details in a bizarre way. At the end of the experiment, you need to use felt-tip pens to supplement the drawing with decorative parts: a patterned edge, lines stretching towards the image, etc.
- Using a carving tool, draw a center line along each colored ceramic tile and break the pieces in half.
- Then you need to divide the tiles into small identical cubes so that their number completely covers the invented image. The same needs to be done with porcelain and several black tiles (for the outline of the design).
- After cutting out the tiles, you need to lay out a similar pattern on a thin, flat surface (“later it will become the back side of the mosaic, which will be attached to the concrete floor”). For volume of the image, pieces of tiles of a darker shade should be laid out on one side. The entire pattern should be outlined with a dark tile outline.
- For the background you need to cut white tiles. Any shape, the main thing is that they evenly fill the surrounding space.
- After laying out a small area of the drawing, you should fasten the cubes with contact paper. To do this, you need to remove the protective layer from one side and carefully apply it to the mosaic so that no bubbles form.
- If desired, you can make a boundary border from dark pieces of tile located along the edge of the image.
- Using a knife, you need to cut the mosaic coating into separate large parts. This is necessary for laying the resulting mosaic on a concrete floor. The fragments can be anything, as long as they are convenient for laying on the floor.
- Using a spreader, you need to evenly apply the adhesive to the concrete and immediately place the mosaic fragment on top. And so on until the entire image is transferred to the floor. Drying time – 12 hours. After this, remove the contact paper and rub the mosaic with adhesive, and remove excess composition with a damp sponge. After 2-3 days, you need to polish the surface of the mosaic floor with a cotton cloth.