Types of suspended ceilings and their characteristics
PVC stretch ceiling
The technology for installing stretch ceilings depends on the material on which the structure is made. Fabric and polyvinyl chloride products are considered popular.
PVC
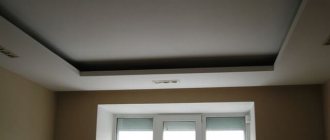
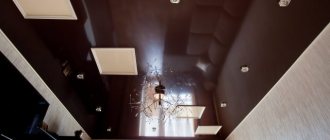
The PVC ceiling is welded, as it consists of several interconnected sheets. To install the product, a heat gun is required, with which the material is heated to a temperature of 60-70 ° C. In this case, the film stretches and can be easily fixed in the frame. After cooling, the PVC stretches and becomes smooth. The product can be glossy or matte. There is also a range of films of different textures and colors. You can even use several canvases of similar shades in one design.
The ceiling must be fastened so that the weld lies perpendicular to the window. The material is not affected by chemicals, does not burn, and is capable of holding a large volume of liquid. Thanks to antistatic treatment, dust does not settle on the surface of the ceiling. The disadvantage of this type of material is its tendency to collapse when exposed to low temperatures, so it is not recommended to use it in unheated rooms.
Fabric
Fabric stretch ceiling
Fabric ceilings are seamless and are a lightweight mesh material that is impregnated with polyester during manufacturing. The width of the panel can reach 5 m, so it is used in large office premises, restaurants, and public buildings. The fabric ceiling is able to hold cold and hot liquid.
To make the material resistant to moisture, it is coated with a special varnish. Polymers are used to change the color of the canvas. In addition, the fabric behaves well even at subzero temperatures. Since the material allows steam to pass freely and does not interfere with air exchange, it can be installed in wooden houses. However, the cost of such a ceiling is high.
Despite the fact that the material is synthetic, it is absolutely safe for human health. To install the structure, a heat gun is not required, since the product does not stretch and does not require heating the room.
There are many varieties of fabric ceilings: plain, colored, intended for photo printing, acoustic. During the production of the fabric, various additives are introduced into its composition, making the material resistant to contamination and tensile strength.
Advantages and disadvantages of suspended ceilings
It is easier to build a frame for a stretch ceiling than to install drywall.
Materials for the manufacture of tension structures have the following general advantages over suspended ones:
- You can get a perfectly flat surface. The presented option is successfully used in those rooms in which there are large differences in the level of the rough foundation. In this case, there is no need to equip the sheathing or frame, which takes away the height.
- Installing a suspended ceiling with your own hands is much easier than building a plasterboard structure. Work is accompanied by less dust and debris.
- Long service life - at least 10 years. Even during the shrinkage of the house, no damage appears on the ceiling.
- Flood protection. Water simply collects inside the structure and is easily pumped out.
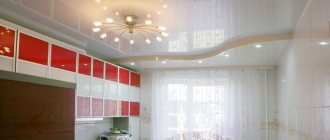
- High degree of functionality. Under the canvas you can hide electrical wiring, lighting fixtures, noise and heat insulation.
- Decorative appeal. Stretch ceilings can be plain or with a pattern.
- Visual expansion of space.
Like other structures, suspended ceilings have some disadvantages: they can be damaged by sharp objects. Despite the ease of installation, the master must have the skills to work with such material.
How to dismantle a suspended ceiling with your own hands
Dismantling the finishing material in question may be necessary if the wiring is faulty (remember - we fixed it to the ceiling?) or if liquid accumulates between the material and the ceiling (for example, the neighbors above them flooded it). In any case, the dismantling process can be done with your own hands, without inviting specialists. Step-by-step instruction :
- getting rid of decorative ceiling plinth;
- use a heat gun or a hair dryer to warm up the film;
- carefully pull out the harpoons from the profiles (they directly “press”/fix the canvas) in the corners of the covering;
- We do the same thing around the entire perimeter - remove the harpoons.
During the process of dismantling a PVC stretch ceiling, you will need to constantly warm up the film - this will prevent loss of elasticity and damage to the material.
If you have to carry out the described process with a suspended fabric ceiling, then there is no need to use a heat gun, but certain difficulties may arise when pulling out the fabric tucked into the profile - such material “adheses” tightly to the bead or clip.
After dismantling and fixing the problem, you will have to repeat the procedure for installing the suspended ceiling with your own hands.
The finishing material in question for the ceiling surface is perhaps the most reliable to date. If you operate it correctly and periodically carry out “hygienic procedures” on it, then for a long time you will not need either repair or replacement.
( 84 votes, average: 4.68 out of 5)
DIY roof repair
Cladding the walls of a house with bricks: instructions and recommendations from experts
Related Posts
Measurements and necessary tools for work
Before installing suspended ceilings, it is necessary to determine the area of the base. The correct fastening of the canvas depends on the accuracy of the measurements. They are carried out at the height at which the profile will be screwed. The minimum distance to the rough base is 3 cm. When using spotlights, the presented value increases to an average of 7 cm. It is also necessary to measure the perimeter of the room.
Tools for work you will need:
- building level;
- laser level;
- ladder;
- hammer drill, screwdriver;
- heat gun with gas cylinder;
- hammer, screwdriver;
- knife.
Dowels are used to secure the profile. In addition to tools, you need to prepare all structural elements: a fixing profile (plastic or aluminum), screws or dowels, and canvas.
To improve sound insulation, mineral wool is used, which is screwed to the sub-ceiling with screws. For reliable fixation, synthetic ropes are additionally used.
Required Tools
To install a suspended ceiling in a room, bathroom or kitchen, you should prepare all the necessary equipment. Every home craftsman has some on hand. Some equipment will most likely need to be purchased.
First of all, for installation you need to prepare a screwdriver and a hammer drill. You will also need a tape measure and a building level. You need to install the canvas into the profile using special blades. You will need to purchase a set of them. You will need straight and angled blades.
You should also choose a certain type of fabric for the stretch ceiling. At the same time, the operating conditions of the finish are taken into account. After this, profiles are selected. They can be plastic or aluminum.
Various additional components can be selected. They are presented in the form of multi-colored inserts. Also, if necessary, purchase clamps and accessories for installing lighting fixtures (glue, plastic rings).
If PVC film will be stretched, you should purchase a special heat gun or a hair dryer. This equipment will allow you to properly mount the canvas.
Ceiling preparation
The seams between the ceiling tiles must be sealed with polyurethane foam.
Before stretching the ceilings with your own hands, you need to prepare the room. All furniture that could become damaged due to heating of the air is removed from the room. Major wall and floor repairs must be completed. Vertical surfaces must be smooth and have straight corners.
The seams between the ceiling tiles are cleaned of debris and loose plaster and sealed with polyurethane foam. The old finishing material is removed from the base and coated with a primer, which will prevent fungus and mold from developing. It is better to remove the plaster completely. At the preparation stage, you need to install the wiring for lighting.
DIY installation instructions
First you need to correctly mark the walls. To do this, the height is measured in all corners. When applying marks, the placement of the chandelier mount under the ceiling is taken into account. Using a laser level, lines are drawn along the entire perimeter of the room. It should be smooth.
Fasteners are installed at a distance of 7-8 cm from each other. Sometimes, to prevent the profile from moving from the drawn line, it is first glued and then screwed. The fasteners must not be attached too close to the edge.
Before installation, the canvas must be stretched evenly, warming the room with a heat gun. Further work is carried out when the temperature in the room reaches 40 °C.
Installation of a baguette for a stretch ceiling
The following manipulations are carried out step by step:
- Remove the material from the packaging with dry, clean hands. It is spread on the floor, which must first be cleaned with a construction vacuum cleaner, washed and dried. It is better to remove all sharp objects, as they can damage the canvas.
- The canvas needs to be installed in the base corner, and then in the opposite one. The base warms up all the time. The same actions are performed with the remaining corners.
- The material is fixed with special crocodile fasteners. They are padded clamps. They cannot damage the canvas.
- When treating the film with warm air, you need to remove the clamp and insert it into the baseboard with an angled spatula. This must be done carefully and slowly. Now you can move to another corner, but the canvas should be supported so that it does not jump out of the profile. The remaining corners are attached in the same way.
- You can start stretching the fabric along straight lines. To do this, use a straight spatula that comes with the material. There is a seam on the canvas. It is secured with 2-3 locks. Next, the canvas between the corners is divided into 2 parts and fixed in the center in the lock. The remaining fragments are divided in the same way.
It only takes a day to assemble a suspended ceiling. If the installation technology is followed, the film will stretch without distortion.
Installation
The most interesting thing begins at this stage. The finished ceiling is delivered to the customer for installation. If you planned to make mortgages for installing a chandelier, they can be made by the same craftsmen who will install the ceiling covering. This is stipulated in the contract as a separate clause and, naturally, will not be free.
Further actions of the installers will depend on the type of canvas chosen. PVC films require a heat gun and heating, but textile fabric is installed without the use of a heat gun.
Special markings are applied to the ceiling and walls for installation of mounting profiles. The canvas will be attached to them. When the marking is completed, the installation of these elements begins. If the coating is PVC film, then it is attached with special clips to the installed profiles and heated. The fabric becomes elastic and can be stretched.
After all sides of the film are secured in the baguette, it is left to cool completely. This takes some time, but after it cools, the surface smoothes out and tightens. At this time, you cannot create a draft and ventilate the room. The last to be installed are lighting fixtures and decorative skirting boards, hiding the junction of the wall and the canvas.
If textile fabric is chosen as a covering, heating is excluded from all operations. First, the covering is unrolled and attached at several points to the baguette, and then fixing and tensioning begins. Gradually, the canvas is fixed around the entire perimeter of the room and gets a finished look. In this version it is tightened exclusively by hand force.
You can see in detail how suspended ceilings are installed in the video below, which demonstrates the entire process in detail.
Types of stretch ceiling fastening
Installation schemes and methods of fastening a stretch ceiling are different. You can assemble the structure using a harpoon, glazing bead or clip fastener. Each type of fastening has its own characteristics.
Harpoon fastener
Methods of fastening the canvas to a baguette
The device of a stretch ceiling with harpoon fastening is applicable if the material is PVC film. The components of the structure are:
- baguette;
- harpoon;
- cloth;
- decorative cornice.
An aluminum profile is used as a baguette. It is mounted around the perimeter of the room. A harpoon is a thin wedge-shaped plate. It is used to attach the film. When taking measurements in this case, you need to be as accurate as possible, taking into account all niches and protrusions. The blade and the harpoon are connected to each other by welding.
The advantage of this fastening method is that there is no need to control the tension and uniformity of the panel. The film is already cut strictly according to the size of the room. Thanks to a special fixation system, the film adheres tightly to the walls. If necessary, such a ceiling can be completely or partially dismantled.
Since the film is securely fixed to the profile, the structure can withstand significant loads. The harpoon installation method is used in large rooms, gyms, and swimming pools. When installing the ceiling, sagging does not form.
Bead fasteners
Bead fastening of the canvas
To make a stretch ceiling using the bead method, you need a U-shaped aluminum profile. A wooden glazing bead is required, with which the canvas is clamped. The presented installation scheme is relatively cheap, and therefore more popular. The disadvantage of this method is the possibility of the bead popping out of the groove. Experience is required to adhere the film firmly and correctly.
The advantage of this fastening method is that there is no need for precise measurements. After fixing the canvas, its excess parts are simply cut off. It is advisable to buy a film in a size larger than the base area.
Installation is simple: a baguette is screwed around the perimeter of the room. The room itself needs to be heated to 60 °C. The product is fixed in the corners, after which they begin to tighten it. The fabric must be stretched correctly to avoid the appearance of waves, folds and other defects. Since after completing the work there remains a technological gap between the wall and the canvas, it can be closed with a plinth.
A feature of the glazing bead fastening method is the impossibility of accurate dismantling of the structure. If it gets damaged, it will have to be replaced. In addition, over time, the fastenings weaken and the ceiling may sag.