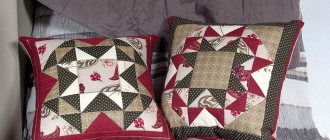
I won’t hide the fact that I was prompted to come to this proposal by your persistence in mastering patchwork and the fact that many of you sew several versions of one block, using different combinations of fabrics. It seems to me that this is how interest in patchwork is formed and consolidated. After all, patchwork is not only a technique, it is also an exciting game with fabrics, colors, shades and shapes!
That is why I decided to show you a method of sewing from strips, although the fabric consumption is not small and, in fact, you get two blocks instead of one. Of course, not everyone will want to sew so many identical (although who will say that they are the same?! =) blocks, but maybe it will be useful to someone.
So, we will need fabrics of four different colors, from which we will cut strips after ironing.
Now it's time to decide on the size of these stripes. We already remember that from a square with side length n
+3.5 cm. We get two triangles with leg length
n
and an allowance of 1 cm, and in our case
n
is 10 cm. As I said above, in the end we will end up with two blocks, not one, so we multiply the number of required squares on 2.
Thus, we get the following calculation: length of each strip = (10 cm + 3.5 cm) x 4 = 54 cm (I would add a centimeter and a half for safety and alignment) The width is not so simple, because two stitched stripes will form the sides of our future squares. I cut 8 cm, but sewed them together with an allowance of 0.6 cm. The excess, which I cut off when aligning the squares, was literally 5 mm on each side. So, if you are sewing with an allowance of 0.6 to 1 cm, I recommend cutting out strips no less than 8.5 cm wide, otherwise there may not be enough millimeters when aligning the squares.
By the way, you understand that if you don’t have fabric in your bins from which you can cut out a long strip at once, then you can cut several strips from one fabric. The main thing is that from them we can cut out the 13.5x13.5 cm squares we need.
Block stripes in patchwork: step-by-step instructions
Before mastering the bargello patchwork technique , it is recommended to start with a “strip to stripe” block.
The stripe-to-stripe block is one of the simplest blocks in patchwork. It consists of strips sewn parallel to each other.
For a patchwork of strips of fabric, take fabric of 5 colors. You can choose any shades that suit your preferences and mood. For a block of 30 x 30 cm, the strips should measure 5 x 35 cm.
- First, sequentially, starting from top to bottom, you need to connect all the strips with pins along the long side. After this, stitch all 5 stripes one by one.
Why do you need to pin? Because only pins will reliably connect the fabric and will not let you down when sewing on a machine. They are secured perpendicular to the seam and removed only after the parts are sewn together. After each stitching, all seams are ironed. These two items - pins and an iron - are full-fledged and permanent participants in the entire technological process of sewing in the patchwork style. Never deviate from this rule. The patterns for patchwork strips presented below will help you easily sew finished blocks.
Features of strip patchwork
The technique of patchwork sewing from strips has a number of differences from products that are made in the patchwork style from scraps of fabric. the type of handicraft is rather similar to applique products. The pieces of fabric are not sewn one by one, in lines, but are sewn to each other, along the edges. Patchwork patchwork using strips of fabric is a very common and favorite way to assemble patchwork among craftswomen. It makes it possible to economically use pieces of material, is completely waste-free and easy to implement. There are many ways to create strip products. They are sewn in the form of square and rectangular blocks, as well as into long ribbons, from which you can subsequently cut out the necessary parts and sew unique things. It is believed that the narrower the strips of fabric, the more interesting and original the work. The whole secret lies in the correct selection of stripes. It is necessary to choose a certain range, for example, from light beige to dark brown. Their number must be considerable.
Bargello patchwork: master class for beginners
Once you have mastered the “stripe” block, it will not be difficult for you to sew a product using the bargello technique.
The essence of the technique is that many multi-colored strips of fabric create a beautiful ornament thanks to a certain stitching pattern. The number of stripes and colors can be very different.
To master this technique, it is proposed to sew a bargello block according to one of the simplest, but quite effective patterns. You will need 20 strips of fabric 6 x 110 cm (including seam allowances) of different colors.
A step-by-step master class on patchwork using the Bargello technique - will help novice craftsmen master this method in a few hours:
When sewing long strips, in order to avoid skewing the entire fabric, it is necessary to alternate the direction of stitching: sew the first pair of strips from right to left, the next pair from left to right, etc.
The bargello patchwork diagrams presented on this page will help you complete the job without errors.
What else will you need for work?
You can’t do without traditional sewing attributes, so you need to prepare or purchase threads, of two types. The usual ones will be needed for basting, others - No. 45, 50. Their color depends only on the desires of the author, it can be combined with the future product, or be contrasting. You will also need:
- pins, needles;
- chalk;
- scissors;
- centimeter;
- scotch;
- iron;
- colored pencils (felt-tip pens);
- segment templates (two) - plastic or cut out of cardboard (thick paper);
- sewing machine.
Triangle patches
The photo shows how to cut a patchwork quilt from triangles of the same shape. You can come up with any patterns, depending on the size of the remaining pieces of fabric and the design of the blanket. But first, after you make the markings on paper and mark all the details, you need to cut the overall pattern along the lines passing between the flaps. Then, using glue, glue each piece onto the wrong side of the fabric of a pre-selected color, not forgetting to allow seam allowances of 1.0-1.5 cm.
If the shapes are geometrically even, then connecting them will not be difficult, but if the flaps have the most bizarre shapes, then when joining on a machine, the seams may not “lay out.” That is, they will puff up even after prolonged ironing with steam. Therefore, it is necessary to slightly cut the convex, oval-shaped seams with scissors in several places. Then the seam line will break up into sections that are easier to lay out. Only if you have never done this before, experiment on test pieces. Don't forget to make cuts not only along the edge of the entire template, but also in the corners. Don't do them too often. Once you experiment with different shapes, you'll quickly figure out where the best cuts are.
Step-by-step instruction
It is easy to sew a blanket from scraps with your own hands. We offer a master class for beginners, with a detailed description of the cutting, assembly and edging of the product.
Before starting work, you should wash or simply soak the selected pieces of fabric in hot water.
They must allow natural shrinkage to prevent deformation of the blanket during its use. Then the flaps are ironed well. Cotton fabrics can be sprayed with a starch solution to improve their appearance.
When choosing fragments, check them for compatibility. To do this, flaps of different textures should be slightly pulled, the amount of stretching should be the same. For example, dense material does not fit well with knitwear. If you don't pay attention to compatibility, the blanket will lose its shape over time. For the same reason, when stitching fragments together, the direction of the threads is taken into account.
For work, you should prepare not only the flaps, but also the backing material, as well as the filler. You will also need threads, a sewing tool and a sketch of the future work. One of the techniques available in patchwork is selected and a drawing of the details is sketched onto paper. For beginners, it is easier to work with squares or rectangles.
When choosing a color scheme, one should not forget about harmony.
Monochrome products look good. The basic tone of the blanket can match the color of the curtains or wallpaper. Children's bedspreads are made bright or tied to the gender of the child (for boys - for girls).
Creating a Sketch
Even professionals do not neglect the sketch, and for beginning needlewomen, calculations and diagrams of both the basic part and the entire project are a prerequisite. It is better for beginners to work with large parts. You can cut identical squares and simply sew them together, but it’s much more interesting to think through and put together a pattern and work with color. For this purpose, sketches are created on which the elements are drawn. According to the scheme, they are assembled into blocks, and fabric is sewn from the blocks.
To simplify the work process, the parts on the diagram are numbered, and the same numbers are transferred to the fabric fragments.
Making your work even easier by creating templates from cardboard or plastic. With their help, it is easy to cut and cut flaps in the required quantity.
Material cutting
A patchwork ruler can make the cutting job much easier. With a simple design (squares, stripes) you can do without it. During cutting, many factors are taken into account.
- The main thing is to remember that the cut must take into account the grain of the thread, otherwise distortions will occur.
- To cut squares, just draw a grid on the fabric and use scissors. For the remaining figures you will need a template and a roller knife. Parts of particular complexity are developed using a special ruler.
- When cutting out, you need to be as careful as possible, otherwise the stitching lines will not coincide with each other.
- When cutting out elements, you must leave 1.5 cm of fabric on all sides for allowances.
- The cut parts should be numbered according to the diagram.
After cutting the fragments, they move on to working with the substrate and fillers. They are cut out according to the selected sizes. When working with backing, be mindful of seam allowances. As for the details, it is easier for novice craftswomen to work with square elements. The substrate and all fragments are well smoothed before assembly. Then you can try it on: lay out the backing and place the squares on it, taking into account the tone of the future product.
Assembly of parts
It's easier to work with squares. The maximum size of the blanks is no more than 25x25 cm, the minimum is 6x6 cm. The most popular part parameter is 12x12 cm. The squares are assembled together into strips, the length of which should match the width of the future blanket. The finished strips are stitched together to form a large fabric.
You need to make sure that the seams go along the wrong side of the product.
For a more complex pattern, blocks are assembled first. The numbered parts according to the diagram are sewn together. Assembling the block should begin with large elements, and then small parts are added. During the working process, you can use safety pins, which will help the fragments not to spread out.
All parts are sewn together using edge seams. Finished blocks should be smoothed before forming them into a canvas. But you can leave ironing for the final stage. When the patchwork layer is fully formed, it should be laid on the wrong side and the joining seams should be carefully smoothed, opening the edges. Then you need to iron the seams from the front of the product.
When the patchwork fabric is ready, begin sewing the blanket itself. The lining fabric is placed face down on the floor, padding polyester or other filler is laid out on it and covered with a patchwork layer. This entire “sandwich” is stitched around the perimeter.
Some needlewomen assemble the three layers in a different way.
Before placing the filling, they sew the lining to the bedspread on one side, then lay out the filling and cover it with the already fixed patchwork layer. It remains to sew three more sides of the product. This method is more reliable and requires fewer pins to secure the edges. At the last stage, the entire blanket is quilted with threads. If this is difficult to do on a sewing machine, you will have to work manually.
Edging and decoration
The edging is needed to hide the seams running along the perimeter of the blanket and to give it an aesthetic appearance. To do this, prepare an edging, the color of which may coincide with one of the shades involved in the patchwork fabric.
To perform edging, you should perform the following steps.
- Measure the perimeter of the blanket and add another 20 cm, this will be the length of the edging.
- The width of the tape is selected to taste. A popular size is 6-8 cm excluding allowances.
- The cut strips of fabric are sewn together at an angle of 45 degrees into one large strip.
- The edge is steamed and ironed.
- One side of the full length of the tape is sewn to the lining of the blanket.
- The second edge of the edging lies on the front side of the product.
The finished blanket can be decorated with appliqués, lace, braid, beads, and any decor that the needlewoman likes.
