What can you paint with?
To choose the right paint coating, you should consider 3 important nuances:
- Wear resistance. The floor, unlike walls and, especially, the ceiling, is constantly exposed to stress: people walk on it with bare or shod feet, move furniture, rub with brushes and floor mops. In order for painted logs to retain their appearance for a long time, you should choose durable, reliable paints and varnishes intended for this type of operation.
- Scope of application. The floor surface itself is a problem area in any interior, and if you have to paint a wooden floor in an unheated or, especially, open room, the situation is aggravated by temperature changes and natural phenomena such as scorching sun or rain, snow, hail. The material must be as stable as possible.
- Design. If your style or personal preferences require preserving the natural texture of the wood, you can simply apply a clear varnish - matte, satin or gloss - to the sanded floor. Another option is wax or oil, but it is best to use them as a coating for wooden floors in heated spaces - houses, apartments. In other cases, use paint for a wooden floor - dark, light, colored.
Varnish
Alkyd, acrylic, and polymer compositions are suitable for covering a wooden base. Oil and essential varnishes are not used in finishing work; they are considered furniture varnishes.
The main advantage of varnishes is that they do not hide the texture, forming a dense transparent film. Even if the foundation is tinted, it will still only highlight the appearance and not hide it. Unfortunately, the varnish layer has not only advantages, but also defects: cracks, chips. To completely hide them, puttying is required, and then coating with opaque paint.
The photo shows a floor covered with glossy varnish
Wax, oil
Liquid oil and hard wax, unlike varnish or paint, do not create a noticeable film, but only block the pores of the wood. Due to this, the texture is emphasized and a waterproof barrier appears. The main disadvantage of this coating is its fragility. Oil should be renewed every year, wax - once every 2-3 years. For comparison, the varnish surface will “stand” for 10-15 years.
The photo shows oil applied to wood.
Paints, enamels
How to paint wood floors
Wood floors are the most common. There are a large number of their varieties: planks, parquet, cork, plywood, made of fiberboard and chipboard. Unpainted wooden floors look untidy, wear out quickly and are inconvenient to use.
Choosing paint coatings for wooden floors
Wood floors can be painted with oil paints, alkyd varnishes and enamels, protective alkyd or acrylic impregnations.
- Paints and enamels hide the wood texture and allow you to obtain a uniform color; In this way, plank floors and floors made of fiberboard and chipboard are treated.
- Varnishes allow you to obtain a glossy transparent surface; Parquet floors are usually varnished.
- Protective impregnations protect the wooden floor from destruction; they do not hide the wood texture and can give the wood a selected shade (for example, the color of stained wood).
When choosing paints and varnishes, pay attention to the information on the packaging. Typically, the manufacturer indicates on the label the type of paint or varnish, the surface for which this type of coating is intended, the approximate consumption per 1 square meter, the recommended number of layers, drying time, and also how this varnish or paint can be diluted.
By watching the following video, you will learn which paint is best to paint the floor:
Preparing the floor for painting
Most painting work is preceded by thorough surface preparation. The result of staining depends on the quality of its implementation.
Preparing the floor for painting consists of several stages:
- If there are remnants of previous paint on the surface of a wooden floor, it is better to clean them off with a spatula, sandpaper or a special sanding machine. If this is not done, the old paint will peel off from the wood, reducing the service life of the new coating; It can also show through the new paint layer, detracting from the appearance of the floor.
- If the surface of the wooden floor is uneven, it must be sanded.
- The floor surface is cleaned of dirt using detergents and, if possible, degreased with solvents.
- A new wooden floor should be treated with drying oil before painting - this will reduce paint consumption and increase the life of the floor.
- Using putty, you need to level the floor surface, cover up the gaps between the boards and holes. Instead of putty, you can use a mixture of glue and small sawdust. If you were unable to completely clear the surface of the old paint, you can tint the putty mixture with new paint - this will ensure that the floor surface has a uniform color.
- After the putty has completely dried, you can begin painting.
Painting wooden floors
To paint wood floors, you can use a medium paint brush, a lint-free foam roller, or a sprayer.
They begin work by painting hard-to-reach places with a brush: corners, baseboards and a 15-centimeter strip near them. It is better to paint the rest of the surface with a paint roller - this will allow you to get a more even surface without paint strokes. During painting, you need to stir the paint regularly to avoid streaks.
The average paint consumption is 180-250 grams per 1 m2, but basically you need to focus on the manufacturer’s recommendations indicated on the paint packaging. If the application is too thin, you may soon end up with worn-out stains on the floor. If the paint layer is very thick, the surface may become wrinkled, into which dirt will get clogged.
When painting the floor, one must not forget about ventilation, since most paints have an unpleasant odor and are toxic. In addition, good ventilation can reduce paint drying time. It is not recommended to open doors and windows wide, as dust and dirt may get on wet paint, and this will deteriorate the quality of the surface.
The paint is applied in 2 layers parallel to the direction of the boards. The second layer is applied only after the previous one has completely dried.
How to open up a wooden floor with varnish
Since the varnish coating is transparent, the wooden floor should be sanded. Sanding is the removal of old paintwork, which also eliminates dirt and damage to the floor surface. Sanding is carried out using a special grinding machine or sandpaper No. 40-120.
After sanding, the surface is completely cleaned of dust using a vacuum cleaner.
Varnish is applied using the same method and tools as painting. The only differences are that the varnish needs to be warmed up a little before use, and it takes longer to dry.
After watching this video, you will learn in more detail about sanding and varnishing a parquet wooden floor:
Features by type of premises
Floor preparation, choice of composition, application nuances depend on where exactly the wooden floor is to be painted.
Open room
Unglazed balconies, open verandas, gazebos without walls are painted exclusively with external (street) paints and varnishes. Choose frost-resistant paints that do not fade in the sun or peel off in the rain.
The photo shows the painting of the flooring on the open veranda
Closed unheated room
In country houses, summer outbuildings, and closed gazebos, it is important that the floor can withstand not only foot traffic, but also temperature changes and high humidity. Universal compositions are suitable, but it is better to choose enamel for exterior use.
Advice! Varnish is not the best choice for cold wood floors because... even frost-resistant varnishes are less durable than the same paints.
Closed heated
The easiest way to paint wooden floors in a house or apartment. Any paint marked “For interior use” is suitable for use. They cost less because they do not contain additional strengtheners and additives. Choose odorless paints or varnishes, wax or oil.
What tools will you need?
Painting a floor is not much different from any other painting job, but the set of tools and necessary things is a little wider.
- Ditch, roller, brush. The roller, which is convenient to squeeze out in the tray, provides quick beauty over a large area. It’s more convenient to use a brush to carefully paint the joints behind the walls and go around the pipes.
- Masking tape. Paper tape will help protect walls, pipes and other elements that should not be painted.
- Wood putty, spatula. For smoothing out irregularities, sealing cracks and seams.
- Chisel. It has the opposite effect of putty - it helps to remove unnecessary protrusions.
- Primer. Used as a preliminary layer, improves adhesion, creates additional protection for wood.
- Solvent. It will help clean your brush and hands after work and remove random stains.
You may also need:
- Construction hairdryer. Effectively removes complex old coatings such as oil paint, even if the number of layers is more than 1-2.
- Grinding or scraping machine. For restoration of parquet before varnishing or waxing.
Stage 4: paint
Painting the floor yourself is done using a roller, brushes or sprayer. To paint the corners you will need narrow brushes. Choose a tool based on the characteristics of the coloring composition.
Make sure that the layers of paint applied are not too dry and thick, apply with strokes, rub over the surface. Before applying a new layer, be sure to wait for the previous one to dry. 2-3 thin layers dry faster and look better than one thick one.
We start the painting process opposite the door against the wall, otherwise you may accidentally drive yourself into a corner.
Which adhesive for parquet is better to choose?
Parquet is a very conservative material, but installation technologies have made great strides forward. Modern compositions for installation vary depending on the type of elements, type of wood and purpose of the room. You can get confused in such a variety, so in this article we will tell you which adhesive for parquet is best to choose.
Recommendations for preparation
The final quality of work depends more than 50% on the preparatory stage. First of all, remove from the room everything that could interfere with painting (furniture, equipment). Clear the perimeter of the floor from baseboards.
A wooden floor treated with paint or varnish that has already begun to peel must be restored to its original condition - this is the only way that subsequent fresh layers will lie evenly on it. This can be done using heating (hair dryer), grinding, chemicals (special removers).
If the coating holds tightly, it is enough to sand the floor to a satisfactory condition and you can proceed to further actions.
- Masking large irregularities. If there are wide gaps between the lags, planks cut to width are tightly inserted into them. After the “patch” has taken its place, it is planed and sanded flush with the floor.
- Leveling out minor flaws. Armed with wood putty and a spatula (it’s better to have two on hand: a soft rubber one and a hard metal one), cover cracks, chips and other defects. Let the putty dry and sand with fine sandpaper.
- Protection before painting. Priming is an important step for wood. It is necessary not so much for better adhesion, but for additional protection. The primer penetrates deeply into the wood fibers, providing a barrier against pests, fire, fungus, and destruction.
How to paint yourself?
Painting a wood floor is no more difficult (and maybe easier!) than any other surface. The main thing is to follow simple step-by-step instructions:
- Cover all areas that need to be protected from pigment with paper tape. Including walls adjacent to floor boards.
- Open a can of paint and stir the contents well to evenly distribute the fillers. Pour some into a cuvette.
- Use a small thin roller or a suitable brush to outline the room along the walls.
- Use a large roller to paint the entire floor area, moving from the far corner to the exit. Leave until completely dry.
- Apply a second coat of paint, repeating steps 3 and 4.
Important! If you plan to install floor skirting boards to be painted in the color of the floor, they are installed immediately after the preparatory work and painted simultaneously with the boards.
After completing all work, give the paint at least 24 hours - during this time the coating will become harder and will not be scratched if accidentally hit by furniture.
Advice! Before moving furniture in, check the quality of the floor paint: if, when the boards have dried, the material has run off a little and bald spots have formed, it is better to cover them up right away.
To make sure that anyone can handle painting and not miss a single stage of the work, watch the video:
Stage 1: assessing the condition
The first thing you need to do is assess the condition of the floor before painting. Remains of the previous paint will need to be removed.
Another important point is the humidity of the room and floor surface. It can be easily identified using plastic tape. Leave it on the floor for about 24 hours and check the result. Condensation on the outer part of the tape indicates increased humidity in the room. Before you begin painting, the humidity will have to be lowered. Eliminating sources of moisture, systematic ventilation, and organizing proper ventilation will help.
Gender question: which is better, laminate or parquet?
What is the difference between parquet and laminate, which is better?
If moisture appears on the inside of the tape, the problem is the moisture content of the concrete. This is usually solved using heaters. You can use a popular life hack: leave bags of salt in the room to absorb excess moisture.
Check your paint instructions to determine the appropriate temperature range for painting your floor.
Features of applying varnish
On the one hand, it may seem that varnishing is no different from painting. But in reality the processes differ markedly from each other.
Firstly, if it is better to take a roller for paint, then for varnish it is better to use a soft, wide brush. Secondly, it is important to varnish at a temperature of 15-25 degrees above zero.
Let's get started:
- Carefully move the polish around inside the can. If you plan to use a brush, you don’t have to pour the contents into the tray.
- Apply the first coat along the grain of the wood, carefully going through each joist and spreading the varnish thinly. Leave until completely dry (time indicated on the package).
- After the first layer, you may notice that the fibers have risen a little - take a block, fine sandpaper and go over the entire floor area to remove unevenness.
- Carefully remove any accumulated dust using a vacuum cleaner and a clean cloth. It is recommended to wash a smooth polished floor 2-3 times.
- Apply a second coat of varnish.
- Sand and wash the floor again.
- Apply a third coat of varnish. It is essential for pine floors. Hardwood can only be coated twice.
Important! The finishing coating is not sanded: to remove the sticky layer, it is enough to wash the floor after drying with a soap solution.
Detailed video instructions will help you put everything in its place:
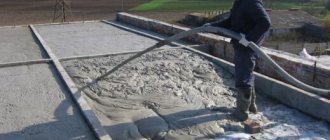
Painting a concrete floor
In order to properly paint a concrete floor, it is not enough to choose an enamel suitable for this purpose. The strength and aesthetics of the finished coating will largely depend on how carefully the preparatory work was carried out.
Before you paint the floor, you need to assess its condition. The concrete surface must be smooth, free of defects, and properly waterproofed. A strong and level base of the floor will guarantee the durability of the coating.
All dirt, dust and debris must be removed from the surface of the base. The surface must be completely dry. If paint is applied to a new concrete screed, it must be sanded and covered with a layer of primer or polyurethane impregnation.
From the moment the screed is arranged until the base is painted, at least 5 days must pass. Work can be carried out at a temperature of at least 10 degrees.
Technology of painting concrete bases
Beautiful design
After all the preparatory work has been completed, the concrete base can be painted. Paints and varnishes are applied to the surface with a roller or spray. Painting the corners is done with a regular paint brush. When working with a roller, strokes are first applied in different directions, after which the enamel is rubbed over the surface to be painted as evenly as possible. The second layer can be applied only after the first has completely dried. As a rule, it takes at least 20 hours for enamel to dry on a concrete base.
You can walk on the painted floor 20 hours after applying the last layer. After three days, average loads on the floor surface are allowed. Concrete enamels are completely polymerized only after 7 days, after which the coating acquires maximum strength and the surface can withstand absolutely any load.
Original painting ideas
The easiest way to make a monochromatic floor covering is to simply paint it one color around the entire perimeter. But if you want something more original, you can arm yourself with patience and create a unique pattern.
For example, alternating white and wooden diamonds: simple, fast, impressive. First of all, paint some of the squares white, then cover the entire area with a couple of layers of varnish.
The photo shows an unusual way of painting the floor
Geometric 3D painting looks no less original - to implement it you don’t even need to have artistic talent, you just need to figure out where and what shade to apply.
Are you afraid of making a mistake when modeling manually? Use stencils! You can purchase ready-made ones or order them from a printing house to suit your taste.
One last idea - add some color! The technique of multi-colored staining looks best on small-format floors, such as parquet. The only negative is that you will have to tint many shades to get a spectacular result.
Floor paint is a budget-friendly, but nonetheless workable option for finishing boards. By choosing the right composition and following all the recommendations, you will create a durable floor covering with your own hands.
Painting laminate
I would like to note that if this coating is worn out and has an unsightly appearance, it is still better to simply replace it, since in general the difference in effort and finances is not very significant. But in this case, you can get a new floor covering.
But if you decide to paint the laminate, then it also needs to be prepared for the procedure.
First of all, you need to remove all the furniture, sweep the floors, and then thoroughly sand the laminate flooring. In this case, the paint will better adhere to the structure, and the coating will retain its original appearance longer. Afterwards you need to clean the floor from dirt; you can even wash it with a vacuum cleaner. Treat with a primer, and then, when it dries, you can paint. After the paint has dried, it should be coated with polyurethane or alkyd varnish.