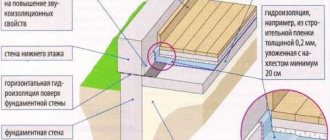
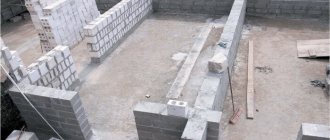
Assembling the formwork
If it is not necessary to create it when laying tiles, then it is necessary for pouring a monolithic coating, since it helps to keep the mortar at the same level until it finally hardens. Often it is made from boards or plywood. The formwork is installed immediately along the entire length of the path or installed in parts as the solution is poured.
Photo: preparing formwork for pouring the blind area of a house
Pegs are placed at the bottom of the trench, to which boards are attached with wire and nails.
To create a waterproofing layer, the bottom of the formwork is covered with polyethylene film. This will prevent the concrete from absorbing water from the soil and will increase the frost resistance of the coating.
Creating a pillow
When the formwork is assembled, you should start filling the sand layer. It will serve as a drainage path for the path. Clean, preferably damp, sand is poured on top of the film or agrofibre and distributed evenly over the area. For greater reliability, a thin layer of crushed stone or gravel can be compacted underneath. Next, the pillow is moistened and compacted.
Photo: sand cushion being compacted
We carry out reinforcement
Metal elements inside concrete extend its service life, prevent the surface from cracking, and reduce the thickness of the mortar layer. To reduce material costs, you can use old wire, mesh, and pipes.
But the best option is reinforcement with a mesh cell no larger than 10*10 cm. Place it in the middle of the trench, securing it with clamps or wire.
Pouring process
It is worth considering that for a pedestrian path, a concrete solution thickness of 5 cm is sufficient; for driveways and areas with heavy loads, the layer should be 8 cm or higher.
The mixing is carried out in a ratio of 1:3. Cement is mixed with dry sand, then water is gradually added. Each portion of the solution should be immediately leveled with a provil. The poured surface is compacted until the laitance is released. As soon as the concrete begins to set, all irregularities are removed with a spatula. After which you can start decorating.
To ensure the concrete hardens well, it is recommended to moisten it with water or cover it with plastic film. After three days, you can remove the film and carefully dismantle the formwork.
We design and decorate
The optimal time to start decorating is one day after pouring the solution. Using an iron rod, they create ornaments on the surface and imitate tiles by drawing contours. In addition, concrete can be painted in different colors with acrylic paint - the path will be bright and interesting.
To add shine, special impregnations, polishes, and liquid glass are applied. Fluoride silicate and wax-based products do an excellent job of this.
Care instructions
To extend the service life of a concrete pavement, it should be treated annually with hydrophobic agents. You should not use an iron shovel to clear snow in winter. Even if the path is slightly icy, it should be sprinkled with sand, but not salt. Otherwise, the coating will begin to crumble over time.
For garden alleys, concrete is a reliable material at an affordable price. And self-paving and decorating concrete paths will make them an original addition to the landscape design of your yard.
Choosing concrete tiles
Concrete tiles come in two types:
- vibration-cast;
vibration-pressed;
Vibropressed is a cheaper option due to the production technology, which allows you to “stamp” a large number of tiles without the involvement of human labor.
Vibropressed tiles are made in a vibrating form using a vibrating press. It turns out to be very durable and is recommended for use in places with constant high load, for example, near garages.
Vibrocast has a simple production technology, is more expensive, but has a more presentable appearance due to its smooth surface. It is less durable and serves mainly decorative purposes. If appearance, color and unusual shapes are important to you, then these tiles are best suited. Remember that at low temperatures, vibro-cast tiles accumulate ice on the smooth surface, and walking on them becomes very dangerous.
This type of paving stones is better suited for individual customers and for landscaping small areas, more for decorative purposes.
Clinker tiles
Advantages of clinker over concrete:
- strength is 4 times higher;
- increased frost resistance;
- increased moisture resistance;
- not susceptible to microorganisms;
- looks more attractive;
- increased service life.
Pleasant looking and durable, clinker pavers are ideal for all types of sidewalks.
It is made from clay of special plasticity. Plastic clays require the use of special additives, thanks to which the material retains its structure during firing and does not crack. So-called fluxes (special rocks) are often used, which increase the ability of raw materials to sinter.
In general, any raw material for tile production includes plastic and non-plastic elements: clays of various types and additives. But in the case of clinker, a special role is played by clay – purified from impurities and, most often, delivered from a limited number of deposits. Our company offers various types of clinker tiles at affordable prices.
So, if you need paving stones at a relatively low price and high strength, vibropressed concrete tiles are your choice. If appearance is important, choose vibration casting or clinker tiles. Clinker tiles are a combination of aesthetics and reliability. Here you can find and buy paving slabs for your garden at low prices. Choose the right material and create your own original landscape design.
DIY concrete slabs
Garden path made of concrete slabs
The advantage of concrete slabs for paving garden paths is as follows:
- high strength concrete
- durability of concrete slabs
- ease of creating and paving concrete slabs
- ease of replacing damaged slabs
- a garden path made of concrete slabs does not require special care and money to maintain
- concrete slabs can be creatively decorated during the creation process
- small cash costs for creating concrete slabs and paving garden paths with them
To make a concrete slab with your own hands, you just need to prepare a mold, make a concrete solution and pour it into the mold. After the concrete solution has completely set (this takes about 3 days, depending on weather conditions), you can begin paving garden paths with concrete slabs. Now we will take a closer look at the steps of creating a concrete slab with our own hands.
In order to make a concrete slab we will need the following materials and tools:
- Wooden beam with a section of 50*50 mm
- Hammer (metal and mallet)
- Nails
- Steel sheet
- Concrete mortar components: cement, water, sand, gravel and dry concrete mix
- Materials for decorating tiles (color pigments, broken ceramic tiles, small natural stones, etc.)
- Reinforcement (your choice, either rods with a diameter of 5 mm or reinforced mesh)
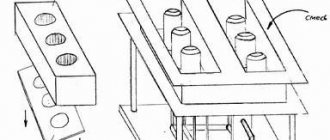
Creating a mold for a concrete slab
Mold for concrete tiles
The mold for the concrete slab is created based on the future dimensions of the slab. As for the size of the concrete slab, it is determined by the width of the garden path. We recommend creating a mold with dimensions of at least 50*50 cm, so that the process of casting slabs does not take a long time, and the garden path is comfortable to move. You can make a mold trapezoidal, round, rectangular, etc., everything is up to your taste.
So, we take wooden blocks, saw them into suitable sections and fasten them with nails - the mold is ready. It is best to make several molds at once in order to simultaneously produce 2-3 concrete slabs.
Next, the mold is attached to a steel sheet. In order for the finished concrete slab to adhere well to the mold, the inner sides of the wooden blocks must be painted with paint (preferably oil-based).
You can more easily make a mold for concrete slabs without using a steel sheet. To do this, you need to find a flat surface, stretch plastic film over it and put a mold of bars on top. As soon as the solution is poured, we wait for the plate to harden, after which we disconnect one of the sides of the mold with a chisel. After this, we fasten the mold again and repeat the procedure. With this cycle, one mold can be enough for 10-12 disconnections/connections.
Creating a concrete solution
The most suitable ratio of materials for concrete mortar is the following: 1 share of cement/2 shares of sand/4 shares of gravel (or crushed stone). It is also recommended to use ready-made concrete mix, which is sold dry, but it will cost more than preparing it yourself.
In order to mix the concrete solution well, it is better to purchase a concrete mixer, or make it yourself, it is not so difficult.
You can also mix the concrete solution manually using a trough and a shovel, but in this case it will take more time and effort.
Now the most important thing: the amount of water in the concrete solution. It should be noted that the ideal proportion of water in the solution should be ¼ of the weight of the cement, but it is unlikely that you will be able to mix the solution well, so it is allowed to pour out a little more water (40% of the weight of the cement).
If you mix the concrete solution by hand, you must first mix the dry material until smooth, then add water little by little. Excess water significantly reduces the strength properties of a concrete product. The ideal solution is one that, when squeezed in a fist, forms a shape that does not spread or crumble.
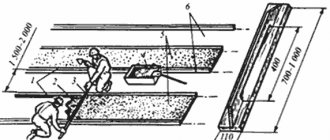
Pouring mortar into the mold and reinforcing concrete slabs
Ready-made concrete slabs
So, let's move on to the main stage of creating concrete slabs with your own hands. First, set the mold and mix the solution. Next, pour half of the required solution into the mold. We lay reinforcement bars (or mesh) on the mortar and add the rest of the concrete mortar.
It’s good, of course, to pour concrete slabs on vibrating tables, which will thoroughly compact the solution in the mold and remove excess voids from it. This technology is used to create concrete slabs for Eurofences.
If you do not have the opportunity to use vibrating tables, then at least compact the solution with a homemade wooden tamper and level the surface with a trowel.
As soon as the molds are filled, we leave the products for several days so that the solution sets and hardens. Usually it is enough to wait 2-3 days. All this time, it is necessary to wet the concrete products several times a day so that they do not crack in hot weather. If it is not possible to wet the concrete slabs, then at least cover them with a damp cloth.
Decoration of concrete slabs
Decorated concrete slab
There are several ideas you can use to decorate concrete slabs.
The first is that when creating a concrete solution, a color pigment is added to the mixture, which will give the concrete slab an original color. The most popular color pigments for concrete products are brown umber and ocher mineral dyes.
The second way is to lay a mosaic of natural stones or broken ceramic tiles on a concrete slab. This procedure must be carried out while pouring concrete slabs. After the solution is poured into the mold, wait a few hours for the concrete to set a little, and lay out the pattern on the slab, lightly tapping the material for decoration with a mallet.
Laying paving slabs on a base cushion
The base cushion can consist of compacted gravel, screenings and sand laid out in three layers. More often, sand laid in one layer is used for country paths. This is a simple and reliable method for its purposes that will save a lot of time and money.
- The first step is soil preparation
Namely, the removal of the top fertile layer. Typically its thickness is approximately 40 cm. The sand is laid in layers with pouring and compaction.
It is also necessary to remove the roots of large bushes and trees, if any. To isolate the soil layer from the sand cushion, geotextile fabric is often used (made from high-quality polymers, it usually lasts a long time).
- The second step is the arrangement of the curb and drainage systems
If you are going to build a border (border stones can be found in the catalog on our website), then it should be mounted on a cement base.
Often the curb is installed in a special keystone made of concrete. You may also need gutters with longitudinal gutters. This is a special type of tile that is laid along curbs in places where rainwater accumulates. They can be installed similarly to other tile elements, clearly aligning each stone with each other. More often, the drain is installed along the curb.
The laying area may have a slight slope of just a few degrees to ensure water drainage. The time interval between the stages of arranging the curb and directly paving the path should be approximately 1-2 days.
Laying the border looks like this:
- First you need to dig a hole so that the curb stone “peeks out” a few centimeters above the surface of the paving stones. For this, a thread-level and wooden pegs are used, by which you can mark the height of the elements, this is especially important for the “winding” structure of the path;
- then pour in large fragments (using a trowel) of cement mortar;
- when the solution has hardened, you can install border elements;
- Large portions of cement mortar are also laid and leveled on the outside of the elements.
- Third step - laying paving slabs
For installation you will need the following tools:
- thread - level, to determine the evenness of the laid rows of tiles;
- rubber hammer;
- Master OK;
- compaction press;
- saw - “grinder” for cutting elements that do not fit into the masonry;
- broom for cleaning paving stones.
To level the surface of the base cushion, you can use a wooden rule. The rule from improvised means is a wooden board
Start laying the first row of tiles, focusing on the thread level. To adjust the height of the products, you may need a building level. When laying the tiles, then they need to be compacted with a rubber hammer (mallet). The thickness of the seam between products should not exceed 3 mm.
It is more convenient to lay the tiles “away from you” towards the water drainage areas, moving along the already laid area. It is better to first lay out whole elements, and then, if necessary, process the required number of additional ones and lay them down. Upon completion of installation, the seams between the products are covered with cement mixture and filled with water. It is also possible to fill the seam with sand and clean the surface with a regular brush.
No. 5. How to correctly calculate the weight of building materials?
So that during the construction process you do not have to urgently purchase additional sand, it is better to at least approximately estimate in advance the amount of materials that will be needed. The concrete layer may differ in different conditions
: for heavy clay soil - 5-7 cm, for sandy and light loamy soil - 10 cm. In addition, if the soil is swampy, then you need to provide a layer of gravel 5 cm thick. In any case, you will need a so-called
cushion, which is made of sand
and has thickness 10-15 cm.
The calculation of all the necessary materials is quite simple. Let's say it is necessary to build a path with a width of W = 1 m, a length of D = 10 m and a thickness of T = 10 cm (0.1 m), and the underlying layer of sand will be equal to P = 0.1 m:
- To organize a sand cushion, the required amount of sand is calculated as W*D*P. In our case, it turns out 1m*10m*0.1m=1m3. According to the reference information, the weight of a cubic meter of sand is 2400 kg, so 2400 kg is needed to complete the underlying layer;
- concrete can be prepared in the proportion of 3 parts sand and 1 part crushed stone, cement and water, but there are other options, which will be discussed later. It is more convenient to first calculate the volume of concrete required using the formula W*L*T, which comes out to 1m*10m*0.1m=1m 3 . According to reference information, the average weight of a cubic meter of concrete is 2800 kg. The resulting weight of the concrete volume can be divided into 5 parts, not taking into account water: 2800/5 = 560 kg - the weight of one part, i.e. cement. The rest 2240 kg is the weight of sand, crushed stone and water. You may also need dyes, plasticizers, water-repellent additives, etc.
Of course, this calculation does not pretend to be strictly mathematically accurate, but it allows you to approximately understand how much and what will be needed.
Laying tiles on cement mortar
The first stage here will be the arrangement of a concrete base.
First, just as in the previous method, it is necessary to remove the top layer of soil, then fill in a small layer of crushed stone about 10 cm.
Then we install the reinforcing mesh so that it rises several centimeters above the surface, fill it with concrete (a layer approximately 10-15 cm thick). Now you need to wait for the concrete mixture to completely harden. After a few days, you can lay the cement-sand mortar and install the tiles.
Laying on cement mortar is similar to the previous method. There is no top layer of sand at the base. The cement mortar is applied in an even layer to each product (you need to make sure that there are no unnecessary elements, bulges, lumps, etc.). The products are placed as close to each other as possible. When laying tiles, stick to the chosen pattern (“rhombus”, “wave”, “old city”, etc.)
Upon completion of installation, it is necessary to treat (fill) the seams with a special solution (grind). Then, we leave the solution to dry for several hours and remove the seams using a special brush. Installation is complete.
Decoration options
Reinforced paving slabs are an economical material that will cost less than natural stone paving. Modern products are distinguished by a wide variety of textures and colors, which makes it possible to produce the option that best suits the stylistic design of the cottage or garden. Outwardly, it can remain neutral, so it can be easily combined with brick, natural stone, cobblestone .
Placement depends on the purpose of the site or track:
- if the path is laid from the street to the house, the products are stacked tightly against each other;
- if the path is rarely used, the slabs can be installed with gaps, which are sown with annual flowers or ornamental grass;
- when arranging open terraces, recreation areas, areas around swimming pools, you can make recesses in the masonry of slabs for planting low-growing shrubs and flowers;
- the distance between the plates should be the same, taking into account the length of the standard step.
Decoration
The standard step taken for an adult is about 0.74 meters.
Landscape designers recommend considering the following design options:
- installation of slabs with stone or clinker connections;
- painting concrete in any color;
- adding marble or stone chips, colored glass, metal or ceramic elements, pebbles, flat stones to the top layer;
- decorating slabs with a relief pattern.
Paths can be straight or curved. In the latter case, you can visually expand a small area, but it requires too much effort. Aesthetic appeal can only be achieved if the path is equipped with curbs.
Coloring
There are two ways to color concrete slabs: adding pigment to the working solution, or painting finished products . The introduction of pigments is a more expensive option, based on the use of special dyes and white Portland cement.
Painting of the finished path is carried out using special compounds that have a penetrating effect. To obtain a rich shade, the slabs are processed several times.
Technology for painting finished concrete paths
To work you will need the following tools and materials:
- water or acrylic stain;
- film;
- concrete sealant;
- spray gun;
- paint roller.
In addition to decoration, it is necessary to organize the protection of concrete slabs, for which dry cement is rubbed into their surface
Sequencing:
- The working surface is thoroughly cleaned and freed from dust and debris. If necessary, the slabs are washed using special degreasing detergents;
- the length and width of the slab are measured, which will allow you to calculate paint consumption;
- walls, flower beds, lawns, and trees located next to the path are covered with film;
- the dye is placed in the spray gun;
- coloring starts from any angle. It is recommended to keep the device at a height of 50-60 cm from the concrete slab being processed;
- 2-3 layers of dye are applied sequentially. Before spraying each subsequent coating, it is recommended to wait until the previous one has dried;
- when the finishing layer is applied, the path must dry well, so it cannot be used for about two days;
- the dry finish can be sealed with a sealant to protect the color. When working, use a short-haired paint roller.
Using paint, the slabs are decorated to look like natural stone. The paint is applied to the surface in uneven layers. Some areas should be translucent, others densely colored. The alternation of dark and light areas should be random, which will allow you to get a natural coverage.
Decorating the surface with drawings
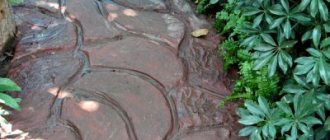
The simplest way to design finished slabs is to apply a pattern to the surface. The work is carried out on the second day after pouring, when the solution has not yet lost its plasticity . Using a screwdriver or a thin steel rod, closed shapes are cut out on the product, simulating flagstone, with the depth and width of the slots being about 5.0 -7.0 mm. During use, soil accumulates in the gaps, which allows you to achieve the complete illusion of masonry.
Printed concrete
The slabs, the surface of which is processed using special matrices, look very beautiful. Before embossing, a tinting fixative is applied to the uncured surface of the product. The finished path acquires a texture that successfully imitates natural materials - boardwalk, slate, paving stones. To protect the coating from abrasion, it is treated with acrylic impregnation.
Decoration with pebbles, ceramics, glass
The cost of products varies depending on regional pricing and manufacturer
Such design is implemented according to the following principles:
- Decorative elements are glued onto a sheet of thick paper with a reference for the future design;
- when working, water-soluble glue is used;
- the paper is placed in a mold and filled with concrete;
- When the material hardens, the paper base is washed off with water.
If you place a backing made of corrugated metal sheet into the mold, the plate can be given a relief texture.
Glossy shine
Country paths can acquire a spectacular shine if you use potassium or sodium liquid glass impregnation . Such compositions are characterized by high adhesion and allow the formation of a durable coating. Alternatively, synthetic resin or wax compounds can be used. Impregnations fill the pores of concrete, protecting it from destructive environments, weathering, and moisture . All substances are applied using a spray gun or brush. The dilution method depends on the manufacturer’s recommendations, so you must strictly follow the instructions.
Tiles for paths in the countryside, what they offer today
To make your summer cottage more comfortable and add the final stage to its design, you should use paths that are tiled. Tiles for paths in a country house are an opportunity not only to distribute an aesthetic load, but also a functional one, since such a design idea will not only decorate the area and complement the facade, but will also protect it from dirt in rainy weather. When creating a landscape design for a site, each owner comes to the understanding that they cannot do without paths and thinks about how to properly design them, what to make them from and where to lay them correctly.
What material can be used for country paths
Modern manufacturers offer a large selection of materials for making tiles for paths in the countryside, which will satisfy any requests of the owner of the site and are provided in a large price segment.
Paths can be made from the following materials:
- tree;
- plastic;
- stone;
- flagstone;
- gravel;
- rubber tiles;
- paving slabs.
Not everyone can afford stone paths, since their price is quite high for the average person. It is completely impractical to use wood for these needs, since it quickly collapses and rots. Plastic does not fit into the natural image of a summer cottage at all. Gravel creates obstacles for comfortable walking on it. In this regard, it is best to use tiles for paths in the country.
The cost of tiles is determined based on the following factors:
- production technology;
- pricing policy of the manufacturer;
- the presence of additional additives;
- quality of dyes;
- manufacturing material.
Tiles for paths in the country are selected according to a number of criteria, which are taken into account by each owner individually.
Path made of concrete slabs
Laying a slab path consists of the following steps:
- Preparing the base. The foundation pit is being prepared by removing a layer of soil to the thickness of the slab and backfill layer. The base is leveled. Crushed stone (drift) is laid in a layer of 5~10cm.
- The formwork is being installed. It is necessary to pay attention to maintaining the general level of the surrounding space - the finished slab should be on the same level as the soil. This is determined by the top cut of the fence to be poured. Leveling - adding sand under the slab.
- The concrete mixture is prepared and poured. Laying must be done carefully so as not to move the formwork.
- Alignment. Typically, a smoothing iron is used (for smoothing). It is possible to use thick plastic film, but this requires a certain skill. It is advisable to cover the surface of the product with waterproofing material for two to three days. This will ensure moisture retention and proper cement hydration process.
- Ironing. The operation will give the surface increased strength and wear resistance. Sprinkle with cement after the liquid surfaces have disappeared.
As you can see, the technology for paving a garden path with concrete slabs is quite simple. This allows owners of summer cottages to realize their creative ideas.
Design of the finished path
The artistic decoration of the garden path includes:
- The actual shape of the slab is square, round, curved.
- Paving pattern - checkerboard, brick, mosaic, “artistic chaos”, etc. Here the fantasy of the owner of the site is fully realized.
- Colored decoration. The dye is introduced at the stage of preparing the concrete mixture or the surface of the slab is coated after the concrete has set.
- Surface structuring. The surface of uncured concrete is decorated with mosaics - broken tiles, pieces of colored glass, small pebbles.
The technology for making paths in the country involves pouring them on site. Hence, a technological gap of 20–50 mm wide is formed between adjacent products. The free space, after removing the formwork, is filled with small crushed stone or soil. Decorative lawn grass is planted in the latter.
What type of paving slabs is better for a summer house?
The main factors when choosing paving tiles for a summer cottage are not only the cost, but also the daily load the coating will be subjected to.
There are two main types of tiles:
- Vibropressed;
- Vibrocast;
- Porcelain tiles.
For pedestrian paths, you can choose tiles 3 cm thick, it will be much cheaper, although the strength will be worse, but it will be enough for a human weight. Porcelain tiles are produced for landscape use with a thickness of 20 mm or more.
The smaller the tile, the stronger it is, as it is more difficult to break.
When choosing tiles for paths in the country, it is worth considering the following points:
- availability of a certificate;
- what technology was used in production;
- size;
- quality;
- appearance;
- strength level.
Tiles that are too bright are often not of high quality due to excess dyes. Choosing a good tile from a catalog is quite difficult, since to carry out a simple examination you need to hold the material in your hands and hit two tiles against each other. If a ringing sound is heard during this manipulation, it means the product is of high quality. A dull sound and strange stains (stains) indicate that the quality is low. It is also worth paying attention to the composition of the material, its density
Laying paving slabs depending on the landscape style
In order for the paths to fit harmoniously, they need to be carefully thought out and made in the same style with the surrounding design. There are several schemes for laying tile coverings.
It can be laid in a checkerboard pattern or in a herringbone pattern. If you want to achieve unity with nature, it is recommended to place the tiles randomly. This scheme will fit perfectly into country or Provence style.
Source: psk-remont.ru
Tiles can be used to decorate various objects. For example, such a path will look natural in combination with pebbles around a pond with a seating area and benches. You can leave gaps between the tiles. Grass will grow through them, which will add naturalness.
Patterned tiles will look perfect on paths running through alleys and plant arches. It will give the landscape a fabulous look.
When choosing a design, you must take into account that artistic styling requires a creative approach and takes a lot of time. Therefore, the price for such work will be higher.
Source: eko-oazis.ru
Paths paved with paving slabs will become a practical decoration of the site. The advantage of this material is that its type can be chosen based on your budget. If the quality of the tiles is good and the installation work is carried out correctly, the paths can be used for decades. They will not lose their attractive appearance and performance characteristics.
2
Characteristics of paving slabs
When making paving slabs, a mixture of concrete and sand with granite chips is used.
Vibratory paving slabs are produced as follows:
- The concrete mixture is placed in a special plastic container, which is placed on a vibrating table.
- After the mixture is compacted, it is sent to a warm place for 12 hours.
- When the composition has stood for the required time, it can be removed from the mold in the form of a tile.
This technology allows you to make the tiles smooth; they can be of any shape and texture. The finished material can be given any color.
Laying such tiles is a pleasure; no glue or grout is required, just a hammer and a block and, of course, the desire to make it as beautiful as possible
It is worth noting that such paving slabs for paths in the country have some disadvantages that should be taken into account when choosing them:
- poor frost resistance;
- low strength;
- long production time;
- high price.
Vibration pressing is carried out as follows. The prepared concrete solution is placed into the mold on the machine bed. The equipment is in constant motion. Due to the punch, constant pressure is created on the mass until it is compacted as much as possible. Tiles obtained by this method do not have a smooth surface, they do not have a variety of colors and shapes. Vibration-pressed tiles have good frost resistance and high strength. It can be used for those areas where the dacha is intended for traffic. The cost of such tiles is much less than cast tiles.
When the slab for installation is selected, calculations are made of how much material will be needed, not forgetting to take into account curbs, if any. Experts advise buying 5% more material, taking into account defects and waste.
A tiled path at the dacha looks especially unusual when you select several options for laying materials with your own hands; in the photo there are pebbles, bricks and paving stones
Concrete tiles for paths in the country
With this material, as we have already mentioned, there are the most options. In addition to special forms for making concrete paths on site, there are a huge number of forms for making paving slabs. The work of molding them can also be done directly on site. Let us immediately recommend an excellent composition for homemade tiles:
- 1 part cement grade 500;
- 1 part fine river sand;
- 1 part granotsev, preferably washed;
- 1.5 - 3% by weight of either plasticizer type C-3, or a similar amount of any detergent, liquid soap can be used;
- basalt or polypropylene fiber at the rate of 50 g per bucket of solution;
- dye - optional.
If it is possible to slightly vibrate the mold after pouring, homemade vibrating tables are often used for this.
https://stroi-specialist.ru/razlichnye-samodelki/vibrostol-varianty-izgotovleniya.html
And if this is not possible, do it manually on any flat, hard surface.
The concrete mixture can also be laid in formwork installed on the site of the future path. After the final setting of the concrete, such formwork is carefully disassembled.
Concrete lawn gratings called “eco-parking” look modern. They can not only lay out interesting garden paths, but also parking lots and playgrounds.
Here it would be appropriate to talk about the simplest and most interesting way of making beautiful and practical tiles for garden paths from concrete and broken ceramic tiles.
For this process you need:
- make 2-3 simple forms (depending on the volume of the concrete mixer or container for mixing the solution) in the form of a flat trough of the same height;
- place fragments of tiles (preferably anti-slip for outdoor use) on the bottom, face down, making sure to fill the corners of the mold;
- fill the molds with concrete mortar prepared as described above;
- drown 2 - 3 pieces of reinforcement with a diameter of 10 - 12 mm, 20 - 30 mm shorter than the long side of the tile, into the concrete;
- remove the formwork after 24 hours and let it sit for at least 3 to 4 days.
Laying of ready-made concrete slabs can be done both in a trough and in separately prepared recesses with the same backfill.
Inexpensive tile options for a summer cottage
A garden or dacha plot can be decorated with quite inexpensive patterns of tiles, which will delight its owner, and at the same time will not cost a lot of money.
You can use the following options for a tile path in your country house:
- Paving stones are the most durable and durable material that is very easy to lay.
- Maple leaf or clover - this type of tile will give your dacha visual aesthetics and an unusual shape.
- The wave tile gives a pattern that is pleasing to the eye, which is liked by many and is especially popular.
- Tile - coil gives an original pavement pattern.
- The scale path is very easy to lay out and will decorate any area, since this type of tile is offered in a wide range of colors.
Material of any shape makes it possible to achieve a well-groomed appearance of the site without any special investments, using different patterns that can be selected to suit any taste.
Advantages of rubber tiles
Rubber tiles are much more expensive than other options for sidewalks, but this is fully justified by a whole list of advantages:
- light weight;
- preventing slipping, which will protect you from injury if you fall;
- does not retain water;
- long service life;
- ease of installation;
- does not deform or break during transportation.
How well such tiles look on paths can be assessed in the photo:
Options for laying paving slab paths in your country house, which will help you choose what you like best. Let yourself choose!
Polymer and rubber tiles for country paths
Most of these products appeared on our market relatively recently, but their consumer characteristics appealed to our summer residents. They are not afraid of frost and moisture, can be re-laid in a new place more than once, and combined with other materials for garden paths.
Disadvantages include the poor resistance of some plastics to ultraviolet radiation, which shortens their service life.
We recommend other articles on the topic