Most often, we show the end result - correctly laid cross-linked polyethylene pipes on a foil backing. What's underneath it? How to properly arrange all the layers so as not to lose heat? We asked our craftsmen to talk about the technology of laying water heated floors. So, what does the correct water heated floor consist of in the Engineering Agency (layers from bottom to top):
- rough screed
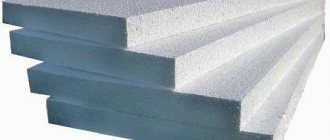
- expanded polystyrene ~3-5 cm
- damper tape around the perimeter
- thermal insulation substrate ~2-3 mm
- underfloor heating pipes with brackets ~2 cm
- final screed for flooring
Thus, the total height of the correct water heated floor cake, taking into account the screed and finishing coating, will be about 10 cm . Therefore, for such a heating system, you need to provide special conditions in advance if you do not want to raise the floor level at the last moment.
IMPORTANT! Think over all the work in advance, consult not only the builders, but also our independent specialists!
Based on typical customer mistakes, we advise you to carefully select a team of builders and installers from the Engineering Agency and contact in advance those who will carry out utilities. Better yet, organize a meeting at the site of engineers and builders together.
general information
A heated floor (especially since the technology of laying a heated floor under tiles is not so complicated), equipped under a ceramic tile coating, has the maximum efficiency of all other options. This happens because the tile is an excellent conductor of thermal energy, despite the fact that it is laid on a cement screed, which has no less thermal conductivity. The result is a layer of heat conductor that has tight direct contact with the source and minimal losses.
Such advantages set tiles apart from many other floor coverings and make them the most successful solution for installing heated floors. Typically, tiles are considered a cold surface, but in this case, their properties become most suitable for performing the assigned tasks. Moreover, the question of how to lay heated floors under tiles is resolved fairly quickly.
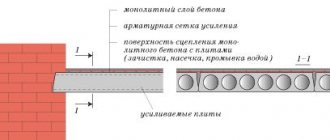
Composition of the “pie” of a heated floor with a concrete screed
Layers of heated floors with concrete screed were discussed in the previous article, here I will list them again (from bottom to top):
- insulation;
- polyethylene film;
- reinforcement mesh (you can do without it, but with it it is more convenient to install the pipe and the floor will be stronger);
- heated floor pipes;
- concrete screed.
Everything else that is above and below what is listed does not apply to the warm floor itself, but it will still be mentioned here, because it plays its role.
Kinds
There are two types of heated floors:
- Water.
- Electric.
Currently, a hybrid method is presented on the market - the use of an electric heating cable placed in a pipe with water. Thus, both methods are combined, although the power supply still remains electricity.
A water heated floor is a structure where heating is carried out using hot water pipes.
Electric - cable or infrared heaters, film or rod, are used.
Both systems operate using the same general technique, using heaters that transfer heat to the floor covering. The only difference is in the design of the heating source and installation of the system . In both cases, warm floors under tiles can be made with your own hands without any problems.
Water
Device
A water heated floor is a system of pipelines installed in a system of layers of a heated floor cake.
This requires laying hot water pipes in a “snake” pattern, evenly covering the entire area of the room .
Water heating is carried out either autonomously, using a boiler (for example, gas or electric), or connected to the central heating system, if possible. A characteristic feature of this design is a softer heating mode compared to electric; the water temperature does not exceed 70-80 degrees, which is fire safe, but quite sufficient for heating, given the radiation area.
Another feature is high thermal inertia; after switching off, such a floor cools down slowly. At the same time, laying a warm floor under the tiles with your own hands in this situation is not particularly difficult.
Pie
Solving the question of how to properly lay a heated floor under the tiles begins with the correct arrangement of the pie.
The tile water floor pie includes the following layers:
- Rough floor.
- A layer of insulation that eliminates unproductive losses - heating the subfloor.
- Waterproofing film.
- MAC mesh.
- Heated floor pipes.
- Screed layer.
- Tile.
This pie composition is most suitable for a concrete subfloor, since for wooden structures the composition of the pie varies:
- Subfloor (plank flooring).
- The sheathing, as thick as the diameter of the pipes, provides a gutter to keep the pipes safe.
- Heated floor pipes.
- Cement strainer.
- Tile.
For wooden subfloor structures, there is no point in laying a layer of thermal insulation, since the structure of the wooden floor itself is, in fact, a continuous thermal insulating layer, and the flooring made of boards has good thermal insulating properties. It is these moments that determine the thickness of the warm floor under the tiles.
Tools and materials
To work you will need:
- Pipes (preferably metal-plastic).
- Connecting fittings.
- Self-adhesive tape.
- Reinforcement mesh.
- Cement, ready-made composition for screed.
- Tiles, tile adhesive.
- Waterproofing film.
- Hacksaw for metal.
- Sharp knife.
- Hammer, pliers, container for mixing cement composition, etc.
You may need much more tools, it all depends on their availability, on the accepted work scheme and on the skills of the master. At the same time, warm floors under tiles: technology and specifics will directly depend on these factors.
Laying
Laying tiles on a heated floor is based on simple principles. The stages of work look like this :
- The area of the room is divided into zones with a maximum area of 40 square meters. m. It is especially important if the room has complex geometry, forcing the use of division to obtain simpler sections. This is necessary for a better choice of pipe placement - snake or snail.
- A layer of insulation is laid. For the best quality work, it is best to use extruded polystyrene; it does not allow water or steam to pass through, and is an excellent heat insulator. In addition, it is quite tough and durable material.
- A layer of waterproofing is laid - best of all, polyethylene film. It will not allow water from the screed to seep between the insulation boards and will cut off the steam that seeps through the screed when the heated floor is turned off.
- Laying the MAK reinforcing mesh, which protects the insulation and waterproofing during installation and pouring of the screed.
- Pipeline installation. Sections of pipes are attached to the mesh to fix the position. Do not fasten it too tightly; temperature deformations are possible.
- Corrugated inserts are attached to compensate for temperature expansion, the pipeline is connected to water and pressurized. (At a minimum, it can be kept filled with water for several days).
- Filling the screed. At this time, the pipes must be under operating pressure.
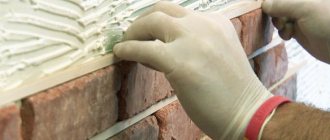
- The screed is allowed to dry, after which the tiles are laid on it.
Attention! Do-it-yourself installation of a heated floor under tiles on a wooden base is approximately the same, only instead of laying insulation, slats are placed on the floor, forming recesses for placing “snake” zigzags.
Some stages of installation, if necessary, can be supplemented with any operations. At the same time, installing a heated floor under the tiles will still be the most convenient way of heating.
Ground installation
This option is possible when the soil is not too loose and groundwater lies no higher than five meters from the surface.
The installation of a warm water floor on the ground differs from that described above by the presence of an additional stage of work:
- the surface is cleared of debris and grass and leveled;
- pour a layer of sand and compact it;
- pour gravel/crushed stone or expanded clay. Layer height – 7-8 centimeters;
- lay the bottom waterproofing layer (possibly from roofing felt);
- lay the reinforcing mesh;
- perform a rough screed 5-10 centimeters thick.
Electric
Device
Electric underfloor heating is a heating cable laid under the floor covering.
Cable mats or infrared heaters of needle or film type are essentially the same thing.
From the point of view of installation work, installing an electric heated floor differs little from a water one, but installing an electrical cable takes less time to check (there can be no leaks, it is only important to determine the quality of the connection and the operation of all sections of the system) . In this case, it is also necessary to cut off the subfloor to avoid heat loss.
An important issue before laying a heated floor under the tiles is the choice of a heated floor system. There is one unpleasant circumstance here that slightly complicates the installation of a heated floor under tiles: using the most effective infrared film system under a cement screed is impossible, so you will have to choose either a heating cable or cable mats, which are an improved version of the cable.
Cable is cheaper. Mat is more expensive, but installation and calculation are much simpler; you just need to purchase a roll of mat of the same area as the room. In addition, the mat is already fixed to the mesh and just needs to be spread out.
Layers
Composition of the cake for electric heated floors:
- rough floor;
- a layer of insulation (optimally extruded polystyrene foam);
- reinforcing fiberglass mesh;
- heating cable;
- cement screed (optimal layer - 5 cm);
- tile.
Important! When using cable mats, screed is not necessary and tile adhesive can be applied directly to the mats.
Tools
To install an electric heated floor you will need:
- thermomats (cable) included;
- hammer drill for cutting a groove for the connecting cable;
- composition for screed;
- tiles and glue for it;
- device for measuring resistance and current;
- tools for applying and leveling the surface of the screed and adhesive composition;
- ordinary plumbing tools (as needed).
Installation process
- The beginning of all work should be calculating the heater, checking the condition of the electrical networks and determining the ability of the wiring to withstand the expected load. You should also determine the heating area, taking into account the fact that it is prohibited to install electric heated floor systems under household appliances or furniture that sits tightly on the floor (without legs).
- Then you should prepare a place on the wall for installing the thermostat and cut grooves for the connecting wire.
- Thermal insulation is laid on the floor.
- Fiberglass mesh or mounting tape is laid on top of the thermal insulation. (or cable mats are laid).
- Cable installation, connection of the control module, connection of all necessary elements.
- Measuring system resistance at test points. Test connection.
- Filling the screed, allowing it to cure completely. Screed thickness (optimally) 20-50 mm.
- Laying tiles on an adhesive layer.
Cable mats can serve as a basis for tiles without a screed, which will increase the heat transfer of the source, since heating of the screed and, accordingly, the energy consumption for it are eliminated . Nevertheless, experts, before making a warm floor under the tiles, recommend pouring at least a minimum of screed in order to eliminate mechanical deformation of the mats and strengthen the substrate under the tiles.
Read more about the electric type of heating under tiles in this article.
Other types of heated floor coverings presented on our website: under laminate (can it be installed, installation and installation), under linoleum (general information, can it be installed and installation process), under parquet boards, under carpet.
Tools and material quantification
When starting to install a heated floor, you need to prepare not only the material, but also the tools that need to be used during the work.
You need to stock up on the following components without which it is impossible to carry out all the work:
- coarse sand and crushed stone;
- thermal insulation with aluminum foil layer;
- reinforced pipes;
- fasteners: arcs designed for bending heating elements, fixing devices;
- damper tape;
- reinforced mesh or fiber;
- proofreader and distribution cabinet;
- self-leveling mixture or materials for the manufacture of cement composition.
The pipe size and pitch should be determined for each room separately. This can be done using special programs or by inviting specialists.
If you decide to do the power calculation yourself, then you need to take this procedure seriously, since errors will lead to a decrease in the efficiency of the system.
For calculations we need the following parameters:
- Room size.
- The material from which the walls are made.
- Type of insulation.
- Type of flooring.
- Pipe material and diameter.
- Boiler power.
Knowing these indicators, you can determine the required pipe length.
conclusions
Installing a heated floor under tiles requires a preliminary study of the operating features of the selected type of heater, checking the condition of the electrical networks or the ability of the boiler to circulate water at the required temperature . All work can be carried out only after careful calculation of all parameters and the presence of a positive result, guaranteeing the successful functioning of the system.
If possible, you should consult with specialists (you can online) about any unclear points and clarify all the details. Such preparation will help to do all the work efficiently, without errors or miscalculations and will ensure comfort and warmth in the house.