Interior ceiling decoration with plastic panels is deservedly popular due to the high performance characteristics of polyvinyl chloride (PVC). The material significantly simplifies the design of both the ceiling surface and the walls, without leveling the base base. With the help of panels you can cover any room, even with a high level of humidity.
A large selection of colors, textures and shapes allows you to create an original and harmonious room design. You can decorate ceilings with plastic panels yourself, following the recommendations of professionals.
What are plastic panels for walls and ceilings, their advantages
To understand how to repair a ceiling made of plastic panels, it is recommended that you familiarize yourself with the strengths and weaknesses of this finishing material.
The composition of polymer products includes polyvinyl chloride, which is characterized by sufficient lightness, hardness and strength, which makes it possible to sheathe walls and ceilings in residential spaces, shopping centers, and offices.
A decorative image or design is placed on the outside of the panels using offset printing, thermal printing or lamination. To give a higher degree of strength, wear resistance, antistatic effect and resistance to sunlight, the surface is coated with matte or glossy varnish.
Manufacturers in the process of manufacturing finishing materials from polyvinyl chloride do not use phenol-formaldehyde resins, which have a negative impact on human health. For painting PVC panels, water-based paints are selected.
A variety of plastic finishes makes it possible to decorate bathrooms, toilets, bedrooms, hallways, and living rooms.
The positive characteristics of plastic products include:
- Simplicity and speed of installation of PVC panels. Even an untrained person can install the sheathing and finish the room, especially if the base base does not have serious irregularities or cracks. Often installation work is carried out using liquid nails. If the surface needs to be leveled, then a metal or wooden structure is mounted - a frame, where the panels are fastened with self-tapping screws
- During operation, the coating does not cause any particular difficulties, washes well, and is not afraid of wet cleaning. But in order not to spoil the appearance of the plastic panels, it is not recommended to use household chemicals; just prepare a soap solution
- Environmentally safe for humans, do not emit toxic substances or harmful fumes
- Good degree of durability. Here it is important to make the right choice, use a denser coating for wall cladding, and a lightweight version is quite suitable for the ceiling surface
- Sufficient level of heat and sound insulation. When decorating a room in this way, you can improve sound insulation parameters and retain heat.
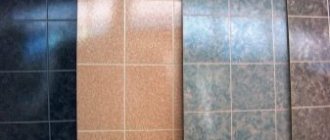
- Extensive range of color solutions. The traditional option is white panels, but there is also plastic with imitation of natural stone, wood or with patterns
- Moisture resistant. Thanks to the smooth surface, the plastic does not retain moisture, and the absence of pores in the coating structure prevents pathogenic microorganisms from spreading. This quality of the panels determines its use in bathrooms
- Resistance to changes in room temperature
- Long service life of the coating, subject to proper installation and selection of quality material
- Relatively low price compared to metal panels
Among the negative characteristics are:
- Low level of resistance to ultraviolet rays, especially for white plastic, which over time loses its original appearance and turns yellow
- Low degree of impact resistance. With a slight load, traces of dents or deformation may remain on the coating. It is recommended to purchase panels from reputable manufacturers
- The presence of a specific odor. This drawback is felt during the first time after finishing the room. But after a few days it completely disappears
- In terms of environmental friendliness, plastic is inferior to natural materials, so it is not advisable to use it for decorating children's rooms.
Attaching panels to the ceiling
If the base base is flat and does not require correction, then you can use the method of making a ceiling from panels by attaching them directly to it. The work is carried out in the following sequence: first, the starting profile is mounted, then strips cut to the required size are inserted into it, fixing them with a minimum interval of 50 centimeters.
Fastening elements are selected depending on the material from which the ceiling is constructed. When it is wood, then you can hammer in nails or use staples with a stapler. With a concrete floor it will be more difficult, since self-tapping screws will not work, and drilling a hole for each dowel takes a lot of time and effort.
In this case, it is possible to make a decision on how to make a suspended ceiling from PVC panels using a frame, with a minimum deviation from the base base, and then assemble the structure as described earlier.
There is another option - fixation with liquid nails. The disadvantage of this technology is that the ceiling structure made of plastic panels is non-removable and, if it has to be dismantled, then completely.
Types of PVC panels
To decide on the choice of polyvinyl chloride coating, you need to familiarize yourself with the types of material.
According to the type of connection, panels are:
- Seamless
Most often used for ceiling decoration. The joining seam after installation is almost invisible.
- Embossed
More rigid, similar to lining. They can be used to decorate wooden walls.
- Panels with rustication (chamfer)
These are seamless panels with decorative bevels at the ends.
Plastic can be classified according to its shape as follows:
- Slatted panels
They have a strong resemblance to wooden lining. The slats are installed horizontally or vertically using special brackets. The length of the panels is 90 cm - 3 m, width 13.5-30 cm, thickness 8-12 mm. To fasten the slats, use the tongue-and-groove method.
- Tile panels
They can be rectangular or square in shape, sizes from 30 to 98 cm. Installation is similar to the previous option, but the effect of the design is completely different. It can be especially interesting to decorate the ceiling with square plastic panels if you alternate tiles of different colors in a checkerboard pattern.
- Sheet panels
They look like plywood and have a pattern. Sheathing is done with liquid nails or using an adhesive composition. It is better to seal the joints with sealant, transparent or white, in accordance with the design. They range in size from 1.22 to 2.44 m, thickness 3-6 mm.
Criteria for choosing plastic panels
Covering the ceiling with plastic panels will have the desired result only if the finishing material is chosen correctly. To do this, it is recommended to adhere to the following tips:
- stiffeners must be free of visible damage and deformation
- the design on the façade should be distinct, with clear lines, without blurred areas
- the coating of all selected panels must have the same tone, for this the panels must be from the same batch
- there should be no dents or scratches on the plastic
- do not buy panels of different sizes
Material selection
DIY ceiling made of plastic panels
The history of the appearance of PVC material, capable of replacing expensive ceramic tiles and poorly painted panels, dates back to the 90s of the last century. At that time it was believed that the room, decorated with plastic panels, had the status of “European-quality renovation”. The material has not lost its popularity to this day. The finishing of bathrooms, balconies, loggias, offices and objects with high humidity cannot be done without the use of polymer panels.
The polyvinyl chloride used to produce this material is resistant to moisture and aggressive environments. It does not fade, is easy to clean, can be installed “with your own hands” without any problems, and is aesthetically compatible with other types of finishing.
DIY bathroom ceiling
Originality of PVC ceiling:
- Smooth surface without preliminary preparation of the base (besides priming).
- Affordable price.
- Durable and easy to care for.
- Possibility of installing panels yourself, without outside help.
- Noise insulation.
- An assortment of plastic panels, thanks to which ceilings made of PVC materials are combined with any type of wall decoration.
- Waterproof.
When I first came to the store to buy plastic panels, I learned that there is a gradation of the material according to its purpose. It turns out that different types of PVC boards are used for walls and ceilings. The main difference between them is their weight. Plastic ceiling panels are lighter than wall panels because they are not subject to mechanical stress. The finishing of structural elements indoors or outdoors is also one of the factors when choosing PVC material.
Important! When purchasing plastic sheathing for exterior use, you should choose panels with improved technical characteristics. They are protected from precipitation and ultraviolet radiation
Installation of PVC panels on the ceiling
When choosing a material, you need to visually inspect the planks. They should not have dents, scratches or other defects. PVC panels are a profile structure with stiffeners and voids. If you look at the end of the plank, then in addition to its even cut, you should see identical membranes clearly perpendicular to the edge. These are stiffening ribs; the strength of the material depends on their number and condition.
It is important to check the connection of the panels when purchasing. The quality of finishing walls or ceilings with your own hands depends on the integrity of the front covering
The interlocking connections must form a single piece.
Before sheathing the ceiling with plastic, you need to prepare tools, calculate the number of panels and choose a method for attaching them.
Calculation of the required number of panels
It is more advisable to finish the ceiling with plastic using panels with a thickness of 5-10 mm and a width of 250-500 mm. Most often, models with a length of 2.7-3 m are on sale, but there are also samples of 4 m.
The area of each option is indicated on the packaging. To make the calculation, you need to divide the area of the ceiling surface by the area of one panel.
For information! When making calculations, it is recommended to add another 15% of the material to the final quantity, as a reserve.
To calculate the required amount of profile, you need to divide the ceiling plane into strips, the distance between which should be 60 cm. Mounting guides will be installed along the strips.
You will need a rigid profile around the perimeter. It can be metal or wood, although the service life of the latter will be much shorter. It can be extended by applying special impregnations and primer emulsions.
You can decorate the ceiling with skirting boards; their size is 3 m in length. You can calculate the required quantity by dividing the length along the perimeter by 3, rounding the resulting figure up.
Required tools and materials
To decorate walls and ceilings with plastic panels, you cannot do without the following materials and devices:
- building level
- marker, pencil
- roulette
- staples or dowels-screws
- metal scissors
- metal profiles or wooden slats
- hammer drill
- hacksaws
- screwdriver
- special hangers for arranging the frame
- plastic and baseboards
When carrying out installation work, it is recommended to take care of protective equipment. These include gloves, goggles, and a suit with protective sleeves.
The process of installing plastic panels on walls and ceilings on a frame
The process of finishing walls and ceilings with plastic is quite simple; the main thing is to adhere to the cladding technology with this material.
Preparing walls and ceilings
When finishing walls and ceilings with plastic, the first thing that needs to be done is to thoroughly clean the base of the old coating (ceramic tiles, wallpaper, paint), dismantle the lamps and electrical wires. There should be no dirt or dust particles on the surface.
The next step is to inspect the surface to identify weak spots. To do this, you can use a hammer to tap the work surface. It is better to start from weak points where cracks and crevices are visible.
Defects identified in this way must be eliminated. They are sealed with cement-sand mortar or plaster. After the treated areas have dried, the base should be primed, which will provide a strong and reliable surface.
Frame installation
Metal or plastic profiles are used to finish ceiling and wall panels. You can use wooden slats, but not in rooms with high humidity levels.
For information! Depending on the final result, profiles can be installed either horizontally or vertically.
Using a building level, it is necessary to draw horizontal lines in increments of 0.5 m. Fastening elements (brackets) must be installed along each strip; the distance between them should be 60-70 cm. It is recommended to secure the brackets with screws.
The staples installed at the lower and upper points must be bent in the shape of the letter “P”. Metal profiles or wooden slats with dimensions of 2x5 cm are mounted in them. It is better to fix them with 25 mm self-tapping screws. It is imperative to monitor the plane of the structure, checking it with a building level.
Wall paneling
After checking the reliability of the installed sheathing, you can begin covering it with plastic panels.
An L-shaped profile is installed along the entire perimeter of the sheathing, and corner profiles are installed at the wall joints. Then you need to measure the distance between the outer sides of the guides and subtract 5 mm from the result obtained.
It is better to mount the panels from the corner of the room, which will reduce the consumption of finishing material. Plastic should be fastened to metal profiles with screws, and to wooden slats - with a mounting stapler and small nails.
Each subsequent panel must be installed in the groove of the previous one. Installation of the last panel is the most difficult; it will need to be adjusted to size and cut. The cut plastic is first installed in the profile, and then in the groove of the previous plastic.
If the installation work is carried out correctly, there will be no cracks or gaps on the tiled wall.
Ceiling paneling
When repairing a ceiling with PVC panels, a plastic baguette prepared in advance to size is first installed. In the corners, its segments must be fastened at an angle of 45 degrees. Attaching the plastic to the frame is done in the same way as when finishing the walls.
The first panel, bending in the middle, is installed with its end parts into the grooves of the baguette. Pressing it against the frame, it is advanced until its shelf is parallel to the baguette. After which the panel must be secured with a mounting shelf. The second and subsequent ones are installed in the same way, only the narrow mounting shelf must be inserted into the groove of the previous one. The last panel will also have to be cut. It is quite possible to make ceiling cladding with plastic panels yourself. Finishing ceilings with plastic panels - photo:
Installation of lighting fixtures is carried out at the stage of installing the frame, even before attaching the plastic. To do this, mark where the lamps will be installed and carry out installation work on the electrical wiring. The final installation of the lamps must be done upon completion of the finishing of the ceiling surface.
How to properly attach plastic panels to the ceiling?
There are many materials that can be used to decorate ceilings, but the most practical and easy-to-use option is PVC panels. And they become even more attractive for the reason that it is quite simple to install them yourself, so there is no need to involve a team of builders. Our article will tell you how to attach PVC panels to the ceiling and how to choose them correctly.
PVC panels - what is it?
PVC panels are a finishing material made from polyvinyl chloride, a plastic that does not burn well and is chemically resistant. Now let's look at the design of PVC panels.
PVC panels for ceiling
They consist of two thin sheets of plastic connected to each other by many stiffening ribs. Along the length of the PVC panels, on one side there is a large mounting shelf, and on the other, a small mounting shelf. The first is used to attach the PVC sheet to the ceiling frame, and the second is used to connect the installed sheets to each other.
So why have PVC panels become so popular? Below is a list of the advantages of this finishing material.
- PVC panels are resistant to moisture . Has the plaster started peeling off the ceiling due to dampness? This will not happen with plastic plates! Do you live in a multi-storey building where there are frequent problems with the plumbing, and you are afraid that the neighbors above may flood you? For PVC panels this is not a problem - after a local flood they can be taken, dried and simply installed back.
- Durability. High-quality PVC panels themselves can last for decades . And replacing damaged or worn-out panels will not be difficult.
- The ceiling made of polyvinyl chloride panels is easy to care for - you just need to regularly wipe it from dust with a sponge dipped in a soap solution. But it should be remembered that to clean such material you cannot use products containing abrasive particles or strong alkalis and acids.
PVC panels - To secure the PVC panels, it is necessary to mount a frame. As a result, a hollow space remains between the false ceiling and the real ceiling. It can be used both for electrical wiring and for sound or heat insulation. This is especially important if there is an attic and a “cold” roof above your room.
- PVC panels are an easy way to level the ceiling without resorting to labor-intensive and complex plastering work. And this saves time, effort and money.
- Plastic panels are universal and well suited for the living room, kitchen, bedroom, bathroom, loggia and other residential and non-residential premises. In addition, a large number of different colors and textures of the material will allow you to choose plastic panels that best match the rest of the room’s design.
- Suspended ceilings from PVC panels are extremely convenient for creating modern lighting systems with many lamps located around the perimeter of the room and in other places you need.
PVC mirror panels
Selection of PVC panels
So, you know what this material is, now you need to select PVC panels and purchase them. First you need to decide on the sizes. At the moment, in construction stores you can see plastic panels either in the form of lining or in the form of rectangular slabs with the dimensions shown in the table below.
Table. Standard sizes of PVC panels.
| Type | Length, mm | Width, mm |
| Lining | 3000 | 100 |
| Reinforced lining | 3000 | 125 |
| Rectangular panels | From 2600 to 3000 | From 150 to 500 |
| Sheets | From 1500 to 4000 | From 800 to 2000 |
How can you tell if you have good material in front of you? How can you unknowingly avoid purchasing low-quality PVC panels that will crack during installation or lose their color after a couple of years of service?
Possible shapes and textures of PVC panels
When going to a hardware store, you should pay attention to the following points. For small rooms, the most suitable are PVC panels of the “lining” type. They should also be given preference if you want to have a ceiling made of plastic, stylized as wooden boards. And for larger premises it is better to take panels or sheets of polyvinyl chloride . As for the thickness, it is mostly the same for all types of PVC sheets and amounts to 10 millimeters.
- The stiffening ribs of PVC panels should not be visible from the front side. Also count their number - the more ribs, the stronger and more durable the panel design.
- The surface of the material must be perfectly smooth, without any defects, chips or damage.
- The mounting and mounting shelves must be flexible enough and not break when trying to bend them.
- Try pressing lightly on the PVC panel. If a crack or dent appears on the surface, then you have a low-quality copy, which you should avoid purchasing.
- Take some panels and try to put them together. Good material joins smoothly and without gaps.
- Pay attention to the appearance of the PVC panels you are purchasing - copies from all packages must be monochromatic and have the same texture. In some situations, PVC sheets from different batches will have slight color differences.
What to look for when purchasing PVC panels: 1. The number of stiffeners: the fewer there are, the more unstable the product.
2. The edges of the plastic tiles must be intact and straight.
3. The surface of the PVC panel should be evenly painted, smooth and without unevenness.
4. The two panels must be properly connected at the joint groove.
In addition to the PVC sheets themselves, you will need to purchase an installation profile. It consists of two “shelves”, one of which is attached to the frame, and the other is connected to plastic panels. Both the starting and finishing PVC sheets are attached to the installation profile . When choosing it, you should pay attention to the thickness of the plastic and whether the profile has any bends or defects.
Ceilings finished with polyvinyl chloride panels
Don’t forget to also buy a ceiling plinth - it not only serves as a decorative element of the future ceiling, but also closes the gap between the wall and the ceiling made of PVC panels. Typically, such skirting boards are called fillets, are made of plastic and are attached with glue.
As for the appearance of the purchased PVC panels, you must determine it yourself, based on the design project for finishing the room and your own taste. You will be presented with many options for panels of various colors and textures. Here we can recommend using a color compatibility table so that the appearance of the ceiling matches well with the color of the walls and furniture.
Table of color compatibility in the interior
Required Tools
Now you need to make a list of tools that will be needed to attach PVC panels to the ceiling. You don't need anything complicated or very expensive; everything listed below can be found at any hardware store.
- Hammer – necessary for installing the frame.
- Screwdriver . If you wish, you can attach plastic panels to a profile or beam using a hammer drill, but it is very heavy, and it is very inconvenient to use it for such tasks. Therefore, the presence of a screwdriver will significantly facilitate the work and increase the speed of installation of PVC panels. And if you attach them not with self-tapping screws, but with staples, then instead of a screwdriver, take a construction stapler.
- To control the accuracy of marking and placement of plastic panels you will need a square, level and painting thread .
- A pencil or marker for drawing lines and marking PVC panels in the order they are laid.
- Tape measure for measurements.
- Electric jigsaw or circular saw - for cutting frame profiles and plastic panels.
- Step ladder . Of course, you can always make do with a table or stool, but this is unsafe and inconvenient.
- Rubber mallet , which can be useful for adjusting PVC panels to each other during installation.
Tools for installing PVC panels
In addition to tools, you need to purchase material for the frame. This can be either a metal profile (grade UD-27 for the main one and CD-60 for the guide) or a wooden beam. Also, do not forget to purchase fasteners (screws, staples or glue), hammer drills, screwdriver attachments, dowels and hangers for the profile.
Accessories for mounting PVC panels
Preparation
It is worth noting that even before visiting a hardware store, it is worth starting preparatory work. The first thing you need to do is create a plan. To do this, measure the length and width of the room and draw a diagram of the future frame .
Approximate diagram of a ceiling made of PVC panels
Then calculate how many sheets and what sizes you will need to make a suspended ceiling.
Important At the planning stage, it will not be superfluous to mark the lines along which you will cut the profile of the frame and PVC panels. At the same time, you can make notes on them using a pencil and marker, indicating in what order they should be laid.
Remember that good and careful planning is the key to quality work and reliable insurance against various troubles and the need to do everything over again.
The second point of preparation is the removal of old finishing materials . If the ceiling was previously covered with a thick layer of plaster or paint, then all this must be removed, otherwise heavy pieces of old finishing can damage the frame or the panels themselves.
The last stage of preparatory work is marking the line of the future frame . To do this, use a tape measure to measure the height of all corners of the room. Find the one in which it is the smallest. You should measure 50 millimeters down from it and draw a strictly horizontal line (control it using paint thread and a level). The same line at exactly the same height should be drawn on the opposite wall. The suspended ceiling frame will be installed on them in the future.
Ceiling markings
Frame installation
Along the lines drawn, holes are marked every 50-100 millimeters, drilled with a hammer drill. After this, dowels are inserted into them. Using holes drilled in the wall using self-tapping screws (for example, a 6x40 mm self-tapping screw), the main frame, made from the UD-27 profile, is attached with a lid to the wall. In this case, do not forget to use a level and ensure that the frame elements are positioned strictly horizontally.
Wooden lathing for mounting PVC panels
Then, using hangers and the CD-60 profile, guide rails are created to which the PVC panels will be attached. The optimal distance between them is 500 millimeters. The metal profile CD-60 is installed with the cover facing the floor; the ends of the slats should be inserted into the profile of the main frame.
Advice! It is very difficult to correctly mount the frame and install PVC panels alone, so this work should be done together with a partner. It would also be useful to have the help of a person who will give and receive tools, cut and bring plastic panels.
Having finished installing the frame, check it several times for horizontalness and the absence of a difference in height - the future ceiling made of PVC panels should be perfectly flat, and this largely depends on how well the sheathing is installed.
Profile lathing
Next, you should begin installing the electrical wiring (if you plan to make ceiling lights). It is advisable to place it in a corrugated plastic sleeve, which will protect the wiring from moisture.
An alternative to a metal profile can be a frame made of wooden beams. This design will cost less, but is susceptible to moisture. The technology for its installation is in many ways similar to that for a metal profile.
- We draw two strictly horizontal lines on opposite walls.
- We drill holes along them at intervals of 5-15 centimeters.
- Insert dowels into the holes.
- We fasten the beam of the main frame to the wall using self-tapping screws and the above-mentioned holes.
- We mount guides made of wooden beams using hangers.
- We attach the guides to the main frame using corners.
- We check the entire structure using a level and tape measure.
It is worth noting that for a wooden frame, the most optimal fastener for plastic panels would not be self-tapping screws, which are screwed in with a screwdriver, but staples, which require a construction stapler . Also, metal fasteners can be replaced with “liquid nails” - construction adhesive that can firmly hold the plastic panel and frame together even under relatively heavy loads.
Methods of fastening PVC panels
Important! If there is an additional load, such as a large chandelier or a second level of suspended ceilings, the frame must be reinforced. To do this, it is necessary to install more guide rails, reducing the gap between them. This is mandatory not only for a wooden frame, but also for a metal profile structure.
Fastening PVC panels to the ceiling
To begin, mount the installation profile by attaching its large “shelf” to the guide rails using self-tapping screws. It can be installed both around the entire perimeter of the room and in the places where the starting and finishing PVC panels are attached.
Fastening PVC panels to the ceiling
Now you need to cut the PVC panels according to the previously developed plan and markings. Many experts advise making the length of the sheet slightly shorter than the width of the room, since polyvinyl chloride can expand even at low temperatures, which means that installation “back to back” can lead to future deformations of the suspended ceiling.
Advice! Also, you should not install PVC panels in a room with low temperatures, especially since under such conditions this material becomes brittle.
If you are planning to make built-in lighting for a suspended ceiling, it’s time to make cutouts for lamps in PVC sheets.
Installation of spotlights in a ceiling made of PVC panels
Once the material is completely prepared, you can begin attaching the first (or starting) panel. To do this, you and an assistant need to insert the launch panel into the installation profile from the side of the mounting shelf, and then secure it with self-tapping screws on the rails. At the same time, make sure that they do not go too deep into the PVC, otherwise there will be a risk that the screws will damage the sheet.
Next, carefully “join” the next panel using the mounting shelf with the starting one, and secure it with the fasteners. Thus, the PVC panels are fastened to each other one by one. They should be connected to each other with great care to prevent damage. Also, no gaps or cracks should be left; PVC panels must fit tightly to each other. If necessary, you can make an “adjustment” using gentle blows with a rubber mallet.
Installation of panels with self-tapping screws
Before installing the last PVC panel, measure the remaining uncovered ceiling space with a tape measure - often the plastic panel does not fit there completely, so it needs to be cut. At the same time, make sure that the cut is as smooth as possible, and there should be no gaps between the finishing PVC panel and the installation profile.
Scheme for gluing ceiling plinths
The final stage is planting ceiling plinths on glue . After this, the suspended ceiling made of PVC panels can be considered complete. Then you can install lamps, decorate walls and remove construction waste.
Video - Making a ceiling from PVC panels
As you can see, attaching PVC panels to the ceiling is a fairly simple task that does not require much knowledge and experience in construction from you. Therefore, for self-finishing a room and, in particular, a ceiling, plastic panels are the best possible option.
Installation without frame
You can decorate the ceiling with plastic with your own hands without assembling metal or wooden sheathing. In such cases, tile adhesive and liquid nails are used. It is important to prepare the most even base here. Be sure to clean it of foreign particles and prime it.
To finish the ceiling with panels, the adhesive solution must be prepared in accordance with the attached instructions.
Using a spatula, apply a thin layer of glue to the back of the plastic and attach it to the corner with a spike. Subsequent finishing elements are glued according to a similar principle, tongue and groove. The last panel is trimmed if necessary. At the end of the plastic ceiling covering, a ceiling plinth is installed.
Plastic panels can be effectively used for both wall cladding and ceiling surfaces. The main thing is to make the calculations correctly, choose a high-quality coating and follow the recommendations regarding the installation of plastic.
Plastic finishing of walls and ceilings - photo:
Ceiling finishing with plastic panels (design) – photo:
Finishing the ceiling with plastic with your own hands - video:
Liked? Share on social media networks!
Many people prefer to choose plastic for finishing walls and ceilings because it is a practical and inexpensive material.
The most affordable and versatile finishing material today is plastic panels. Plastic finishing can be used in almost any room: be it a residential building or an office. No climatic conditions, such as dampness, humidity, drafts and even low temperatures, can cause significant harm to it. These products are available in almost any hardware store and are therefore one of the most popular finishing materials. When installing, it does not have any particular complexity of fasteners and allows you to choose different colors and shades. Both a specialist and an ordinary householder can assemble a plastic ceiling.
Construction of a frame for a ceiling made of plastic panels
Finishing the ceiling with plastic panels is simply impossible without installing a powerful and strong metal frame.
As a rule, to create it, ud and cd plasterboard profiles are used - they allow you to create a frame in the shortest possible time and qualitatively level it relative to the horizon level. With a wooden lath, which some craftsmen use to file plastic, such numbers do not work. Wood should not be used at all for mounting a frame - firstly, it is damaged by changes in humidity, and secondly, it rots and has a much shorter service life. But let's return to our frame, and the first thing we need to do is mark the level of its plane. For large areas, it is better to use a laser or hydraulic level for these purposes. In small spaces, you can get by with a long rack tool. Using one level or another, marks are placed on the wall under the ceiling, relative to which the guide profiles ud are installed. They will indicate the position of the suspended ceiling made of plastic panels in the plane.
The guide profiles are attached, depending on the wall material, either with self-tapping screws or dowels. In a good way, the spacing of their fastening should be 400mm, but due to the fact that the suspended plastic structure is light in weight, this distance can be increased to 600mm.
Installation of PVC panels on the ceiling
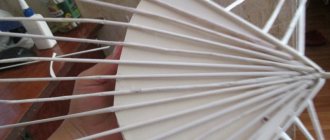
The next stage of work, which involves installing a ceiling made of plastic panels, is laying stiffeners into the guide profiles, directly to which the plastic PVC panels will subsequently be attached. You should decide in advance on the direction of laying the strips - as a rule, they are mounted along the wall with a window. This way the seams are less visible. The frame, or rather its supporting cd profiles, are installed strictly perpendicular to the direction of laying the plastic strips.
The supporting profiles are cut to sizes corresponding to the dimensions of the room, and installed in the grooves of the guides, after which they are fastened together using small metal screws. The installation step of the cd load-bearing profiles can vary from 500 to 700 mm - the optimal step, in which the ceiling does not sag, is considered to be a step of 600 mm.
How to make a ceiling from plastic panels photo
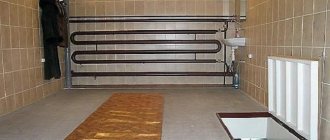
It is impossible to make a high-quality ceiling from PVC panels with your own hands if you do not give the frame rigidity. To prevent the supporting profiles from bending under the weight of the plastic, they must be secured to the existing ceiling. Depending on the distance between the frame and the ceiling, different types of fastenings are used: at short distances U-shaped hangers are used, and at large distances special quick hangers with spokes are used. In some cases, it is advisable to make so-called boots yourself - they are made from ud profile, cut and bent in the shape of the letter “L”. Its smaller side is attached to the ceiling, and its larger side is attached to the side of the supporting profile. They are installed in a checkerboard pattern, either on one side of the profile or on the other.
Walls and ceilings made of plastic: features of panels
PVC panels for finishing ceilings and walls are leaders in the finishing materials market due to their low cost and huge range. Depending on the size, purpose and shape, PVC panels can have several varieties.
And the name day:
- Sheet panels. They are used for finishing large-sized premises; when fastened, they form the smallest number of joints.
- The stacked tile panels are square, thanks to which you can create a completely unique room design.
- Stacked slatted panels are rectangular with a length of up to 6 m and a width of 20 cm.
Plastic panels have many colors, patterns and textures. According to the technology of applying the ornament, they are divided into laminated and varnished products. A film on which a pattern has already been applied is glued to the laminated panels.
PVC panels can have different textures and images. This can be an imitation of natural materials (marble, wood, stone, etc.), as well as complex artistic ornaments.
Varnished PVC panels involve printing a design onto the plastic itself. This type is more durable.
Variety of plastic panels
This material can be plain, checkered, striped, with all kinds of plant elements, as well as imitating natural stone or brickwork, etc. Despite the available variety, to make a ceiling from plastic panels, one-color products are used, most often white or with a light tint.
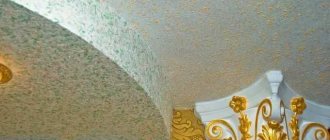
Depending on the type of surface, these products can be matte or glossy. There are models with a rough finish and shiny inserts; they are usually used to implement original design solutions.
Since the installation of panels on the ceiling is usually carried out in utility or technical rooms, it is better to use glossy products for small surfaces, since then the bath, kitchen, toilet, loggia appears higher and, due to reflection, looks more spacious.
The presence of reflections on them increases the degree of illumination. More lamps must be installed on a matte ceiling or they must have increased power.
Finishing the ceiling with plastic: choosing a material
An easy way to install plastic panels on the ceiling is to use a metal profile that is accessible to everyone. The design is not expensive and quite economical. The metal frame strongly affects the humidity of rooms, which are higher than normal. The profile does not rot, deteriorate or deform. Thanks to these qualities, this type of installation is very popular and widely used.
Modern production of plastic panels has achieved great results. The size of the panels has different thickness and width. It is this fact that should be taken into account when choosing panels.
When using thin plastic on the ceiling, recessed lights will illuminate not only the room, but also all the fasteners inside the frame. The transparency of the design will not cause delight.
Advantages of the material:
- Durability. PVC panels can last more than 20 years if they are not subjected to mechanical damage.
- Practicality. The panels are not picky and are very easy to maintain. They do not require special detergents and can be cleaned using conventional methods.
- Moisture resistance. The panels do not deform or rot from excess humidity in the room, so they can be safely used when decorating kitchens, balconies and bathrooms.
Among the disadvantages of the material, one can highlight the low level of strength. However, if you do not expose the surface to damage, the finish will last quite a long time.
Installation of a plastic ceiling: where to start
When starting installation, it is initially necessary to carefully measure the area on which the panels will be laid. Further actions will help you make an accurate selection of the required fasteners, as well as the material for assembling the frame and sewing panels. Before sewing on the frame, it is necessary to remove the old finish and treat the surface with an antiseptic. This will allow you to see irregularities and make it possible to eliminate them if necessary.
Recommended Tool:
- Construction pencil, tape measure and painting cord;
- Hydraulic level, square and fasteners (clasps, screws, dowel-nails and hangers);
- Drilling tool (drill or hammer drill), screwdriver and hammer;
- Cutting tool and miter box.
Frame assembly begins with precise markings. This is one of the most important details in installation. The frame is sewn on in stages. Using a marking tool, the sheathing is sewn on, followed by fastening the remaining planks. Next comes installation of the profile and cutting of plastic panels. Laying the panels will not take much time if the frame and sheathing are marked accurately.
Assembling a plastic ceiling with your own hands: installation stages
The process of covering walls and ceilings with plastic is almost identical. The only difference is in the complexity of installation and the number of fasteners: the lathing on the ceiling should be more frequent and more clamps will be required.
The process of cladding walls and ceilings with plastic involves 4 stages:
- Surface preparation. The ceiling must be cleaned of old finishing. Then the entire area is treated with an antiseptic composition. This will prevent the possible occurrence of mold or mildew.
- Measuring and marking. An accurate measurement of the area of the surface to be finished will allow you to determine the required amount of materials, and the markings will help at the next stage of work.
- Installation of sheathing. According to the markings, holes are drilled for the dowels with which the profile is attached. The profile is attached around the perimeter of the room on the wall with a 5 cm indentation from the lowest corner of the ceiling. The sheathing is attached to the ceiling using hangers. To maintain the same height as the profile attached to the wall, a stretched line is used. Also at this stage of work the necessary communications are carried out.
- Fastening PVC panels. Before you begin installing plastic panels, you should pay attention to the perimeter of the room. If it is uneven, the first panel will need to be cut accordingly so that all subsequent panels are attached at a clear right angle to the profile. If this is not done, the fastening of each panel will involve cutting it at the end. The plastic is attached to the sheathing with self-tapping screws. Be careful when handling the panels as the material is quite fragile.
If you plan to install recessed lamps, it is better to make holes for them immediately when attaching the corresponding panels: this will be most convenient. Attach the eyes to the plastic with the same care, so as not to break the material.
Selection and installation of 220 V devices
When operating 220 V lamps, even if you screw in even low-power incandescent lamps of 40-60 W, you will need to think about thermal insulation of the housing. The fact is that when the lamp heats up, it also gets very hot. For this reason, the plastic begins to darken and warp. To avoid overheating, a layer of flexible heat insulator is glued to the body.
You not only need to know how to properly make a ceiling out of plastic panels, but also remember about electrical safety when working with lighting fixtures. If this is a bathroom, then it should install lamps with a high degree of protection, at least IP44, which means that the lamp body is not dangerous from water jets.
Such devices are expensive because complex technologies are used to manufacture them. As a rule, such lamps are bulky, since their body is most often ceramic. It will not be possible to place them on plastic - you will need mortgages, which should be installed when constructing the frame. They represent additional jumpers at the place where the lamp is mounted.
Installation of plastic on walls and ceilings (video)
Plastic ceilings have a lot of advantages. Without complex plastering work, you will get a perfectly flat surface; if the apartment is flooded by neighbors from above, such repairs will not have to be redone. PVC panels are easy to attach, are inexpensive and are sold at any hardware store. The textures and colors of this finishing material allow you to realize the most daring design ideas.
- Author: admin
Rate this article:
(0 votes, average: 0 out of 5)