My name is Kirill, I am a specialist in the field of finishing residential and non-residential premises, in today’s article I will tell you about all the intricacies of finishing a bathroom with PVC panels, I will share my experience and tips.
Have questions ? Call!
For finishing a bathroom, one of the most budget-friendly, but no less effective materials is considered to be a plastic panel. The article reflects its varieties, strengths and weaknesses, and discusses the specifics and types of installation. There is also a gallery with examples of work.
For your information
If you want to create a unique design and need simple installation, then finishing the bathroom with plastic panels is the most suitable option.
Pros and cons of using plastic panels
This material is very popular and in demand. And before using it for the bathroom, study its strengths and weaknesses:
Strong:
- Simplicity of installation and dismantling work.
- Affordability.
- Aesthetic characteristics, elegant appearance, various textures.
- Resistance to temperature changes.
- Repel odors
- Masking of communications.
- Resistance to moisture and water.
- Hygiene. Resistance to bacteria.
- Durability.
- Easy to maintain.
- Non-flammability.
Weak:
- No breathability. There is no throughput potential.
- Melting when burning. This releases hazardous elements.
- Unsuitable for use in corridors and escape routes.
- Destructible from washing with hard brushes.
- Susceptibility to mechanical stress and ultraviolet radiation.
- Modest level of sound and heat insulation.
For your information
Although today, thanks to modern technologies, this material is being improved, emits less pungent odor and meets high fire safety criteria.
Types of PVC panels
If you intend to cover your bathroom with plastic sheets, you should decide on their types:
- Wall. The most common. Also suitable for ceilings, only here thinner modifications are used (density up to 5 mm). For walls we use stronger versions. Their thickness lies in the range of 7 -12 mm. These types have a huge range of colors, images, textures and imitations of other coatings, such as wood.
Their geometric shape is an elongated rectangle. In the design, two parts are connected by ribs. There are locks along the edges for fastening together.
- Tiled. Shapes: square, rectangle. There are versions with and without connecting pins; with one or many layers; flat and swollen; with and without adhesive base; with decorative components and imitation of other materials. This type has a wide choice of external texture and better strength due to smaller parameters.
- Lining. Imitates the appearance and width of real lining. The length is 6 m.
Structure: two layers that hold the lintels together; there is a locking mechanism, as in item 1.
The assortment includes products of various tones and colors. The seam is always visible.
The material is durable and versatile. I recommend it for laying long lines horizontally.
- Leafy. They have a texture that creates an imitation of tiles or mosaics. There are variations with plot and photographic images.
The material is characterized by relief, which duplicates the appearance of wood, brick and other materials. It doesn't have a docking lock. It must be mounted on a smooth base, usually with glue. The process is easy and fast.
The bathroom can be decorated with plastic panels on the walls and ceiling. Use any type you like and that is suitable, taking into account the quality, external texture and installation method.
It is important to do everything correctly, here are some articles for you
How to glue wallpaper correctly. The foreman shares his experience. Finishing work. Stages of finishing work. How can you save money when renovating?
to size
Wall models have different thicknesses, but better preserve the geometry of the version with a parameter of 7-8 mm. The optimal length is 2.5 - 3 m. Width - 25 - 37.5 cm. Sheet modifications have a length of 98 - 120 cm, width - 48 - 98 cm, density - 3-5 mm.
Tiled ones most often have a square shape, and their sides are equal. Dimensional variations range from 30 to 100 cm. In single-layer products the density is 3 mm, in structural products it is 15 mm. Lining can be purchased in the following parameters: width – 10 cm, length – up to 6 m, thickness – 8-10 mm.
Facial image strength
Before installing PVC panels in the bathroom, I recommend studying their types according to the indicated criterion:
Thermal printing. Used in 80% of products. The film is transferred thermally. And the image appears on the outside of the lamella. The print replaces the varnish, creating a smooth base. For this reason, the models do not require varnishing. They are susceptible to wear and sunlight. I recommend using them in rooms protected from the sun and in a temperate climate. Examples: utility rooms, dressing rooms, corridors. These types have a variety of painting palettes. And this is their main advantage.
- Offset printing. Here the engraving is copied with a roller and rolled along the outer plane. This creates the appearance of marble, but does not produce distinct figures.
Strengths: high wear resistance: significant texture retention period (10 years); no fading; the presence of relief and an elegant outer layer.
- Laminated models. They are distinguished by the highest strength and price. The outer area is finished as follows: a painted, textured and structural film is glued. It forms a defensive layer from external aggressive influences. And the product is endowed with increased wear resistance and is suitable for use in any room.
- Plain. They may or may not be varnished. They come in matte and semi-matte finishes. Typically used for ceilings.
The unvarnished subspecies are the least durable. They also quickly fade from the sun, nicotine and other air impurities.
Lacquered options have a decorative function and are resistant to such influences, and have a long service life.
- Products to which coloring pigments are added directly during the production process. Since the entire mass is covered with paint and there are no decorative components, they are characterized by durability. They may have a varnished finish.
Have questions ? Call!
How to choose high-quality PVC panels
When you plan to cladding a bathroom with plastic panels, you need to choose these products wisely.
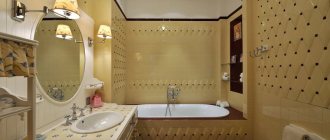
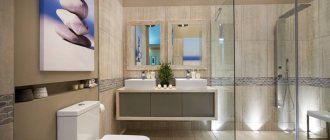
When choosing a coloring, you should read the parameters of the room. If they are modest, then I advise you to take canvases in lighter colors with variations of wood or tile imitations. Models with simple white flowers are also allowed.
Due to the dark color, the space is visually reduced. And the presence of bright tones causes excitability and rage.
Finishing a bathtub with plastic panels should be done only with high-quality materials. To choose them correctly, you should be based on the following criteria:
- The position of the ribs is at a distance of 1 cm. The density of the front side is at least 1 mm.
- Is there any bleed through of internal partitions? In a product of poor quality this is very noticeable.
- Presence of a pungent odor. This is a sign of a cheap version.
- Translucent front plane. A good quality model should not have it. Such versions can be mounted on the ceiling and walls of non-residential premises.
- Presence of defects, cracks, deformations and scratches.
- Identity of parameters and connections of products.
- Monochromatic pictures.
- Colors, relief variations. These factors can visually develop the space.
Important
If you want to cover the walls of the bathroom with PVC panels in 3D format, then keep in mind that it is very difficult to maintain the usefulness of the image of these versions. The reason is that very precise merging of their joints is required.
It is important to do everything correctly, here are some articles for you
How to glue wallpaper correctly. The foreman shares his experience. Finishing work. Stages of finishing work. How can you save money when renovating?
Disadvantages of PVC panels
Fragility. Dents and scratches easily appear on the surface of the panels.
Fire hazard. Some types of material begin to smoke when heated. Don't buy too cheap panels made in China.
If you choose thicker panels, the usable area of the bathroom is reduced.
Equipment and additional elements
PVC panels in the bathroom are installed normally if they are fully equipped. It should contain the following components:
- Corner 1: universal. Externally, it is a plate bent at a right angle. Used in finishing external and internal corners.
- Skirting for floor and ceiling. We partially place it under the panels. The outer part masks surface defects.
- Corner 2: external. The width of the inner part is greater than the width of the outer part. Hides uneven areas of the outer corner well.
- Corner 3: internal. We place its wide side under the slats. And the narrow one on the outside hides uneven places in the inner corners.
- Profile 1: connecting. Thanks to it, we make a lockless connection between the panels. This is true when their length is not enough for finishing work.
- Profile 2: initial and finishing. We install at the beginning and at the end.
- Profile 3: F-shaped. We put it in the junction areas, we can use it as a platband.
- Mounting sheathing strip. This load-bearing frame component. Its material: plastic or metal profile.
- Klyammer. A metal element that presses the panel to the bar. Thanks to it, we dismantle products without compromising factory characteristics.
Depending on the method of fixing the panels, you must have:
- self-tapping screws with a press washer,
- staples,
- stapler,
- liquid nails.
The scheme for using the components is as follows:
Types of sheet moisture-resistant wall panels
Sheet panels for the bathroom should be selected taking into account the room. Manufacturers offer various shapes, textures and colors.
By shape
Depending on the shape of a particular component, there are two types of panels.
Slat panels are narrow elongated rectangular slats with a length of at least 2.5 m, an average width of 25 cm, and a thickness of 8 to 12 mm. Outwardly, they are very reminiscent of the wooden lining familiar to each of us. In a bathroom with a low ceiling, it is advisable to carry out the cladding by orienting the slats in a vertical direction, then the room will appear higher. For a tall room, on the contrary, a horizontal arrangement is acceptable.
The difference between sheet and slatted panels is only in the width - for the former it is almost 15 cm wider. The tiled version has a square shape and a smaller cross-section, due to which quick installation is achieved. In addition, by selecting equilateral rectangles of different colors and textures, you can create original mosaics. As for the remaining characteristics, there are no significant differences to speak of.
Sheet panels for the bathroom and textures
Manufacturers of sheet panels are so sophisticated in choosing colors! Often such cladding very accurately imitates brick or stone masonry, marble or ceramic tiles, glass mosaics or wood.
Special equipment is used to glue (laminate) the front part of plastic panels. Thanks to this technology, they look better, give the room an elegant look, and on the other hand, become more resistant to mechanical stress.
Mirror sheets, being light, are at the same time considered quite durable. They are either perfectly polished, or tinted with some kind of coating, or with a mirror mosaic, which is obtained by making cuts.
How to calculate the number of panels and additional elements
Working with PVC panels in the bathroom begins with calculating their number and additional components. We take into account the specifics of this room: different transitions, an abundance of corners, etc. The more there are, the more unused waste is generated, especially when working with panels with decorative images or asymmetrical patterns.
For other models, we increase their number by 15% of the working surface area.
For an accurate calculation, we take measurements of the total length:
- external and internal corners,
- ceiling and floor plinths.
Solving dilemmas with profiles:
- How much starting product will be needed?
- Will a linking view be needed?
- What components will be used to finish the corners: simple or complex?
Advice
If you have experience working with similar panels, use simple corners; if you don’t have the skills, use complex options. They hide cutting imperfections or sizing errors.
When calculating the slats and mounting strips, we take into account the required distance between them - a maximum of 50 cm. We fasten them in areas where the floor and the flow meet, bringing them as close as possible to all corners and openings. We place the slats here regardless of the positions of the final row.
It is never possible to carefully calculate clamps or screws. We immediately purchase them in large quantities.
Places for installing plastic panels
PVC panels are suitable for interior decoration of residential and office premises, hotels, shopping centers, etc. Such cladding can be installed in bathrooms and toilets, on glazed balconies and loggias, in hallways and living rooms and used for kitchen decoration. PVC cladding is also used to create an interesting design for living rooms.
The cladding surface is often a high-quality imitation of various materials: brick, wood, tiles, stone, cork. Such decorative qualities are irreplaceable when:
- you need to quickly and inexpensively update the interior;
- insulate and finish the walls;
- make lining in the bathroom, toilet, etc.;
- veneer the internal walls of a country house, which is heated occasionally;
- create a unique decor for hotels, bars, cafes, etc., stylized as bare brick or tiles with a colorful pattern.
Cream PVC panels in the seating area
Mounting methods
How to attach plastic panels in the bathroom depends on the chosen installation method. Their list is as follows:
- For clamps.
- To the sheathing.
- On a metal frame.
- Without it (item 3).
- On glue.
Fastening with mounting clamps
Installation of plastic panels in the bathroom using this method is as follows: the panels are attached to the sheathing, which is formed by plastic slats, using special “locks”. Due to them the process goes much faster.
This method is usually used in rooms with a large area. The overlay strips cover some centimeters, but this is not noticeable here.
Pros:
- Quick installation.
- High-quality hiding of defects.
Minuses:
- The need for sheathing.
- The method is effective only in large rooms.
Attaching to wood sheathing
Here the fixation does not take place with a special frame. We use a stapler or simple nails.
The advantages of this technique:
Effectively hide communications and uneven areas. To do this, we create a separate box.
Minuses:
The need to treat the sheathing with special protective compounds.
Installation on a metal frame
Installing plastic panels in the bathroom requires removing all foreign objects from the room, as well as plumbing fixtures. The reason is that the work affects all wall surfaces.
After this, we measure the height of the walls from the extreme points: from floor to ceiling. Based on the obtained indicators, we cut the profile to make a frame.
Here the sheathing under the panels should be plastic or metal, due to the serious humidity of the room. The wooden version is also suitable, but only painted and specially treated.
We install the slats, maintaining a step of 40 cm. We move the wall and ceiling away by a maximum of 40 -50 cm. For fixation, we use a level and a stapler.
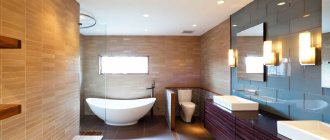
The panels are mounted vertically. This makes the room visually more spacious.
We also cover the areas where plumbing fixtures are located with panels so as not to deteriorate the overall style of the room.
Finishing the bathroom with plastic panels starts from the corner that is furthest from the doorway.
We display products using a level. And we fix them with self-tapping screws.
After installing the panels, fill all joint areas with sealant.
This method has the same advantages as the option with wooden sheathing, but no special processing of the frame is required.
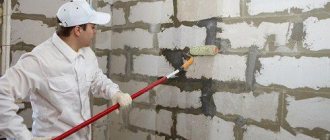
Frameless installation
With this method, we first prime the walls. In our work we use liquid nails for PVC panels. This is a special glue. And its consumption per 5 sq.m is 1-3 cans. The more curvature on the walls, the more it is wasted.
We remove differences with a parameter greater than 3 mm. This is sufficient for the planned installation.
Next we cut the material. How to cut PVC? An ordinary hacksaw with a wood blade will do here.
After this, we apply liquid nails pointwise to the panels in a checkerboard pattern.
We retreat 5-10 cm from the edge of the panel. This way the glue will not spread.
How to glue the panels correctly? We apply the products to the wall and gently press them down and immediately remove them from the wall for 6-7 minutes. So the panel dries out, and we return it to the wrong place.
Advantages of the method:
- Saving effort and money.
- Saving usable space.
Minuses:
- There is a certain preparation of the walls, but only large slopes, more than 3 mm, are removed.
- Does not hide communications.
Have questions ? Call!
Glue method
Here we also use liquid nails for PVC panels. We add additional fixation along the top and bottom edges. Other mixtures are also suitable for use.
To select adhesive for PVC panels in the bathroom, you should study the instructions for it. It reflects whether a particular composition is suitable for plastic.
The advantages of this method:
- Simplified installation.
- There are no strict criteria for surface preparation.
Minuses:
During a new renovation, it is difficult to remove old canvases. We use a spatula to peel off and trim the glue sections.
How to choose quality panels
Before you buy PVC wall panels for the bathroom, read the main criteria that plastic panels must meet:
- A large number of stiffeners. The more ribs, the more durable the plastic. Be sure to check the integrity of the stiffeners. Dented partitions will poorly support the front part and a dent will soon appear on the panel;
- The thickness of the panel should be 1 or more centimeters;
- There should be no scratches, abrasions or dents on the front side of the panel;
- The joints must also be smooth; deformed areas will not fit well and the plastic will lie unevenly;
- Before going to the store, carefully measure the area of your bathroom. It is better to buy material with a small supply. It will come in handy when trimming panels;
- Check with the seller, the cost of the panels is calculated by the coverage area or by the number of panels;
- The product must have a quality certificate;
- The packaging must bear a mark about the fire safety and environmental friendliness of the material;
- If you are buying a large batch of plastic, the panels should be the same size and the same color;
What is the difference between vertical and horizontal laying
The question often comes up: how to cover walls with panels, vertically or horizontally? What is the difference?
In the first option we make a horizontal frame, in the second – a vertical one. But in the bathroom I recommend using only vertical installation. Otherwise, water easily penetrates into the areas between the canvases and the wall. With its regular accumulation, fungi form. To eliminate them, a complete disassembly of the coating, preventive measures and new cladding will be required. And these are serious expenses.
It is important to do everything correctly, here are some articles for you
How to glue wallpaper correctly. The foreman shares his experience. Finishing work. Stages of finishing work. How can you save money when renovating?
Decoration of corners
When installing plastic panels in the bathroom with your own efforts, you need to correctly design the corners.
For this task, plastic corners are used for external and internal formations. They have two versions:
- Invoices. We install them on top of the laid covering.
- Integrated. Fasten before assembly.
Since plastic has good flexibility, we use another method. Step by step it looks like this:
- Cutting the canvas from the inside (we use a construction knife).
- A neat fold in the right place.
- Place the narrow panel element against the corner and bend it. Using the sample, we measure the bend area on the product. Alternative: using a hair dryer, we direct the air flow to this area, heat it and bend it. This creates a seamless transition. The main thing here is not to melt the panel and act extremely carefully.
Installation of PVC panels
Finishing walls with PVC panels is not a complicated process; almost anyone who has the skills to work with finishing materials can do it. There are two ways to attach the panels.
- Frameless method:
- for glue (liquid nails);
- using construction staples;
- self-tapping screws.
- Frame method: metal or wooden profile.
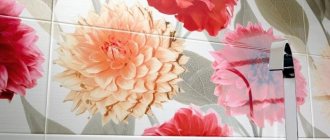
PVC panel for bathroom tiles
Frameless mounting is possible if the wall is flat, without obvious protrusions and dips (up to 3 mm). When using glue, it is necessary to take into account that for each type of panel a corresponding glue is produced. Using a compound designed for another type of PVC may not hold the plastic on the wall. Sometimes universal adhesives are used, but their adhesive ability is worse than that of “narrow-profile” adhesives.
Using a construction stapler you can quickly and easily secure the panels.
When attaching plastic to a concrete or brick wall with self-tapping screws, it is better to purchase dowels and self-tapping screws separately, and the diameter of the screws should be 1-2 mm larger than the dowel. This will allow you to hold the panel securely.
White and cream PVC panels in the bedroom
Installation is carried out in this order:
- The old coating is removed and the wall is cleaned.
- The surface is treated with a construction antiseptic, regardless of whether there are traces of fungus or mold.
- After drying, walls with small cracks and defects are puttied.
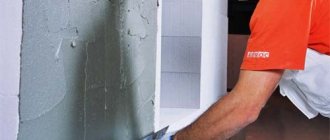
- Glue is applied in a streak-like manner to the back side of the panels, and the panel is pressed tightly against the wall. Either the panels are fastened with self-tapping screws or staples.
- When installation is completed, the framing profile is installed.
The advantage of the frameless method is that plastic glued to the wall can withstand impact loads much better.
PVC panels in a spacious bedroom
Mounting to a metal or wooden profile is considered more reliable and the only option if the walls are not level. The metal profile is used for fastening heavy cladding and installation in rooms with high humidity. It is advisable to use grid mounting when it is necessary to put a layer of heat or sound insulation under the panels, or to hide communications. To do this, you need to carefully install the grille (profile).
To work you will need:
- building level;
- plumb line;
- construction pencil or marker;
- roulette;
- construction hammer or stapler and staples;
- electric drill;
- tool for cutting panels (grinder, circular saw, jigsaw, plastic cutter, regular metal hacksaw or wood hacksaw with small teeth for cross cutting);
- Power tools should be operated at low speeds; this will avoid overheating of the PVC, melting of the edges and the release of substances harmful to humans;
- screwdriver;
- You may need a miter box and a shoe knife.
PVC panels in the bathroom
Pipe box
How to place plastic panels in the bathroom to effectively hide communications? Here we arrange a special box. The operating algorithm is as follows:
- Frame assembly. To do this we use metal guides. We mark a mark on the surface by drawing a detailed drawing of the intended installation using a level. We create holes into which we will place the dowels.
- Vertical fixation of profiles on both walls.
- Their installation on the floor and ceiling. We form a coal format.
- In uneven areas, we trim the profile ribs. This way the strip fits tightly to the wall.
- Installation of the profile on the corner. We fasten it in the areas where the metal ribs contact, at the top and bottom.
- Strengthening the angle with jumpers. We maintain a step of 50 cm. During the process, we test the evenness of the structure with a level.
- When assembling the frame, we create a door. It will make it easier to work with meters, replace pipes, etc. Product sold separately. This is a small frame with a door. Based on its parameters, we arrange a place for it in the design. We add profiles to the main frame and strengthen it with vertical strips. We put the frame and fasten it with screws or glue.
- We calculate the protrusion of the door so that it does not protrude against the background of the entire wall covering. We also mount panels on it and adjust the image.
- Laying the covering. We position the initial plastic strip from the corner and place the panel in it. Installation here usually involves self-tapping screws. They are located along a narrow groove line.
- We insert the following into the provided fabric and use this principle to sheathe the entire box.
- Fastening overhead corners.
In our work we comply with the following criteria:
- The pipes do not interfere with the structure.
- We wrap the water pipes with insulated material.
- In areas with high pressure we make a lot of jumpers.
Installation of plastic panels to the ceiling
How to cover a bathroom ceiling with such products, and which models are optimal for this? Here we use glossy versions with a width of 20-25 m. We work only using the frame method and the following algorithm:
- A sheathing is created for the main structure. To do this, we attach the profile to the ceiling surface, observing a step of 50 cm, and retreat from the floor slabs to the distance required for installing the lighting. For installation we use special steel hangers.
- We use a level to mark the areas where the wall profile is attached. We will fix the plinth and linens on it.
- We install a metal or plastic profile around the entire perimeter of the bathroom
- We attach a plastic plinth to the formed sheathing using glue or self-tapping screws.
- We place the panels one at a time into the baseboard and attach them to the sheathing using self-tapping screws.
- We arrange suitable holes at the locations of the light fixtures. We use a jigsaw, a crown or a knife.
Advice
This DIY installation of PVC panels in the bathroom must be done with already prepared wiring for lighting. The wires are connected to the box. The cable ends are insulated during installation.
As a rule, there are few lighting fixtures in the bathroom. Most often one. When installing several products, the wiring type must be parallel. So, if one device breaks down, the others will continue to work.
By mounting canvases with holes for lighting, we produce wires for easy connection of light:
To install the final panel, measure the distance from the previous panel to the wall. We cut it so that we place it close together. We attach the plinth to it and move it to the previous panel.
All work is completed with the installation of fittings for the lamps and themselves.
Installation of panels on a rough ceiling
This option is especially popular when finishing a bathroom in a wooden house. The easiest way to work is with a slatted ceiling. Its stages are:
- Treating the rough ceiling with antiseptics.
- Arranging a vapor barrier using aluminum foil or polyethylene film.
- Measuring the distance between two walls (opposite).
- Cutting skirting boards. At the corners of the connection, its angle should be 45 degrees.
- Installation of elements with liquid glue. Only three skirting boards are fixed at once. The fourth is attached after placing the canvases.
The thickness of the panels used is no more than 4-5 mm. They only penetrate 2 cm into all baseboards.
Advice
To avoid mistakes, we measure the length of the ceiling: from its extreme line to the edge of the baseboard itself. We add 1.5 to the indicator. And 5 mm are retained to simplify installation. Each panel is measured and cut individually.
To ensure accuracy of joints and installation, we arrange the following work:
- We place the end of the canvas in plinth 1. Bend it slightly and place it at the end of plinth 2 (opposite). Align the panel and insert the long edge into the baseboard 3.
- We press the panels tightly, one to the other and fix them with a stapler. The higher the density of the locks, the higher the strength of the connection. In uneven areas and when gaps appear between the products, we place parts of plastic here, and then fix the panels.
- After installing all the canvases, measure the width of the uncovered ceiling. Based on this data, we cut the material.
- The panel is placed in skirting boards 1 and 2 (as in step 1) and one edge is connected into a lock. The other is fixed separately. To do this, even before installation, the reverse side is glued or a hole is made in one plane (part 1) for the diameter of the self-tapping screw, and he screws part 2 to the ceiling.
- The base part is cut off from plinth 4. The remaining plane is covered with glue and attached to the wall in the desired position.
During the installation process, we save space for wiring or lighting.
Installation of panels to the ceiling on a metal frame
This method is optimal for uneven ceilings. Stages of work:
- Along the perimeter of the bathroom we cut out a line for installing load-bearing profiles. At a distance of 50-60 cm we place other profiles. We use hangers on uneven surfaces.
- We glue 3 baseboards onto liquid nails. To place them in corners, we cut them at an angle of 45 degrees. If there are no right angles, we adjust all the cuts. We glue the products both to the wall and to the profile. Having applied the plinth, take it away for 2-3 minutes and apply it again. We check his position using a rule. If there are gaps, carefully move it to the limit with the smooth side of the rule.
- We place one end of the panel in plinth 1, bend it slightly and center its second end in plinth 2 (opposite). We level it and move it into baseboard 3. For laying the canvases, only a long section of the ceiling is used. This results in fewer cuts and makes it easier for the lamellas to bend during installation.
- Fixing the panels to the profiles using self-tapping screws with press washers.
The final panel is cut according to the parameters of the existing gap. We simplify installation by leaving a gap of 1 -1.5 cm. Then we hide it with skirting boards.
Before installation begins, we determine the position of the lamps and the method of their installation. And we create suitable holes in the panels in advance.
How to install panels when mounted on a ceiling diagonally
Here we calculate the ceiling area and the maximum length of the canvas. The second indicator is obtained by the formula A2 + B2 = C2.
Here A is the length, B is the width, C is the diagonal. It turns out C = √ A2 + B2.
There will be a significant waste of material here, so I advise you to purchase 15% more of it than initially required.
The next steps are:
- Fastening three skirting boards (the method is described above).
- We cut a piece of the panel at an angle of 45 degrees from one end side. At the cross point, cut the second piece at an identical angle. An initial panel has formed, the shortest one. We put it in the corner.
- The length of most of this panel is measured. This is the parameter of the smaller face of the subsequent canvas. We apply these indicators to the new product and cut it off on both sides at the designated angle.
Using the same principle, we cut and install the remaining panels.
For which styles is plastic finishing suitable?
When deciding to cover the walls in the bathroom with panels, take into account the overall interior of the room. By definition, these products are completely unsuitable for the following styles:
- Classic.
- Country.
- Art Deco.
The most suitable ones are: modern and minimalism.
However, today the range of products is extensive. They imitate many materials and have original images
Often, owners have the opportunity to paint plastic panels to their liking in any colors.
Advantages of PVC wall panels
There are several reasons why it is worth finishing the walls in the bathroom with PVC panels:
- Ease. On plasterboard walls, for example, it is not always possible to stick heavy tiles. But weightless PVC panels can be glued to any surface;
- The panels are inert to any detergents, even aggressive household chemicals;
- Cheapness;
- Easy to install;
- Variety of colors and textures;
- You can hide wires and uneven walls behind thicker panels;
- Since plastic has no pores, germs do not accumulate on it.