The hallway is the last to be renovated. The main reason is that all construction debris and dirt during the renovation of all other premises will pass through it. Something in it will wake up, fall away, smudge, and what will the face of the house turn into? So, when making more or less serious renovations in an apartment, you should definitely think about renovating the hallway, especially since renovating a hallway with your own hands is not a technically difficult task, and professional, high-quality inexpensive renovation of a hallway is a fairly common service.
Of course, the owners choose whether to do it on their own or not. But keep in mind that due to the small volume and surface area of the room, the cost of the work will be no less than 50% of the total, i.e. When renovating the hallway by outside craftsmen, half of the payment will go to them for the work. So look according to your skills and budget capabilities. If you decide to do it yourself, then first of all you need to know the features of the room.
What to consider?
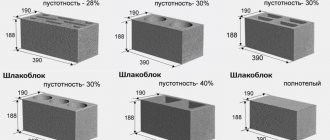
Hallways, as we know, are mostly small and cramped, with no sources of natural light. Dirt is carried into the hallway; people walk on the floor in stiletto heels, or even skates. They place weights on the floor, sometimes hard and angular. Splashes from umbrellas, clothes, and shaking off pets fly onto the walls in the hallway.
A wave of cold air from an opened door may burst into the hallway, and the relative humidity in it will immediately jump above the dew point. Condensation may not be noticeable to the eye, but it will remain in the cracks and pores of the finish, and will slowly do its destructive work: rot, mold, all kinds of infection.
But you want to have even a small corridor that is clean, bright, cozy, and not a dark, gloomy passage that immediately spoils the mood of both yourself and your guests. This is quite possible if repair work is carried out according to a clear plan, in a certain sequence and with full knowledge of the matter, especially regarding the choice of materials.
Purchase of finishing materials
Before starting renovation work, you need to take care of purchasing finishing materials. It is advisable to buy them with a small reserve, but those who want to save as much as possible can carefully calculate all the details and purchase only what is necessary.
Don't pass by sales on store shelves. This section often contains the remains of some materials, but they are quite enough to decorate a small hallway.
Related article: What to do with an empty wall: 5 stylish design options
However, you should also not purchase the cheapest finishing products . Materials must be of high quality, easy to work with and environmentally friendly.
It should be noted! It is better to avoid complex and elaborate design solutions. Not everyone can fix a plasterboard sheet on their own, and this is the condition for the next trick.
Planning
The general sequence of planning a hallway renovation, according to the importance of the stages, is as follows:
- Lighting;
- Organization of space;
- Surface finishing;
- Flooring;
- Furnishings.
Options for repairing a hallway depend primarily on its original layout with exemplification - calculating the volume of the room, the area of the ceiling, walls and floor separately and the type of layout. The latter largely determines the choice of the nature of lighting, volumetric and surface design, and the technological features of the work performed depend on them. Therefore, it is advisable to link the description of the repair to the most common types of hallways.
Required Tools
In order to make repairs indoors, of course, you will need tools. In the case of cosmetic repairs, it will be enough to prepare the simplest construction tools. So, in our case we need to prepare:
- spatula (preferably of different sizes);
- stationery knife;
- kitchen scissors;
- tassel and buckle;
- roller (can also be of different sizes).
Types of hallways
In typical houses, the layout of hallways can be roughly divided into the following types:
- Box;
- Corridor;
- “Nora with a Snatch”;
- Coupe.
The box hallway is typical for brick Khrushchev apartments: from a small (about 4 sq. m) kennel, doors lead to the bathroom and living rooms; perhaps also for the kitchen, if the house was originally built for the “comrades” of the nomenklatura, i.e. superiors. “Boxes” are found both in Stalinist buildings and in modern houses. Repairing a small hallway of this type is the easiest; The most troublesome thing is the furniture - because of the doors on all the walls it is very difficult to install a standard wardrobe.
The hallway-corridor is most often found in a panel house. The corridor is often narrow and long, so its decoration is of particular importance as a way of organizing space. Repairing a simple corridor is of medium complexity. The hallways, box and corridor are shown in the picture.
Hallway-box (left) and hallway-corridor (right)
“The hole with the snatch” is an indispensable part of the Khrushchev block: a narrow corridor past the nursery to the living room (hall) with a branch past the bathroom to the kitchen. The design of the renovation is quite complicated: narrow, cramped, how to organize the space if there is only a little of it? It is still possible to do it decently, if you take into account the orientation of the apartment to the cardinal points, see the corresponding section.
Note: they began to call the living room a hall just during the second wave of Khrushchev’s housing construction, which was marked by the fight against architectural excesses and the appearance of panel boxes with ceilings of 2.5 m and a total area of up to 11 square meters. m/person.. Etymology – black humor of new settlers.
Hallways-compartments
A hallway-compartment is not a wardrobe in the hallway at all, but a hallway in an apartment either in the form of a box with a corridor extending from it, or in the form of a stepped and/or winding corridor, see fig. The first are typical for new buildings above the budget class; the second - for old houses, especially those that have survived the disaggregation of apartments. When renovating a hallway-compartment, the main attention should be paid to organizing the space. Finishing is also important, but as a complementary and final design element.
Create a project for the future hallway
To save money, you need to know in advance what you want the hallway to look like after renovation. Often people have to spend money after the renovation is completed to correct any defects or completely redo certain elements.
The reason for such unforeseen expenses is the lack of a hallway design and work plan. To avoid the above-mentioned incidents, you should take care of this in advance. It is not at all necessary to go to specialists and order a three-dimensional projection of the room from them; it is enough to draw every desired detail on a sheet of paper.
Note! To create a projection it is not necessary to have artistic skills; the simplest floor plan will do. You should first measure all the corners of the room and transfer them to a sheet of paper in the appropriate scale. There are specialized sites on the Internet where this is done absolutely free.
Lighting and ceiling
Hallway lighting, except in cases of some very specific individual wishes, is required to be as close as possible to shadowless (enveloping light). Otherwise, all further efforts to organize the space may be nullified, and the cramped room will seem even cramped; The surfaces of the hallway should be created by tone and texture, and not by the play of chiaroscuro; there is simply no room for it. That is, the ceiling in the corridor as a whole should be a source of diffused light and itself, as it were, dissolve in it. Based on this, we choose ceiling design options.
The best color for the ceiling is white or light warm colors. The simplest and cheapest option is painting with acrylic enamel, but careful leveling of the base surface is required; oblique light (see below) will immediately reveal the slightest irregularities.
In compartment hallways, a mirrored ceiling or a stretch ceiling made of shiny film may be appropriate, provided that the color scheme is maintained correctly, see below. For low ceilings, a suspended shiny ceiling may fit in a box, but for a “hole” or a narrow winding corridor this option may not be considered: a person in such a hallway will see himself either at the bottom of a well, or in a glacial crevasse.
Optimal in terms of labor, costs, created effect and possible options for further design - a two- or multi-level plasterboard ceiling. It is advisable to use curved surfaces: a certain association with clouds arises and the hallway seems to expand. In addition, a two-level ceiling allows you to place a minimum number of lamps (which both cost money and consume electricity) to obtain the desired lighting effect.
How to get shadowless light? When making repairs yourself with a minimum budget and labor costs, the best methods are:
- For a plasterboard ceiling - an oval niche with lamps in it, shining crosswise onto the walls at a slight angle to the ceiling surface.
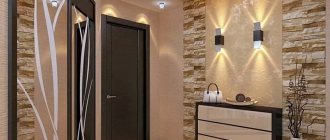
- For a smooth painted ceiling - linear fluorescent lamps just under the ceiling, open or behind the cornices, see fig. on right. A box is enough for a pair of 13-16 W lamps on opposite walls; total – 50-60 W.
Note:
A common option for lighting a hallway is sconces shining on the ceiling (decorative lamps of sufficiently high power are required), gives little reflection of light from the ceiling, and below there are quite deep intersecting shadows, so additional light will still be required to visually expand the hallway.
Successful (right and left) and unsuccessful (in the center) hallway lighting
The first option requires some caution when performing. Look at the pictures left and center. On the left, halogen lights shine from the sides of the niche; on the right there are linear fluorescent lamps behind them, like because of a cornice, and the frame of the niche is dark. The effect is obvious: on the left, even a stack of small shelves does not create a dark gap, and on the right, the entire hallway is gloomy.
In the case of a suspended ceiling, lamps must be placed in openings with frames (eyelets): the light reflected from the shiny film becomes significantly polarized, and the lighting seems “dead.” Accordingly, the design of the lamps should provide significant dispersion of light to the sides, and the walls should be light and neutral in tone.
If a narrow corridor is being renovated, like a “hole” in a Khrushchev building or a winding corridor in a once “proletarianized bourgeois” apartment, then organizing lighting is possible not only with fluorescent lamps from the upper corners. A good result is achieved by two or three round plasterboard lampshades with 3-4 halogen lamps each, shining from the sides of the lampshade along the sides of the ceiling. Lamps - 5-9 W each.
A very good, but expensive and complex solution for hallway lighting is a stained glass ceiling glowing from within, a light ceiling, see fig. on right. Unfortunately, it is impossible to imitate it with a solid stretch ceiling with light bulbs hidden in the interceiling space: there is no ventilation, the light bulbs will burn out one after another due to overheating, and the panel itself will soon burn out and become stained.
Colors and textures
There is no room in the hallway for playing forms, decor, or architectural delights. Therefore, the design of the hallway (and remember, we need to visually increase the volume) is based on the interaction of colors of textured surfaces. There is no recipe for all occasions, so we will analyze only typical mistakes, and then it’s a matter of your taste.
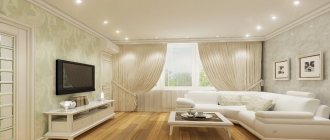
Errors in hallway design based on tone and color scheme
In the picture on the left, everything seems to be in order: pastel tones, a sufficiently large volume of the hallway allows the use of a suspended ceiling, the light is well organized. But here’s the problem: doctors say that regular contemplation of the combination of green and blue with yellow over large areas destabilizes the psyche. In this case, it would not be a mustard ceiling that would create a problem, but a light beige or cream ceiling.
In the center everything is clear: an ice cave. In hot countries, the decision may be quite justified, but in the harsh winter, entering one from the street... brrr!
On the right, the designer seems to have set out to expand the space by dismembering the surfaces that limit it. The reception is quite legal, but with sufficient volume, and here it is clearly not enough. In addition, an excessively contrasting color scheme gives an oppressive variegation. By analogy: by cutting 2 m from a piece of cloth, we get a cut for a suit. By cutting it into 5x5 cm shreds, we get a bunch of garbage with the same total area.
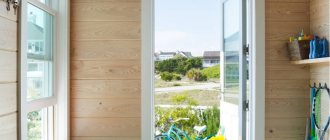
Errors in hallway design based on finishing texture
The next row of drawings shows errors in texture. On the right is a rough finish of the walls with laminate to resemble bamboo parquet. It does not reflect light well, and the dark front panel of an overly large cabinet seems to push into the person who enters. In addition, when the laminate reflects light, it polarizes some of it. With exclusively artificial lighting, this manifests itself in the apparent roughness of the finish.
In the center there is an obvious mistake: the floor is very dark, with a rather rough texture. There is such a concept: the dominant of the dark; From our distant ancestors we have inherited the expectation of danger from the darkness, and here the black floor seems to grab your feet.
On the right there is too much stone, and the mirror reflecting it only enhances the gloom. In general, the renovation of a corridor with artificial stone trim is justified in terms of aesthetics only for a fairly large hallway-compartment, and it is advisable to place the areas lined with stone on the end walls, which have little role in creating the light pattern.
Walls
If the ceiling provides the basis for the proper organization of space in the hallway, then finishing the corridor along the walls completes it, visually expanding the space and creating coziness. This task is complex, so first we will consider general design techniques, then technological features, suitable materials for the job, and finally - everything in combination in relation to hallways of different types.
Design
A visible increase in space in the hallway can be achieved in three ways:
- General lightening of the finish is easy, inexpensive, and gives a great effect. But it can give the room a somewhat official, or even hospital-like appearance. The matter can be improved with proper furnishings.
- The imaginary division of space is a sharp or smooth change in the nature of the decoration along the length or height of the walls. For hallways this is the main design technique.
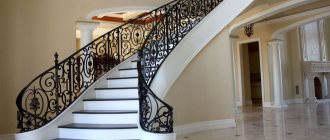
- The physical division of space with arches, transparent or translucent partitions, decorative false beams and/or false beams. It is quite labor-intensive, costly, and really “eats up” volume, so it is used as an auxiliary technique for spacious hallways with a staircase leading from them, when renovating a narrow, long, winding corridor and in other special cases.
The imaginary division of space, in turn, most often means the creation of surfaces or stripes that differ from the general tone. In this case, you must adhere to the following:
- The contrasting surface should be visible all at once, at least with peripheral vision when looking from the front door.
- Changing the color towards lighter and/or warmer tones opens up the space in the direction of the eye.
- Vast dark surfaces from above press, and from below they pull.
- Dark surfaces on the sides of the bottom are acceptable at a small height.
- Large dark planes should be “diluted” with something, see below.
Note:
A stepped or smooth change in tone is a very effective technique when renovating a long corridor.
Features of the technology
The simplest, cheapest and design-effective way to decorate a hallway is wallpapering. Here the features of the technology come down to their correct choice, see below.
When covering walls with laminate, MDF, clapboard and tiling, we must not forget about the small size of the room: you cannot use lathing. In this case, leveling the walls for cladding is done in the following ways:
- Irregularities more than 5 mm high (depth), bubbles, mold, weeds, drips - complete replastering. Stripping the walls down to the masonry or slab, starting plaster along the markers (markers) and finishing with troweling.
- Irregularities 1-5 mm - multi-layer cement plaster. Consumption for a layer of 1 mm is about 0.87 kg/sq.m. Apply in layers of 1 mm after spraying the previous dried layer with careful and attentive grouting with a polisher.
- Peeling of the old plaster, small irregularities - treatment with an abrasive mesh on a block and replastering with thin-layer gypsum plaster. Consumption is about 1.7 kg/sq. m.
Note: a steel polisher must be used; the wooden one in the middle is “eaten away” very quickly and produces regularly alternating bulges.
Laying of cladding elements is carried out using glue; Silicone is best. Laminate, MDF and lining boards should be placed VERTICALLY to avoid the accumulation of dirt in their grooves, especially at the bottom. Tiling the hallway with tiles is not common, but it is durable and hygienic.
Materials
In a small hallway, the consumption of finishing materials is small, so their choice is determined primarily by the actual quality, durability and durability, and not by price. Resistance is important not only to moisture, dirt and wear, but also to instant mechanical impacts: sleds, garden and household tools are brought into the hallway. Even a metal buckle on a handbag or a dangling fishhook can ruin the cladding, and it is impossible to partially transfer it when laying it with glue without lathing.
In order of preference, the following types of finishing materials for hallway walls can be offered:
- Wallpaper.
- Porcelain tiles.
- Tile tiles.
- Organic slab materials: laminate, MDF, lining, plastic tiles.
- Liquid wallpaper.
- Venetian (decorative) plaster.
Wallpaper
Non-woven/foam film is not suitable: it is easily scratched and torn. And the most important thing: even for the most careful owners, such wallpaper shrinks (stretches) over time due to sudden changes in temperature and humidity when opening/closing the door, and cracks appear between their stripes. Modified (reinforced) paper ones, with an outer durable decorative layer, are also of little use: once someone shook off an umbrella in the hallway after rain or smeared a wet jacket on the wall - expect peeling in six months or earlier. Cork wallpaper - paper with a thin layer of cork on it - is absolutely unsuitable: the paper base on bustilate gets wet, and the cork swells from moisture, and under artificial lighting, cork wallpaper appears dark and loses its decorative effect.
Suitable vinyl or, better, propylene wallpaper, two-layer (duplex) or three-layer (triplex). Silk-screen vinyl is more expensive, but very decorative: ordinary vinyl wallpaper is reinforced with natural silk threads, and the wallpaper looks like silk.
Vinyl wallpaper can be glued with ordinary polymer wallpaper glue using standard technology, but propylene wallpaper requires a special one. In any case, casein glue or homemade pastes with a backing made of newspapers or wrapping paper are completely unsuitable.
Porcelain tiles
We’ll talk more about porcelain stoneware when discussing flooring. It is good for wall cladding, among other things, because it comes in a variety of textures, with designs and patterns. If there is some excess funds for the renovation of the hallway, then facing with porcelain tiles at least 80-100 cm from the floor will eliminate thoughts about the next renovation for many years.
Tile
Cheaper than porcelain stoneware and not much inferior to it, but it is rarely found on walls in hallways. A possible reason is that it gives a directional reflection of light and at the same time polarizes it, so that the hallway takes on a somewhat deathly appearance. But when finishing the same 80-100 cm from the bottom, this drawback will not affect, but the walls will be reliably protected in the most vulnerable area.
Organic slab cladding
In a hallway without natural light, the following disadvantages of slab cladding materials of organic origin clearly appear:
- The ability to accumulate dirt and moisture in the seams.
- “Scratchability”: laminate, on which you can safely extinguish a cigarette, is scratched by a nail.
- Polarization of light reflected from them.
If you still plan to cover the hallway with “boards,” then you should buy materials of at least class 32, i.e. highly or particularly resistant to mechanical and climatic influences; in common parlance - “for outdoor use.”
Liquid wallpaper
Liquid wallpaper has come into use relatively recently. In essence, this is plaster of a special composition, into which rags, flakes and threads of different colors are added. The dry mixture is diluted according to the instructions and plastered with it as with ordinary plaster.
Liquid wallpaper can give a stunning aesthetic effect (see figure), but the finished coating is porous, so it must be coated with acrylic varnish. To create images, you do not need to buy ready-made sets of metal partition profiles, as in Fig. on right. You can do it yourself:
- Cut strips of thin cardboard as wide as the thickness of the plaster layer.
- Roll them into rolls and tie them with thread.
- Dump into a bucket or pan and fill with PVA water-polymer emulsion.
- Leave for at least 2 hours, pour the emulsion back (it is still quite suitable for other uses); Immediately wash the container from under the lock with warm water.
- Spread the cardboards on film to dry.
- Once dry, bend and cut as desired; Glue to the wall with drops of construction silicone or mounting adhesive.
Despite the apparent simplicity of the material, the technology for preparing liquid wallpaper is quite complex and is not feasible at home. Leading manufacturers keep their subtleties secret. Silk Plaster technology on natural silk is considered the most advanced, but due to the high demand for the material, the market is flooded with fakes, so you need to buy from trusted authorized dealers.
The technology for applying liquid wallpaper is described in detail at the link.
Venetian plaster
Decorative plaster is made from ordinary white gypsum by adding mineral powder of the desired tone - colored sand, stone chips - or a mixture of different fillers. Stukko d'arte has been known since the middle Renaissance, and from the time of Giorgio Vasari and his “Lives ...” it is considered an attribute of elite apartments of the highest class: it is not builders who work on Venetian plaster, but painters, creating works of high art, in Fig. left.
However, it is possible to prepare decorative plaster yourself and use it to create at least the simplest gradations of tones, as shown in Fig. on right. To avoid sedimentation of the filler, it is necessary to prepare Venetian plaster in small portions, strictly following the recipe, and work quickly, for the same reason.
For the hallway, filler should be taken with rounded granules, for example. sifted and washed sand of various shades. Ground stone filler will provide a rough surface that can scratch shoes or rub clothes.
No information is known about Venetian plaster with synthetic polymer fillers.
Wall decoration with space organization
Hallway-box
“Diluting” a dark surface with a pattern to eliminate the dominance of the dark
It’s easiest to repair and decorate a box, no matter if it’s in a Khrushchev-era building or a new building. The room is almost cubic, so you can decorate it based solely on your own taste. Vast dark planes are not forbidden, but certainly with a pattern (see figure); he will suppress the dominant of the dark.
If the hallway is a compartment in the form of a box, tapering further into a corridor, then it would be more expedient to make an arch between them and design it separately as a box and a corridor. According to design techniques, a cube and a long extension from it are poorly compatible and it is easier to give them space separately than together.
Khrushchev's boxes were often equipped with a closet. Usually it is used to store household supplies and all sorts of rubbish, but by widening the entrance opening and removing the door, the closet can be turned into an excellent wardrobe. At the same time, the problem of furnishing a small hallway is solved without any extra effort, and the wall between the hallway and the closet is not a wall, but a half-brick partition or made of lightweight material, so no permits are needed for this work.
Khrushchev labyrinths
Repairing a corridor in a Khrushchev-era building is, by design, a task of tasks. It’s narrow, low, cramped, and the designers didn’t seem to think about lighting at all. Nevertheless, it is possible to give a “hole with a hole” a more or less decent appearance. The main rule: do not think about arches here, they will only constrain and lower what is already cramped and low.
You should start by determining the orientation of the apartment according to the cardinal directions. If the living room faces south, southeast or southwest, and the door from it to the hallway has a transparent or translucent insert, the recommended option for organizing the space is as follows:
- The “entrance” to the kitchen past the bathroom is visually separated by an overhead ceiling beam made of laminate boards of a dark, but not completely black, tone.
- We design the kitchen entryway in a kitchen style, based on pure functionality.
- The resulting not very long, but narrow corridor is divided by two planes along a solid wall: a darker one is closer to the exit, a lighter one is closer to the living room (hall), if there is a closet opposite the mouth of the “exit”; this is actually the only suitable place for him in the “burrow”.
- If the “hole” is furnished only with a hanger at the entrance, we expand it with wide stripes of a tone that becomes lighter towards the expanding surface: horizontal upwards; vertical - towards the living room.
Note: under no circumstances combine visual expansion along and up on one surface! The effect will be deadly even for an ardent adherent of Malevich or the late Van Gogh!
If the kitchen overlooks the bright 2/3 of the semi-horizon, we consider the nook with the doors of the nursery and living room to be a corner; We separate it with a false beam, as indicated above, and expand it in stripes or leave it uniformly light. We decorate the previous “entrance” to the kitchen a little darker than the resulting narrow box (more precisely, a pencil case) at the entrance. We also make the ceiling of the “otnorka” a little darker than the walls of the pencil case in the regions to the south, with bright natural light; if in summer the Sun is low and cloudy weather is common, on the contrary, it is lighter. Such a hallway looks best if the ceiling is “skinny” - under the mezzanine; if not, this is the perfect opportunity to arrange it.
The kitchen and corridor can be either uniform or different in design, but it is still advisable to have a lighter kitchen. The more natural light passes into the “hole”, the less its polarization will affect when reflected and the wider the choice of materials for finishing will be.
Advice:
Don’t try to make something out of nothing in the “Khrushchev hole,” to put it mildly. Doesn’t put pressure on perception – already success; The creators probably didn’t even intend this.
Video example of renovation of a small hallway in Khrushchev
Hallways-compartments
In a box compartment with a corridor, instead of separating the volumes with an arch, you can successfully use the same overhead ceiling beams, as shown in the picture with compartment hallways in the section on types of hallways. This virtual division of a long corridor into segments will allow you to uniformly design the entire hallway (same figure). The work is much simpler and cheaper.
We decorate the winding compartment-corridor either “Khrushchev-style” or uniformly light. However, there are many configurations of such hallways and it is hardly possible to give uniform recommendations for all.
Floor
Most of the main enemy of any flooring - grains of sand from shoes - gets on the floor in the hallway. Therefore, a laminate floor of even the highest grade will not last the estimated period. The tiled floor in the hallway is not very good - it is stable, but dangerous and slippery. Patients slipping in a tiled hallway while wearing wet shoes is a common occurrence among emergency room doctors.
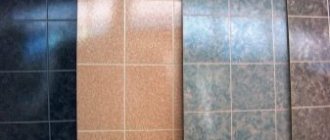
The best option for flooring in the hallway, as well as in the kitchen, is marmoleum. It can be simply laid in one piece on the previous floor without any preparation. Cheap and cheerful - the most expensive slab marmoleum costs about 2,000 rubles/sq. m or less, and the estimated service life in the most frequently visited public premises is at least 10 years.
Marmoleum flooring (left) and porcelain tiles (right)
Marmoleum is produced not only in rolls, but also in the form of tiles and boards. From them you can type simple patterns on glue, see fig. left. However, the range of textured and patterned marmoleum is very limited, so for a more expensive, but practical and beautiful flooring, we can recommend porcelain tiles, shown in Fig. on right:
- Exceptionally resistant and durable: the estimated service life on ventilated facades is 100 years or more.
- Decorative: produced textured, including wood, with drawings and patterns.
- Non-slip: smooth, easy to clean, but not glazed.
- Hygienic: absolutely dense, does not absorb anything.
- Does not polarize reflected light; gives a reflection close to diffuse.
However, porcelain stoneware, like any tile, needs a prepared surface, and prepared until it is completely even and smooth. Suddenly, an inspection of the base floor revealed serious defects; it is impossible to make major repairs by replacing the screed: a new cement-sand screed must last at least 40 days, and where to live during this time? Walkways do not save: once someone stumbles, and the work is ruined.
But it is not all that bad. The area of the hallway is small, there are concentrated loads in it, so it is enough to fill the gaping cracks with thick silicone, and quickly repair the potholes with plaster or alabaster.
The next stage is pouring a cement-based self-leveling screed (it is much cheaper and stronger than polymer) in a layer 10 mm from the most protruding mound. The mixture consumption will be about 18 kg/sq.m. m. A self-leveling cement floor gains sufficient strength in 3-5 days. If you pour it on Friday evening and everyone leaves for the dacha, then by Monday you can walk on the screed without fear, and lay the tiles the following weekend.
The floor in the corridor made of porcelain stoneware is laid without any special features: using assembly glue with crosses between the tiles, and after the glue has hardened (from 20 minutes to a day, depending on the brand), the seams are cut with a moisture-resistant finishing compound. There is a nuance here: as in the bathroom, you cannot smooth the seams with your finger, as dirt will collect in the microrelief. You need to iron it with a ironing iron or a piece of round electrical cable in vinyl insulation.
DIY repair
All solutions that you can do yourself will cost much less . For example, it is not necessary to resort to replacing old doors between rooms if it is possible to wallpaper or paint them.
Along with new furniture, it is advisable to start transforming the appearance of the old one, if any. This process is carried out in three stages:
- Preliminary processing.
- Primer.
- Painting.
Furnishings
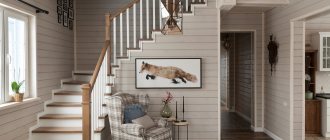
Combi wardrobe in the hallway
The best option for non-cluttering hallway furniture is a combined wardrobe-bedside table-shelf-hanger, see fig. There is also a nuance here: custom ones are exactly the same size as the height of the road, and between the top of the standard ones and the ceiling there is a gap - a dust collector, a fly airfield and a reliable base for spiders and cockroaches.
The simplest and most obvious way out is to just fill the gap with polystyrene foam. With a space of 10-25 mm inward from the edge. Why indentation is needed:
- 10-12 mm: PVA glue the mounting mesh onto the end of the foam insert and plaster it flush with the cabinet. You can paint the plaster to match the furniture, ceiling or walls, or you can leave it as is: a curved white edging adds variety to the design.
- 20-25 mm: directly glue the LED strip onto the end of the foam, no fuss - powered by the cheapest and lowest-power adapter, without a controller with a microprocessor. This will provide emergency light - power consumption is 2-3 W - and will allow you to successfully use a wall mirror to expand the space.
About mirrors on the walls
Practice shows that attempts to visibly expand the volume of the hallway with the help of mirrors or covering the walls with mirror tiles do not bring much success: it is still clear that this is just a reflection. But the described LED stand near the mirror immediately gives depth to the reflected image. Why is not yet clear. Perhaps this is due to the line spectrum of LED light, but the effect is obvious.
Manufacturing instructions and drawings of a corner cabinet and a compartment
Having decided on the model of the future cabinet and its design, you need to make a drawing. To avoid doing this yourself, you can find a ready-made version online and make your own adjustments.
In addition to materials and diagrams, the following tools will be required for work:
- tape measure and pencil;
- construction knife;
- fastening elements (bolts, screws, self-tapping screws);
- furniture fittings;
- sandpaper;
- jigsaw or saw;
- screwdriver or screwdriver.
You will also have to purchase finishing materials and decorative elements to decorate the cabinet.
Step-by-step production of a sliding wardrobe in the hallway with your own hands
If there is a niche in the hallway, you can limit yourself to making a built-in wardrobe, installing shelves and a sliding door system in it.
Drawing with the dimensions of a wardrobe in the hallway with your own hands
The process of creating a wardrobe with side walls is more complex:
- The frame part is made of wood.
- Markings are applied to the walls and floor and holes are made at the points where the frame will be fixed.
- Inside, slats intended for shelves are installed.
- Shelves are cut from plywood sheets.
- Drywall is used as cladding for the side parts, which is subsequently painted or pasted over.
- Guides are installed on the floor and ceiling.
- Doors are being installed.
You need to make sure that the doors move freely. If necessary, their position can be adjusted using screws.