Why is it beneficial to use bunk beds?
The obvious advantage of these beds is their spaciousness and the ability to rest comfortably for both children and adults:
The feasibility of assembling bunk beds for children is determined by the small area of the room.
The need for additional sleeping places is ensured, taking into account individual sizes. Possibility of creating sleeping places for adults, below, and for children, on the second shelf.
Expansion of the living area for spending free time. Rational use makes it possible to save on the quantity and cost of furniture, as well as on cleaning the room.
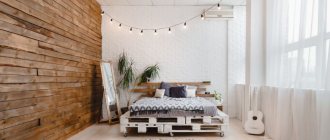
A unique look will help create a unique interior with a harmonious and cozy atmosphere, which is so important for a sleeping area and for a healthy, sound sleep. Stylish examples can be ordered from the catalog of finished products, or you can make a bunk bed with your own hands according to the provided drawings.
Using beds not only as a place to relax, but also for storing things and clothes, writing instruments. Some types can combine a desk, a folding desk, a built-in wardrobe, retractable drawers, and a small exercise machine.
Manufacturing and assembly process
Making a bunk bed with your own hands. Before assembling the product, the timber and boards must be kept indoors for several days so that the wood can acclimatize. This simple method prevents warping and drying out of the material.
You can cut the boards yourself, or you can order cutting to size at the place of purchase.
- The first step is to make the bed frames. To do this, a beam with a cross section of 5 * 10 mm is fastened in the form of a rectangle according to the size of the sunbed. The best fastening is using the tongue-and-groove method using wood glue, but this option is only possible if you have a milling tool. If this is not possible, the connection is made using metal corners.
- A spacer made of the same timber or board 10*2 cm is installed in the frame, having previously cut it to width. Depending on the expected load, there can be from 1 to 4 spacers.
- Sides are screwed to the frame: from a board with a section of 15*2 cm for the lower bed and 20*2 cm for the upper one. The screws are screwed in from the inside and make sure that they do not go right through the side.
- 4 racks for the frame are made. To do this, 2 bars with a cross section of 5 * 10 mm and a length equal to the height of the bed together with the second tier fence are fastened in two so that they form an L-shaped profile. In this case, the self-tapping screw is recessed into the wood, and the recesses are puttied and sanded with sandpaper.
- At the height of the first and second levels, holes are made in the finished supports for the mounting screw. The same holes are made in the frames of the sun loungers.
- It is recommended to fix the structure to the wall. To do this, the upper level is secured to the vertical risers with screws. Then the product is applied to the wall to mark the fixation points. At this stage, you cannot do without an assistant, since the fastening must be rigid. Holes are drilled in the wall at the level of the second tier, then corresponding holes are made in the bed itself so that it passes through the beam of the frame and the posts. The structure is pressed tightly against the wall and secured with screws.
If the bed is installed differently, then it will not be attached to the walls.
- The first level is mounted - for reliability, metal corners are used.
- At the second level, sides are made: boards measuring 20*2 cm are fixed to racks. The screws are screwed in from the inside and the holes are sealed using the method described above. In the area where they plan to install the stairs, the sides are not attached.
- For the stairs, two 4*6 cm beams are fixed to the frame of the beds - both upper and lower. Install the crossbars, securing them with self-tapping screws.
- A plywood sheet is placed on the frame - the bottom, or the slats are secured to the batten holders.
If necessary, the structure is sanded and covered with matte or shiny varnish. The edges are sealed with thermal tape or plastic edge.
How to make a wooden bunk bed with your own hands (video):
Features of the bed
Considering the obvious advantages, it is necessary to note the existing disadvantages, among which are:
Safety must come first. For a small child, there should be sides on the top shelf; on the bottom they will also protect against falling.
When choosing a bed design, carefully inspect the stairs. A simple, vertical one is suitable for older children.
For kids, it is better to choose an inclined option, with comfortable wide steps and handrails. The space under the steps can be used for spacious drawers for clothes, toys, and household items.
Pros and cons of bunk beds
Purchased products are expensive, and they do not take into account the characteristics of the room where they will be installed. Therefore, it makes sense to make a two-tier structure yourself, combine it with a study table or a cabinet for storing things, and provide drawers under the lower tier.
The main advantage of bunk beds is significant space saving in the apartment
The simplest summer cottage option can be made by any home craftsman who has a little knowledge of tools and has skills in working with wood. In a city apartment, such beds are most often installed in the nursery. This allows you to free up space for games and activities.
The disadvantage of the design is the increased risk of injury. If you decide to install such a structure in the nursery, take care of a reliable side on the second tier of the bed so that the child is safe. In any case, you should not put a baby under three years old to sleep on the second tier.
Children's two-story cribs
The sleeping area of a child's bed is determined by the standard dimensions of the mattresses. As a rule, it is 160x70 cm. There are transformable beds that provide for lengthening the sleeping area as the child grows.
You can make various options for a children's bed yourself:
- classic, for two children;
- a variation of the first option - for three or four children;
- a loft bed for one child, where the sleeping place is located at the top and there is a place for studying below;
- corner, when the upper and lower berths are located at an angle of 90 degrees to each other;
- with a retractable lower tier;
- folding
Unusual options for two-tier structures for a child in the photo
Classic bunk bed suitable for two children
A corner bunk bed with study space helps save space in the children's room
A transforming bed with a pull-out lower berth is an excellent solution for a small apartment. A bunk bed with a slide and a whole range of equipment will appeal to little athletes
A transformable bunk bed with a pull-out bed and a table provides the child with a full-fledged place to sleep and study. The loft bed is suitable for one child
A bunk bed in the shape of a house is a great place to sleep and play.
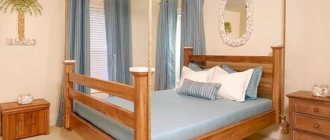
A combined bunk bed, decorated in a nautical style, will appeal to the young dreamer. A loft bed with a sofa on the lower tier provides a place for mother and child to sleep
An original bunk bed with curved supports and a wide lower berth will fit into any interior
Boys will love this car-shaped bunk bed
A folding bunk bed is a great option for saving space for games and activities.
A bunk bed with drawers, cabinets and shelves allows you to place a lot of necessary children's things
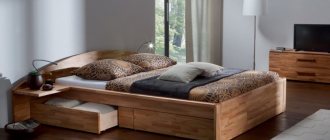
A wooden bed with different widths of sleeping places is designed for sleeping children of different ages
Two-level designs for adults
Bunk beds for adults are most often installed in barracks, camp sites and other places where it is necessary to accommodate a large number of people in a small area. A homemade design is a convenient option for a summer residence.
Do-it-yourself two-story bed for a summer house - video
In a one-room apartment, a combined model is useful: the top place is for children, the bottom is for adults. But there are many options for loft beds; they are suitable for adults and children. If necessary, you can even install a two-tier structure with two double beds. It will come in handy when accommodating guests.
Options for double beds for adults and combined models - gallery
If the height of the ceilings allows, the bed can be made into a three-tier bed. A combined version of a bunk bed with a narrower upper place allows you to accommodate an adult and a child. A bunk bed with two double beds is an excellent option for a large family. A metal double bed has increased strength. A folding loft bed saves space and does not get in the way. during the day you can install a sofa in the loft bed for greater comfort
The built-in loft bed is completely invisible and very cozy
A metal folding bunk bed is a stylish and comfortable interior detail. An original version of a combined bed for adults and two children with a treehouse style will appeal to the whole family
A classic wooden bunk bed for adults and children will appeal to all inhabitants of the house. The corner version of a loft bed with a sofa helps to accommodate many guests.
Types of multi-tiered furniture
A DIY children's bunk bed can be one of the following types:
A standard option for two identical beds, where there are bunks on the bottom and top according to the selected sizes. Experts advise: if your child is 6 years old or older, use adult bed dimensions, 90x190 cm, to make them. The ladder in this form is located on the side and is not removable. For greater stability, the structure is attached to the wall.
Model with a double bed below, which can be transformed into a sofa. The staircase is located on the side, which is not always convenient in order to save space. But due to the lower sofa, which comfortably accommodates several people during wakefulness, there is no need to purchase additional furniture.
Design with an extra bed and a side staircase with built-in drawers. The design provides a third lying place, which is hidden under the bottom of the lower bed and pulled out if necessary.
Savings on furniture occur due to spacious drawers; no additional chests of drawers or wardrobes are required. This model is very large, reliable, and stable.
Note!
Do-it-yourself screen: a step-by-step master class for creating it yourself. Types of screens, manufacturing materials + design ideasDo-it-yourself installation of interior doors - preparation of the structure, selection of doors, installation step by step + instructions from professionals
DIY shoe rack - types of designs, manufacturing materials, step-by-step master class with simple diagrams and drawings
Non-standard options when several people need to stay in one room. The upper bed is equipped for children's needs, the lower double bed is for parents. The design requires massive parts and fits organically into any interior.
Dimensional designs for large families, with a minimum number of seats designed for four people. The bed is located along the wall with a ladder in the middle.
Such a do-it-yourself bunk bed will require more raw material, additional fastening, and preliminary calculations for installation.
Combined attic structures. On the top floor there is a sleeping place with a side, vertical staircase; below, if necessary, there is a children's corner, a closet, a sports complex, a desk, a computer desk. To assemble bunk beds of the design you like, you can use drawings and diagrams from our website.
Constructions
There are many varieties of children's bunk beds. And it's not about the size, but about the designs. Let's start with the principles of construction:
- The basis of the structure is a frame made of timber, to which all other parts are attached: sides, railings. The bars must be higher than the level of the upper lounger by the height of the back or sides. To ensure safety, the height should be at least 40 cm from the top edge of the mattress.
The design is based on four vertical beams, to which all other parts are already attached. - They make two identical beds with thick posts and a strong frame. One is placed on top of the other and connected using dowels or pins. If the height of the legs and backrest is not enough, and the mattress of the upper tier is too low, the racks are further increased, not forgetting to strengthen the joints.
Two identical beds are placed on top of each other and fastened together - A workplace is arranged below, and a sleeping place above. Such 2-tier beds are also called “loft”. This option is for those whose children compete with each other. And two sleeping places on different floors will cause constant conflicts. Two such “kits” solve the problem. Read about the types of attic beds here, and in this article about how to make them yourself.
A two-story loft bed is a great solution for a small space or competitive children. - Corner arrangement of beds. When the bedrooms are not located one above the other, but against two adjacent walls. Then downstairs there is also the opportunity to organize a workplace or play space (playhouse).
Corner arrangement of berths - The sleeping places are located along one wall, but not above each other, but shifted. This option makes it possible to use the available space more efficiently - fill it from wall to wall.
2-story bed with offset sleeping places - Roll-out or pull-out two-story children's beds. This is a transformable furniture option. During the day, the lower berth is hidden under the upper one. With this construction, the height of the bed may be small. This is a solution for those who are afraid that children may fall from the second floor or stairs. Roll-out double-decker bed is safer for children
The choice of designs is great, but that's not all. Stairs add further variety. They can be ordinary, like on a wall bars, or in the form of steps or boxes stacked on top of each other. The most economical option is conventional: they require little material and take up little space. But you can put things in a ladder of drawers, like in a chest of drawers, which is also practical. And such steps are even more reliable: you can attach high railings to them to make them even safer.
Staircase option with drawers
Stairs made of rungs or steps can be located in front - along the long side of the beds. At the same time, they are sometimes made in the center, sometimes on the right or left. Another option is stairs from the end. They are also made vertical, and then they take up almost no space, and sometimes at an angle. It’s easier to climb on these, but it’s not always possible to place them: the space doesn’t allow it, and it’s easy to get caught on the protruding legs.
Read about how to design a children's room here.
Material selection
After selecting a suitable design, taking into account the number of beds and the location of the bed in a room with convenient access to the stairs, consumables, their quantity, quality are determined, and tools are prepared.
Types of bunk beds
The classification of bunk beds is quite wide. It includes the following categories:
Purpose
This refers to the age category of users for which the bed is made:
- Children.
- Teenagers.
- Adults.
Initially, bunk beds were intended for children, but it quickly turned out that both teenagers and adults willingly use such structures and highly value their originality and convenience.
Number of beds
At first glance, this position seems unnecessary, since there are usually two places - below and above. However, there are options with one seat located on the upper tier, while the lower tier is occupied by a desk, chest of drawers, wardrobe, sofa, etc. In this case, there is a great saving of space in the room, obtained by combining several pieces of furniture into a single unit.
In addition, there are options with three beds. Such designs combine a double bed at the bottom and a single bed at the top. That is, it turns out to be a two-story sleeping place for the whole family, which sometimes helps to cope with the lack of space in a small room.
There are also more multi-bed options, when on the upper tier there are several beds in two rows opposite each other. This option is good for large families, although it is difficult to call such a structure a bed, since it is precisely a structure that occupies the entire width and most of the height of the room.
Material of manufacture
The following materials can be used to create a bunk bed:
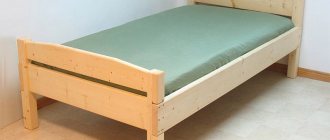
- Solid wood. This option was one of the first to appear. Mainly pine was used. Such beds were made in large quantities by various small carpentry workshops. These structures were also actively produced by home craftsmen who had the ability to machine wood. This is a good option, allowing you, if you have certain skills, to create very impressive products that are practically indistinguishable from factory samples. You should immediately take into account that beds made of solid pine are quite light and require fastening to the wall to prevent the possibility of tipping over.
- Metallic profile. Basically, a rectangular steel pipe is used. The appearance of such structures is distinguished by a certain lightness and airiness. At the same time, the strength of such a bed is very high (if all connections are made with high quality); in terms of reliability, this option is the leader among all alternative models.
- Laminated chipboard. The material appeared relatively recently, but has already firmly occupied its niche in the production cycle for the manufacture of inexpensive furniture. For the home craftsman, this option is attractive because all the components, edges and other parts are available for sale and are quite cheap. Making a bed comes down to cutting the material into parts of a certain shape, gluing the edges and joining in the required sequence. This material is also suitable for creating multifunctional structures.
- Plywood. To make a bed from plywood, you need strong, fairly thick plywood with outer layers of beech or birch veneer. The assembly and joining technique is similar to the manufacturing technology from laminated chipboard, but in this case it will also be necessary to finish the surfaces with varnish, stain or a solid color. The need for unnecessary operation is a disadvantage of the material, but the high strength, far superior to chipboard, makes this method quite reasonable and attractive.
- Combined materials. This option occurs quite often. Basically, a frame is assembled from durable parts (wooden blocks, metal pipes, etc.), after which the outside is covered with decorative materials (chipboard, wooden boards, plastic panels). The method is attractive because it combines a strong supporting structure with materials that are visually attractive, but unreliable in terms of strength.
Additional functions
The idea of combining a bunk bed with various pieces of furniture appeared almost immediately. There are options with built-in wardrobes, desks, and various pieces of furniture. In almost all cases, the whole set only benefits from such a combination. Various options are used, from the simplest in the form of drawers or roll-out drawers, to more complex ones. Thus, the desk, located on the lower tier, turns out to be placed in a separate compartment, separated from the rest of the room. This promotes concentration and eliminates various distractions. In addition, a bed and a sports corner (wall bars, other equipment) or a games room are often combined. For children, such a bed is always a great joy.
Note! All the possibilities that a bunk bed can provide, the types and manufacturing options of which are distinguished by a wide variety of styles and design solutions, go beyond the usual functions of a simple sleeping place. Thanks to the presence of additional elements, such structures become the central units of the room’s interior and determine the style of the entire furniture.
The most durable is metal
Metal products have the greatest strength and reliability.
Note!
Do-it-yourself sliding wardrobe - manufacturing manual with a full description of the stages, types of structures, choice of manufacturing materials (photo + video)Do-it-yourself carriage screed: step-by-step instructions for creating it yourself, diagrams and drawings for beginners, selection of materials and tools (photo + video)
DIY stool - types of stools, manufacturing materials, step-by-step master class with simple diagrams and drawings for beginners
A frame made of any type of metal profile, round, square, rectangular or flat, looks stylish, ensures structural reliability, withstands significant loads, is not subject to mechanical damage, is easy to wipe clean, and has a service life of several decades.
Compared to other materials, metal will be more expensive, but with welding skills you can save on the services of a welder.
Types of bunk beds: photos of interesting options
The option of a 2-story bed is selected depending on the purpose, age of the children and their personal preferences. A younger child usually sleeps on the bottom bunk, while his older brother or sister occupies the top bunk. The two-tier design can also be used for one child. In this case, the sleeping area is located at the top. Underneath there is space for games, activities, or a convenient storage system.
There are the following types of two-level beds:
- traditional model;
- bed with sofa;
- design with a retractable tier;
- loft type bed.
A traditional DIY wooden bunk bed is the simplest design that can be made by any craftsman with minimal woodworking skills. For this model you will need a small amount of component materials. This design can be prefabricated or solid. In the first case, the upper berth, when installed on the floor, turns into a regular bed.
The lower tier of a bunk bed can be converted into a sofa
The second type of bunk bed is represented by a design with a folding sofa in its lower part. This is a very comfortable and unusual model that allows you to organize a comfortable seating area and a place for receiving guests, which is done with the help of a soft backrest. In this case, you will not need to purchase additional chairs for the room.
Helpful advice! Same-sex children can sleep on the pull-out sofa, and older children can sleep on the top floor.
An attic bed is convenient for a small room. The design consists of a sleeping area, which is located on the upper tier, and a work area located under it. A pull-out desk, bedside tables and cabinets can be provided here. You can also leave the lower space free by arranging a play area there.
For a large family with four or more children, you can organize a two-tier set consisting of two or more identical sections. Despite the fact that such a design will require significantly more material, the sleeping places can be carefully placed along one of the walls of the room, thereby saving free space.
For large families, you can make a bunk bed with four sleeping places
Pull-out wooden bunk beds: photo examples
The design with a retractable tier can be presented in several versions. In a do-it-yourself extendable bunk bed made of chipboard, the tiers are securely fastened together. In such a transforming bed, the lower tier with a sleeping place extends forward, to the right or to the left. This design is made with a height of 60-80 cm. The product can be a traditional two-level model with a ladder, in which another berth is pulled out under the lower bed.
The roll-out model has separate sleeping places. The lower tier is not attached to the upper one, so it can be rolled out and installed anywhere in the room. The result is two separate beds.
The most functional option is a bed with drawers, which are located under the lower tier. This model is successfully implemented in roll-out designs. An interesting variation is a sliding double bed, in which the sleeping place is hidden in a niche during the day, and in the evening it is pulled out for further use.
A bunk bed with a pull-out third berth will help significantly save space.
There is the most compact option, when there are two pull-out berths under the upper bed. When unfolded, this design resembles steps. This model will significantly save useful space, which can be used for games during the day. In addition, the cost of this triple bed will be much lower than the total amount spent on the purchase of individual stationary options.
Helpful advice! For the lower tier, it is recommended to purchase a thick mattress to fully insulate the sleeping area.
The model with a podium from which the beds extend out looks original and unusual. The podium can become a specific area of the room where you can organize a place for games or study. It is recommended to place cabinets for toys, linen and other things at the base. However, it is advisable to install such a design in rooms with high ceilings.
Another newfangled option is a grow-out bed, in which the sleeping places can be transformed, increasing in length. This feature of the model is used as the child grows older.
Roll-out model allows you to install the lower tier anywhere in the room
Economical option
The use of MDF, furniture panels, chipboards for furniture assembly simplifies the work and makes it more cost-effective. It is enough to cut out the necessary parts from the sheet and connect them together. Cutting into parts can be ordered in construction stores and construction markets.
Multi-storey structures involve the use of additional materials, metal, wood to impart stability, ensure reliability and strength.
Furniture panels are mainly intended for covering the finished frame. What is the advantage of mastering such material, its ready-made appearance, wide range of “wood-like” colors. It is already covered with a smooth, laminated sheet with a water-repellent surface and does not require additional impregnation.
The disadvantages of operation include the release of the adhesive composition used in the production of shields. To reduce the effect, all edges are securely insulated.
How to assemble a retractable model
A pull-out bed is the most convenient and safe for a child's room. The height of the upper berth is slightly more than 70 cm. During the day, the lower tier moves in, creating additional space for children to play and do activities. At night you will have an extra bed. A distinctive feature of the model is that the beds are not connected to each other, they can be used separately.
A pull-out bunk bed takes up little space, freeing up space for your child’s games and activities.
Making such a bed is not difficult. All parts are made from chipboard or laminated chipboard furniture.
- Make the base of the bed from a solid board 18 mm thick, which is attached to the sides using minifix and two dowels on each side.
- Additionally, strengthen the structure with a metal corner in the head and legs from the bottom, and on the sides - from the top.
- Also attach the sides to the bottom with four minifixes and three dowels each. Connect them to the side walls with a wide head bolt.
- Attach four wheels to the side walls of the lower part. Cut radius grooves under them and place metal plates on top.
A pull-out bed has many advantages: space saving, ease of manufacture and additional sleeping space. The only drawback of the design is the lack of a drawer for storing bedding.
Self-assembly of furniture
Recently, more and more often furniture is made to order or craftsmen assemble the structures with their own hands. This is due to a more precise fit “in place”, taking into account the individual characteristics of the child, his leisure time, and hobbies.
Making it yourself will cost less and you will be confident in the reliability and strength of the design; if necessary, you can always add or replace individual parts.
Experts advise you to carefully read the instructions before work, adhere to safety rules, and do not skip important manufacturing stages.
Assembling a bed from a metal rectangular pipe
To assemble such a bed you will need a welding machine. In addition, to create smooth bends you will need a special template and a gas burner to preheat the material.
Assembly begins with the backs. The rack blanks are cut to the required length, the length of the crossbars is 70 cm minus double the thickness of the pipe. Both backs are welded, then proceed to attaching the longitudinal strips. If you don’t want to bother with bolted connections, which are more difficult to make on metal than on wood, then you can simply connect all the parts for welding. This will make it impossible to disassemble the structure if necessary, but will significantly speed up the work and simplify the task.
If you cannot refuse the opportunity to disassemble the structure, then you need to drill holes in the backs along the axes of the longitudinal strips, with a diameter equal to the outer size of the bolt threads (long furniture bolts M8 or M10 are used). The ends of the longitudinal strips are welded tightly, holes are drilled in them and the corresponding thread is cut. As an option, nuts are welded inside the pipe, or connecting holes are made on welded areas.
A bed assembled in this way is in no way inferior in strength to an all-welded structure.
The beds are attached in a similar way, by welding or bolted connections. It is noteworthy that the creation of such a product in an ordinary apartment is unlikely; a workshop or some kind of production base is needed here. Moreover, after assembling the bed, it will need to be painted, which is done using a spray gun or by airless spraying in several thin layers. The best option for making such a structure with your own hands would be a workshop (garage) of a private house or cottage.
In some cases, instead of a rectangular pipe, a regular, round pipe is used.
This complicates the process somewhat, since welding requires a good fit of the surfaces being joined, but in general, the process is the same. Externally, a bed made of a round pipe looks no worse; for some, this option may be more preferable.
Consumables
Required tools and materials:
- Solid wood;
- A set of power tools for woodworking: saw, jigsaw, drill;
- Brushes for material processing, painting, impregnation;
- Paint, impregnation. You can use combined mixtures that include varnish and toner or impregnation and color;
- Set of connecting and fastening parts;
- Varnish.
Detailed master class on manufacturing
Step 1: Determining the bed design. Calculation of consumables. Sleeping place 190x90 cm. You can independently adjust the dimensions of the structure with the transfer of changing the size of the necessary parts. Construction of a drawing (you can download ready-made diagrams from the Internet with attached cutting and dimensions).
Step 2. Processing, drying, impregnation of wood. The material must be dry to avoid deformation later.
Step 3. Cut into parts. For assembly you will need 4 longitudinal posts, staircase parts with transverse footrests, boards for a berth with holes for ventilation - 2 pieces, fencing sides made of timber - at least 5 pieces (for double boards or decorative decorations, parts are added locally, based on their drawing designs).
Step 4. Assembling the structure. It is better to connect the parts of the bed in the room where it will stand, so as not to run into the problem of a large product drifting with its significant weight.
Step 5. Finishing. Painting, varnishing. Experts recommend applying several layers, allowing each layer to dry thoroughly.
Known examples
The results of searching for options for making a bunk bed yourself on the Internet give, I must say, a completely positive result - as for children's beds. The user will find clear instructions, with drawings and material sheets, on how to make this very bed. However, taking a closer look, you can understand that these are not the simplest, cheapest and most reliable options.
For example, in Fig. drawings and diagram of the bed assembly, described in detail on the Furniture Circle website. It is quite suitable for its intended use. But let's take a closer look at the positions highlighted in red:
One of the options for making a children's bunk bed
To assemble the bed (mattress pad, lounger, item 3), you need to make 12 mortise connections. Not to mention the fact that this is not so simple, a stock frame made of 50x50 timber with so many mortises will not be very strong. If your loved ones start a pillow fight on the bed, it may break. But it’s difficult to fix, because... the beds are integrally included in the power circuit of the bed. Therefore, the assembly of the product (item 5) is complicated: the beds are first made without platforms (tires), the bed is assembled with bolts, and only then the platforms are mounted. The bolt nuts are tightly closed; If they get loose, you won’t be able to tighten them up. But they can get loose, because... the stocks hang on bolts, creating significant concentrated loads on the tree. Conclusion: This bed will only allow its occupants to grow into adults if it is made from high-quality (and expensive) hardwood. Structurally and technologically unnecessarily complex.
Construction of a bunk children's bed made of soft wood
An option for a bunk children's bed, which can be made from pine or spruce (see figure on the right), is also described in sufficient detail, even on several sites. The first thing that catches your eye is the high consumption of materials and labor for marking and sawing parts. The strength of a bunk bed made of soft wood can be ensured in a simpler way, see below.
Secondly, the wood for this bed is suitable, although soft, but of high quality, without knots, twists, cross-layers, i.e. not cheap either. The reason is the lamellar stocks, which is why the corners had to be additionally strengthened, because the lamellas in the main power circuit do not work. Knots and other wood defects, suddenly they end up in load-bearing parts, become centers of concentration (foci) of loads, and the bed will not last long. A mattress laid on slats is, of course, more comfortable, but both doctors and psychologists clearly say: it is not good for children to sleep on something that is too soft. A child's bed should be a little hard. Lastly, this bed requires a lot of hardware that is visible from the outside.
But don't worry: It's still possible to make a durable bunk bed from whatever wood you have on hand. A detailed video in 3 parts, how a man did and did, and still made a good bunk bed from knotty pine, see below:
Video: example of making a wooden bunk bed
And we will then look at why this works or does not work.