How does the layout affect the interior?
- perception of the coating as a whole - the selected layout option must correspond to the purchased material and look aesthetically attractive after installation;
- creating a creative interior - you don’t have to buy a batch of tiles of the same color and size. You can experiment, try to arrange it in several different ways, and then choose the most interesting one;
- material consumption - all tile laying options require different numbers of products per 1 m2. For example, the classic layout is the most economical, while the unusual layout requires the purchase of more tiles. Also, if your choice fell on non-traditional layouts, be prepared for the fact that you will have to additionally process the materials and, possibly, purchase auxiliary parts;
- visual effects - with the help of the correct selection of ceramics and the method of laying it, you can enlarge the room or raise the ceiling.
- classical;
- diagonal;
- with offset;
- Christmas tree
Basic technology with diagonal laying
There are not only direct methods of laying floor tiles, but also diagonal ones, in which the material is laid at an angle to the walls. In this case, the square looks like a regular rhombus, which makes the appearance of the coating more original.
In this case, it is also advisable to choose tiles without a pattern with uniform toning.
However, all diagonal options for laying floor tiles have a number of disadvantages:
Options
What are the most popular layouts of tile and ceramic materials in the bathroom on the floor and walls today:
Standard without offset
This is the most popular layout plan. In Soviet times, all bathrooms in new buildings were decorated this way, so for many this layout causes instinctive visual rejection. Her example in that version can still be seen to this day in the apartments of elderly people. However, if it is done using large tiles, then the standard layout without offset looks quite stylish and original.
Diamond laying
Or diagonal. Also a very common layout option. Peculiarities:
- Creates a very interesting visual effect and looks stylish. With its help, the most original and stylish designs are obtained. Gives depth to the room and sharpness to the design.
- This is a rather labor-intensive option, so only an experienced master finisher can carry out such a layout. Requires careful calculations and careful cutting of material. Labor costs are comparable to laying mosaics.
Wall panel
Features and rules:
- This layout design makes the room lower while expanding it. You should carefully study the floor plan.
- The floor can either coincide with the walls or be completely contrasting with them. Each design is interesting in its own way.
- In some variations you can see a combination of light bottom and dark top. However, this layout of tiles in the bathroom lowers the ceiling level, so it is suitable for narrow and high rooms. But in most of our standard apartments, small and not too high bathrooms are still more common.
- The border on the walls of the bathroom can be made either as a narrow strip or as a fairly wide independent section, tiled in several rows. In addition, there may well be several of these strips, especially if they are narrow. Just don’t forget that each of them will make the room a little lower.
With border
In this layout option, the tiles that are laid on the floor continue on the wall. But not completely on the entire wall, but 2-3 rows above the floor. Higher up, it is advisable to make tiles of a different shade, most often lighter. This layout plan will make the room design lower and wider.
Fragments with an accent
Adviсe:
If you decide to choose such a bathroom tile layout project, you should know that you do not need to focus on more than 2-3 areas of the bathroom. An ideal example of a layout where accents are made in the area of the washbasin, heated towel rail and shower. Or in another similar version. If you do not want to increase the height of the ceiling, then the accent area should not start directly from the floor, but it is better to do it at some distance
In this case, there is also no need to bring the accent to the ceiling. You can make accents using mosaics. This layout plan does not apply to the floor. Accents made on the floor look ridiculous and inappropriate.
Or in another similar version. If you do not want to increase the height of the ceiling, then the accent area should not start directly from the floor, but it is better to do it at some distance. In this case, there is also no need to bring the accent to the ceiling. You can make accents using mosaics. This layout plan does not apply to the floor. Accents made on the floor look ridiculous and inappropriate.
Equality of colors
In this case, they take several colors - contrasting or similar, usually 2-3 shades - and decorate the bathroom walls with them. In this case, the colors should not be mixed. One wall is laid out in one color, the second in another, etc. You definitely need to choose a harmonious combination of colors. Peculiarities:
- This way you can visually clearly separate the functional areas in the bathroom. For example, highlight the area near the washbasin in red, and use black tiles to decorate the area near the shower. The layout can be both horizontal and vertical.
- In this case, the floors are finished with tiles of the same colors, but they can be mixed. For example, it would be great to use a checkerboard layout for the floor.
- This design does not look good in a small bathroom, as it will visually make the room narrow and small.
Laying tiles and porcelain tiles general recommendations
The most important stage of floor finishing is the installation of tiles. We will not consider a step-by-step guide, but we will remember the basic subtleties of laying tiles.
- First of all, you need to choose a laying scheme. This will help calculate the amount of materials needed (tiles, adhesive mixture, etc.).
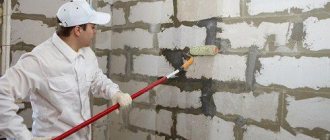
- The final result of the work will depend on the quality of preparation of the base. The smoother the surface, the more beautiful the tile looks, and the longer it will last.
- Materials must be purchased with a reserve, in case of battle or incorrect calculations.
- Buy only high-quality materials. Otherwise, this may affect the performance characteristics and appearance of the tiles. Cheap materials, even in the same package, can often differ in shade and size, which affects the visual characteristics of the material.
The traditional way of laying tiles on the wall and floor
This option for laying ceramic tiles on the wall and floor is considered the most common and simplest. In this case, it is assumed that the tiles will be installed parallel to the walls with the rows fitting as closely as possible to each other. In this case, the laying of tiles or porcelain stoneware on the floor should be as even as possible.
Traditional way of laying tiles
Laying tiles on the floor in the traditional way involves using a product in the form of a square or rectangle.
Decorating a room with the traditional method of laying tiles
Distinctive features of traditional styling
Traditional installation of ceramic products on the floor and wall can become impressive and unique if you use different colors. Although this option is considered simple, it is also recommended to know some tricks:
- Before laying, carefully examine the tiles for manufacturing defects. To do this, lay it out on the floor. And if everything is fine, then it can be used at work. Even the slightest unevenness and roughness are very noticeable;
- If you use a traditional layout of porcelain stoneware or tiles, then be prepared for some monotony in the design. After all, the tile itself is not very decorative. To add color and color, it is better to use additional bright decorative elements in interior design;
A little paint and color in decorating the floor in the traditional way
This method is optimal for seamless tiles.
What are the options for laying tiles on the floor - the difference in methods with examples of implementation
To implement any design ideas and personal preferences of consumers, the building materials market offers a huge selection of ceramic tiles of various shapes, colors, sizes, textures, as well as those that are excellent for their intended purpose.
Consequently, there are several methods for laying tiles. They are designed both to achieve purely practical goals and to achieve an aesthetic appearance. We will tell you in our article what options there are for laying tiles on the floor, as well as in what cases it is advisable to use one or another technique.
Types of layouts
There are many types of laying tiles on the floor and walls of the bathroom, from the simplest to the incredibly complex. Each option has its own advantages and features. Let's look at the most popular types of tile laying.
Straight
The simplest and most popular option for laying tiles in the bathroom. The tiles are located strictly parallel to the floor and walls, side by side. For such a layout, a simple rectangular or square shape is suitable.
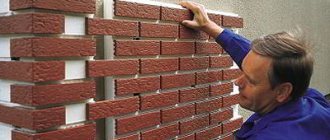
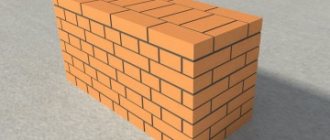
Running
Otherwise, such a design is called brick or stone masonry. In order for such decor to look harmonious, it is worth choosing the right proportions of the tiles. The ideal ratio of width to length is 1 to 2. How beautifully you can lay out tiles in the bathroom, imitating brickwork, is shown in the photo below.
Diagonal
One of the most difficult methods of laying tiles in the bathroom, requiring experience. When choosing such masonry, it is necessary to take into account that due to the constant cutting of tiles, the material consumption will be much greater compared to other options. However, the effort and money spent will be worth it, since diagonal laying of tiles is also one of the most impressive.
Despite its effectiveness, diagonal design is not suitable for every bathroom. If the area is small, it is better to use simpler options, since the diagonal will only make all the shortcomings of the room visible. It is better to choose a similar layout for a spacious room, but you should pay attention to the curvature of the walls - they should be perfectly smooth without deviations from the perpendicular axis. You can see in the photo how to use tiles laid diagonally in bathroom design.
Modular
An eye-catching choice for bathroom design. In this case, tiles of different sizes are used; they can be laid out in any combination, which gives room for imagination. There are a lot of options for combining different tiles in the bathroom; the most interesting ones can be found in the photo.
Horizontal
Clear lines can significantly change the proportions of a room. The horizontal layout of the tiles most often consists of a dark bottom combined with a light top. There may also be an option with several horizontal stripes of different colors. With this design, plain tiles are most often used.
If you choose a finish with patterns, it is better to separate parts of the masonry with a plain border. To make the design more harmonious, the border is used not only at the bottom of the walls, but also under the ceiling. You can see what the horizontal tile layout in the bathroom will look like in the photo below.
Vertical
With a vertical tile layout in the bathroom, brighter stripes clearly stand out against a plain background. The width of the stripes can be different, the same or alternate. However, it is worth considering that too many stripes look too bright and are not suitable for decorating all the walls of the bathroom. In this way, it is better to highlight only one wall, a separate area or niche.
Vertical stripes visually stretch the room upward, while at the same time narrowing it slightly. This looks good on long longitudinal walls, but not on the ends in narrow rooms. Using stripes, you can highlight different areas of the bathroom, if it is combined with a toilet, as well as the most significant design elements.
Mosaic layout
The combination of regular tiles and mosaics in the bathroom looks very impressive. A real mosaic is more difficult to install, since it requires laying out hundreds of small elements exactly according to the diagram, without ever making a mistake.
However, there are simpler options - ready-made mosaics on a grid or imitation. Mosaics can be used in different ways:
- Wall decor. The mosaic pattern can be made in one color or with a full pattern. The choice of ornaments, colors or subject of images depends on the style of the interior and the personal wishes of the household.
- Flooring. If the bathroom is small, colorful mosaics on the walls may look too bright, but similar decor on the floor will look good even in a small area.
- Zoning of space. Using mosaics, you can divide the bathroom into zones. This type of finish is especially popular in the shower area or on the wall along the bathtub.
- To attract attention. Mosaics can be used to highlight specific details, such as a sink or bath towel hooks.
- Decoration. Mosaic does not have to occupy the entire bathroom; it can be a border, individual stripes or patterns.
- Hard to reach places. The tiny details of the mosaic allow it to be used for finishing the most complex surfaces.
How beautifully to combine tiles with mosaics in the bathroom can be seen in the photo.
Tile layout examples
In addition to the layout examples given above, there are options for laying tiles that can be considered classics; others, on the contrary, have appeared quite recently and, although they often go against many recommendations, they look very good.
Choosing a way to lay out tiles in the bathroom is not easy
Darker bottom
This technique is a classic: the lower third of the wall is made of a darker color, the upper third is made several tones lighter. This method of laying out ceramic tiles, to put it mildly, is not at the peak of popularity. It was popular about a decade ago. But there are several techniques that give the classics a modern twist.
With this method of laying tiles, the room seems spacious, since most of the walls are decorated in light shades. In this case, the tiles for the floor are chosen in the same color as the tiles on the bottom of the wall. If you can’t find exactly the same one, look for something very similar in texture and color. In its “pure” form, this method of laying tiles does not look very modern.
Dark colored panels at the bottom of the wall
To make this bathroom tile installation look more modern, you can add vertical or horizontal stripes to break up the monotony. Many collections offer not only darker and lighter tile options, but also decor of different sizes, from which strips of different widths are formed.
Vertical stripes can be added to horizontal stripes
More often, not two, but three types of tiles are combined: two plain ones and a decor that combines both primary colors. Decorative elements can be of different widths. Then you can make strips or columns of different widths from them. To prevent the upper part from being so monotonous and boring, add thin stripes of the same color as the lower part of the wall, and add a plant or flower border at the bottom.
Combination of tiles in the bathroom of different colors and textures
Most factories produce collections that contain two basic tile colors - darker and lighter - and a set of decorative elements. Such collections are usually not cheap, but it is easier to create a competent composition from them, and they are the right size, so there will be no problems with styling and fitting.
Accent wall
If dividing the walls by height does not appeal to you, but the monochromatic design makes you despondent, you can consider the option of an accent wall. Most often, it is decorated with tiles of the same color, but of a different shade - several tones lighter or darker than the main one.
Dark accent wall in a light bathroom
In this case, more than one wall is decorated with brown tiles, but it also extends onto part of the adjacent one. This technique is suitable for narrow, long rooms - it visually makes the room more like a square.
An accent wall does not have to be decorated with tiles of the same size. One wall decorated with mosaics or small tiles looks great.
For variety, you can use a mosaic
The mosaic looks great either on its own or in combination with tiles of different formats - square, rectangular, large and medium-sized. It is used when finishing curved surfaces - thanks to its structure, it fits even columns of a small radius.
Floral motifs
Recent design trends have resulted in most bathroom tiles being made in a single color. Many collections have an interesting texture, but are made in the form of monochromatic fragments. Not everyone likes this design - the interior turns out to be too “cold”. You can add a touch of fantasy using tiles with flowers or butterflies, floral or geometric motifs.
Add some decor with flowers, butterflies or other floral patterns
But you need to be careful with this type of decor: it’s too easy to “overdo it,” especially in a small volume. But even a few isolated fragments don’t look good either. So, it is advisable to work with floral decor in programs that provide a three-dimensional picture - it will be easier to imagine what you will actually get.
Diagonal pattern
The basic method of laying ceramic tiles is considered the main one for any subsequent ornament, one of which is diagonal. It is one of the most complex, but very beautiful and original methods of laying ceramics.
The peculiarity of this ornament is that its pattern is turned over at an angle of 45 degrees to the wall. It is recommended to use square-shaped tiles, preferably plain ones. The difficulty is that every piece of ceramic that is adjacent to the walls is trimmed. And this significantly increases the time required to complete construction work and a lot of waste is generated.
On the other hand, using this method of laying tiles, you can effectively hide any unevenness in the floor and visually significantly expand the space of the room. The most successful use of the diagonal method is in the kitchen and in the hallway of the apartment (house). And for the bathroom this is an ideal option.
Layout of tiles diagonally from the center.
In this case, it is very important to correctly calculate the materials, especially if a checkerboard layout pattern will be used in the future. Installation recommendations are identical for both floor surfaces and walls
The installation recommendations are identical for both the floor surface and the walls.
Before you begin directly laying tiles, you need to prepare the floor surface. So, you need to thoroughly clean the base of the floor from the remnants of the previous covering material. It can be linoleum, bitumen or wooden elements. Regarding weak and particularly absorbent areas, it is also necessary to pre-prime the surface. After all, a flat floor surface helps simplify construction work on laying ceramics and significantly saves special tile adhesive. If the floor renovation will be carried out in the bathroom, it is additionally recommended to waterproof the base.
Getting started with diagonal laying does not require much effort. After all, the tiles are laid in a direct way using rectangular ceramic elements whose length is equal to the diagonal of the square ceramic tiles. The latter are the main ones in the construction process.
Then, using previously prepared tiles in the shape of a triangle, the second row is laid along the hypotenuse. As for the subsequent rows, it is recommended to lay them according to the following patterns:
- Using the horizontal row method, the upper and lower corners must be positioned in a straight vertical line. Whereas on a straight horizontal there will be lateral angles.
- The inclined row is considered a very complex method of laying “diagonally”. After all, only a specialist can produce it; a beginner cannot do it.
Areas of use
In any Provence style interior there is plenty of space to use ceramics. Ceramic tiles and porcelain stoneware can serve not only as utilitarian wall and floor coverings, but also as unique decor. Tiles can be a real work of art! Let's consider several options for its use.
Kitchen
Kitchen tiles in the Provence style are a very popular search object. The lightness and comfort of the French provincial style with its warm and unobtrusive colors is perfect for decorating a kitchen interior. You can use tiles in the kitchen interior to decorate the apron, floor and even all walls. Small tiles with ornaments are perfect for a kitchen backsplash. Floor tiles in soft shades with decorative abrasions will be combined with a Provençal kitchen set. Kitchen interior design provides many opportunities to create the atmosphere of Provence!
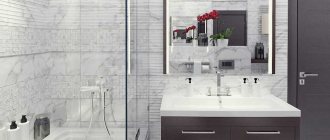
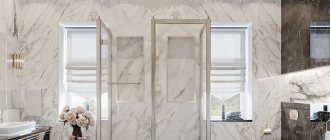
Bathroom
Bathroom tiles in Provence style can recreate the atmosphere with their pattern or shape. For example, you can use tiles or mosaics in the form of bricks. To decorate the walls in the bathroom, you can use a tricky move - cover only half of the wall with tiles, limiting it to a decorative border and continuing the decoration with paint or plaster. This decision requires careful selection of materials, but the result will fully pay off the efforts. For a bathroom in the Provence style, wall tiles with convex decor - relief patterns or classic baroque elements - are suitable. You can also decorate the walls with decorative tiles with a pattern or panel. You can lay tiles with ornaments on the floor - the main thing is that it is matte so as not to slip!
Living room
The tiles can also be used in residential areas. This may seem like a strange decision at first, but choosing the right tile design can yield great results! Porcelain tiles are great for installing heated floors. This feature of the material will create a warm and cozy room with a unique atmosphere.
On the wall
The difference between porcelain tiles and ceramic tiles is that the former is considered a flooring material, while ceramics, with some exceptions, are usually installed on walls. However, if the height of the walls does not exceed three meters, then porcelain stoneware can also be used for its cladding.
The peculiarity of wall tiles is that they are thinner and lighter. It is much easier to cut than porcelain stoneware. Another difference is the wider possibilities of decorations. The position of the wall material allows you to decorate it with three-dimensional elements, relief, golden inserts, sparkles and unusual patterns. On the market you can find many collections in light colors, perfect for a Provence style interior.
On the floor
Ceramic tiles in the Provence style can also be used for floors. Decorative patterns and abrasions perfectly convey the atmosphere of provincial France. Some types of ceramic tiles can be laid on the floor - you should contact the catalog or managers for more information. However, it is still not suitable for installation outdoors. Open-air areas can only be covered with porcelain stoneware, since, unlike ceramics, it is frost-resistant.
How to choose the optimal layout
Before choosing a tile, it is worth drawing a sketch by hand to decide on the type of cladding. To do this, you need to draw a detailed plan of the room with all dimensions and furnishings:
- carefully take measurements of the floor and walls, openings, and indicate the parameters on paper;
- draw up a drawing of the bathroom and be sure to show the location of the doorway, window (if any), all niches and ledges;
- indicate the location of plumbing fixtures, sockets, switches, and pipeline outlets.
Now that the plan is ready, you can choose the optimal layout scheme using sketches with colored pencils. Such a sketch will help determine the best location of decorative elements, places to cut tiles, and problem areas. Be sure to consider the degree of complexity of the work if you plan to do the cladding yourself.
Tile layout options may depend on the geometry of the walls and the presence of protrusions
Correct layout of tiles in the bathroom
Repair of ceramic floor tiles
Under the influence of fluctuations in temperatures, loads and time, sooner or later repairs will be required. Let's look at common problems and options for solving them.
Repairing minor chips and scratches
You can easily fix such minor defects with your own hands. It is enough to take grout for the joints that matches the color. Dilute it with water to the consistency of thick sour cream and apply it to the surface of the ceramic tile with a rubber spatula (or just by hand).
Repair with replacement of one element
If one or more adjacent tiles are cracked or falling apart, repairs must be made to completely replace these areas. The most difficult thing is to remove the broken elements without touching the whole ones. There is a way to do this neatly:
- First of all, take care of yourself - put on safety glasses, a helmet or at least a cap, and take care of your hands and feet.
- Cover adjacent elements and joints with adhesive tape or masking tape to prevent damage to their surface.
- Using a grinder, make cuts along all four sides of the damaged tile. The cut should go as deep as possible so that our manipulations do not affect the adjacent plates.
- Drill several holes with a drill (without perforation mode).
- Using a chisel, pressing against the drilled holes, break the plate into pieces.
- Clean the surface of old tile adhesive. Apply a layer of deep penetration primer. Using a notched trowel, apply a layer of adhesive to the floor (or tiles).
- Lay the tiles. Use a building level to ensure the new element lies level.
- Let the glue dry completely, then use grout to go over the seams.
The video shows how to replace one tile on the floor (~ 3 minutes video)
Reasons for tile deformation
In any case, no matter what kind of repair you carry out, the most important thing is to understand the causes of such defects and try to correct the cause itself, and not deal with the consequences every time. If defects, and usually this is cracking of elements, occur due to temperature changes and, as a result, movement of the base structure, it is necessary to consider the possibility of thermal insulation of the floor. If the causes of defects are related to humidity, it is necessary to take care of waterproofing or selecting materials with the highest level (lower percentage) of water absorption.
These days they make floor tiles of amazing quality, so if you frequently repair tiles, you may have selected the specifications incorrectly. Contact your building materials supplier or find a new one.
Laying
Much attention is also paid to the mixture for laying flooring. It should be homogeneous
A mixture that is too thick or thin will not work. If during the work the master breaks the tile and it is impossible to buy a replacement in the store, then the professionals have a proven technique for this. You need to crumble the old tiles and lay them out in the form of a mosaic.
You need to know that whole tiles are laid first. And only at the very end the missing halves are assembled. The trimmings begin to be laid out after the main laying fabric has dried. Then sheets of plywood are placed on the finished part of the floor and the missing parts begin to be laid out.
Excess mixture that comes out should be removed with a cotton cloth. If it is not possible to completely remove it right away, then after finishing the work all excess must be removed. Special chemicals or ordinary water and rags will help with this.
Offset brickwork
To add variety to the interior, some owners use a scheme that replicates the brickwork of the walls. It got its name because the elements of each next row are shifted relative to the previous one.
The amount of displacement can be different, by half a tile, by a third or even by a quarter. The latter is called “deck” due to its similarity to the covering of ship decks. The choice depends on the taste of the apartment owners.
Note that this type of installation is suitable for rectangular tiles. With its help you can create a beautiful “parquet” tile pattern. It is especially good if the ceramic surface imitates natural wood.
Stylists do not recommend using tiles of 2 contrasting colors in this method.
Note that offset installation can be done either with a parallel installation method or with a diagonal installation method.
In order for the floor surface in a kitchen with this type of coating to be smooth, the master must strictly maintain the same distance between the masonry elements.
Methods for laying ceramics “carpet” and “rosette”
Scheme for laying carpet tiles.
This layout method does not require any special skills. It can reflect how well developed the imagination of the owner of the room is. The peculiarities of this method are that it is necessary to perform tying. It can be created from tiles, the color of which will contrast with the main color of the floor. You will need to make a central part, which may contain locks, flowers, as well as a pattern of various shapes. Carpets look good in the hall and fireplace area. They can also mark the place of the kitchen table.
Using rosettes you can create a festive mood. For this method, you will need to purchase a square-shaped facing material. It is recommended to post it in the usual way. The peculiarity of this method is that among the plain surface of the floor, in a place that is not crowded with furniture, there should be a pattern. Today you don’t need to come up with a decorative element yourself, because manufacturers have made ready-made sockets from which you can choose the one you like. In most cases, these are prefabricated images, that is, the design is applied to several separate tiles.
Methods for laying one-dimensional tiles
At the moment, the following options for laying out tiles on the floor are most in demand:
- Base;
- Basic at an angle;
- Chess;
- Checkered at an angle;
- Take a running start;
- Take a run at an angle;
- Lines and geometric shapes;
- Kaleidoscope;
- Carpet;
- Sockets;
- Combining drawings.
Criteria determining the choice
Modern options for laying out tiles on the floor are determined by various factors, among which we note:
- Geometric complexity of the room;
- Assortment of facing materials on the market;
- Aesthetic preferences of the customer;
- Project budget;
- Qualification of the craftsmen involved in installation.
Choosing the optimal layout type
- The basic type of installation has become widespread due to its simplicity and versatility. The fact is that such technology is equally in demand both in the arrangement of residential premises and in the finishing of public buildings.
The photo shows the basic layout
You can find tiles laid in even rows close to each other in commercial centers, offices, waiting rooms at airports and train stations, and in other places with high traffic levels. The advantage of the technology is the short installation time and guaranteed aesthetic result.
- The basic layout of porcelain tiles on the floor, made at an angle, is an opportunity to quickly and easily diversify the interior of a room. In this case, the tiles are also laid in rows close to each other, but diagonally.
As a result, a properly laid flooring consists of evenly spaced, equilateral diamonds.
Basic angled position
- The chessboard laying method can be done with your own hands, but it is considered more difficult to implement. Most often, for this method, contrasting tiles are selected in order to highlight the checkerboard pattern as much as possible.
Chess method
But, according to experts, there is no particular need to purchase contrasting tiles, since products with a difference of one or two tones can be successfully used to create a checkerboard pattern. To implement the most attractive floor design, it is advisable to use tiles without a pattern. If there is still a pattern, we position the tile so that the image is in the same direction.
- Checkerboard laying at an angle is performed like regular tile installation, but in a diagonal direction.
- The installation is carried out approximately in the same way as finishing brickwork. The point is that each subsequent tile is laid with some offset relative to the previous one.
Installation in a running motion
The optimal aesthetic result in this case is possible by using rectangular porcelain tiles with a wood texture. As a result, a properly tiled floor will resemble parquet.
This installation technology requires special care, since the expansion joint should be minimal so as not to spoil the aesthetics of the parquet board. One way or another, this technique suggests the advisability of installing rectangular rather than square tiles.
- Porcelain tiles are laid at an angle at an angle by craftsmen with a high level of qualification, since the facing material is not located parallel to the walls, but at an angle of 45 degrees.
Installation at an angle
By the way, the use of this method is relevant in rooms with perfectly smooth walls.
According to experts, tiles laid at an angle emphasize the unevenness of the walls and this must be taken into account when choosing the optimal method
- The herringbone pattern imitates classic parquet. Of course, to achieve the desired result it is necessary to use rectangular tiles.
Herringbone tiles
Laying the material “staggered”
The method of laying tiles “in a run”.
Often today, tiles are laid using the brick laying method - “staggered”. If you want to emphasize authenticity, you should use this display method.
The peculiarity of this pattern is that the brickwork for the floor can look good in the kitchen or in the hallway. The drawing that results from the layout can give the room originality. In this case, the tile should be positioned so that its middle is above the seam that separates the material in the bottom row. Laying tiles staggered can only be done in rows horizontally.
The technology for laying tiles on the floor is carried out in almost the same way as laying them using the basic method. The only difference is that in this case it will be necessary to maintain the thickness of the seams so that there is no gap from edge to edge of the surface.
Scheme of the order of laying tiles “in a run”.
The features of this method depend on the option chosen for surface cladding. During the laying process you will need to use a mooring cord. You should approach installation wisely if you plan to use mastic. The base of the floor will need to be leveled, because in the future it will not be possible to level the tiles, and therefore all the work that has been done will go down the drain.
Before tiling the floor, beacon slabs should be laid in the corners to determine the level of the floor surface. The screed is moistened with water, after which the tiles are laid in rows strictly along the beacons. Next, the surface should be leveled using a hammer. Upon completion of the work, the beacons will need to be removed. After 2-3 days, the seams should be filled with cement or liquid mortar.
The most popular installation methods
There are several most popular ways of laying tiles on the floor. Let's talk about them in more detail.
Basic drawing
The basic ornament has existed in our country for a very long time. At one time, they designed standard bathrooms, for the decoration of which square tiles were used. Modern experts recommend using large tiles to complete the basic design (an exception may be aprons in the kitchen). The basic version is ideal for laying rectified tiles without gaps.
Basic at an angle
This drawing is somewhat more interesting than the basic one. But to get started, you will need an inexpensive tile cutter, since to create the original pattern, the tiles will have to be cut very carefully. The basic ornament at an angle hides curvature and surface defects and is perfect for installation in the kitchen and bathroom.
Laying out in a run
The method is usually used to cover the surface with rectangular tiles and is an imitation of the laying of ancient sidewalks and pavements. The running method is used by specialists when there is a need to emphasize the authenticity of a room or when creating interiors that have a historical focus. Laying should begin in the center of the room in the shape of a triangle.
Chess drawing
A spectacular ornament, which most often uses contrasting colors, greatly enlivens the space, giving it brightness and elegance. Suitable for any room and surface.
"Chess" at an angle
An original ornament that has the same characteristics as “chess”, but at the same time perfectly hides the curvature of the surface. Staggered laying can have the opposite effect, as the surface will appear uneven due to an optical illusion.
Line drawing
This pattern looks very original in any interior. To perform this installation, you need to purchase tiles of the same size and shape, but in different shades. Looks great and unique as borders.
Carpet pattern
The laying pattern in the form of a carpet is suitable for people who want to create an unusual design using tiles or ceramic tiles. The idea of a drawing is limited only by the imagination of a specialist. Tiles of various shapes, colors and sizes are suitable for installation.
Drawing "ornament"
Similar to the previous picture. It seems that when compressed you can see a checkerboard pattern, so the “ornament” can only be enlarged. At the same time, increasing the center gives the pattern an additional advantage. In the photo you can see that the dark tiles around the central, lighter part take on the appearance of borders.
Kaleidoscope drawing
This is a collection of cute and fun patterns. When performing, small tiles of various colors and shades are used. A large tile in a “kaleidoscope” installation turns into a set of awkward spots.
Herringbone pattern
The installation method imitates parquet and is suitable for rectangular and elongated tiles. In this case, the material can be placed either in a zigzag or randomly. It is not recommended to use tiles with marble or stone imitation on the surface. A cladding that has a long and narrow shape will visually enlarge the room. A larger tile, on the contrary, will reduce it. With this installation method, the use of a large number of colors is encouraged.
When actually using one of the installation methods, do not forget about the rules for working with tiles and some of the nuances of making ornaments. And then any, even the most daring experiment, will have a positive result.
Tile laying process
Technology for marking and laying tiles on the floor diagonally
Having carefully examined the various options for finishing bathroom tiles, let’s move on to studying the installation process itself using the example of tiling a bathroom floor.
To do this, let’s imagine that the tiles have already been selected, all materials have been purchased, and the necessary measurements have been made.
- We clean the surface: we remove the old covering from the floors: linoleum, parquet, tiles along with glue or mortar. After tapping the surface and hearing a dull sound, we also remove the old screed (this means that there are cavities under it and the base is not strong).
- Next, we prepare the surface for laying the tiles.
- If there are large differences relative to the horizon, it is necessary to level the surface. We do this with cement-sand mortar.
- After the screed has dried, prime the surface and dry it.
- We arrange waterproofing using bitumen pastes or a special mixture for plaster waterproofing.
- We prime again to increase the adhesion of the base to the future coating.
- If the differences in the horizontal floor level are small, you can use a special self-leveling mixture (leveling mass), which can remove the difference from 3 to 15 mm. When using leveling compound, surface priming is not necessary.
The base of the floor is now ready.
The bathroom options for decorating with tiles were discussed above and you have already chosen the appropriate installation method.
- We begin laying the tiles in the direction from the far wall to the doors. We also determine which wall will have a bathtub, shower stall, washing machine or furniture under which the cut edges of the tiles will be hidden. We carry out the work from the direction of the open corner (whole tile) to the wall with plumbing (cut tiles).
For this:
- We place two tiles in the corners at the required height and attach them to alabaster (it dries quickly and can be easily removed in the future);
- Wet the underside of the tile well with water (you can dip it in a container of water);
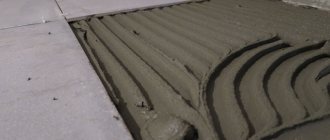
- Using a special (notched) spatula, apply diluted glue to the entire surface of the tile;
- we lay it in place, joining it with the lighthouse tiles, and leaving a gap between them using special identical crosses;
- we put the laid tiles in place, tapping them with the handle of a trowel;
- we check the correctness of the draft using a rule, a lath or a nylon thread, placing it on top of the lighthouse tiles, or we check the horizon with a short level;
- remove excess glue that appears after settling with a trowel;
- use a spatula to clean the seam between the tiles;
- we check the horizon again;
- We repeat the entire cycle until the end of the row, then remove the beacons and install them with glue.
- After all the tiles have been laid and the glue has dried, we begin grouting the joints:
- Use a dry cloth to remove any remaining adhesive from the surface of the tiles;
- Using a rubber spatula, fill the seams with diluted grout;
- let dry and remove excess.
As you already understood, the installation process is not complicated, but it requires care and attention. A well-chosen technology will ensure a long service life of the tile covering. Good luck!
Gallery
cutting
This is not a difficult task, but it requires skill and special tools. There are different types of tiles, each of them requires its own set. For tiles with a porous structure, you need to use a glass cutter. Such a device will not be able to cut other ceramics; there are special types of electrical devices for it.
There is a special scheme for using a glass cutter at home. First, the cutting line is marked. The tiles should be laid on a horizontal surface to avoid slipping. Then a straight line is drawn using a ruler using a tool. It is not recommended to press down firmly on the tiles during this work.
Then you need to tap on the other side of the plate along the cut. The next step is to push the tile to the edge of the table with the cut end and press on the edge of the tile. If all the technology is followed, the ceramics will break off strictly according to the mark. Uneven ends can be corrected using pliers or sandpaper.
The scheme for using a tile cutter when working with tiles is somewhat different.
The tiles are laid on the base of the tile cutter. After this, the blade is pressed tightly against the plate and the tool handle is pulled
Close attention should be paid to the correct direction of the blade in relation to the tile. All these manipulations must be done at one time so that all the edges come out smooth.
As a result, the resulting cut is broken off by hand.
Layout methods
There are several installation options, on which not only the overall appearance, but also the spatial perception of the bathroom will completely depend.
Standard
This is the most popular and fairly simple method that allows you to significantly save time and materials. With this layout, the tile modules are placed in even, straight rows, seam to seam. This standard design option can also be combined, in the form of a harmonious multi-colored cladding, due to which it is possible to significantly diversify the design.
The photo shows a bathroom interior with a standard tile layout made in two colors.
With offset
This layout is also called running or dressing. When using it, it is possible to create an imitation of brickwork and, depending on the direction of the rectangular elements, make changes to the geometry of the space.
The photo shows the layout of green boar tiles with an offset on the wall in the interior of the bathroom.
Checkerboard
Basically, this classic layout involves the use of square black and white tiles, reminiscent of a chessboard. Also, to create a more interesting pattern on the surface, other combinations would be appropriate, for example, blue and yellow, red and white, beige and brown, or purple and light green.
Herringbone
It has a rather luxurious appearance and is characterized by the placement of elements at an angle of 90°, which repeats the laying of parquet boards. This design is distinguished by the presence of several subspecies, such as French herringbone, double herringbone or triple herringbone, which looks like weaving.
The photo shows a bathroom with narrow rectangular tiles in different colors with a herringbone layout.
Diagonally
Thanks to diagonal laying, you can not only decorate the surface, but also hide its minor defects and visually expand the boundaries of the bathroom. For this method, square tile products are most often used, with a plain or patterned design. The only negative is that after cladding a lot of excess material remains.
With border
It involves dividing the room by color into two parts, where the cladding of the lower level has darker shades, and the upper one has lighter shades, or vice versa. With this installation you can make the room lower or wider.
Modular
Looks great both on the walls and on the floor. For a modular layout and creating an interesting geometric pattern, at least three tile elements of different sizes are used.
Linear
Provides the ability to apply tile finishes of different colors, which can be arranged in the form of wavy, solid, broken or parallel lines in any order.
The photo shows the interior of the bathroom, with a wall lined with mosaic tiles with a linear layout.
Carpet
This method is externally similar to a carpet with a magnificent geometric pattern. A tiled carpet or panel can feature bright patterns on a plain fabric or be framed with a colored border.
Ornament
It can have the most varied, intricate design and ornate patterns with alternating different masonry options and the use of tiles or mosaics in three or more shades.
Layout options
The small format of the tiles, characteristic of the Provence style, allows you to play with its layout. Let's look at some options:
- Seam to seam is the standard installation method. Good for square and rectangular slabs
- Diagonal - a favorite layout by many, differs from the first in the direction of the seams relative to the room. Requires more labor and tile consumption
- Checkerboard pattern - one of the two types of installation listed above with alternating two different slabs of the same format
- Staggered - layout in the manner of brickwork. Suitable for rectangular and boar tiles
- A rug is a classic type of layout that creates a rectangular or square accent on the floor using tiles of varying sizes and designs. The result resembles a carpet lying on the floor.
- Laying out tiles of different sizes is a complex type of layout. It is advisable to choose it in cases where the tile manufacturer himself offers this method and provides a finished product for it
ViSoft Premium
This is specialized bathroom design software for professionals. One of the functions is tile layout. The database contains a large number of samples - almost 39 thousand types of tiles from different manufacturers (at the time of writing there were 362). The layout project is developed based on the samples that are in the database; new ones cannot be added.
There is also a Russified version
Here is a summary of the program's capabilities:
- Selected tile samples are automatically placed in the specified area.
- It is possible to view other layout options.
- To create a bathroom interior, you can choose plumbing fixtures from a huge database. In this case, the sets are compiled automatically. If necessary, they can be adjusted.
- During the creation process, the project can be turned in any direction, evaluating the result from different points.
- Take “snapshots” of the results obtained.
There are two operating modes: drawing and sketch. In drawing mode, a black and white image is created, which can later be “filled” with different colors. Sketch mode - immediately with color.