12507 0 5
Vadim August 27, 2016
No matter how high-quality your bathroom tiles are, the monotonous, geometrically correct background will sooner or later get boring. Neither a beautiful frieze nor shiny inclusions can save you here; you want something new. A decorative panel for the bathroom is a great solution. Many people consider it something extremely complicated and insanely expensive, however, this is not at all the case. In this article I will talk about the intricacies of choosing the style and material for your panel, and also give tips on DIY installation.
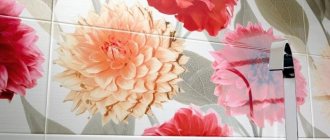
Rich colors on the seabed.
One fine day I set out to select and install a tile panel in the bathroom. I had already laid simple tiles, so I decided that nothing was impossible for a talented person. That’s how it is, but as it turns out, the technical aspects are not the main thing here.
Product Features
Decorating a bathroom with a composition of tiles is gaining more and more relevance over time. When choosing a finishing material, you should focus on the following aspects:
- long period of use;
- hygiene;
- durability of finishing;
- image resistance to high humidity, cleaning agents and temperature changes;
- affordable price.
A room can be effectively transformed with a tile pattern.
When purchasing a set, you need to pay attention to the material from which it is made. As an economical option, you can choose ceramic tiles. In addition to it, wall panels, porcelain stoneware structures, and mosaic finishing are used to create decor.
Selecting material for the panel
When choosing a panel for the bathroom, an important role is played by the material from which the image is actually composed. It determines how bright, rich, and most importantly original your painting will look.
Abstract tile layout.
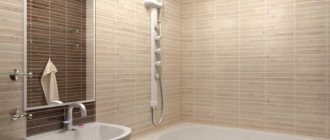
- The undisputed leader here is, of course, tile . This material occupies at least half of the entire market. The main advantages of tiles are its wide range of models, luxurious colors, simple installation and, of course, affordable cost. A relative disadvantage can be considered its low mechanical strength; upon impact, the glaze cracks and often breaks off. But the bathtub is not a workshop and you definitely won’t be swinging a hammer there;
- Porcelain tiles are an order of magnitude higher in this ranking . It is made on the basis of feldspar and, thanks to a unique technology, has a homogeneous structure. That is, there is no glaze there, such a tile is a single monolith. In terms of strength, porcelain stoneware is second only to metal. To make it clearer to you, it is porcelain stoneware that is used to cover the floors in modern shopping centers;
Painting made of porcelain stoneware.
- Wall panels are, frankly speaking, a budget option . The quality of such panels is very mediocre. The bottom line is that a finished image based on plastic or wood is attached to the crate. The only advantage of such panels is the possibility of their quick and inexpensive replacement. In other words, if the picture is tired or has become unusable, it can be replaced with a new one in a couple of hours;
Wall panels.
- Good old mosaic . As I already mentioned, many people perceive mosaic as a type of tile, but this is not at all the case. A real mosaic is made from pieces of colored minerals or so-called smalt. To put it roughly, smalt is colored glass, the color of which is achieved by adding oxides of different metals to it. A mosaic panel for a bathroom made from natural minerals costs exorbitant amounts of money, so craftsmen usually use this same smalt;
- Glass panels are a special direction . Despite the availability of the material itself, such paintings are quite expensive. The reason for this paradox is that colored glass tiles for such purposes are made to order and are almost always handmade.
But to be honest, a good glass panel is worth the money. With a professional layout and proper lighting, glass paintings are superior in beauty to the now fashionable 3D photos;
Mirror panel.
- Mirror panels are considered one of the types of glass decor . Mirror tiles, of course, cost less than custom-made colored glass, but still, the price of such paintings is decent. The main advantage of mirrored walls or ceilings is their versatility. They look great both in a huge room and in a miniature bathroom.
Varieties of composition
To decorate your bathroom, it is worth exploring different types of wall art. The type of design depends on the material that was taken as the basis for the finishing.
Has image resistance to high humidity
Wall decoration
The dimensions of the decorative painting directly depend on the total area of the bathroom. The chosen design is able to smooth out some of the shortcomings in the room and emphasize the external advantages. In a large bathroom you can install an oversized design. A pattern made of ceramic tiles is suitable. For the bathroom they often choose:
- seascapes;
- ships;
- marine flora and fauna.
A painting that should be installed in any corner will help make a small bathroom visually taller and wider. The drawing must have no plot. The best option would be abstraction or the image of thin lines.
The dimensions of the painting depend on the area of the room
Wall panels are made in different interpretations:
- Photopanel is a relatively young type of decoration. You can create it from any photos. Most often they use photos of media personalities, animals, plants, city landscapes, retro photos, etc.
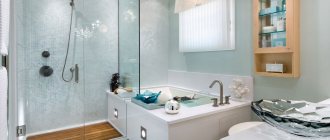
- For a small bathroom, it is better to use mirrored wall decoration. A mirror will not only visually expand the boundaries of the room, but also fill it with light. The surface can be decorated with various translucent patterns.
- The walls of a small bath can also be decorated with a painting consisting of one tile. The drawing is placed against a background of tiles painted in one tone. Colored spots attract attention and look original.
- Panels with 3D images are made from modern materials of increased strength.
- Mosaic finishing is most often used to decorate the bathroom. However, laying such material is a very labor-intensive process. The images of seashells on a snow-white beach look beautiful.
Photopanel is a relatively young type of decoration
Mosaic composition
Mosaic as a decorative material is very popular among designers. The selected image is laid out using small multi-colored tiles up to 3 cm wide. Each part is secured using a special metal mesh. All elements are made from the following materials:
- Various textured ceramics. Mosaic tiles are coated with a moisture-resistant glaze, which also protects the surface of the future decor from abrasive wear.
- Glass mosaic looks like crystal. A spectacular image is not afraid of excess moisture. Glass parts do not react to acids and other chemicals.
- The smalt finish is durable and reliable. The technology for producing smalt elements makes it possible to install spectacular internal lighting when gluing.
- The use of stone of natural and artificial origin allows you to create unique compositions when decorating walls. The material can be polished or aged.
Mosaic as a decorative material
Mosaics can be used to create ornaments from oriental culture that will convey the long-standing spirit of history to the bathroom. Also, modern motifs, abstractions, portraits, silhouettes of animals and people, and elements of the plant world are created from small pieces.
The essence of making a mosaic is that the parts should be placed in random order. The result is unique patterns. A classic bathroom is decorated with geometric shapes. A room with a Provençal interior is decorated with images of pastel flowers or seashells.
A classic bathroom is decorated with geometric shapes
Ceramics on the floor
Due to their quality characteristics, ceramic tiles are best suited for decorative finishing of bathroom floors. The floor covering withstands mechanical stress well, is not afraid of dampness and has a long service life. The technical properties of a tiled panel in a bathroom make it possible to place electrical elements under the decorative material to install a heated floor system.
The tiles laid out in the shape of a rozon will look interesting. However, this type of ceramic image is suitable for a spacious room. The surface of the coating should be matte or glossy. Among the patterns, marine themes, shells, and paintings by famous artists are often used.
The floor covering withstands mechanical stress well
Ceramic wall panel
To create a composition in the bathroom, you can choose ceramic tiles of various textures and colors. The popularity of ceramic material is also due to its distinctive properties:
- ease of laying tiles;
- low cost;
- suitable characteristics for use;
- resistance to contact with household chemicals;
- resistance to mechanical stress;
- ability to withstand temperature changes.
Ceramic tiles with tulips
Along with all the advantages, tiled flooring also has some disadvantages. The main disadvantage of tiles is fragility.
Methods of applying ornaments
The pattern is applied to the ceramic surface using several methods:
- printing followed by firing is a time-consuming and expensive method. Using this method, an image can be applied even to a ribbed surface;
- sublimation printing is a faster and cheaper technique;
- A decal is a method of applying a design using a decal. The decal is the most functional option;
- The cheapest way is to use UV ink.
Painting a wall in a marine theme
When choosing photo tiles, it is necessary to take into account the place where installation will take place and the presence of high humidity. The decal technique is best used in a bathroom with good lighting and a constant level of humidity.
The cheapest cladding is used in rooms with low humidity and little risk of mechanical damage.
Features of porcelain stoneware
Porcelain stoneware finishes have a long service life and strength properties. The quality of the material is superior to its tiled counterpart. Porcelain tiles have a low level of water absorption compared to other types of finishes.
Porcelain tile finish has a long service life
Porcelain tiles have the following advantages:
- suitable for use in damp rooms;
- It is reliable and highly resistant to scratches;
- images of varying complexity are applied;
- The material is easy to care for.
Advice It must be remembered that this type of finish is very slippery and is not recommended for use on floors. Tiles with a glazed and polished surface are used for wall decoration.
Phototile
To create a decorative look in the bathroom, most designers prefer photo tiles. Using this material you can create images in the richest and brightest colors. It is also possible to choose any pattern. Photo tiles are used to decorate not only small areas of the bathroom, but also the entire wall.
With photo tiles you can create images in the richest and brightest colors
When purchasing photo tiles for a wall panel, it is recommended to choose the following options:
- images of wildlife or beaches of exotic countries. Waterfalls, fish, shells and jellyfish will look harmonious in the bathroom interior. The image of small boats with white sails will be romantic;
- For a bathroom decorated in various styles, floral patterns are suitable. Orchids look spectacular close-up;
- many designers use family photographs for panels.
From this type of tile you can make a whole image or break it into separate parts. To ensure that the selected picture covers the entire wall, high-resolution photographs are used. For a small canvas that can be placed in different areas of the bathroom, the cost will be much less.
A good option would be to select several small photos. Photo tiles are suitable for framing a doorway or mirror. You can also decorate a niche with it and install beautiful lighting there.
You can make a solid image from this type of tile
Glass tiles
A glass panel can have a matte, corrugated or smooth surface. It looks like a glass composition that is used to decorate an empty area on the wall. Such structures can be equipped with various lighting. Pieces of glass measuring 10x10 are painted in different shades and beautiful compositions are laid out from them.
The glass picture in the bathroom has some features:
- they are able to create bright accents in the interior of the room;
- suitable for rooms decorated in modern design directions;
- Glass panels with a mirror surface will look interesting. During the installation of special lighting, holographic patterns are applied.
May have a matte, grooved or smooth surface
Single-tile panel
A painting created from one tile contains a specific plot. The features of this type are as follows:
- For the main image, geometric shapes, large flowers, and animal silhouettes are used;
- the design is applied in bas-relief;
- the composition is often complemented with ceramic structures;
- Used mainly for finishing narrow spaces.
Carefully selected single tiles make it possible to decorate the bathroom wall with original compositions.
Black design
From several tiles
The most popular option for decorating a wall is a prefabricated image. The general plot consists of parts, each of which is applied to a separate tile.
The features of the prefabricated panel are as follows::
- the whole image is assembled from individual parts;
- elements are combined in such a way that the resulting joints are not visible;
- sizes sometimes reach three meters;
- The shape of the coating can be square or rectangular. The composition can be made either round or oval.
Bright room design
The large image should be placed in the center of the entire wall.
With 3D drawing
A panel with a 3D effect appeared not so long ago. Modern technologies are used for its production, so the image on the tile looks very realistic. The photo print applied to the material must be subject to further firing. As a result of this process, the product is completely protected from the destructive effects of moisture. During firing, the paints penetrate deeply into the surface and are fixed there. A special glaze is applied to the top of the tile.
A panel with a 3D image is considered a unique material
3D painting has significant advantages:
- long period of use;
- mildew resistance;
- ease of installation;
- ease of care;
- hypoallergenic characteristics;
- high impact resistance.
A panel with a 3D effect appeared not so long ago
A panel with a 3D image is considered a unique material because it radically changes the perception of space and time.
FreeSize
The free-size panel or free-size design was created specifically for rooms of non-standard height. The advantage of this type of composition is that the owner of the room can decide for himself what height his future panel will be. The main thing is that the picture fits harmoniously into the atmosphere of the room.
The plot of the scenery is divided into three separate parts: the middle, the beginning and the end . The main role in such a puzzle is played by the middle, due to which the panel can be lengthened by any amount. The middle part of the plot consists of tiles on which one design is applied. The first and third squares cannot be swapped or another tile added to them, since they are where the beginning and end of the image are placed.
Beach motif
A clear example will help you understand this better. The panel depicts a tree. The story begins where the trunk comes out of the ground. The crown completes the picture. The trunk itself is the middle. So it can be extended to at least a five-meter height by simply laying identical tiles one after another.
There is another type of free size - a tile on which a pattern is applied that has no boundaries . That is, it will not be possible to put together a specific picture from them. The panel is represented by a scattering of elements created in order to create a randomly chosen pattern. Tiles can be connected in any order at your discretion.
As a result, you can post:
- starry sky;
- abstract composition;
- flower meadow;
- combining different patterns from one set.
How to lay tiles correctly if there is a panel in the center
In simple cases, tiles are laid from the middle or from the edges; the choice is determined by the preferences of the master and the features of the room layout. In the case of a panel, planning the position of the tile should begin with its placement. There are fewer problems on the floor - first you should lay the pattern out dry, evaluate its position, and, if necessary, make certain adjustments.
Important. When laying out panels, the main factor is the location of the pattern, and not the joint lines of individual tiles. In this case, the dimensions of the tiles in the corners are not decisive. If this is necessary for the drawing, then the segments can be asymmetrical.
The tiles of the panel should be numbered, this will make it easier to lay it out
Dry laying on the walls is impossible; the tiles will not stick. There are two ways out of the situation. The first is to draw a grid of tiles on the wall indicating the location, and lay out the panel itself on the floor. You will need imagination to evaluate. The second is to temporarily fix the panel on the wall with a small amount of glue. To prevent it from sliding down under its own weight, you should make the glue thicker than for work or use various supports from scrap materials. After inspection, the panel is removed as quickly as possible, the wall and tiles are cleaned of any adhesive residue. This method is quite labor-intensive, but allows you to get the most realistic idea of the final wall design.
The panel does not have seams between the tiles, which creates additional difficulties during wall cladding. It is better for inexperienced craftsmen to start finishing the bathroom with a panel; all mistakes made will move to the corners, where they are less noticeable. And if distortions in the tiles appear in the drawing, then the work will have to be redone.
Laying photo tiles
And one last piece of advice. Before starting work, you should check the dimensions and layout of the tiles as carefully as possible. To facilitate control, it is advisable to apply vertical lines for the position of each row on the walls, and spread the glue in such a way that they remain visible. In the area where the panel will be placed, you can make a grid, which will make it possible to control both the horizontal and vertical position of each tile.
Rules for choosing a decorative composition
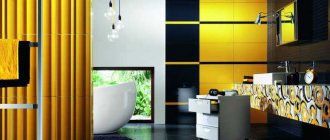
Panels are primarily a finishing material. Therefore, when choosing a suitable pattern, you should base it on the shades of the room and its dimensions. For a small bathroom, it is better to choose a monochromatic composition with small, eye-catching images. The drawing should be in pastel colors so that bright colors do not hide the space. Dark and contrasting tiles are suitable for large rooms.
The selected composition should fit harmoniously with the overall design style:
- for a bathroom decorated in retro style, select a panel with an abstract pattern;
- tiles with marine motifs promote relaxation. These could be ships, beach landscapes, fish, shells, etc. This composition is combined with a Mediterranean-style interior;
- graphic patterns and mosaics are suitable for an ethnic bathroom;
For a small bathroom it is better to choose a monochromatic composition
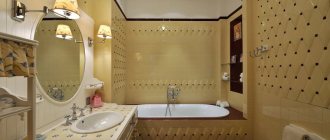
- classic or baroque style can be complemented with tiles in delicate tones, which depict landscapes, butterflies or flowers;
- An oriental bathroom will become special if you use unusual patterns and bright colors. You shouldn’t limit your imagination; you can use an abundance of colors;
- A country style bathroom should be decorated in subdued colors. A light mosaic with a matte surface is welcome;
- Natural motifs are typical for small spaces. For decoration, use tiles that imitate wood, leather or bamboo. Seashells are also popular.
In brown tones
Tile panels for the bathroom are selected based on the preferences of the home owners, the size of the room and its interior . You can choose an inexpensive option or order more expensive decor from a designer.
Focus on room size
In a compact room, a panel is used that visually enlarges it, here are several options:
- horizontal or vertical orientation . This can apply to both the image as a whole and the rectangular tiles that make it up. When oriented horizontally, the room appears longer; when oriented vertically, the illusion of a high ceiling is created;
- mirror panel. With such decor, the room not only visually increases in size, but also becomes lighter;
- landscapes and other images with perspective . The outlines of mountains in the distance, an alley going deep into the park and other similar pictures create the illusion of space even in the smallest room.
Dirt on the mirror is very noticeable, so such panels are not recommended to be placed in splash areas - on the kitchen apron or next to the bathtub.
Advantages and disadvantages of tiled construction
Decorating walls in the bathroom with tile panels is not a new trend in interior design. This type of finishing has been used for many centuries. Over time, only the tile format changes - new textures and patterns are invented. The range of materials used has also expanded significantly. Modern designers now have access to ceramic panels, porcelain stoneware and glass compositions. Panels and tiles with photographic images are popular among apartment owners.
Disadvantages include the high cost of the material and complex installation. For those who do not understand the process of laying panels, it is better to stick with photo tiles. The selected image is applied to ordinary tiles. The finished tiles are attached to the wall in the most usual way. The technique is simple, but as a result the bathroom will acquire its own zest and uniqueness.
New trend in interior design
Glass panels look very unusual. They can be supplemented with LED lighting . Glass panels are not popular on the market because they are very expensive. Also, during their installation some difficulties often arise.
Phototiles are also made from plastic and wood. Their price is low, but the panel itself is short-lived. This option is used by people who like to frequently change the style of their bathroom design.
Color varieties of tile paintings
The most organic compositions are those whose colors completely match the color of the walls in the bathroom. Light images visually expand the walls and enlarge the space. Warm colors create an intimate atmosphere . Bright accents will fit into almost any design, even modern minimalism, and the appearance will remain original.
This type of finishing has been used for many centuries.
Such an unusual combination of colors should not violate the integrity of the composition or stand out from it. Attention is paid to the contrast of colors and their correct combination. The tones should resonate not only with the walls, but also with the furniture, frieze and plumbing.
Over the centuries, tile panels have changed their shapes, colors, and production methods. Modern technologies have made it possible to significantly diversify the designs and ornaments used in compositions. For this purpose, standard and innovative materials are used, with the help of which there is wide scope for the designer’s imagination.
Ready-made panels have become the most popular . The picture consists of standard size tiles with a printed pattern. This is an inexpensive option. It can be decorated according to your wishes and taste with friezes or inserts.
The tones should resonate not only with the walls, but also with the furniture
Mosaics are used to create an exclusive interior. Mosaic panels can be purchased ready-made or ordered according to your own preferences. The composition can be created from many multi-colored small tiles or elements of the same tone. The options for images are very different - from drawings with a plot to single figures.
Features of decorating a room depending on its area
The size of the panel also matters and it depends on the dimensions of the bathroom. The details of the chosen design will hide the obvious shortcomings of the room and improve its interior.
Owners of large rooms use some recommendations that they should not be modest with scale. You can come up with something unusual, for example, tiling the entire wall with mosaics. The mosaic panel can depict dolphins, ships, seascapes, and wildlife.
It is recommended to decorate medium-sized bathrooms with ornaments on 2/3 of the entire wall. Any theme is suitable, whatever the owners’ imagination is capable of.
In pink
Bathrooms with modest dimensions should be expanded with the help of a panel placed in one of the corners. The drawing does not have to contain a plot. Abstraction is often chosen with a minimum amount of bright details with clear contours.
The process of visiting the bathroom for children can be made more interesting and exciting. To do this, the area above the washbasin or the bath itself needs to be decorated with a tiled panel depicting cartoon characters or fairy tale heroes.
Popular drawings in children's style are cartoons where the main characters are fish, for example, Dory or Nemo. From fairy tales you can take those characters that the child loves. Images of wild animals, fairy fairies, travel themes, bright butterflies and birds, cars and ships are also suitable. Children will enjoy taking a bath surrounded by their favorite characters from books or TV.
Night city
How to make a mosaic panel on the floor or wall of a bathroom from broken tiles
If you want to make the bathroom interior completely exclusive, then you can decorate the floor or wall with panels of your own making. Such work will require much more time, but the result will exceed even the wildest expectations. You just need to take your time and carefully follow the recommendations.
Step 1 . Carefully level the surface. If using a whole tile you can correct errors up to a centimeter in size, then a mosaic panel requires a perfectly flat surface.
It is advisable to use a mixer to mix mixtures.
The photo shows the process of stirring the mixture to level the floor under the tiles
The mixture is poured or spread on the floor
Leveling the mixture using the rule
Step 2. Collect pieces of multi-colored tiles. An important condition is that the thickness of the tiles must be the same. If there are discrepancies, then this is not a critical problem, you can work with them, but during laying you will have to show more patience. In addition, when pressed, a thick tile will fill the seams between the thin pressed-out glue, and this is an unpleasant phenomenon; the excess will have to be removed.
Tiles for future panels
Step 3. Make it yourself or find sketches of the drawings on the Internet. When choosing, pay attention to the colors of the existing broken tiles. You should not only have a complete set of them, but also a sufficient number. If you are doing this kind of design for the first time, it is recommended to start with the simplest drawings.
Panel drawings
Step 4 . Transfer the design to the bathroom floor. Don't be discouraged if the transferred sketch doesn't look very similar to the original. Any changes are considered editing by the “artist” and only emphasize the individuality of the panel.
Performing markup
Redrawing diagrams directly onto the floor
Practical advice. Do not draw very small details of the design on the floor, this will only waste time. During installation, the necessary changes will be made taking into account the size of the broken tiles.
It is better to draw with chalk so that the lines are bold and are not covered with tile adhesive. No chalk - use a carpenter's pencil. It gives wide lines and has an increased length. An ordinary pencil quickly wears off on cement mortar.
Step 5: Wrap the tiles in cloth and use a hammer to break them into small pieces.
The tile is broken with a hammer through a cloth
Adjust the size slightly taking into account the features of the design. Remember that it is never too late to make a small piece out of a large piece, but on the contrary, it is impossible. Conclusion - don’t split them too much; during work you can always reduce the size to the required values.
Get pieces of different shapes and sizes
Take precautions and protect your eyes. Small tiles may have very sharp edges, do not injure your hands. If your drawing does not have strict outlines, then you can use a notched trowel to cover a fairly large area of the floor and lay a mosaic panel on top according to the sketch. When the pattern is quite complex, then each piece of tile must be spread and glued separately. Pay attention to the location of the lines and choose appropriate colors.
Ceresit SM11 Plus adhesive is used to lay tiles on the floor.
The glue should be thick
Practical advice. If the drawing has straight lines, then the panels should be laid from them. Select pieces of broken tiles with straight lines of the appropriate color and size and glue them to the floor surface. If the piece is large, carefully shorten it with a hammer.
Laying the first pieces
Step 6. Align the plane of the drawings very carefully. You can do this using a smooth trowel: place it on the drawing and tap it a little with your hand. You can use a level to accurately control the position. If a slope is noticeable, use a smoothing iron to correct the problem. Never press the panel pieces too hard, always leave glue between them and the floor. Otherwise, it is very difficult to control the plane of the entire drawing; you will no longer be able to correct the position. In case of significant deviations from the plane, you will have to remove the tiles and start the work all over again.
Frame of the first picture
Laying the middle
Almost finished panel
In addition to this problem, the lack of a sufficient layer of adhesive between the floor and the tiles critically reduces the adhesive strength. The fact is that a very thin layer of glue, when hardened, almost completely loses its physical strength and even with little effort turns into sand.
Layout of the second panel
Work is carried out from the center
Added small details
Laying out the frame of the third panel
Layout of the drawing
Top view of the panel
Step 7: Seal the seams with grout. If their total area is large, then the color of the grout can be the main background. Before grouting, remove any adhesive from the seams that protrudes above the surface of the panel. You need to know that the grout consumption for a mosaic panel is much greater than for laying tiles. Practice shows that you should buy about four times more of it than manufacturers recommend for laying ordinary tiles. The grout is prepared according to existing manufacturers' recommendations and applied with a flat rubber spatula.
Grout
Stirring the grout
Applying grout
Applied grout
Step 8. After the solution has hardened a little, carefully remove the residue with a rag and clean the surface of the panel. The time for the solution to set depends on the thickness of the seams; in the case of panels, this will require at least 12 hours. When grouting joints, do not make indentations; the surface should be as smooth as possible. It is better to use a small block and attach a thin piece of foam rubber to it on one side.
The grout needs to be wiped off
Everything is ready - wait for the glue to dry completely. Such a panel on the bathroom floor not only looks beautiful, it is safe to walk on. A fairly large grout area completely eliminates the risk of slipping. In the style of a mosaic panel made of ceramic tiles, you can decorate not only the floor, but also the walls. Be sure that no one else will have such a bathroom, and for you it will become the most beautiful and comfortable.
Original floor finish. Three panels in a row
Design ideas
There are several ways to transform your bathroom using a combination of multi-colored tiles and different types of panels:
- Classic design . The dark bottom is separated by a frieze from the light top. Single-tile panels are used as decoration, which are placed throughout the light area. Along the upper perimeter you can make a dark border laid out in one tile.
- Horizontal edging . If there is a large amount of furniture in the bathroom, the horizontal design method is used. A dark stripe of one to three tiles separates the light bottom and top. When decorating like this, you should take into account the arrangement of furniture and equipment so that the design does not end up being closed. Dark tiles can be laid out in a checkerboard pattern.
- Vertical accents . Panels with a vertical direction highlight static objects. For example, a contrasting composition can be used to highlight the area of the toilet, washbasin, bathtub or shower. At the same time, the width of the panel should be slightly smaller than the furniture or plumbing fixture itself. The image can start from the floor and end at the ceiling, unless it is an animal, portrait or photo. For panels covering the entire height of the wall, abstractions, landscapes, mosaics or a monochromatic pattern are suitable. Horizontal lines should not cross such compositions.
Some tips on panel installation techniques
I won’t deceive you, installing panels with your own hands is not an easy task. However, there are some areas that an amateur can handle with great desire.
Of course, the simplest thing here is to arrange a single-tile panel. Any clever instructions are not required in this case. If you have previously dealt with laying tiles, then you can safely get to work.
Prefabricated paintings made from several standard tiles are not much more difficult to install. This technique differs from the classical one only in the absence of gaps between the elements of the image.
Mountain waterfall.
Initially, you will need to decide on the bottom cut of the panel. This can be the edge of the bathtub adjacent to the wall, an intermediate frieze in the middle, and for volumetric paintings, a floor plinth. Starting from the bottom cut, you will need to first mark and then lay your picture without gaps between the tiles.
If you decide to buy a mosaic panel for your bath, then ready-made canvases are now sold for amateurs. The small tiles in them are already glued to the mesh. All you have to do is apply construction adhesive to the wall and attach pieces of the canvas to it. And when everything is dry, fill the gaps between the tiles with special grout.
Whatever type of panel you choose for yourself, if we are talking about self-installation, then before directly laying it on the wall, the picture should simply be laid out on the floor. This will make it much easier for you to navigate and distribute the work.
Laying out mosaics with your own hands.
As for the author's exclusive works, it is naturally better to entrust them to professionals. Although when I created a mosaic panel for my bath, I didn’t hire anyone, but I was busy for about 2 months.
First I found a suitable picture. I am not a professional artist, and in order not to be foolish, I took an abstract landscape. After that, from a small picture in a magazine, I transferred the image to a large sheet of plywood.
I used smalt as the main material. It is not expensive in itself; it is important to decide on a palette and take each color with a small margin. Next, I reproduced my panel on plywood, lightly gluing each element.
Panel in the shower stall.
When the painting was finished, all I had to do was smear the wall with construction glue, and then tear off pieces of smalt from the plywood one by one and transfer them to the wall. Naturally, upon completion of the work, I filled all the gaps with grout.
When I started my work, I was advised not to spend money on smalt, but to use broken tiles. You can find as much of this stuff in every hardware store as you like, and for free.
I don’t advise you to do this, because the look of the picture made from broken tiles is, to put it mildly, mediocre. If money is really tight, and your soul requires creativity, then take broken porcelain tiles. As I already said, the inside of such a tile will be the same color as the outside, therefore, the problem of an unflattering side cut disappears by itself.
Homemade painting from broken tiles.
Video 1.
Video 2.
Video 3.
Video 4.
Video 5.
Original do-it-yourself panel
Decorating a bathroom with decorative elements created with your own hands is a pleasure. Moreover, this finishing option will cost much less than a purchased one. For creating your own bathroom panels, mosaics are a better choice. As a result, you can get a unique item that will never be found anywhere else.
Useful for this work are unnecessary tiles left over after repairs, or broken pieces that were originally planned to be thrown away. There are many methods for creating panels. However, the initial stage is drawing a sketch of the future composition.
In English style
The simplest and cheapest way to make a beautiful panel is considered to be decoupage technique . The design is applied to tracing paper or film, and then glued onto a specially selected tile. The image is applied after proper installation of the facing material.
Advice: After sticking, the printout should be coated with a colorless varnish, which will provide additional protection for the design from fading or erasing. This method of creating a tile panel with your own hands is convenient and simple, but it should not be used in rooms with high humidity.
Application of old and innovative technologies
Mosaic is an ancient method of creating a decorative composition from tiles. The design is made up of many individual multi-colored scraps of tiles, glass or stone. For this purpose, broken or cut ceramic tiles or majolica are often used. The process is very labor intensive. It requires minimal skill and experience working with mosaics, as well as a considerable amount of time. But it’s worth going through all the difficulties, because the end result will exceed all expectations, and the bathroom will become unique and inimitable.
This design will take you to the islands
For lovers of modern technologies, applying an ornament to the tile with a special composition, which is very similar to glaze, is suitable. The design is applied by printing or by hand. But this method is not suitable for creating panels at home, since the painted tiles must subsequently undergo a heat treatment process.
Regardless of the chosen method of creating a tile panel, hand-made decor can give the bathroom interior absolute exclusivity. With such a panel you can decorate an entire wall, a separate section of it, a niche, or frame a mirror or doorway with it. With the help of such decoration, you can interestingly zone your bathroom, highlighting the washbasin, bathtub or shower area.
In turquoise color
Price
Here are some examples of price panels:
- carved glossy panel Royal Marble (Italy). Prefabricated from 4 tiles, size - 100x100 cm (module of the same size, 50x50 cm each). Cost: 23,540 rubles;
- round panel Insignia (Spain). A collection of 4 identical tiles. Two sizes are available: 89.26x89.256 and 178.92x178.92 cm. Price - 8,500 rubles;
- glossy panel Unica Rosone (Russia). A prefabricated set of 4 tiles, size - 120x120 cm. Costs 25,300 rubles.
The Russian manufacturer sells panels on ceramic tiles at more modest prices - from 500 rubles per piece. size 50x50 cm.