The Mauerlat belt is the basis on which the rafters are attached. Try to hold them together as best as possible. The durability of the roof depends on this. Foremen may call the Mauerlat a murlat. If you hear it once, you will understand what we are talking about.
Moving along the perimeter of the walls, they lay the Mauerlat. The rafters will be located on it. Its task is to firmly connect the roof to the structure. So that it is not torn off by hurricane winds. Thanks to the Mauerlat, the load is evenly distributed on the walls of the house.
Try to approach installation responsibly. It happens that a house is built without using a Mauerlat, what happens then? The rafters are fixed to the floor beams, of course, if they are strong. It turns out that the roof, with its weight, puts pressure on the places on which the rafters also rest. Mauerlat has the advantage of distributing the load evenly on the walls.
What materials can it be made from?
Before laying the sheathing, the rafters are covered with a layer of waterproofing, protecting it from getting wet.
Waterproofing is laid in a horizontal direction, starting from the eaves and going up. The strips are laid with an overlap of 10-15 cm, the joints are sealed with tape. There must be a ventilation gap between the sheathing and the waterproofing; for this, slats no more than 4 cm thick must be placed on each rafter leg.
Now you can sheathe the rafter system. The sheathing can be made from timber 5*5 cm or boards having a thickness of no more than 4 cm and a width of more than 10 cm. The sheathing begins from the bottom of the rafters, maintaining a certain step.
After installation, the sheathing begins to cover the gables and overhangs. Depending on the construction budget and the desires of the homeowner, you can make a gable roof with your own hands with gables made of plastic, corrugated sheets or wooden boards. Knowing how to sheathe the gable of a house with corrugated sheets, you can carry out the installation yourself. The sheathing is attached to the sides of the rafter using nails or self-tapping screws. Overhangs can be hemmed with all kinds of materials.
The structure is often made of wood, using wooden beams or boards fastened together. Often a steel profile is used. The choice depends on the weight of the roof.
Wooden beam
The timber is placed under the rafters along the perimeter of the roof. With this arrangement, the load is evenly distributed to each point on the walls of the house. There should be no knots on the timber, and if there are any, their size should not exceed 2/3 of the thickness of the wooden product. When arranging the Mauerlat, knots will interfere with the main structure, so it is better to avoid them. If there are many knots on the beam, then a break may occur in the places where they form.
In frame construction, when the roof is light in weight, boards fastened together can be used. This design is not suitable for a heavy structure - the boards will not withstand the high load. This material is suitable for roofing without insulation and additional elements that increase weight.
Steel profile
Instead of wooden products, steel structures are often used. This material is more durable, as it can withstand increased loads. The steel profile is represented by a square section or round metal pipes. The use of steel as a support for the roof implies the presence of metal lining around the perimeter of the external walls.
What to put under the Mauerlat. What is a roof Mauerlat
The Mauerlat belt is the basis on which the rafters are attached. Try to hold them together as best as possible. The durability of the roof depends on this. Foremen may call the Mauerlat a murlat. If you hear it once, you will understand what we are talking about.
Moving along the perimeter of the walls, they lay the Mauerlat. The rafters will be located on it. Its task is to firmly connect the roof to the structure. So that it is not torn off by hurricane winds. Thanks to the Mauerlat, the load is evenly distributed on the walls of the house.
Try to approach installation responsibly. It happens that a house is built without using a Mauerlat, what happens then? The rafters are fixed to the floor beams, of course, if they are strong. It turns out that the roof, with its weight, puts pressure on the places on which the rafters also rest. Mauerlat has the advantage of distributing the load evenly on the walls.
Peculiarities
Most often, not solid logs, but beams are taken under the mauerlat. It is more convenient and easier to work with. The beam is ribbed and stable. If you put it on the walls, it won't fall. Mauerlat is very important when constructing a roof, so read the recommendations and select timber of the required diameter. Which one exactly is needed? This depends on various parameters:
- The total area of the house and how much is the perimeter of the walls?
- Roof type;
- The material with which the roof is covered;
- The material from which the supporting structures are made;
- The climate in the area;
- Is there an attic, several or other extensions?
To a greater extent, the calculation will depend on what type of roof you decide to install on your home? In your case it is gable. Start from this when selecting materials for construction.
What material can be chosen for the Mauerlat?
Popular materials:
- Wood, and specifically timber;
- Metal;
- I-beam;
- Channel.
Let's consider different options.
timber
Timber is suitable as a material for constructing a gable roof. A material with one of the following sections (in cm) is required:
- 10x10.
- 15x15.
- 10x15
- 8x18.
- 20x20
The material is placed under the rafters, walking along all the walls. Thanks to this, the load on your new home will be even.
When choosing wood. Pay attention to the presence of knots on the timber. They should not be more than 2/3 of its thickness. Why? Because the material must stretch under load, and knots interfere with this.
If you are unlucky enough to come across knotty wood and you did not know that such beams cannot be laid, then soon cracks may form somewhere on a wall or several. This means that the material did not work as a shock absorber under the weight of the roof.
Boards that are fastened
If you are building, for example, a country house that does not have a heavy roof, you can save a little by using solid timber instead. Boards fastened together. You will get a good Mauerlat.
Steel pipes
It happens that the design is combined, using a wooden Mauerlat and steel pipes at the same time. The wooden beams do not protrude beyond the house, but pipes are attached to the ends. They bear the main load when the gable slope is near the roof.
Often, additional beams are used when constructing the Mauerlat. The following requirements apply to pipes:
- They should be small in cross-section. Holes are made in the rafters and pipes are pulled through them;
- Choose steel pipes. After all, they will support the entire roof.
- The steel must be of high quality. It is unacceptable for the material to undergo deformation over time.
- Holes are made in the rafters along the axis. Their diameter should be 10 cm smaller than the height of the rafter leg. Doesn't it work out that way? This means that additional steel fasteners are needed.
It’s great that steel pipes bend perfectly and they are so strong that a small diameter is enough to support the entire roof. And the fact that there are small holes in the rafters will not harm them in any way. They are strong enough to withstand the required loads.
It is very good that the Mauerlat in such a design is under the roof. This means that it will not be exposed to rain or snow, which means it will not begin to rot.
Mauerlat installation
This material can be attached to walls in different ways. Let's look at the mounting options:
- Brickwork. The structure is required to be fixed to wooden blocks, which are embedded in the wall from the upper end down 2 or 3 rows. It is secured with staples.
- Blocks with cells. For such fastening, an armored reinforced concrete belt is poured near the roof. Threaded rods with Ø from 1.2 to 4 cm should be left in the fill. They are installed by each
jtcase.ru
A few words about the rafter system
The rafter system is a roof frame with slopes, assembled from the rafter legs themselves, as well as the mauerlat and ridge beam. The Mauerlat is a support beam that is located along the perimeter of the upper part of the walls of the house, and the ridge beam is installed directly in the upper part of the roof in the place where two opposite rafter legs are connected at an angle.
Main parts of the rafter system
Designing a rafter system is an important task, during which it is necessary to correctly calculate the wind and snow loads that will fall on the roof, as well as take into account other parameters. The first indicators will depend on the climatic region in which the facility under construction will be located.
Designing a rafter system is an important task. The
design of a rafter system may include the rafters themselves, the ties that will be located between them, purlins, additional supports - the so-called rafter legs - and other elements. The assembled rafter system usually rests on the same Mauerlat or on floor beams. Mauerlat helps to evenly distribute the load along the entire perimeter of the walls.
Mauerlat helps to evenly distribute the load along the entire perimeter of the walls
Details of rafter systems using the example of a gable roof, which can be used for various structures
Above are examples of wooden roof trusses; in addition, in some cases trusses made of concrete and metal are used
Table. Dependence of the cross-section of rafter legs on their length and pitch.
| Pitch, cm / Length, cm | 300 | 350 | 400 | 450 | 500 | 550 | 600 |
| 60 | 4x15 | 4x17.5 | 5x15 | 5x15 | 5x17.5 | 5x20 | 5x20 |
| 90 | 5x15 | 5x17.5 | 5x20 | 7.5x17.5 | 7.5x17.5 | 7.5x20 | 7.5x20 |
| 110 | 7.5x12.5 | 7.5x15 | 7.5x17.5 | 7.5x17.5 | 7.5x20 | 7.5x20 | 10x20 |
| 140 | 7.5x15 | 7.5x17.5 | 7.5x20 | 7.5x20 | 7.5x20 | 10x20 | 10x20 |
| 175 | 10x15 | 7.5x20 | 7.5x20 | 10x20 | 10x20 | 10x25 | 10x25 |
| 215 | 10x15 | 10x17.5 | 10x20 | 10x20 | 10x25 | 10x25 | – |
Mauerlat cross-sectional dimensions SNIP
Recommended parameters in accordance with SNIP rules should be at least 100x100 mm for wooden beams. These are the indicators that are considered average, allowing you to reliably hold the roof on the walls. Builders recommend increasing the dimensions to 150x150 or 100x150 mm to increase the reliability of the structure.
There are several requirements for the section:
- the wood must be treated with an antiseptic not only on the cut, but along the entire length;
- individual elements are secured using a direct lock;
- beams are laid over the entire area of the walls.
If you reduce the cross-section of timber or boards, the structure will not be reliable: the roof may not be resistant to adverse weather conditions.
How to attach the Mauerlat
The main requirement when arranging a support is immobility and precise fixation of structural elements. For this purpose, studs, anchor bolts, wire method and wooden plugs are used.
We invite you to familiarize yourself with: Do-it-yourself gutter: installing a gutter, how to make a homemade one from scrap materials
Special metal pins are embedded in the masonry of the walls, then they are used to fix the mauerlat. This method is ideal for lightweight structures. The stud looks like a metal bolt in the shape of the letter “L”, and can also be welded to a square of metal. The studs are immersed in the brickwork to a depth of 45 cm.
To enhance reliability, the Mauerlat is attached to an armored belt using anchor bolts. The manufacture of a reinforced belt is mandatory when using aerated concrete. Such blocks are soft, so it is impossible to screw bolts into them.
When the armored belt is installed in the formwork, threaded anchors are tied to it. They should be aligned exactly along the line - this will ensure a strong fixation. The fasteners themselves must be strictly vertical for the fastening process to take place accurately. There should be as many anchors as there are rafters or more. Anchors should not be located in the places where rafter legs are attached.
The classic method is to use wire fastening. To do this, follow a certain sequence of work:
- Pieces of wire are placed 4-5 rows before the end of the masonry.
- The distance between the pieces is maintained at 60 cm.
- The ends of the wire rise up 20-30 cm.
- The ends of the wire material are hidden in the solution.
- The other end of the wire is used to tie timber or boards to the wall.
This option is used everywhere in construction. It is suitable for houses made of brick or other stone, as well as where mortar is used for walls.
For small structures, for example, for country houses, wooden plugs are used as fastenings. They also securely fix the Mauerlat. The plugs are the size of a traditional brick; each element is treated with an antiseptic and covered with roofing felt. Sometimes plugs are made from timber impregnated with bitumen for strengthening. The cork is laid below the level of the rafters or at the same level at a distance of 50-70 cm from each other.
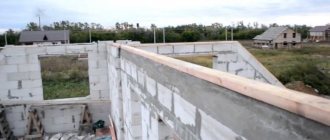
Installation of Mauerlat on brick walls
In a house with brick walls, the mauerlat is laid along the perimeter of the walls, closer to the inner edge and is protected from the outside by a low wall projection. The place for laying and the method of fastening the mauerlat beam should be prepared at the stage of laying the wall. Depending on the method of fastening the Mauerlat, preparatory work can take place according to one of the following scenarios:
- Wire tying. Three rows before the top row of brickwork, a wire rod is laid between the bricks and embedded in the wall. The length of the wire should be sufficient so that you can then tie the beam. The number of wire rod laying must be no less than the number of rafter legs.
- Fastening with anchor bolts. Directly to the brickwork, after drilling holes in an amount equal to the number of rafter legs, anchor bolts are driven and tightened.
- Laying wooden plugs. The size of one brick, wooden plugs pre-treated with an antiseptic are placed in the brickwork. The plugs can be laid below the place where the timber is laid, through a row of bricks, directly under the Mauerlat, next to the Mauerlat, but closer to the outer edge of the wall. The mounted Mauerlat is attached to the embedded plugs using metal brackets. The number of fastenings is not less than the number of rafter legs.
- Laying pieces of reinforcement into the brickwork. During the construction of walls, pieces of reinforcement are embedded into the brickwork to a depth of at least three rows. The reinforcement (diameter of at least 10 mm) is bent into an L-shape. The short edge (at least 25 cm) of the bent reinforcement is laid in the lower rows of the masonry, the long edge should stick out vertically from the masonry at the location of the axial marking of the future mauerlat. The length of the piece of reinforcement protruding from the masonry should be equal to the thickness of the mauerlat beam plus 25 cm. Then holes are drilled in the beam and it is placed on the protruding pieces of reinforcement. Next, the reinforcement is bent and fixed to the beam with a nail bracket. The number of fastenings is equal to the number of rafter legs.
Installation of the unit in the ridge part
The rafters are attached either to the mauerlat or to the ceilings. But how can fairly massive rafter legs be secured to these foundations? There are two main ways of attaching rafter legs directly to the Mauerlat - rigid and sliding connection options. The rigid version is suitable for layered rafters - in this case, the leg will “sit” firmly on the Mauerlat, which is what needs to be achieved.
This can be done by creating a notch in the rafter or by attaching a special support block to it. In the first case, a template is made, and the required dimensions of the notch on each rafter leg are cut out from it. The rafters rest on the edge of the mauerlat with just these notches and are fixed in place with nails or other fasteners. It is also additionally required to drive the nail vertically into the leg. The connection will be strong and rigid.
The rafters are attached to the mauerlat.
Creating notches can be replaced by attaching bars to the rafters that will rest against the mauerlat. The beams are attached to the rafters using metal corners - thanks to them, the leg simply cannot move to the side.
Nodes for supporting rafters on purlins and mauerlat
It should be remembered that if on one side of the rafter a rigid type of connection was implemented, then on the other side the type of fastening should be different. If you use a hard method on both sides, then the risk of deformation of the wooden structure in the future increases. Wood is a living and breathing material that has the ability to shrink and expand under the influence of a number of factors, including humidity and temperature.
If the house is built from logs or beams, then a sliding option for attaching rafter legs can be used. In this case, the wooden elements are able to move slightly. There are even special mounting systems called skids on the market. But you can also use metal corners that have oblong holes through which fasteners are driven/screwed.
Example of sliding rafters
Let's look at an example of how you can connect rafters to each other in the ridge area.
Step 1. To connect the rafters end-to-end, you need to saw off their upper part in such a way and at such an angle that two opposite elements meet each other above the ridge beam.
How will the rafters be connected?
Step 2. Next you need to make two wooden overlays (the shape is shown in the picture). They are applied on one and the other side of two previously joined rafter legs.
You also need to make two wooden overlays
Step 3. After this, the linings need to be secured with long nails on the rafter legs. You can also connect the rafter legs in the ridge area using a special toothed plate.
Fastening wooden linings
A special plate can also be used
The Mauerlat has rotted. How to carry out repairs without completely dismantling the roof
Mauerlat is the most inconspicuous, but very important element of the roof. It is the foundation on which the rafter system rests and distributes the weight of the roof over the entire surface of the wall. The Mauerlat is made of timber and attached to the unloading belt. In houses made of timber and logs, the functions of the mauerlat are performed by the upper crown of the log house. The Mauerlat is fastened to a brick wall using studs embedded in the masonry. To protect against dampness, roofing material is laid over the unloading belt.
In order for the rafter system to be stable, the end of the rafter must rest on the Mauerlat with its entire plane. For this purpose, the interface unit is carefully adjusted and secured. When the Mauerlat rots, the rafter sags, the plane of the slope is disrupted, and leaks and aesthetic defects in the Onduville roof may occur. Further destruction of the Mauerlat leads to weakening of the rafter system and failure of the roof.
Local repairs to the Mauerlat can be performed without completely dismantling the roofing; in most cases, it is enough to open the eaves lining and remove several shingles over the damaged area. The main difficulty is to remove the nails without damaging the onduvil. To dismantle bitumen shingles, you can use a nail puller, having previously placed a 40x150 mm board or a grinder under the paw, carefully cutting off the heads of the nails. The second method is much easier, but requires some skill.
If the size of the affected area of the Mauerlat is small, repairs are carried out in the following sequence:
— at a distance of ≈ 0.5-1.0 m from the mauerlat, bumpers made of boards with a section of 50x150 mm are installed on the rafters on both sides. The hammers are attached to the rafters with nails;
- two struts are attached to the rafters, one end of which rests against the break, and the other rests on the mauerlat outside the rotten area. The struts are attached to the rafters using nails.
If a significant area is damaged, the struts are supported by an additional beam, installed as close as possible to the damaged mauerlat and secured to the wall or floor beams.
To prevent further rotting of the Mauerlat, it is necessary to remove the rotted wood, thoroughly treat the affected area with an antiseptic composition and eliminate the causes of rotting:
— waterproof the Mauerlat;
- treat the Mauerlat with an antiseptic composition;
— inspect the roof and eliminate leaks;
— ensure the effective operation of the roof ventilation system (clean the supply and exhaust ducts, bring their area into line with the area of the attic, remove foreign objects and ensure the free movement of air masses);
— on insulated roofs, you should check the serviceability of the vapor barrier and the efficiency of the ventilation system of the under-roof space.
After completion of the repair, the dismantled section of the roof is restored. The top shingles are carefully placed under the laid shingles and nailed through the old holes. Installation of the onduvilla at the repair site is carried out in accordance with the instructions.
Fasteners
So, to fasten the rafters at the bottom the following can be used:
- metal studs. In this case, you will also need reinforcing metal linings;
- nails and staples. Reliable, simple, not expensive. Frequently used option;
- nail strips made of galvanized steel. They have several rows of teeth about 8 mm high. These plates allow you to achieve the most durable and reliable connection.
Types of fasteners
Self-tapping screws, bolts, various metal corners, and brackets can also be used. Clamps, studs and other elements are used. As for the corners, they come with or without a notch and may differ in parameters, including the thickness of the metal and the number of holes for fasteners. There are also reinforced corners, with an additional stiffening rib on the bend.
Attaching the rafters to the mauerlat
Rafter fasteners
We suggest you read: Height of shelves in the steam room - All about the bath
Methods for attaching the Mauerlat
Hanging rafters can be attached to the Mauerlat in several ways:
- A groove is cut out on the rafters, and a metal pin is driven into the wall at a distance of 15 cm from the top edge. The rafter is placed on the mauerlat, tied with wire and pulled to the wall. The wire is wrapped around the pin.
- The second method involves laying out a brick stepped cornice. The Mauerlat is laid along the inner edge of the wall and a groove is made in it for the rafter leg.
- When using the third option, the rafters rest against the floor beams, which extend beyond the perimeter of the house up to half a meter. The beams are cut at an angle and secured with bolts. Using this method, you assemble a roof without a Mauerlat with your own hands.
How to arrange it correctly?
To construct the Mauerlat, it is necessary to use beams whose cross-section is equal to a third of the thickness of the main wall . Typically, timber with a cross section of 150 or 200 mm is suitable for this. It is not worth taking thicker ones, since this is an additional load on the wall, and it is quite difficult to lift beams of such a cross-section to a greater height.
If the mauerlat beams are joined, then the length of each part should be as large as possible. To illustrate this, the following example can be given: the standard length of any lumber is 6 meters. If the wall on which the rafters will rest is 8 meters long, then for the Mauerlat you need to take two beams of 4 meters each. Using a six-meter beam and a two-meter “sawing” would be a mistake.
Before strengthening the beam on the wall, it must be protected from moisture . To do this, just wrap it in roofing felt and secure it with a construction stapler (the height of the staple is at least 10 mm).
The Mauerlat beam is laid along the inner edge of the main wall or exactly along the center line. Otherwise, you will not be able to securely fasten it. At the junction with the cross beam, a half-wood cut is made, a hole is drilled and a dowel is driven in. The corner of the connection is secured with a construction clamp. It must be hammered in so that the hypotenuse of an isosceles right triangle is formed.
Connection of rafters in the ridge area
In the upper part, the rafter legs are also attached in one of two main ways - end-to-end or directly to the ridge girder. In the first case, the upper part of the rafters is sawed off at a certain angle and two opposite legs rest against each other at the place of the cut. It is most convenient to make cuts using a pre-made template, with the help of which it will be easier to maintain the correct angle, which depends on the angle of the roof slope.
Fastening the rafters to the roof
The rafters can also be overlapped. In this case, the ends are not cut off; fastening is done between the side planes using pins. This, by the way, is the easiest way to connect.
Methods for attaching rafter legs
Dacha48.ru
I somehow omitted this question when writing an article about beams and, as it turned out later, it was in vain! Let's figure out what's what.
In general, the Mauerlat has two main purposes.
The first is to take the load from the beams and distribute it evenly onto the wall. And in the second case, transfer the loads from the “thrust” of the rafters. This is when building a simple roof, when the rafters on top rest against each other, and the bottom is cut into the mauerlat, and there are no additional contractions or tightening. In general, not my case. Therefore, I am considering here the first purpose of the Mauerlat.
The roof mass is huge! It is necessary to take into account everything: floor beams, the entire rafter system, the ceiling, insulation, sheathing, the roof itself, the mass of rubbish that will be stored in the attic, the snow on this roof. In general, it runs up quite a bit, and all this puts pressure directly on my gas silicate, trying to push it through and destroy it.
When I started building the roof, I roughly figured out what was what.
So:
- 8 cubic meters of wood (dry pine weight 650-700 kg) - 5600 kg;
- about 70 OSB sheets (about 16 kg each) - 1120 kg;
- soft roof 210 square meters (weight of one square roof 8.5 kg) - 1615 kg;
- insulation 22 cubes (37 kg each) - 814 kg
- snow load according to SNiP 2.01.07-85 - 31860 kg
Here, I think, it’s worth understanding a little. We look for SNiP with any search engine. I’m not providing the link because it’s harmful, but because today the link is SNiP, and tomorrow I don’t know what. Paragraph 5.2 of SNiP states: the calculated value of the weight of snow cover Sg per 1 m2 of horizontal surface of the earth should be taken depending on the snow region of the Russian Federation. This is not the area of the roof, but the area of the horizontal surface of the roof. In other words, this is the area of land that the roof covers. For example, if you cover 100 m2 of area with a roof
and make a gable roof at an angle of 60 degrees, then the roof area will increase exactly 2 times, and the area of the horizontal surface of the earth under this roof will remain 100 square meters.
And snow will fall on this roof as much as 100 square meters of land. This seems to have been sorted out.
The dimensions of my house are 12x13.5, the roof protrudes 30 cm on each side. The horizontal surface is 12.6 x 14.1 = 177 m2. Using map number 1 (Zonation of the territory of the Russian Federation according to the estimated weight of the snow cover of the earth), we look for our settlement, find out the snow region,
put it in the table.
The number in brackets, in my case 180, will indicate the load per 1 m2. We multiply 177x180, we get almost 32 tons. If you add everything up (both the snow and the roof), you get an impressive colossus - weighing 41 tons!!! My poor blocks...
We look at the picture and count the points where the beam lies on the block. I counted 126 points.
Our block has a width of 20 cm, the width of the beam is 5 cm. We multiply one by the other, we get the area of \u200b\u200bone point of 100 cm2. We divide 41,000 kg by the number of points, we get 325 kg of pressure on each point or 3.25 kg per cm2.
We find out the compressive strength of the material. In my case, according to the manufacturer, destruction occurs at a load of 27 kg/cm2, which, you see, is much more than 3.25? It is for this reason that I decided that I did not need a Mauerlat.
Features of the Mauerlat device depending on the type of roof
A gable roof is based on a triangle, which gives it rigidity. It contains the following elements:
- Mauerlat are beams laid directly on the outer walls along the entire perimeter of the house. Fastening of these elements is most often done using anchor bolts. The recommended material for the manufacture of elements is coniferous wood. The cross-section of the beams has the shape of a square with sides of 100*100 mm or 150*150 mm. It is on the Mauerlat that the rafters rest, and the load from the entire system is transferred to the external walls.
- A bench is a beam of a certain length into which the racks rest. It is laid in the direction of the internal load-bearing wall. The element is used when arranging the roof of large houses.
- Struts are elements made from small bars. They are installed at an angle between the post and the rafters. This arrangement helps strengthen the rafters and increase the load-bearing capacity of the roof.
- Racks are roof elements located vertically. Through this element the load from the ridge beam is transferred to the walls. The racks are located between the rafters.
- The tie rods are beams that connect the rafter legs at the bottom. This element is the base of the truss triangle. Like braces, these beams make wooden roof trusses stronger and more resistant to various loads.
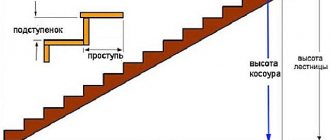
- Rafter legs are boards of a certain length, having a cross-section of 5*15 cm or 10*15 cm. The elements are connected to each other at an angle, forming the vertex of a triangle. Two connected rafter legs are called a truss. The number of such structures is determined by the length of the house. In this case, the distance between the farms can be no more than 1.2 meters and no less than 0.6 meters. When calculating the pitch of the rafter legs, the total weight of the roof, wind and snow load should be taken into account.
- The ridge is located at the highest point of the roof and is a beam that serves as a connection for the slopes. This element is supported from below by vertical posts, and the ends of the rafters are attached to it from the sides. In some cases, instead of timber, two boards are used, connected at a certain angle and nailed to the top of the rafters on both sides.
A do-it-yourself gable roof involves making sheathing from boards or timber, which are nailed onto the rafters in a perpendicular direction. Depending on the roofing material, the sheathing can be continuous or with gaps.
Depending on the type of roof - gable, three or four slopes, as well as hip or single slope, the Mauerlat will have fastening nuances.
The support beam for the rafter system of this type of roof requires increasing the height of one wall, since there is no slope. To do this, use the formula for calculating a right triangle. The thickness of the Mauerlat depends on the angle of the pitched roof. First, the top layer of the wall is covered with roofing felt, then the beam is fixed to the wall with anchors. The horizontal position is measured with a level, then the bolts are tightened.
In this case, the device is always fixed on two opposite walls - the roof will rest on them. When building a house from timber or logs, such a device will not be needed. If the house has a load-bearing wall in the center, then the Mauerlat captures 3 points of support - parallel and load-bearing. The distance from the outer edge of the wall should be at least 5 cm.
The support beam in this design is also installed around the perimeter with support on the load-bearing wall. The device involves distributing the load of the roof onto the walls. A timber with a cross section of 100x100 mm or 150x150 mm is suitable here. Coniferous lumber is used as timber. Before installation, it is treated with an antiseptic. Floor beams are installed on top of the Mauerlat.
The hipped roof has a rectangular envelope design or 4 identical triangles. The main goal is to prevent the roof from moving away from the axes of the Mauerlat. The structural elements are fixed on 4 sides of the walls. This is done with studs, anchors or wire, sometimes wooden plugs are used - depending on the material of the walls. A hipped roof is considered the most resistant to wind, but its design still requires the installation of a support beam.
We suggest you read: How to cover tow between logs
The roof support beam is installed around the perimeter of the walls, as well as on the load-bearing elements of the partitions, if present. To relieve the load on the walls and increase rigidity, a diagonal jumper is installed between two adjacent elements of the Mauerlat. The support beam must have a cross-section of 100x150 mm.
How to install the Mauerlat yourself
Let's look at how to do it yourself and mount the Mauerlat correctly. To make the frame, the material from which the elements of the rafter system are made is used.
The material for the Mauerlat can be used:
- wood;
- steel profile.
It is important to ensure the continuity of the supporting contour and reliable fixation of the joints. In most cases, a reliable roof plate is made from square-section wooden beams with a side size of 15 or 20 cm. It is not practical to increase the cross-section of the beam, which is associated with additional costs and increased load on load-bearing walls. If the material of the required cross-section is not available, you can make a support beam of a composite structure using boards 5 centimeters thick.
Carry out construction activities for installing the Mauerlat according to the following algorithm:
- Clean the supporting surface of the main walls from construction debris and dirt.
- Lay two layers of waterproofing material around the perimeter, which can be ordinary roofing felt or polyethylene.
Prerequisite: the Mauerlat must be laid closer to the inner edge of the wall and there must be at least a little protection on the outside
- Cut blanks from wooden beams, the length of which corresponds to the size of the walls.
- Carry out cutting of corner joints and joints of timber.
- Treat the workpieces with antiseptic impregnation and fire-retardant compound.
- Mark the coordinates of the holes for fastening the support frame elements, using a flat board attached to the fasteners.
- Drill the beam, ensuring that the holes you make are perpendicular to the top and bottom edges.
- If necessary, join the beams using an oblique cut, self-tapping screws, nails or bolts.
- Secure the corner elements of the resulting frame using plates or staples.
- Connect the assembled roof plate to the fasteners and secure according to the chosen fastening method.
- Check the horizontal installation of the support frame using a building level.
- Install shims, if necessary, to ensure the required position.
Please note that the Mauerlat can be installed either along the center line of the main walls or even along the edge. In this case, the distance from the outer edge of the wall to the wall of the beam should not exceed 50 mm. It is advisable not to splice parts of the support frame, but to use solid beams.
Technology for attaching rafters to the Mauerlat
In this instruction, we will look at how cuts are made on the rafter legs, and how the structural parts themselves are attached to the Mauerlat.
Step 1. To make the correct cut on the rafter leg, it is important to apply markings. It is most convenient in this case to use squares and a pencil.
Marking
Step 2. Next, you should make cuts along the applied markings. To do this, you can use a jigsaw or a regular handsaw. To speed up the work, it is recommended to use the first option. The resulting “heel” or cut will be laid directly on the already installed Mauerlat.
Making cuts
You can use a hand saw for work
The resulting “heel”
Step 3. Next, the leg with the notch should be installed in its place.
Installing a leg with a gash
Step 4. Two large metal corners are installed on one and the other side of the rafter leg.
Metal corners are attached
Step 5. In the side parts, the corners are fixed with fasteners - for example, self-tapping screws, nails. They need to be screwed or driven into small holes - at least 4 pieces in each direction.
Self-tapping screws are used for fastening
Another photo of the process
Step 6. Next, the rafter leg needs to be drilled through - the hole should be suitable for a pin with a diameter of 12 mm.
A through hole is made
Step 7. Next, you need to insert a pin into the resulting hole and tighten the corners together, tightening the nut on the other side of the pin.
Tightening the corners
Step 8. After this, you need to install the “grouse” into the Mauerlat through the hole in the other side of the corner. “Capercaillie” is also a fastener.
After this, you need to install the “grouse”
Step 9. Next you need to install the small corners. They are attached to the mauerlat and rafter leg, but on the other side of the heel.
Fastening small corners
By the way, you can now use various online calculators to calculate rafter cut angles. There you can specify all the necessary roofing parameters, and the system will produce the desired result in a matter of seconds.
What is the difference between layered and hanging rafter systems?
Before assembling a gable roof, you need to know some features of its structure. A hanging rafter system is installed when the house is small in size and there is no internal load-bearing wall. In this case, the rafters are connected at a certain angle, making appropriate cuts at their ends; nails are used for connection.
When installing such a rafter system, the posts and ridge are not made, and the support of the lower ends of the rafters falls on the external load-bearing walls. To make the structure more durable, the top tightening should be located no further than 0.5 meters from the top. Sometimes floor beams are used as tie-downs. The absence of racks frees up the attic space, which allows it to be used for arranging the attic floor.
If the house has an internal load-bearing wall, then it is more effective to use a layered rafter system. In this case, the bed is laid, support posts are fixed on it, onto which the ridge is nailed. This method is considered simpler and more financially profitable. When designing ceilings at different levels, the studs can be replaced with a brick wall, which will divide the attic space into two parts. A gable roof can also be made with different slopes along the length, which is also very beautiful and practical.
Layered rafters are installed in the following order:
- The load-bearing wall, located in the center of the house, is covered with waterproofing material.
- A bench is laid on top and secured with bolts or metal brackets.
- Racks made of beams with a cross section of 10*10 cm are placed on the bench.
- Purlins are nailed on top of the racks in a horizontal direction, strengthening the structure with temporary spacers.
- Install the rafters and fix them.
After installing the main structural elements, the wooden surfaces are treated with fire retardants.