In addition to the usual materials for creating children's crafts and decorative elements, you can use simple grains that are found in every kitchen.
A handmade craft made from grain will help a child develop his fine motor skills and imagination, and will also be an excellent reason to spend quality time with his parents.
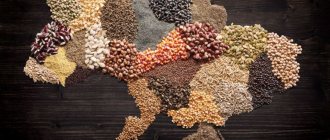
For creativity, you can choose almost any grain: from small millet to large coffee beans and beans. The choice of material depends on what kind of craft you want to make.
Topiary - a universal gift
Topiary is a win-win solution if you want to make an original gift for March 8, New Year, wedding, birthday or Valentine's Day.
To make one of the versions of this “European tree” with your own hands you will need:
- one package of split green peas, which can be purchased at any grocery store;
- a foam ball with a diameter of 20 cm, sold in art stores or through Internet sites with decoration themes;
- PVA and hot melt glue;
- package of floral moss;
- pots, preferably a durable clay one;
- a small wooden skewer or branch, a knife;
- floral foam or polystyrene foam;
- acrylic or water-based paints.
After visiting a craft store and purchasing materials, start implementing:
- Paint the flowerpot and stem in the desired tone, or you can apply a design.
- Then tint the base ball green.
- When the paint has dried, make a 3 cm indentation at the base of the crown.
- Glue part of the ball, sprinkle peas.
- Gradually you will fill the entire surface with peas. The future crown must be left until the glue has completely polymerized, about 10-12 hours.
- You need to apply glue into the recess and secure the barrel.
- Now put the foam in the flowerpot and decorate the surface with moss.
- Topiary is ready to surprise your friends!
Topiary
Using grains you can make a so-called tree of happiness or topiary. Such an unusual item will fit well into the kitchen interior and become its original decoration. The most beautiful crafts are made from coffee beans.
To create a topiary you will need a small decorative pot for the tree, a wire or pencil for the trunk, a foam ball or plain paper (you can also use foil) to create a crown, a heat gun with glue sticks, coffee beans, tape, plaster mixture and elements for decoration (ribbons, beads, paint).
First you need to form a crown. It can be either simply round or have the shape of a heart, square, cone or any other - it depends on your imagination.
Immediately make a mark on the crown in the place where the trunk will be attached - this will prevent damage to the topiary in the future if the decor is applied to the attachment point.
Next, you need to tint the ball well with paint so that the gaps between the decor are not so noticeable. To do this, you need to pour a little acrylic of the desired color into a container and apply the paint to the foam using a dry sponge.
After the ball has dried, you can begin gluing the decor. It is best to think through and try on all the decorations on the ball before you glue the first grains or beads. For inspiration and new ideas, you can look online for photos of similar crafts made from grains.
Read here: Craft rocket: how to make a decorative rocket out of cardboard and paper, bottles and cans (80 photos)
The trunk of the tree also needs decoration. It is best to use tape for this purpose - tape or acrylic. If desired, you can also use satin ribbons.
After the crown and trunk are completely ready, they can be connected to each other. To do this, a recess is made in the ball with a diameter corresponding to the width of the trunk. The recess is filled with hot glue and the end of the barrel is placed there until it stops.
To install the topiary evenly in a pot, you need to fill it with a gypsum mixture, place the free end of the trunk there and wait until the mixture hardens completely. The top of the plaster can be covered with small stones, beads or moss. The original topiary is ready!
Magnet photo frame made of cereals for the refrigerator
Prepare for work:
- cereals of different colors, shapes and sizes;
- cardboard and regular pencil;
- scissors with a ruler, a heat gun, a couple of magnets.
Steps for making a magnet frame from cereals:
- Draw a frame on the cardboard, then cut it out.
- Using a heat gun, cover the base with cereal.
- Glue the magnet to the back of the frame.
At this point the work is completed - the magnet in the form of a frame made of cereal with decor is ready to settle on the refrigerator door!
Check out the photo gallery, here you will find ideas for crafts in the form of frames made from cereals.
Decorating eggs with cereals
You will need: boiled eggs, various cereals at your discretion, PVA glue, brush, felt-tip pens if desired.
Master Class
- Apply glue to the egg or part of it using a brush.
- Dump the egg into the cereal.
- If desired, draw a face and decorate it to your taste.
The Easter egg made from cereal is ready! You can use buckwheat, rice, semolina, coffee beans, Easter sprinkles and even pasta. Fantasize and surprise everyone!
DIY cereal wreath
Prepare for this work:
- two base wreaths made of straw with a diameter of 20-25 cm;
- peas in green halves;
- glue with a brush;
- foil and twine.
Subsequence:
- Apply glue in zones, starting from the inside.
- Sprinkle portions of peas onto the glue.
- After the glue has set on the inside, decorate the outside.
- Prepare a piece of twine 20-50 cm.
- Make a pendant out of twine and decorate the wall.
Original Easter eggs
Peas and any other cereal can also be used to decorate Easter eggs.
Boil the eggs until ready. Dry, cool, coat with glue. We glue peas, rice, and other cereals onto the eggshell in a dense layer, creating an original design. At the end of the work, the eggs can be painted with gouache paints or coated with varnish for shine.
At the end of the work, beautifully place the Easter eggs on a decorative dish.
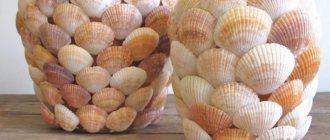
Interior ball decorated with beans
For this item, prepare:
- a ball of polystyrene foam and bean grains;
- paints with brushes, PVA glue.
Steps:
NOTE!
- Peonies made of corrugated paper - how to make a beautiful paper bouquet with your own hands quickly and easily (110 photos)
Frameless furniture - tips for choosing a design, the best models and tips for their use (110 photos)
Cardboard house - step-by-step instructions on how to make a beautiful toy house with your own hands (75 photos)
- Paint the ball and let dry
- Coat half of the ball with glue and apply cereal.
- After drying, you can paint the item if desired.
Christmas tree toys made from different seeds and cereals
For this work, prepare:
- plastic bases;
- various cereals;
- PVA with a tassel, satin ribbons;
- acrylic varnish and a disposable plate.
Work steps:
- Pour grains or cereal into a plate.
- Cover the base with thick PVA.
- Roll the toy in the filling.
- Apply fine grains in 2 layers.
- Dry the toys, varnish them, add ribbons.
- Hang crafts on the Christmas tree with your children - now your family is ready for the holiday!
Creative materials
In order to begin work, it is necessary to prepare grains of various crops. You may need to create paintings:
Also, leaves, beads, fabric and some other items can be used as auxiliary materials, with which you can decorate the product. It is imperative to have a tool kit. Here you will need the following simple items:
In order to make corrections in the drawing, a needle may be needed. It is advisable to varnish the finished canvas. It is better to choose thick cardboard for the base of the picture. This is necessary so that the picture does not lose its shape. It is best to place the finished work in a frame. It can be plastic or wooden. Thus, paintings from cereals and seeds
will look much more beautiful, they will be able to fit into any eco-friendly interior.
Contrasting pattern of black and white beans
For this work, prepare:
- beans of two colors;
- frame and base;
- brush and PVA glue, black with white paint;
- simple pencil.
Steps:
- Draw a plot.
- Color the zones.
- Apply glue to the details of the design and glue the beans.
- Let the painting dry, then frame and hang.
Using this technique, you can create multi-colored scenes to suit every taste. Choose simple shapes. Take large fallen leaves and make a grain craft with the children on the theme of autumn.
How to make a “Ladybug” applique from semolina?
Ladybug from cereals
- Cut out a piece of colored paper in the shape of a leaf and draw the veins with a ladybug. After this, coat the cow with glue
- Sprinkle semolina on top and turn the sheet over. Shake it to remove any excess
- Now you can paint the surface, and you will get a beautiful applique
Cereal decor on eggs
Such crafts will come in handy before Easter, and children will really enjoy making fun paraphernalia. Prepare:
- hard-boiled eggs;
- various small cereals;
- PVA, felt-tip pens and a brush.
Steps:
- Apply glue to the top of the egg.
- Dip into a mound of cereal.
- Leave to dry.
- Finally, draw in the eyes and smile.
How to make a “Sunflower” applique from cereals and seeds?
Sunflower
Seeds also look great on applications. You can use simple seeds or seeds of other colors. For example, this is how you can make a simple sunflower:
- Draw a sunflower on a sheet of cardboard
- Cover the middle with seeds. To do this, first apply glue and then scatter the seeds
- Now spread glue on the petals and use corn grits for decoration
- Apply glue pointwise to different places and sprinkle blue cereal on them.
Cereal napkin rings
Prepare a cardboard roll, this can be the basis of disposable towels or something similar. Other materials:
- PVA glue and brush;
- sharp knife and paints;
- different cereals.
Steps:
- Cut the cardboard roll into discs 4-5 cm wide.
- Lubricate with glue, sprinkle with cereal, let dry.
- Tint to your taste.
The decor for table setting is ready!
Blackberry
A master class on crafts made from millet grain is gaining popularity. This material produces unusually realistic blackberries and raspberries.
To make berries, you will need: thin floral wire, foil, silicone or hot melt adhesive, millet, acrylic, sponge, acrylic varnish, green corrugated paper.
The creation of berries begins with their formation using wire and foil. To do this, take a piece of wire 3-5 cm, one end of which is bent into a loop. The loop is wrapped in foil, which must be pressed with your fingers to give the raspberries a slightly triangular shape.
Afterwards, glue is applied to the entire surface of the foil blank and grains are sprinkled. They should be carefully adjusted with your fingers to distribute them evenly.
The workpiece can be stuck into the sponge until the glue dries completely - this will protect the workpiece from deformation during the drying process.
After the glue has dried, you can start coloring the berries. Using a dry sponge, you need to apply acrylic to give the berries color. After coloring the berries, you need to dry them again for several hours.
At this time, you can start making sepals. To do this, you need to make a sepal template from plain paper and transfer it to corrugated paper. Next, you need to cut out the resulting parts and give them a more natural shape by slightly twisting the tips of the sheets and giving the edges the shape of small teeth.
Read here: Crafts from matches: detailed instructions, diagrams and a master class for making various crafts (95 photo ideas)
After the paint has dried, you need to cover the crafts with a final layer of varnish, make a puncture in the sepals and stick them to the berries.
Decorative berries can become a hair decoration, an element of an artificial bouquet or topiary.
Simple decor with cereals
Cereals are great for filling clear bottles, jars and vases. Use this technique to add accents to your interior. Depending on your style, choose grains in natural colors or color your own!
Molecule
To create a three-dimensional crystal lattice, we need pea cereal and a set of toothpicks.
Soak the peas in warm water for 2-3 hours. While the cereal acquires the desired structure, we draw on paper a model of the future craft. Mark the places of the peas with dots.
Once the peas are soaked, you can begin to act! Just string the peas onto toothpicks and create the desired model.
There is no need to worry about the safety of the craft - toothpicks are held very tightly in dried peas!
Coloring of cereals
Young family members willingly create children's crafts from cereals; children are especially attracted to colorful materials.
There are 2 approaches to coloring cereals:
- Enhance the natural color of the grains.
- Repaint the cereal in a bright tone.
To get a vibrant color like a paint can, you need a white base. Therefore, choose rice, pumpkin seeds or white beans.
If you need a shape or texture, for example, buckwheat, then paint it in 2 stages - first white, then bright.
We create applications and paintings with our own hands
The topic of work can be anything. But crafts made from grains and other natural materials on the theme of spring turn out to be very beautiful and original. Spring landscapes (crafts made from watermelon seeds and cereals), lush flowers (flowers made from pumpkin seeds are especially good - asters, sunflowers, snowdrops) are great ideas for children's creativity.
The more different cereals, seeds and seeds you use, the better, because they all not only vary in size and shape, but also in color and texture. That is, you will have a huge space for imagination and creativity. And if your grain craft requires some special colors, then you can always paint your materials using watercolors or gouache.
Try starting with a simple appliqué. For example, as a craft, you can make a basket with flowers from pumpkin seeds.
- Draw the outlines of the basket on a piece of thick paper or cardboard and spread them with glue.
- Next, place pumpkin seeds along these contours to make a three-dimensional basket.
- Inside, draw flowers in exactly the same way - these can be sunflowers, asters, poppies, daisies, snowdrops or any others. Use seeds of various sizes to create them - pumpkin, watermelon, sunflower seeds.
- The centers of the flowers can be made from beads or filled with fine grains.
- Paint your bouquet and paint the basket brown. You can decorate the applique with sparkles or stickers, or add some plasticine details.
It’s easy to make a vase with flowers on the spring theme - just like a basket. To keep children's crafts made from seeds for a long time and not fall off, you can spray them with hairspray or coat them with clear nail polish.
A favorite activity for children will be creating applications and paintings depicting various animals, birds or fish. Together with your child, come up with a plot and bring the fairy tale to life using crafts made from pumpkin or watermelon seeds, as well as other various materials.
Fish, hedgehogs, bees, snails, ducks, cats and other animals are incredibly cute. See how easy it is to make a picture of a hedgehog as a craft from seeds.
- Print out a drawing of a hedgehog or draw one yourself.
- Apply a good layer of glue to his back and start gradually attaching seeds to him (these could be watermelon seeds or sunflower seeds).
- You need to glue the seeds so that they all point with their sharp tips in one direction.
- You can simply paint the rest of the hedgehog’s body, and attach mushrooms or fruits made from plasticine to its spines.
But what an interesting picture you can create with a peacock using watermelon seeds, as well as semolina and corn grits.
- Draw a peacock on thick paper or print out a ready-made template (even regular coloring books will do).
- Apply glue to the round ends of the feathers and cover them with corn grits. Do the same with the bird's legs.
- When it dries a little, shake off the remaining residue from the sheet.
- Decorate the feathers with watermelon seeds, gluing each one tightly.
- After some time, cover the entire remaining peacock image with glue, except for the head, and fill it with semolina, while clearing the contours with a toothpick.
- You can paint the head and decorate the picture as you wish. As you can see, crafts from watermelon seeds are very simple to make.
Will serve as a beautiful decoration for your home. To make it you will need very simple and affordable materials that can be found in every home - cereals, but twigs of suitable shape and length can easily be found on the street. Children will be especially interested in the process of creating this kind of crafts.
Therefore, if you have small children in your family, you can safely get creative with them and create any kind, including this one. Make such unusual and exclusive coral branches for yourself and create a bouquet from them. They can be placed in a tall vase or in a ball vase with shells and sea stones poured into it.
And in general, such corals will look harmonious in tandem with others. This original decoration looks great in the bathroom or living room. Now let's get back to the master class itself.
To make corals from branches and cereals
we will need the following materials:
- a few branches from trees,
- peas,
- PVA glue,
- spray red paint.
Rice and pea corals master class.
First, let's prepare all the materials we need. The main thing in our craft will be a branch of any tree, which we will try to turn into sea coral. Choose branches that have branches - they are most suitable for this, because sea corals have a beautiful lush shape.
Place rice and peas in bowls. Peas should not be whole, but in halves.
Now let's get down to creativity. Using a brush, apply PVA glue to part of the branch. There is no need to coat the entire branch with glue at once; it’s easier to work with each section separately. After applying the glue, dip the twig into the rice, which sticks well to it. Next, carefully glue the pea halves into the empty areas.
Thus, cover the entire branch with cereals - rice and peas.
After this, we need to give our corals time to dry. Place the coral sprigs vertically in the vase and leave until the next day.
Now that the corals are completely dry, you can apply spray paint to them. You can paint corals any color. They look beautiful in white, red and blue. For my craft, I used universal enamel in the form of a spray. In general, any aerosol paint is a godsend for anyone who loves handicrafts and making crafts with their own hands. After all, with its help, in just a few minutes, you can apply the desired color to any surface in an even layer, rather than painting each element with a brush.
Place the coral branches on the newspaper and paint them with the paint you have. Look carefully to ensure there are no unpainted areas. You can also paint a couple of branches white, and the remaining branches red. This will be even more original.
One day, the boys and I decided to make a little craft out of toothpicks. Somehow we already made simple shapes with them, connecting toothpicks with balls of plasticine. And now it was decided to try pea construction.
Single color dyeing
Prepare
- bags made of dense polyethylene, zip bags of a suitable size;
- alcohol or vinegar, food coloring, grain measure and disposable plates.
Steps:
- Take a bag, add 50 grams of cereal.
- Pour in 50 ml of alcohol or 100 ml of vinegar.
- Add some coloring.
- Close the bag and spread the paint inside over the cereal.
- Pour the cereal onto a plate and leave to dry
How to paint cereals for applique?
How to paint cereal?
There are several ways to color cereals and each of them can be used to create crafts.
The first coloring method is simple and can be used with children:
- Dilute the gouache with a little water
- Place cereal on cardboard in one layer
- Paint the grains and leave them for a while to dry
The second coloring method is also simple:
- Pour gouache into a plate and add cereal to it
- Take a dry brush and mix everything. The cereal will stick together, but that's okay. After drying it will be crumbly again
- If you want to make the most of your grains, use a slightly different coloring method:
- Pour as much cereal into a plate as you need and add water
- Pour in a little gouache and leave it overnight
- Place the finished cereal on any surface and let dry
You can prepare the grains in advance and place them in jars without lids. This way you will have everything ready for new applications.