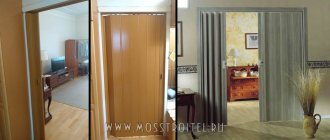
How and how to finish door slopes in a house and apartment ↑
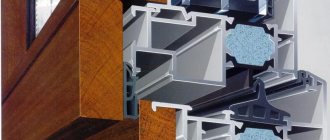
From the outside, a small gap between the opening and the frame can be closed using platbands - special shaped strips, usually included in the door installation kit. However, from the inside of the room there remains a fairly wide area of exposed brickwork with layers of concrete mortar, and to ensure the proper level of tightness it must be finished not with one, but with several types of materials - insulating, load-bearing and decorative.
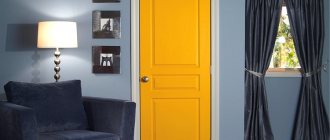
Finishing slopes improves the microclimate and is part of the design
According to the installation method, there are 3 options for finishing slopes for entrance doors:
- Applying cement mortar directly to the wall and further plastering it. It is considered the most reliable and cost-effective method, but at the same time the most labor-intensive. To lay out perfectly smooth surfaces, you must have some experience both in preparing the plaster solution and in its application.
- Gluing finishing panels using a suitable adhesive mixture. Finishing door slopes using this principle is more expensive, while the “wet” installation process is quite long (each layer must be allowed to dry), but it is quite accessible even to a beginner in the repair business.
- Fastening finishing elements to a pre-assembled frame. The fastest solution that allows you to achieve a perfectly flat surface, hide telephone or electrical communications, and install lighting equipment in the door block. The downside is the low mechanical strength required to protect the door fasteners from breaking.
It is advisable to isolate the slopes from the concrete walls with a layer of polyurethane foam or mineral wool
In order for the slopes to withstand temperature changes, especially noticeable if the door leads directly to the street, and not to the corridor or landing, it is advisable to install a layer of thermal insulation on the wall: it can be mineral wool, polystyrene foam or its modification - penoizol. If installing insulation does not allow the width of the opening (according to SNiP, the dimensions of the doorway must be at least 0.8 x 1.9 m), cover the slopes with sandwich panels.
Frame slopes are indispensable when the opening is too wide and a large volume of cement mixture is required to seal it. They are also chosen when there are damp walls, or there is no time to do finishing work - plastic or wooden panels themselves look presentable. In order to fix thin sheets, the space between them and the walls is filled with polyurethane foam sealant, which also serves as a heat barrier.
You can choose the shade of the sandwich panel to match the color of the front door
In addition to the protective function, the slopes perform the task of decorative design of the opening. To cover the rough surface, one of the following materials is layered onto concrete or drywall:
- paint – thanks to the varied palette, you can choose any shade, and, if desired, a textured pattern, thereby decorating the hallway space in an original way;
- wallpaper is a good choice for those who, at the same time as replacing a door, are making repairs in the corridor, since using the same wallpaper on the wall and slopes creates the impression of a monolithic surface (a step-by-step algorithm showing how to decorate slopes at the front door with wallpaper is described in the section on finishing operations);
- one-sided sandwich panels - due to the peculiarities of their structure (a layer of extruded polystyrene foam is attached to a sheet of polymer plastic), there is no need for additional measures for insulation and sound insulation of surfaces, and their minimal weight allows them to be attached directly to the wall using an adhesive method;
- plastic panels are considered a compromise option, since, despite the external similarity with sandwich panels, plastic is very fragile, and when finishing deep slopes it is very problematic to achieve uniform rigidity over the entire area;
- MDF is quite durable (withstands medium impact loads without causing scratches or dents) and easy to install material, allowing it to be installed even under conditions of increased operating load;
- laminate or parquet board - a wide variety of colors and textures allows you to choose a tone-on-tone panel with the canvas and door frame, and the high strength, designed for use as a floor covering, determines the long service life of the slopes.
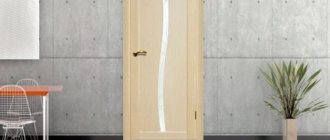
Laminate cladding
Recently, designers, trying to include the doorway into the overall interior picture, use atypical building materials to decorate it - ceramic tiles, mosaics, natural or artificial stone.
Artificial stone in the hallway looks modern
Tiling
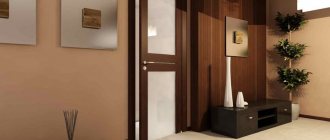
Interesting door jamb design options
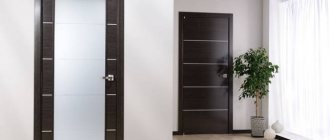
There are many options for decorating internal door slopes. The finishing with laminated panels in stained oak, wenge, and zebrawood looks beautiful.
The design of the door slopes is the final touch after finishing them.
Classic, baroque interiors are decorated with carved borders; for Empire, Gothic, and Renaissance styles, ceramic or stone mosaics are suitable.
This finishing option is good because these surfaces are quite easy to care for.
For antique interiors, plastic stucco molding, including patina, is suitable.
It has an attractive appearance, adds zest to the interior, and is impeccable in terms of performance.
Minimalist hallways are decorated with MDF panels matched to the walls, while loft hallways are decorated with artificial stone imitating red or white brick.
The result is original and unique, and the cost of materials is minimal.
Modern, budget interiors are finished with vinyl, PVC, and paintable plaster.
Some types of materials (plaster, chipboard, MDF and plasterboard without a decorative coating) need to be painted to blend harmoniously with the interior of the room.
Peculiarities
After installing the door, you want to relax, but the most important stage is just ahead. After installing the product in the opening, it turns out that the door slopes look, to say the least, ugly, and can spoil the first impression and the joy of replacing the door. A completely reasonable question arises: what can be used to cover the walls to make them look attractive.
The most popular options are to plaster and then paint or cover the space with laminate. Both options are practical, but when working with laminate you will have to do lathing. If you have absolutely no experience in carrying out construction work and want to spend a small amount, then plaster remains the most attractive option.
There are several reasons why you should choose plastering walls. Among the main advantages:
- there is no need to make a lath, which on interior doors will take up part of the space in the passage;
- there is no need to involve specialists in the work;
- low cost of material;
- it takes half as much time as in any other case when designing slopes.
But this method also has disadvantages that are worth knowing about:
- it is necessary to additionally coat the slopes with paint;
- from an aesthetic point of view, not the best option.
Working with laminate requires not only experience, but also patience. Creating a sheathing takes more time, additional tools will be required:
- hammer;
- glue;
- screwdriver
Surface preparation
This is a required item for most of the options listed. Only panels and strips fixed to the sheathing make it possible to do without leveling the slopes. But even in this case, it is advisable to smooth the surfaces at least in rough form and insulate them. It is convenient to lay the insulation in the cells of the sheathing.
If you plan to use a material that is attached with glue or that requires the most even surface possible, it is advisable to perform preliminary leveling using plaster or drywall. In both cases, you can form a beautiful outline with clear corners or a graceful arch.
It is easy to lay insulation under the drywall panels.
In this case, by pressing the insulation, you can form a gradual expansion of the doorway, as shown in the photo above.
Plastering of slopes is carried out either directly on a load-bearing wall (concrete, brick or block masonry), or on top of sheet insulation - foam plastic or extruded polystyrene foam.
For plastering over insulation, a reinforcing mesh is required - it significantly improves the adhesion of materials and strengthens the plaster layer.
The surface around the doorway will also have to be either sealed (leveled) with plasterboard or plastered.
For finishing with glue-based materials or thin-layer decorative plaster, you will need finishing putty - it removes minor irregularities and strengthens the layer of rough plaster.
Installation of drywall: 3 ways
This is another easy way to make attractive door frames with your own hands.
Finishing putty
Instead of the adhesive used for plastic, preference is given to conventional finishing putty, which has proven to be a good fixer for plasterboard sheets.
- Careful repeated measurement of all surfaces of the opening is the first necessary step. Markings are applied to the drywall, and the material is cut into blanks with a construction knife (metal hacksaw, jigsaw).
- After trying on all the elements in the opening, putty diluted with water to a paste-like consistency is applied to their “wrong side” in large “slap” patches. The parts are fixed on prepared (primed) slopes.
- If suddenly there is a need to fix them, then use supports - for example, a wooden beam. Having fixed the material, it is left in this state for 10-12 hours. Then the supports are removed and the composition is waited for to dry completely.
- The surface of plasterboard slopes is puttied, sanded, primed and painted.
Polyurethane foam
This material is used if the surface has been well prepared, meaning there are no large depressions (up to 30 mm deep). If there are any, then the potholes are first filled 1/3 with foam. Deeper defects require the intervention of cement mortar or starting plaster.
- A foam snake is applied to the back of the plasterboard blank; its thickness is no more than 10 mm. The part is pressed to the surface, then torn off and placed to the side. The purpose of this step is to wait for the foam to increase.
- After 5-8 minutes, the element is finally fixed and left until the composition hardens for 12-24 hours. The last step is to close the gaps between the drywall and the wall with plaster. Finish the slopes after the material has dried.
Both methods have a big advantage - simplicity and speed of surface design. But there are also disadvantages:
- pre-leveled surfaces are a prerequisite, otherwise ideal installation is impossible;
- there is a risk of bending of plasterboard elements;
- voids left between the wall and the material;
- low reliability of such finishing.
For those who want to get durable and beautiful door slopes, it is better to choose the next, more complex option.
Frame mounting
This method is universal, but also more labor-intensive, but the end often justifies the means. The frame is made of wooden beams or (better) from an aluminum profile. Such slopes can withstand almost any cladding: both tiles and artificial stone.
- Measure the opening - the dimensions of the racks, as well as the horizontal guides. The necessary elements are cut with a grinder or metal scissors.
- In the opening with a pitch of 300-400 mm, holes are made with a puncher into which plastic dowels are inserted. Constantly checking the geometry with a level, the segments are fixed with self-tapping screws. For reliability, jumper elements are installed.
- If work is carried out in the entrance door opening, then the slopes are additionally insulated. In this role, practical mineral wool, glass wool, polyurethane foam (in a very thin layer) or more expensive material - extruded polystyrene foam - are used.
- Plasterboard blanks are fastened around the perimeter, maintaining a distance of 200 mm. The caps are recessed into the skin by 1 mm, but no more. The outer corners are reinforced with perforated corners, they are fixed with self-tapping screws.
Drywall sheets mounted on a frame, polyurethane foam or putty are finished. The seams are glued with serpyanka, the surfaces are puttied, primed, then the finishing material is applied.
How to make slopes on the front door with the installation of panels using glue or foam
This method is suitable for relatively small uneven slopes, where insulation is not required and there will be no significant mechanical loads.
A special foam adhesive is used as a means of installation.
It can be applied to the panels themselves, immediately fixing them in place, but the option shown in the video is more convenient.
With this technology, the panels are cut exactly to size so that when installed in place, the side strips support the top. The lower part of the side strips can be supported with heavy objects or placed in guides (if a certain distance from the sheathing to the base surface is required).
First, the top panel is attached. It is placed tightly against the thrust surface (door frame) and is slightly deflected with the outer end down. Foam is blown into the resulting gap so that it is evenly distributed over the entire surface, but does not come out.
The side strips are mounted using the same principle.
Then all that remains is to close the joints with corners or mount the platbands first.
It is advisable to cut the plastic corner at the corners so that it fits tightly on the panel and wall.
To fix the corner, use the same foam or “liquid nails” glue.
This cladding method can be considered one of the cheapest and fastest.
Similarly, you can finish the opening both inside and outside with sandwich panels and plasterboard. When using the latter option, further finishing is required.
What materials can be used?
Next, we’ll talk about building materials used in finishing door slopes based on the degree of demand, price advantages and quality characteristics.
Dye
Decorating slopes with regular paint is the easiest and fastest way, but the aesthetic component in this case fades into the background. The main advantage of painting is the ability to quickly update the coating, as well as replace it at any time.
For painting, you can use water-based emulsion or special textured mixtures. There are many design options in this case. The use of paint is especially important when you want to complete repairs quickly.
Wallpaper
Wallpaper will look advantageous only if the door slopes have a flat base. Wallpaper is usually used when a complete renovation of the hallway is planned. The main advantage is the ability to visually expand the space in general and the doorway in particular, as well as create the impression of a monolithic surface of the door slope.
Gluing wallpaper is not difficult - anyone can handle this task. It is better to give preference to thick vinyl or non-woven wallpaper - they will lie more evenly on the wall surface and will last much longer than their paper counterparts.
Single-sided sandwich panels
Sandwich panels are made of plastic, but unlike PVC panels, their interior is filled with polyurethane sealant, rather than hollow. The main advantages of the material are:
- spectacular external design;
- ease of installation;
- ease of care;
- good thermal insulation;
- moisture and heat resistance;
- no finishing required;
- An absolutely even coating that allows you to create even wide slopes (up to 1.5 meters).
Important Among the disadvantages, it should be noted that over time, sandwich panels turn yellow, and when subjected to mechanical stress, cracks and scratches form on them
Plastic panels
On the construction market you can buy plastic for every taste and color - from plain white to unusual options for leather, wood and other materials. At the same time, installing plastic slopes will only take a couple of hours. The main rule when installing plastic panels, if you decide to trim the door slopes with plastic, is to handle the material carefully, as it is very fragile and can break even from slight pressure.
MDF
When choosing MDF panels for finishing slopes, you should take into account that they will only stick to walls coated with lime-cement mortar. The composition is applied to a surface previously treated with a primer. Special glue is used to attach the panels.
The advantages of the material are:
- laconic design - you can choose MDF panels to match the door leaf;
- high resistance to loads;
- no additional finishing is required - putty and painting, which saves time and money on installing panels.
Among the disadvantages, we note the high cost of the material and the complexity of installation.
Parquet board
There are many options for parquet boards on the construction market, which can be selected to match any type of door leaf. Wenge color models look beautiful and modern. Most often, parquet boards are used to decorate wooden doors or to match the floor covering.
Laminate
Laminate is notable for its strength and durability, which is why it is often used for finishing doors. It is well suited for finishing doors made of natural wood, while being cheap and accessible. In addition, there are options that imitate a wide variety of surfaces - stone, marble, etc., so you can choose a laminate for any type of entrance door.
Tip In addition, laminate is resistant to moisture and detergents, has a low specific gravity and is easy to install. This material can be mounted using either adhesives or short screws.
Slopes for entrance doors: plaster or drywall
The most common ways in which entrance door slopes can be finished is by covering them with plasterboard or using plaster. The main advantage of these methods is their relative simplicity and low cost, which attracts many DIY enthusiasts to these materials. By and large, almost all of them approach the issue of finishing slopes thoughtlessly, and only a few, understanding the full responsibility of this element of the entrance group, prefer to first study the features of technological processes and, most importantly, the capabilities of these materials. But they cannot be used under all operating conditions.
Let's start by looking at the question of what kind of doors we are talking about - those installed in an apartment or in a private house? The difference here is significant - while the former do not have direct contact with the street, the latter do. Close contact of the door leaf with cold air in winter is a prerequisite for the formation of condensation. Condensation is water, which will destroy the same drywall in the first year of operation, fungus will settle on it and eat it over time. In general, there will be troubles. If you are going to finish the slopes of the front door with plasterboard, then only on the doors of apartments in which there is an entrance between them and the street.
Finishing entrance door slopes with plasterboard photo
Cement-sand plaster is somewhat preferable in this regard, but, again, the fungus settles on it just as successfully. Here you need to take some additional measures - the opening itself needs to be treated with strong anti-fungal primers. In addition, a certain amount of this primer must be added to the solution itself. This is the only way to qualitatively finish the slope of the front door with your own hands in a private house.
Finishing door slopes with plaster photo
PVC slopes and polyurethane linings
Wherever PVC is used now! So the front door can be framed with it. Installation is quick, and the price of PVC slopes is quite low. But this material does not have many advantages.
PVC is fragile and easy to break. Sometimes it’s enough to just lean on it and all the work will go down the drain. The slope cannot be repaired; it will only have to be replaced. And in general, the service life of the material does not exceed a couple of years. Some people cover plastered slopes with plastic, but in reality it looks ugly and cheap.
Plastic slopes
By the way, you can also decorate the slopes with polyurethane overlays, which can imitate stucco. This option looks decent. But the price for such overlays is high. You need to glue the overlays on a flat surface, so you will still have to pre-plaster or cover the ends of the walls with plasterboard.
DIY door slopes - original ideas
How to make original slopes on doors without special expenses? Even the simplest option - painting - can be turned into a fun way of finishing. Alternatively, you can apply two layers of paint: the background layer is applied with a regular roller, and when it dries, a second layer of lighter or darker paint is applied with a texture tool. You can buy one or make one yourself - just wrap a standard paint roller with a piece of suede, so that the material forms waves, bends, indentations, in a word, texture.
- Another effect - colorwash - will allow the slopes and walls to look more airy, soft, if you want. To begin with, the main background is also applied, on top of which a lighter paint, closer to the background, is applied with a sponge or cloth. Using light washing movements or crosswise movements, rub the second layer, due to which a picture of airy lightness is formed. If you don’t have any time to fuss around, use stencils, which you can either purchase ready-made or cut out yourself.
- If you still have wallpaper after renovation, you can cover the slopes with it. This is quite practical, especially if the wallpaper is washable - after all, the doorway gets quite dirty.
- Slopes made of laminate or parquet boards are installed very quickly and look original. Just don’t forget to buy special corners to hide the joints of the dies at the corners. If you think about it, this method is very practical - laminated coating on the floor alone can last about 25 years, and on the walls even longer. Laminate is easy to clean, does not fade and is resistant to mechanical damage.
- Another quick and durable option is slopes made from MDF boards. It should be noted that MDF is still not as durable a material as laminate, but its installation is even simpler - you just need to cut strips in accordance with the width of the slopes, fix them with glue and decorate them with corners.
- Slopes made of artificial stone are more complex in design, but very beautiful and durable. Depending on the shape of the stone and its color, you can achieve the effect of antiquity or, conversely, create modern designs. The stone is attached mainly to a special adhesive base; to adjust individual elements you will need at least a grinder with a diamond wheel. To give a wet effect, be sure to coat the surface of the stone with polymer varnish.
- Ceramic tiles or mosaics look very impressive in a doorway, especially if you choose the right colors and placement. The option is very practical: durable, easy to clean from any dirt, does not attract or accumulate dust.
- Mirror tiles or mirror mosaics will give the doorway greater height and width. A do-it-yourself finishing option for modern interior design; slopes for interior doors look best from this material.
- The use of cork panels will allow you to create a very harmonious finish for the slopes, especially if the hallway has parquet, parquet boards or laminate. To increase the wear resistance of the material, it can be coated with a special elastic varnish for cork.
Before making door slopes, evaluate which materials or decorative elements you already have as a happy owner, perhaps this will give you a fresh idea. It is simply impossible to list all the options - in different parts of the world, designers come up with a wide variety of finishing methods. Surely, somewhere they are already experimenting with 3D slopes or figuring out how to use the free space. Indeed, why not arrange small niches, bookshelves or hiding places in the interior slopes? So don’t limit yourself in your imagination!
Methods for finishing the front door from the inside
You can make a new finish and slopes on the entrance metal or old wooden door.
The presence of a large number of finishing materials will help give the iron door the look of a classic wooden model, and make the plastic door leaf look similar, for example, to marble.
The following technological processes are used for interior finishing of entrance doors:
- upholstery;
- coloring;
- sheathing
It is quite possible that finishing the front door from the inside will require solving issues of sound insulation and insulation.
Upholstery
Upholstery of the inside of the front door with soft materials has recently found a second wind. This is due to the appearance on the market of artificial leather substitutes (vinyl leather, nitro artificial leather, etc.). The popularity of soft substitutes for natural leather is due to its excellent consumer qualities:
- low price;
- a large number of textures and colors;
- long service life, etc.
Artificial leather has serious disadvantages - it ignites quickly and is easily damaged by sharp objects.
Coloring
Painting is the easiest way to update a door panel
Painting is the easiest way to finish the inner surface of an outer door, allowing you to quickly and without large financial costs transform the latter beyond recognition.
- Oil paints have good adhesion to metal and wood. The glossy surface is resistant to mechanical stress and lasts for a long time. Disadvantage: long drying time.
- Acrylic and alkyd enamels are applied to any surface, dry quickly, and maintain a glossy shine for a long time.
- Nitrocellulose paints are used only for painting interior surfaces.
The negative side of painting is that it is impossible to provide sound insulation and additional insulation.
Sheathing
Sheathing as a way to update the inside of the door
Sheathing the inside surface of the front door with rigid materials has recently become widespread. This method has no obvious disadvantages. Among the advantages are:
- a large range of products (material, color, texture, etc.);
- long service life;
- the possibility of arranging sound and heat insulation;
- easy care, etc.
The following materials are used for cladding:
- natural wood;
- PVC panels, fiberboard, chipboard, MDF, etc.;
- decorative rock.
Boards made of pressure-glued wood, used for lining the inside of the door leaf, give the hallway a respectable appearance, indicating the well-being of the owner of an apartment or private house. The service life of this environmentally friendly material exceeds 50 years. The natural pattern of wood and its texture allow a door covered with it to fit into any interior.
Often the inside of the door leaf is sheathed with MDF sheets, chipboard or moisture-resistant plywood. However, externally, these materials are aesthetically unattractive and therefore require additional veneering, lamination with a special protective film or painting.
A less popular method is covering the door with laminate or solid panels made of PVC or fiberboard, assembled from standard panels with a width of 10 to 50 cm. The materials give the door panels a fairly presentable appearance, are easy to clean and can last at least 10-20 years.
The inside of the front door acquires sophistication and individuality if decorative stone is used for its cladding. The thickness of the plates should not be more than 4 mm, otherwise the door will become heavy and may warp over time.
Plates with stone, as a rule, have an adhesive base, but when installing them it is recommended to use construction resin. The latter will prevent the appearance of cracks and breaks in the facing material.
Materials for finishing slopes
The slopes framing the entrance to the apartment must correspond not only to the external features of the door, but also to the design of the hallway as a whole. In addition to a purely decorative function, such elements around the door serve as additional insulation. They also cover the joints between the frame and the wall.
For this purpose, you can use various materials or put existing slopes in order. If the door is strong and reliable, but does not stand out in any way in appearance, it is enough to level the slopes with plaster and strengthen them. Such work is usually carried out not only from the entrance, but also in the hallway. Plastered slopes look quite neat. They can be painted in a color similar to the shade of the door itself or to match the wallpaper in the hallway.
It will reliably close the joints between the wall and the door frame, and will also make the walls warmer. Due to this, the slopes will take on a neat appearance. Drywall can be:
- cover with wallpaper;
- cover with paint.
This material has many advantages. The main advantage is that there is no need to level the plaster according to building regulations and then clean the wall. You can trim the slopes from natural wood, if it is suitable for finishing the doorway.
Wood has always been in demand and never goes out of fashion. It combines perfectly with any interior. It can be easily tinted using modern or folk remedies. The tree will serve for many years, maintaining its decorative properties. As a last resort, you can paint the wood to match the color of the hallway.
An alternative to wood can be laminated lining made from fiberboard. It is produced in a variety of colors and imitates the textured patterns of various types of wood. Accordingly, you can choose housing to suit any hallway design. But it is not recommended to finish the slopes on the outside of the door with this material, since it does not last long there.
Another finishing option is ready-made PVC panels. They are made in various widths and in a wide range of colors. The production of such parts and their subsequent sale are carried out by specialized schemes. They have a subway that installs panels. This finishing option looks respectable. It has good aesthetic properties. PVC panels can last a long time. But it is better to place them on the side of the apartment.
On the entrance side, it is better to use 1 or 2 finishing methods, which were discussed above. If you are confident in your abilities, then you can install ready-made slope parts yourself. Another option is to use polymers for finishing on the inside. This is a plastic lining. It can be easily matched to the color of the walls in the hallway. The stores offer a wide range of this material.
Slopes are sometimes sheathed with chipboard panels. They are usually used for very thick walls. But it should be noted that today this finishing method is becoming less and less popular. This is due to the emergence of alternative materials that can replace these massive panels.
One way or another, if material of the required size was found at home, you can use it to design door slopes from the inside. It should be noted that there are other materials that can be used to install slopes on the front door. They can be used to arrange planes around the door. And yet the options that were described above are the most popular.
Preparation for finishing
Don't forget about safety precautions. Basic knowledge will help you avoid unnecessary incidents and help maintain your health:
Work in clothes made of thick fabric, and they should cover as much of the body as possible. Wear safety glasses or a screen, shoes should also cover the top of the foot, these can be boots, but, for example, you cannot work in slates. There must be a headdress on the head. When performing processes at height, you can use a stool or chair, but these means of scaffolding must be stable and in good working order
If you are not feeling well, then it is not recommended to perform work.
Registration begins with preparatory operations.
Tools and materials
To perform work on plastering surfaces, you should prepare the following tools and materials:
- cement mortar or dry plaster mixture;
- metal corner for aligning corners;
- fine and coarse sandpaper;
- small size rule;
- jar for mixing the solution;
- mixer;
- plumb line;
- level;
- mallet;
- trowel and spatula;
- construction float (when grinding the last layer of mortar-based plaster).
- primer;
- finishing putty.
To attach panels or lining you need to prepare:
- panels, corners and trims;
- timber with a section of 20*30 or 15*30, a metal profile is possible;
- dowels;
- panel holders:
- perforator;
- self-tapping screws;
- jigsaw:
- screwdriver;
- hammer;
- hacksaw;
- level;
- ruler.
To fasten drywall and vinyl panels, you need to prepare the same materials as for lining, but also glue or finishing putty.
After completing the preparation, you can perform direct work. How to sheathe door slopes so that they last a long time and fit into the interior?
How does the process of decorating slopes with MDF panels take place?
Step 1. First of all, you need to prepare all the tools. This includes a tape measure, a square, a pencil, a miter saw, a sharp knife, a hammer, masking tape, a screwdriver, and a drill. You also need fastening materials and polyurethane foam.
Tools required for work
Prices for popular models of screwdrivers
Screwdrivers
Step 2. Next you need to take measurements. The procedure is carried out after installing the door - you need to measure the width of the end part of the wall, as well as the width of the doorway. It is better to take measurements at several points vertically and horizontally.
Taking measurements
The width of the opening is measured
Step 3. Now you need to make markings on the MDF planks according to the obtained dimensions. The edge along which the cut will be made must be taped with masking tape. If this is not done, unsightly chips may appear on the panel during sawing.
Marking MDF panels
The edges of the cut are taped with masking tape
Step 4. Using a square, you need to draw an even cutting line.
The cutting line is drawn
Step 5. Using a miter saw, you need to cut the workpieces.
Blanks are being sawed
Step 6. Now you need to assemble the received additions into one design. Use a drill to drill holes for the screws. It is not recommended to screw them in directly with a screwdriver - the fasteners can damage the panels. The holes are made in several pieces at a distance of 10-15 cm from each other.
Assembly of accessories
Step 7. Next, the resulting box needs to be installed in the doorway. You need to install it evenly so that the gaps between the frame and the door are equal on all sides.
The box is installed in the openingStep 8. Now you should make about 10-12 spacer elements from a wooden block.
Manufacturing of spacer elements
Step 9. Spacer elements need to be hammered between the wall and the box. About 3-4 pieces are hammered vertically, and 2 pieces along the upper and lower borders of the box. The block should not stick out; it must be hammered in tightly.
Spacers get clogged
Step 10. Now you can install the platbands. First you need to attach the trim and measure the desired length.
Installation of platbands
Step 11. Next, you need to use a saw to cut the trim to measure at an angle of 45 degrees.
Trimming trims
Step 12. Before installing the platbands, the gaps between the wall and the box must be foamed with foam. It will help further secure the box and provide sound and heat insulation. Excess foam can be cut off with a knife after it hardens.
Gaps are filled with foam
Step 13. Next, you need to secure the vertical trims to the extensions using small decorative nails.
Vertical trims are nailed
Step 14. Now you need to measure and saw off the casing at the top and bottom, and then secure it with nails.
Platband is measured
Step 15. After the structure has been assembled, you need to fix it on the door frame with masking tape for about a couple of hours. Once the foam is completely dry, the tape can be removed.
The structure is fixed with masking tape
Video - Finishing narrow slopes
After the main work on finishing the slopes has been completed, you can begin additional decoration. If they were plastered or decorated with plasterboard, then there is a lot of room for creativity. You can cover the slopes with paint, decorative plaster, wallpaper, draw patterns, attach laminate, stone, tiles and use other materials. The main thing is that they fit the overall style of the interior and meet all the wishes of the home owner.
Finishing
The door slopes are completed and now all that remains is to close the gap between the wall and the jamb. There are platbands for this purpose; they give completeness to the repair work. And they create a beautiful look.
Work technology:
- Measurements are taken of the doorway.
- The platbands are cut to size: 2 vertical and 1 horizontal, while the angle of 45 at the joints is adjusted.
- Fastening is done with glue, liquid nails or simple nails, for example, 15. You can use polyurethane foam for this.
When finishing slopes, it simultaneously reduces noise permeability and increases resistance to external loads. How to cover a doorway is decided by everyone independently, based on work experience and economic considerations.