The most popular base for flooring these days is concrete screed.
It is optimally suited for laying parquet. A concrete screed is also made on a wooden floor, for a water-heated floor in a bathroom, bathhouse, the base of a garage and even its roof, on the street.
This is mainly due to the fact that its installation is quite simple and can be done with your own hands; in addition, the thermal insulation of such a base (including the garage roof) has high parameters, and it also has optimal strength and durability.
It should be noted that the concrete screed is produced in several stages, due to which the required thickness is achieved.
Malfunctions and their causes
The most common damage to subfloors are:
- general weakening of the screed. Characterized by the appearance of a large amount of cement dust as a result of a violation of the mortar preparation technology or poor quality of cement;
- potholes and cracks. Formed due to excessive point load on the floor surface. The presence of voids in the top layer of the concrete base also causes the screed to crack and deform. This defect is considered the most dangerous for decorative flooring: the area located above the damage and lacking solid support quickly deteriorates and collapses;
- detachment. Diagnosis of this malfunction is made by tapping the floor surface with a hammer. In the peeled areas, the sound from the impact will be muffled, and dust will begin to escape through the resulting cracks. Detachment can be expressed in visual swelling of the top layer and raising of the corners after the solution has dried. The reasons are often uneven drying of concrete, lack of a primer layer under the base and the use of low-quality cement;
- excessive dust formation. Due to excessive loads and general aging of the screed, a large amount of cement dust forms on its surface. Sometimes floor dusting is associated with poor quality cement and a violation of pouring technology.
How to strengthen a concrete screed on the street?
Concrete floors are characterized by high strength, durability, unpretentiousness, and an affordable price. But at the same time they also have weaknesses.
The most obvious of them is the tendency to destroy the top layer. Over time, cracks, potholes and chips appear on the surface of a concrete floor.
To prevent this process, various concrete strengthening technologies are used.
How to reinforce concrete: mini-instructions
Under the influence of various factors, the concrete coating is damaged and loses its properties. Despite the fact that over time, production is improved and the quality of building materials increases, universal construction products also have their drawbacks.
Everyone wants to carry out a good renovation in their apartment so that they do not have to resort to re-finishing for at least several years. To do this, you have to work carefully and carefully, resort to various tricks, and correct the shortcomings of the material used by various means.
Ironing a concrete floor can be considered one of these methods.
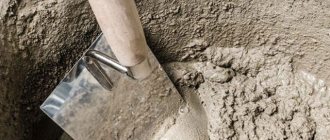
Rubbing cement into a freshly laid floor is the easiest way to reinforce concrete.
All the work can be done with your own hands, significantly saving on hiring professionals. Initially, ironing was done using cement. It was used to mop the freshly laid floor. The percentage of cement in the upper layer was artificially increased. Whatever it was, the floor became stronger.
And yet there was a certain drawback - low adhesion of the iron to the concrete surface. As a result, detachment. In this regard, over time, manufacturers have managed to develop special compounds that strengthen the top concrete layer and do not lead to rejection of the new material.
Source: https://specgidromir.com/kak-ukrepit-betonnuyu-styazhku-na-ulitse/
How to level a concrete floor on the street
Any floor covering requires a smooth and durable base. In turn, the most reliable basis, according to most experts, is a concrete screed. Its arrangement, as a rule, does not cause serious difficulties and anyone with basic construction skills can cope with this work. But before you make a concrete screed with your own hands, it’s still worth familiarizing yourself with the intricacies of the process.
Photo of a concrete screed in an apartment.
Despite the fact that concrete is a very strong material, it is susceptible to the adverse effects of the atmospheric environment. Thanks to this, a concrete screed on the street can quickly break. And to prevent this and maximize its service life, you can use special equipment. It’s good that in today’s building materials market there are a considerable number of them on display – these are impregnations and primers.
Purpose of impregnation
When a concrete screed is performed indoors, it is not influenced by external negative aspects. It's a different matter when it is performed on the street. In this version, the following things work on a concrete floor:
- very high humidity;
- high mechanical loads;
- large and severe temperature changes.
The worst thing for concrete is sudden temperature changes - due to this, the screed begins to become covered with cracks. And then water gets into the cracks that form, which leads to irreversible damage.
This is all aggravated if poor quality cement was used during the work, or the pouring technique was violated. In this option, the destruction process will go much faster.
Due to this, the use of strengthening impregnations is simply necessary for screeds poured outdoors. Thanks to its own characteristics, it is absorbed into the outer layer of concrete and strengthens it. Moreover, similar products form a protective film on the surface, which prevents moisture from entering the screed.
Impregnation for concrete
How to level a concrete floor in a garage? This question is usually asked by garage owners whose flooring is gradually beginning to deteriorate. Chips and potholes appear on the surface, and more and more often it is necessary to remove dust that appears from somewhere. There are many reasons for this.
This review will examine in more detail some of the features of floor leveling technology and provide recommendations on this issue. But first of all, you need to become familiar with the characteristics and properties of concrete flooring and the importance of the leveling process itself.
If the floor screed is not made correctly, then over time it can collapse: crumble, crack, buckle. In this case, there is no need to redo it.
You can simply repair the screed, which will be a more economical option.
When cracks appear in the floor screed, it is necessary to initially determine the cause of their appearance, and then begin to eliminate them.
The reasons for the appearance of cracks in a cement screed may be an incorrect coating layer, rapid drying, excess or lack of water in the solution, lack of edge tape or expansion joints.
If the floor screed is cracked due to the lack of expansion joints, then it is necessary to cut through the shrinkage joints.
In this case, the depth of the cut should be at least one third of the thickness of the base. The distance between the seams should be within 5 meters. Seams are sealed using polyurethane-based sealant.
When cracks appear in them, you can make a groove, thus expanding it. It is necessary to remove dust from the walls of the groove and prime them. To seal cracks in the floor screed, it is necessary to use a non-shrinking substance, which is applied with a spatula.
If the cracks on the floor screed are minor and the floor covering is tiles, then they can be ignored.
Cracks in the floor screed must be sealed with a mixture of PVA glue, cement and water. All these components are mixed so that the mixture can be poured into the gap. After this, the solution must be allowed to harden and the installation of the floor covering can begin.
If the floor screed has burst, then it is imperative to correct this defect before laying the floor covering.
If the concrete mixture is poorly compacted, air cavities may appear in the screed, which cause cracks to appear. In this case, it is necessary to remove the screed to the cavity and fill it with solution.
In order to see the cavities, it is necessary to widen the crack. If you find it, then use a pick to knock out the solution. The walls of the resulting hole must be primed and then sealed with cement mortar.
The composition of the cement mixture, which is prepared for sealing the cavity, should include one part sand and three cements. Before pouring the mixture, the concrete must be wetted with water.
The compaction of the mortar after pouring must be compacted using the piercing method. A metal rod is used for this purpose.
After repairing the floor screed, it is necessary to ensure that the temperature in the room is not very high. To prevent cracks from appearing on it, it is necessary to periodically moisten the place where the cement mixture is laid with water.
If the floor screed coils, then it is made poorly. The reason for the coiling of the screed may be a poor-quality mixture for the screed, a lack of primer on the base, a dirty and dusty base that is used for the screed, etc.
In this case, it is necessary to hit the screed with the blunt edge of a hammer. If the mixture is of poor quality, then a dent will remain at the impact site. The screed may buckle in the presence of cracks or in their absence.
If the screed coils in the presence of cracks, then you can try to eliminate it. To do this, it is necessary to widen the crack. Next, a very liquid solution of sand and cement is prepared.
It would be best to add PVA glue to this solution. Next, the resulting solution is slowly poured into the expanded mixture. It is necessary to pour the solution in small quantities, allowing it to dry in parts.
If this method does not remove the coiling of the screed, then it must be completely removed and refilled. This is a rather expensive option. That is why it is necessary to carry out the screed according to strictly established rules.
Tweet
In the Construction and Repair section, to the question Tell me how to make a concrete screed on the street so that it does not rise in winter? asked by the author Bear the best answer is Make the layout with large screenings, compact it, then make reinforcement with reinforcement No. 10 with a 20x20 cell, and fill it with a concrete layer of at least 10 cm at the rate of 1k3 if manually or 1k6 if with a concrete mixer, then water it every three days with water to make it stronger ! Good luck!!!
Answer from 2 replies[guru]
Hello! Here is a selection of topics with answers to your question: Tell me how to make a concrete screed on the street so that it does not rise in winter?
Answer from Sergey Dmitriev[guru]1) dig 25 - 30 cm.
2) Fill 10 cm with clay. 3) Walk around with a vibrating rammer. 4) cover with 10 cm of clay. 5) Walk around with a vibrating rammer. The thickness of the compacted soil should ultimately be at least 20 cm. 6) Place formwork 7) lay masonry mesh. pour concrete. 9) cover with polyethylene - in summer, and in winter, electric heating must also be installed before pouring concrete.
Answer from Uncle Fedor [guru] To Sergei’s option I will add the wish to add 15-20 centimeters of crushed stone against capillary suction, so that moisture from below does not rise into the blind area.
Answer from Gennady Kashitsyn [guru] Apparently you are afraid of “swelling”. Therefore, never use clay, which will absorb moisture, despite its conditionally water-repellent properties - replace all previous recommendations with sand, which are necessary and sufficient. (soil heaving in winter usually occurs in loamy and clayey soils that have accumulated moisture) In these cases, soil replacement and surface drainage are recommended.
Answer from Andrey Ponomarev[guru] Do everything as Sergey Dmitriev says, only instead of clay - ASG. Because clay absorbs moisture and swells greatly during frost heaving. PGS - replaces the heaving layer with a non-heaving one.
Popular methods for repairing concrete floors work effectively provided that the floor surface has retained at least seventy percent of its integrity. If the concrete screed is destroyed by more than thirty percent, it makes sense to replace it with a new one.
The pouring process itself is quite simple, but certain rules must be followed when performing it. The surface on which the screed will be poured must be absolutely clean. For better adhesion of the mixture to the rough surface, it is necessary to use a primer mixture. If there is high humidity in the room, preference should be given to a primer with water-repellent properties.
After the steps described above, the starting floor is filled with a small layer (5-10 cm) of a self-leveling composition, from which air bubbles formed during the filling process are removed using a special needle roller. It is permissible to apply a second layer of composition if necessary.
After the screed has been poured, it needs to be given time to settle. It is not recommended to allow any impact on the coating for a month, because... It is during this period of time that the filled layer finally hardens and acquires all its inherent properties. However, despite observing the technical rules for pouring concrete floors, after some time it becomes necessary to repair them. Let's look at the types of damage and repair methods.
Strengthening the screed may become necessary if low-quality cement was used when pouring it or the floor surface is constantly exposed to high external loads (for example, in workshops and industrial premises). It is best to dismantle the poor-quality base and fill in a new screed rather than repair the coating on large damaged areas, but there is not always enough time and money for this.
Screed device
First of all, the screed acts as a kind of base, the thermal insulation of which is at a high level.
Almost all types of coverings can be laid on top of it, and it is also possible to install a water-heated floor in the bathroom.
Due to its high waterproofing characteristics, it allows you to effectively protect the space from moisture and extraneous noise.
Parquet and tiles can be laid on such a surface; of course, sanding must be done before this. It is also possible to install a water heated floor.
As a rule, concrete screed is made on special soil (including on the street), correctly distributed over the beams.
Its minimum thickness can be only a few centimeters. The technology for creating such a coating is relatively simple and can be done with your own hands.
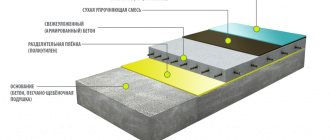
This type of coating is installed strictly on the ground (for example, in a garage or on the street) and must consist of several independent layers.
If the room does not have a water heated floor, then to begin with, lay the most ordinary gravel or crushed stone, on top of which sand is poured, which will improve the thermal insulation.
This soil (including outdoors) is carefully leveled and prepared for the next layer. After this, it is necessary to pour the concrete layer. Its thickness should be approximately the same as the thickness of the previous layer.
Adhesion strength is ensured with cement paste, after which grinding is carried out.
Video:
The technology and installation of the screed is almost the same as for parquet, bathroom, garage (which is located on the street), roof and can even be used in a bathhouse. A water heated floor can be installed under the screed.
In order to make such a coating with your own hands (including in a bathhouse and on the roof of a garage), you will need to purchase such universal materials as cement, sand, or buy a ready-made mixture that is sold in dry form.
The technology for producing concrete, which can be used in a house or apartment, involves preparing a solution at the rate of one part cement, three parts sand and a small amount of water.
Then, when a concrete floor screed is required, which must have a large thickness, light concrete is prepared. In this case, expanded clay is mixed with cement. Due to this, the required thickness is achieved.
At the same time, for a garage (including on the street) or a roof, the soil is laid in a thicker layer than for parquet or a bathroom.
In almost all cases, the technology for constructing such a base is developed based on the state of the initial coating.
It is necessary, first of all, to correctly calculate all layers, taking into account not only the minimum thickness of the cement coating, but also the soil.
This is mandatory both for a garage (which is located on the street), a bathroom, a roof, and for parquet, and even if a wooden floor is provided, as well as the installation of a water-heated floor, where thermal insulation is important.
Repair composition
Mixtures for restoring cement screeds are widely represented on the modern construction market. They include polyurethane components and synthetic resins and are more intended for industrial use. When carrying out renovation work in an apartment, purchasing expensive compounds is not always rational, so for minor repairs you can prepare the mixture yourself.
To do this, you need to mix PVA glue with water at a ratio of 1: 3, then add one part sand and three parts cement. The resulting composition should be carefully moved using a construction mixer or a drill with a paddle attachment.
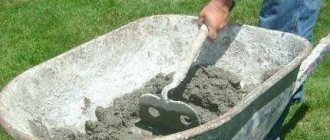
Preparation of concrete mixture by hand
For work you need two buckets and a pair of shovels. One of the buckets and one of the shovels are for cement only and must be completely dry. The second pair of tools is used for sand and gravel. Materials measured in buckets are lightly compacted with a shovel and leveled on top. To mix concrete, use a wide container. Sand and crushed stone are thoroughly mixed, creating grooves on the surface into which cement is poured. All components are mixed as many times as necessary to form a mass of uniform color.
The mixture is shaped into a cone, a hole is made in it and water is poured in. The composition is poured from the edges of the cone into a recess with water, it should be completely saturated. Then a cone is formed from the mass again and the previous steps are repeated until the concrete dough acquires the required consistency.
During the mixing process, water must be added in small portions; too much liquid will reduce all efforts to zero.
Compliance with the proportions will allow you to obtain a concrete mixture of the desired plasticity, homogeneity, and the absence of voids. This means that the structure has an impressive service life.
The rough or finishing floor covering - concrete screed, is the most popular type of floor for outbuildings, garages, rooms with high humidity, and also the only possible rough floor covering for residential premises in the event of destruction of the wooden floor by fungus.
Considering that the concrete for the screed can be prepared and laid on your own, a concrete screed can be called one of the most “budgetary” options for obtaining a strong and durable floor.
How to strengthen?
To strengthen the subfloor screed, it is necessary to drill a series of holes with a hammer drill, equidistant from each other at a distance of 25 cm and having a diameter of 20 mm. The depth of the channels made should be equal to the thickness of the screed. The work should be carried out using a drill with a slight angle of inclination of the working groove.
Then a mixture of epoxy for concrete “Rizopox-350” and quartz sand should be poured into the holes, then iron rods should be inserted. The fittings must first be degreased. The upper, widest part of the channel is also carefully filled until it is equal to the level of the base. Installation of the decorative coating can begin after complete drying, subsequent dust removal and priming of the screed.
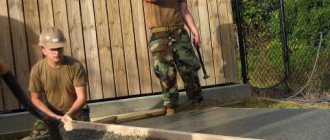
Main works
It is necessary to proceed to this stage only after complete installation of waterproofing and reinforcement. In this case, you first need to apply markings to the walls indicating the level of the future screed along the entire perimeter.
Using expanded clay as insulation
Insulation
Until recently, craftsmen used special materials to create insulation, which they laid on the floor. However, they significantly increased the surface level. The most popular types of insulation for this type of work are polystyrene foam and expanded clay.
The porous structure of foam concrete allows you to supplement the protection from the cold
Currently, foam concrete screed is especially popular. Its creation process involves adding a special composition to the solution, which, after hardening, acquires a porous structure. It is this that helps retain heat inside.
Advice! Insulation is usually used in rooms where the floor is exposed to cold from below. However, such protection can be installed in any room.
Making beacons using guides made of metal and landing plaster
Lighthouses
The purpose of this design is to create a certain support for the tool, which will be used to perform the alignment. That is why the installation instructions recommend treating this process very responsibly.
First, you need to decide on the material of manufacture. Professional craftsmen recommend using metal guides as a basis. In this case, it is best to fix them using planting plaster.
Concrete lighthouses with a metal base
It is worth noting that if a film under a concrete screed or other rolled material is used to make waterproofing, then it should first be fixed with tape on the wall and at the joints.
The distance between the beacons is usually made arbitrary, but it should not exceed the length of the rule from which 20 cm was subtracted. Also, for ease of work, experts advise retreating from the walls about 20 cm.
The right tool will make the entire installation process much easier.
All beacons must be installed strictly level and must correspond to the height of the surface being created. Moreover, if a concrete screed is being repaired, professional craftsmen recommend raising the floor a little, tightening it over the entire area.
Advice! The next stage of work should be started only after the solution on the beacons has completely hardened. In this case, it is imperative to check once again the compliance of all supports with the markings and, if deviations are detected, correct them.
Pulling by beacons
Alignment
If you do the work yourself, then it is imperative to control the amount of liquid in the solution. The quality of the finished product and its service life depend on this. It is believed that no more than 30% of the total volume of dry materials should be added, but it is better to reduce this figure slightly.
The floor leveling process is carried out using a special tool called a rule. They use it to stretch cement mortar across the floor, using beacons as supports. In this case, this procedure must be performed in one approach in a specific room.
Excess moisture will be immediately noticeable when spreading the material
It is worth noting that it is best to purchase a rule with a water level. Its price is a little higher, but thanks to this technical solution you can control the process directly during installation.
Advice! You will be able to walk on the dried screed in just two days. However, it must be remembered that the coating will gain full strength only after 90 days, although it can withstand significant loads after two weeks.
How to repair?
After diagnosing the emerging peelings, as well as in cases where the screed is swollen and “booming,” it can be repaired only if the damaged surface makes up no more than 30% of the total area of the self-leveling floor. There are two ways to repair detachments. The first is to carry out targeted injections using a liquid repair mixture and consists of several stages.
Next, the channels should be cleared of dust and a primer mixture should be poured into them, trying to evenly moisten the entire surface of the internal cavity. After pouring is completed, you need to dry the treated surface with a construction hairdryer. Cement-adhesive mixtures or epoxy resins can be used as injection materials.
Injections should be carried out slowly, allowing the solution to be evenly distributed throughout the entire internal cavity. The procedure should be carried out until the upper part of the channels is filled with the mixture to the floor level. The repaired screed must dry for at least a day, after which you can begin priming and subsequent installation of the finishing coating.
The second method of repairing a delaminated screed involves completely dismantling the problem area, removing dust and priming the surface, followed by pouring concrete. The method is used in cases where spot repairs are impossible when the damaged area is large.
Cracking of the surface of the screed can occur from uneven load on the finishing coating, impacts and poor moisture of the concrete base during drying. If the floor surface is cracked, burst or crumbles badly, it is necessary to take emergency measures, because cracks are the most serious defect of screeds.
To fix the problem, you need to deepen and widen the crack with a grinder until you get strong edges, using a disk for working on stone. Then you should cut grooves perpendicular to the direction of the crack, 2 cm deep and 15 cm wide. The surface of the recesses is thoroughly dust-free and primed.
Next, the crack needs to be filled with a repair compound to half its depth and a metal bracket must be installed. To increase the strength of the solution, you can add quartz sand to it. After filling the main crevice, you need to fill the transverse grooves with mortar and remove excess mortar. Then you need to wait for the repaired surface to dry completely and begin sanding it.
When repairing deep cracks, their cavity must be drilled out to the full depth of the screed. When forming transverse grooves at the ends, you need to drill holes 2-3 cm deep. You need to fill a deep crack in several steps, giving each layer time to harden as much as possible. The first batch of the mixture should be made a little more liquid.
After the second layer has set, you need to install metal tightening brackets, securing their ends in the drilled holes. Then a plasticizer is added to the solution and a final fill is made, which will hide the bracket underneath. After the solution has completely dried, the repaired area is sanded and the screed is prepared for installation of self-leveling flooring or installation of floor covering.
Repairing Potholes
Repair of potholes and chips should begin with their widening and deepening, which must be carried out until the edges of the deepening stop crumbling. To do this, you should use a grinder equipped with diamond blades designed for working with stone. For serious potholes, the depth of which exceeds five centimeters, it is necessary to drill through the entire thickness of the screed. Then you should remove construction debris from the crevice and thoroughly dedust it. Next, you need to apply the primer mixture and let it soak in.
Filling the pothole with a solution should be done in several stages, applying each subsequent layer only as the previous one dries. This will ensure uniform drying of the solution throughout its depth and prevent the appearance of cracks.
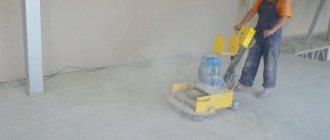
Removing dust
Very often, an old screed, especially one that does not have a decorative coating on top, begins to gather dust. This problem is most typical for the floors of garages, warehouses and industrial premises. Constant weight loads combined with vibration and regular temperature changes contribute to the rapid destruction of the coating and the appearance of cement-sand dust.
Initially, the floor should be cleaned of mechanical debris and dirt. Then the surface is dust-free and inspected for cracks and potholes. If they are detected, problem areas are repaired, and after the solution has dried, they are sanded. Then you need to cover the entire surface of the screed with a penetrating primer mixture and wait until it is completely absorbed.
You can cover a dusty floor with a specialized composition that has a polymer base. The solution is able to penetrate 5 mm deep into the concrete screed, completely preventing the formation of dust. The treated surface acquires excellent vapor-permeable properties and is also characterized by high resistance to chemicals, sudden temperature changes and abrasion.
To increase the anti-slip effect of the floor, quartz sand is applied to the uncured composition, which forms a rough surface after the product dries.
To do this, the surface of the screed is dust-free and primed. After the primer mixture has dried, tile adhesive is applied to the screed and the fabric is laid. The canvases should be laid overlapping, leaving no open areas.
After the first layer of glue has dried, a second layer should be applied over the fabric. This will securely secure the dusting base and increase adhesion. Then, around the perimeter of the room, it is necessary to install a damper tape, which will act as a compensator. The last stage will be the installation of beacons and installation of a self-leveling mixture.
Types of screeds
Laying the base for parquet, a bathroom or sauna in a house, for installing a water-heated floor, as well as on the roof of a garage involves several stages of work. It is customary to distinguish several different types of bases.
So, the screed, which is connected to the covering, is performed directly at the base of the interfloor ceiling.
In addition, it can be installed on the ground in the basement and on the roof of the garage.
The video below shows the technology of floor screeding.
Video:
The technology for its implementation involves careful preparation of the base. Due to it, it is possible to strengthen the adhesion of concrete particles and the ceiling itself.
In the case when a concrete screed is carried out on the ground in the basement, a gravel cushion must be used.
Its thickness, as a rule, is over ten centimeters, and laying on the ground takes several days.
The next type of coating is made on a separating layer and is performed when the surface is damp and there are also grease-type contaminants on it.
Its installation is carried out through a special separating layer, the role of which is played by roll insulators, for example roofing felt. The thickness of such a screed must be at least three centimeters.
In this case, sanding of the top layer is necessary. Sanding will allow you to achieve maximum evenness of the top surface.
In order to answer the question - how to make a concrete screed correctly, you need to carefully familiarize yourself with the technology of work.
Only then can you make with your own hands the ideal base for laying parquet, bathroom tiles or wooden floors, as well as garage roofs (on the street) with your own hands.
Another type of concrete coating is called floating. In this case, concrete is laid on a layer of special coatings.
Their role can be played by mineral wool or corrugated cardboard; polystyrene foam boards are also suitable for these purposes.
This screed is most relevant for those rooms in which there is very ordinary soil under the floor and there are no heated rooms.
The screed on the ground can be poured in a private house on the ground floor or garage. Also, this type of base can be installed in the yard or on the street, as well as in a bathhouse where water heating is not provided.
Almost any screed can be filled with your own hands, and to do this you just need to follow the technology and correctly follow all the recommendations.
In any case, the entire complex of work includes several stages.
The arrangement of some types of foundations may require the use of special waterproofing or reinforcement, which significantly increases its strength and prevents moisture from penetrating into the room.
If parquet is laid on top of the base, the top surface should be relatively smooth; for this purpose, sanding is used.
Concrete pavement on the street must be made on a special pad consisting of gravel or crushed stone of a certain layer.
Tips and tricks
By following these rules, you can significantly simplify repairs and significantly increase the service life of the screed:
- To prevent a freshly poured concrete surface from cracking, it is necessary to regularly moisten it throughout the drying period;
- the use of high-quality materials and strict adherence to floor pouring technology will help to avoid many malfunctions and make the screed strong and durable;
- Liquid glass or tile adhesive will help hide minor damage and minor defects;
- When repairing cracks and potholes, primer should not be neglected. This will strengthen the surface and increase the adhesion of the strictly layer with the solution;
To learn how to repair cracks in a screed, see the following video.
Which self-leveling floor to choose for the street
Street coverings must be frost- and water-resistant, extremely strong and durable. A series of self-leveling compositions for outdoor work meets all these criteria; you just need to carefully consider the choice.
Installation of thin-layer finishing self-leveling floors
The basic requirements for the base are identical for all manufacturers: an absolutely flat, durable (from 200 kgf/cm2), dry (up to 4% CM) surface. Must not be:
- Places with standing water, dew drops;
- Slope more than 3%;
- Cement laitance, traces of dirt, oil, dust;
- Weak or peeling areas.
All defects are eliminated by grinding, milling or sandblasting. Holes and potholes are filled with quick-drying repair compounds. The permissible base temperature for work is from +10 to +25 ° C, relative air humidity is no more than 80%.
Mixing the Base and Activator of the self-leveling coating
Before pouring, the surface can be primed 1-2 times. It is advisable to use materials from the same series. After drying, mix the components, pour over the surface, spread evenly with a spatula and roll with a needle roller to remove air bubbles.
Epoxy compounds are generally thicker than polyurethane compounds. Similar to mastic or floor enamel, only the layer is thicker - up to 3 mm. Therefore, it is applied with a paint roller. To create an anti-slip surface, after painting, chips or other decorative fine-grained fillers are scattered over it. After 3-7 days the floor is ready for use.
Advice! If you need repairmen, there is a very convenient service for selecting them. Just send in the form below a detailed description of the work that needs to be performed and you will receive proposals with prices from construction teams and companies by email. You can see reviews about each of them and photographs with examples of work. It's FREE and there's no obligation.