If you decide that your house will have a heated floor system, on which you plan to lay a modern finishing coating, then a base made of cement-sand mortar will be truly reliable. Its installation can be done on any base, even uneven, and you will be able to make the desired slope. However, it is important to prepare the mixture correctly, and then apply it according to technology. Leveling and drying are equally important steps if you want to get a strong, safe coating.
Preparing the rough surface
The floor screed is poured on a previously prepared surface. If the house has an old wooden floor, bare soil or a concrete slab, then you should approach each case individually. If there are large cracks and depressions on the rough surface, they should be cleaned and covered with cement mortar. To grind a concrete floor, you can use a grinder or concrete milling equipment. You can get rid of the resulting dust using a construction vacuum cleaner.
Equipment and tools for laying concrete screed
The choice of tools and equipment is based on the scope of work and the technology used.
In general, the implementation of laying a concrete screed may require the following:
- concrete mixer – for mixing traditional working solutions for large volumes of work. When filling small areas, it is enough to use a construction drill with a mixing attachment and a clean container;
- mortar pumps, pneumatic blowers - used in the implementation of semi-dry screed technology;
- metal profile - for arranging guides;
- level (laser or water) – for precise marking and measurements. For such work you will also need a tape measure, a ruler, and a tapping cord;
- rule or vibrating screed - used for leveling and compacting screeds;
- concrete finishing machines – for troweling the surface. To prepare the base, you will need milling or sandblasting machines, construction vacuum cleaners, and hard metal brushes;
- shovels, spatulas, smoothers.
When preparing screed bases on the ground, tamping machines are used
Installation of beacons: reviews
Filling the floor screed, according to the craftsmen, can be done directly onto the ground. To do this, the soil is compacted and supplemented with a sand cushion. It is important to have a waterproofing layer to prevent moisture from seeping down from the concrete. Only then can you begin placing beacons, which act as guides. They can be made from scrap materials using long slats, broken bricks, pipes and cement mixture. Home craftsmen do not recommend using wood, as the material will absorb moisture from the screed, causing shrinkage to occur unevenly.
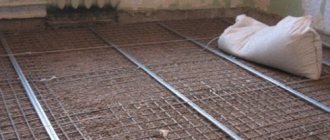
First you should prepare slides from cement mortar on which it will be convenient to install the profile. Its location is checked using a building level. The beacons should be positioned strictly parallel to each other, while the outermost ones should be removed from the walls by 20 cm. The distance between the beacons should be less than the length of the rule by 40 cm. As experts emphasize, beacons made of metal pipes, the fastening of which made using a dense gypsum solution.
Concrete screed on the ground
Installing a structure on the ground is a labor-intensive process that requires not only the main stage of work, but also high-quality insulation of the foundation, blind area, and a device for draining water from the base.
However, the system has a number of advantages:
- the structure is suitable for most types of soil, including complex sandy and clay soils;
- a well-insulated foundation is resistant to the forces of frost heaving;
- concrete consumption may be less compared to a typical slab base;
- reliability;
- communications do not require additional insulation;
- there is no need to ventilate the underground space.
Among the disadvantages are the following:
- If a high base is being built at the site, backfilling with a large volume of soil is required. This leads to higher costs of work.
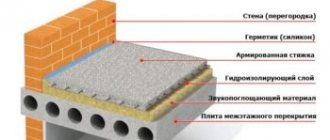
The structure is often laid in the presence of a good heating system, which will eliminate freezing and deformation when the groundwater level is not higher than 4-5 meters. A multilayer system is always laid on the ground . It is important to follow a strict sequence of work, since each layer carries its own functional load.
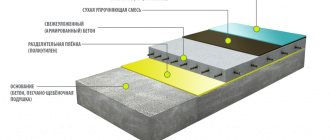
General structure of the ground screed:
- base;
- sand cushion;
- gravel or crushed stone cushion;
- rough screed (leveling based on lightweight concrete);
- a layer of steam, hydro, and thermal insulation;
- finishing reinforced screed;
- finishing coating.
Preparation
Preliminary preparation is a mandatory stage of work when installing a screed on the ground. When starting work, you must remember that each layer of the system is aligned horizontally.
To begin with, the zero level is set. Marks are placed along the perimeter of the walls, with a reference point to the bottom of the doorways. By raising or lowering this line you can vary the thickness of the “pie”. The thickness of the fill is controlled using a stretched cord, which serves as a level.
Preparing the soil and filter layer
If necessary, the plant layer is removed with shovels, and the soil is dug out to the thickness of the structure (zero level serves as a guide).
If the volume of work is large, it makes sense to turn to professional soil compaction rollers.
The soil must be well compacted, for which vibratory compaction equipment is used . Such machines provide a combination of static and dynamic loads, which ensures high preparation density and a high depth effect.
The backfill base - sand - should be shed with water. The preparation is carefully compacted in layers. The thickness of each layer is 10-15 cm, the amount depends on specific conditions.
Operating principle:
- sand is spread on the ground, maintaining the optimal thickness;
- pass through the layer using vibrating compaction equipment “dry”;
- the preparation is sprayed with water from a hose with a spray nozzle. The material should become damp, but not wet. Excessive water will ruin the tamper;
- tamper along wet sand in two approaches, changing the orientation of movements;
- secondary humidification;
- tamping in 2-3 approaches.
Next, crushed stone or gravel backfill is used (coarse crushed stone is used). When compacting crushed stone backfill, local impacts act on the base, which works to further deep compact the underlying layers.
Waterproofing
When the preparation is completed, the issue of waterproofing becomes relevant. The task is to protect the system from moisture. At this stage, the question often arises about the construction of the sub-concrete layer. When working on the ground, this step is not required. The footing works under the pressure of groundwater, which is important for basements .
A polyethylene film of 150-250 microns is placed on the base. An overlap of 15-20 cm is required, the joints must be treated with tape. The material can be applied in two layers. The waterproofing should extend onto the walls a few centimeters above the zero level. The material must be carefully spread in the corners, since this is where the likelihood of moisture penetration is highest.
As an alternative, bitumen-polymer membranes or polyvinyl chloride can be used.
Pouring rough screed
Light (lean) concrete with the addition of crushed stone is used. For mixing, take 1 hour of cement, 2 hours of sand and 4 hours of crushed stone. The thickness of the preparation should be about 4-8 cm. There are no special requirements for the rough screed, however, the differences in height should not exceed 4 mm.
Thermal insulation
If the project provides for the installation of a thermal insulation layer, this stage is implemented. It is important to choose the working material wisely.
It should be:
- fireproof;
- high strength;
- convenient to use;
- with a low thermal conductivity coefficient.
Due to its properties, thermal insulation, as a rule, also has a soundproofing effect.
The market offers a large number of materials, but the following thermal insulation is suitable for ground screeds:
- expanded clay;
- Styrofoam;
- mineral wool;
- isolon;
- extruded polystyrene foam.
Each type of insulation requires its own installation technology. In practice, slabs based on mineral wool, polystyrene foam, and expanded polystyrene are most often used. The thickness of the layer is calculated based on the climatic conditions of the area. However, the minimum thickness cannot be lower than 100 mm . The mats are laid staggered, close to each other. Thermal insulation is arranged in one or several layers.
If the finished layer is made on the basis of foam plastic, mineral wool, it is covered with an overlapping polyethylene film with gluing of the joints, since these materials are afraid of direct contact with concrete. Extruded polystyrene foam does not require such manipulations. At this point the preparation can be considered complete.
Reinforcement
Reinforcement helps provide additional durability and strength to the concrete structure and prevents cracking. According to the technology, a steel mesh with a rod with a diameter of 5-6 mm, a cell of 100 * 100, 150 * 150 mm is used.
The reinforcement layer should not be adjacent to the thermal insulation, for which special clamps are used - “chairs” - so the mesh will be in the body of the concrete . The material is laid overlapping on one cell, connecting the joints with wire. For high operational loads, a reinforcement cage is built.
Installation of guides
Installation of formwork and guides allows you to accurately maintain the required level of the structure. It is customary to set the screed level based on the level of the doorways. To do this, markings are applied around the perimeter using stretched cords.
They act this way:
- The area of work is divided into equal sections. The width of each of them should not exceed 2 meters;
- install guides with a height corresponding to the level of the screed;
- after checking the horizon, the guides are fixed on the base with cement-sand mortar;
- Formwork is installed between the guides. So the area will be divided into rectangular zones (maps), which will be filled with concrete.
It is recommended to treat the guides with special oil, since they will subsequently be removed.
Preparation of concrete
Concrete is prepared on the basis of cement grades M400, M500, observing the proportional ratio of sand and crushed stone. To calculate the required amount of materials, we focus on the pouring area and the thickness of the structure.
To lay the screed on the ground, take 1 hour of cement, 3 hours of sand, 5 hours of crushed stone
Fill
To obtain a monolithic surface, several technological approaches are used.
Technology for pouring screed on the ground:
- Filling the formwork begins from the corner. When several rectangles are filled, the solution is distributed with a shovel over the base;
- carry out rough alignment. As a rule, move it towards you, removing excess solution;
- concrete is compacted with deep vibrators;
- 24 hours after laying, the formwork and guides are removed in the finished areas. All resulting voids are filled with cement mortar;
- When the screed is completely filled and leveled, it is covered with plastic film. If required, additional grouting is carried out using concrete finishing machines.
The finished structure requires maintenance. For 4-5 days, the concrete is moistened 1-2 times a day by spraying water.
Seam cutting
Concrete is a very fragile material in its structure that cannot resist plastic deformation. Cracking can occur under the influence of loads and internal stresses caused by hardening processes and temperature changes. To control this process, expansion joints should be cut.
Seam cutting technology:
- the seam should be clean and straight. The worker involved in this stage of work must know which seam should be cut and when, to what depth;
- cutting is carried out when the screed has gained sufficient strength. If a seam cutter is used, work begins 24 hours after pouring, but no later than 72 hours. Using wet cutting technology with special cutters, seams are made 4-12 hours after finishing the screed;
- Before starting work, it is better to make a test cut. If aggregate falls out of the concrete, it is too early to start work;
- The location of the seams is marked with chalk, focusing on the stretched rope. Cutting is carried out in the same sequence as pouring concrete to 1/3 of the thickness of the screed.
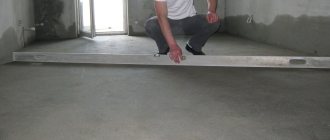
To support the edges of the seams under loads, they must be sealed. The sealant is selected based on the operating conditions of the screed and the type of load. A correctly made concrete screed turns out to be homogeneous, impeccably smooth, without defects or flaws . The evenness of the surface is checked by the rule. Per square meter, the height difference should not exceed 4 mm.
Strengthening concrete
The finished structure can be further strengthened with toppings. This is a solution for industrial floors where a high level of load is expected, for garages and similar premises. In residential premises, it is enough to limit yourself to applying epoxy impregnation.
Laying waterproofing and reinforcement
You can fill the floor yourself. For this purpose, the cement screed is prepared according to a certain proportion. The ratio of materials will be mentioned below, and at this stage the waterproofing should be laid. To do this, you can use roofing felt and other similar materials that are combined with the screed. It is important to remember that the solution must adhere well to the base; most often, a universal primer is used to increase adhesion characteristics. It takes about 4 hours to dry the surface after applying the primer. If the floor absorbs moisture well, then it should be primed twice, otherwise it will not be possible to achieve a positive result.
When installing a floating floor system, it is better to use plastic film. Pouring the floor screed with concrete must be accompanied by preliminary laying of the reinforcement cage. To do this, it is best to prepare a mesh with square cells with a side of 100 or 150 mm. The diameter of the rods should be 5 mm.
Analysis of sand concrete composition
When finishing a subfloor with your own hands, you need to take into account many characteristics of the coating:
- presence of temperature changes in the room;
- intensity of floor use;
- indoor humidity level;
- type of foundation or floor (presence of a basement).
When arranging foundations in rooms with a specific microclimate, you should not use a regular cement screed. Why? The resulting coating has high hygroscopicity and capillarity, so moisture easily penetrates deep into the base and destroys the reinforcing mesh. Over time, this affects the integrity of the subfloor and finishing floor.
Sand concrete contains granite screenings.
What material is best to choose in this case? As practice shows, sand concrete has good moisture resistance and frost resistance. One cannot discount the insignificant consumption of the material itself, which is due to the high plasticity and fluidity of the solution. However, the technical characteristics of the sand-cement composition are influenced by the concentration and presence of individual components.
But no matter what mixture you choose for the subfloor, it will definitely include the following substances:
Cost of concrete floor screed per m2
- granite screening;
- fine or coarse sand;
- Portland cement.
However, the technical characteristics of the screed are influenced by the additives included in the mixture, which include:
- plasticizers;
- antibacterial substances;
- retarders and accelerators of the screed curing process.
What sand concrete is best to choose in this case? The type of composition chosen directly depends on the conditions of use. When pouring a solution onto a small base area, it is more advisable to give preference to solutions with a quick hardening period. If you need to equip a larger subfloor, it is better to opt for compounds with a long curing time.
Reinforcement recommendations
If the future floor will be subject to intense loads, for example, trucks will drive on it, then a reinforcement cage should be laid instead of a mesh. To do this, stock up on rods, the diameter of which can vary from 8 to 16 mm. The reinforcement is tied manually or with a special gun. To construct a concrete floor, the surface of which will be subject to a high dynamic load, a solution is used, to the components of which steel fiber is added. It replaces reinforcement and works in tension.
Pouring the solution
Pouring the floor screed must be accompanied by leveling. The paths between the slats should be filled by moving towards the doorway. To level the solution you need to use a rule or a trowel. If it is necessary to arrange a multi-level screed, plywood formwork is additionally installed, thanks to which the solution will not flow into the neighboring area. In the highest place, the screed layer should have a thickness of 2 cm, otherwise the surface will become covered with cracks, but this parameter should not be made more than 8 cm, since the load on the foundation will be unjustified. The most suitable option is 5 cm; to install such a floor, you should prepare concrete grade “M300” or higher.
Advantages and disadvantages of sand concrete materials
The quality of sand-concrete compositions is affected not only by the amount of additional ingredients, but also by the brand of cement used.
When repairing a floor with your own hands, not everyone understands what criteria should be used to choose mixtures for applying screed. But experienced craftsmen choose sand concrete due to the following advantages:
- Easy to prepare solution;
- Long service life of the screed;
- Resistance to corrosive processes;
- Resistance to temperature changes;
- Good sound and heat insulating qualities;
- High frost resistance.
Important! The quality of sand concrete compositions is affected not only by the amount of additional ingredients, but also by the brand of cement used. When choosing a material with your own hands, it is worth knowing that there are several disadvantages of special screeds, namely:
- The price of sand concrete mixtures is higher than conventional cement ones;
- If the sequence of mixing the components of the mixture is not followed, the technical characteristics of the subfloor may significantly deteriorate;
- When diluting a solution with your own hands, without special equipment, it is difficult to track the degree of its homogeneity.
Installation of a heated floor under a cement screed
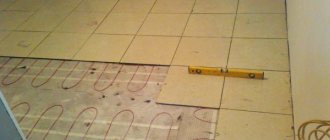
Such a system is usually mounted on an old base, on top of which thermal insulation is laid, which can be foil or polystyrene foam. The presence of this layer is mandatory, otherwise the heat will go down. The next step is to lay the water pipeline, heating mats or cable. There is no talk of high strength of such a design. Therefore, holes must be made on every square meter of thermal insulation.
Along the perimeter of the area where the heated floor is being installed, it is necessary to leave 15 cm of free space. This will allow the top screed to rest on the bottom layer, which is especially important for small rooms. The underfloor heating screed is poured taking into account the formation of a concrete layer of 5 cm. This will ensure rapid heating after turning on the system. If there are circumstances that force you to make the screed less than 3 cm, then a universal plasticizer should be added to the solution. For 100 kg of dry mixture you will need 1 liter of additive. As an alternative solution, you can use a self-leveling mixture, which has higher elasticity, to fill the floor.
Additional layers
The base of the floor can be insulated in various ways. The most popular is expanded clay backfill. But it is worth noting that this material is suitable for private households. For apartments, the best option is polystyrene foam. When constructing a thermal insulation layer, such a layer must have a sufficient level of rigidity to meet all requirements.
No substrate should be exposed to excessive moisture. This leads to the appearance of negative factors, premature failure of materials and the entire screed as a whole. Roofing material will help protect the base. An alternative would be a polyethylene film of sufficient thickness. The overlap of each subsequent layer of material should be at least 15 cm. Do not forget about the overlap on walls and decorative elements in the room. 10 cm is enough here. Subsequently, after installing the floor screed in the apartment, excess parts of the waterproofing material are removed using a utility knife. If this layer begins to adhere to the laid pipes, an additional sealant is applied for better quality.
A layer of waterproofing must be provided in bathrooms, kitchens and toilets. Other rooms are equipped with them for better protection from dampness from the basement.
Reinforcement can act as an additional layer. The mesh is perfect for a concrete floor. It must have small cells if it is laid on a ground surface. The mesh is made of metal and is included in the composition for pouring floors. As an alternative, you can use special wire. Everything will depend not only on the area of the room, but also on other installation features.
Technology for laying heated floors under screed
Filling the floor screed (the price of the work will be mentioned below) is quite often done by home craftsmen on their own, since this work is not difficult. Thermal insulation should be laid on the rough screed, which is secured with glue or tape. Next comes a metal mesh, which is useful for marking and laying the pipeline. The mesh should also be fixed to the base. A damper tape is stretched along the perimeter of the site, which will level the coefficient of linear expansion. Next, the underfloor heating elements are installed around the perimeter of the site; they should be connected to the coolant supply system.
If you find out the cost of pouring a floor screed, the price does not suit you, then you should do the work yourself. Moreover, the technology is quite simple. So, at the next stage, you can carry out the final screed of the floor, after which the craftsmen have dried, they begin laying the finishing coating.
Activities before pouring the screed
Using damper tape
- Cement screed is made from cement and sand in a 3:1 ratio with the addition of water;
- The type of screed is determined based on the functional purpose of the room and its humidity;
- Next, the zero level in the room is determined using a water level. The zero point is determined simultaneously in all rooms at a distance of 150 cm from the floor surface. At this distance, a mark is made on the wall and projected onto all other walls using a water level. Then all the marks are connected by a single line, and the zero level of all rooms is obtained;
- Measure the distance from the line to the floor surface on all walls. The lowest indicator indicates that the floor is the highest at this point;
- Having decided on the type of screed, begin preparing the base for its application. You will need to dismantle the floor covering, remove loose base elements, and then remove dust from the surface with a vacuum cleaner. The final step in preparation will be priming the base for better adhesion.
When using all types of screed, except self-leveling, the layer of screed must exceed 3 cm.
Recommended proportions
If you will be pouring the floor screed yourself, then first you need to familiarize yourself with the ratio of materials. The optimal proportion, proven over the years, is to use part cement and three parts sand. In this case, for such a ratio you will need two parts of water. You can use other options in which part of the cement is added to part of the sand; you can use a 1:2 ratio. However, in this case, although you will improve the strength of the floor, you will lose in quality. After installation, the solution will set quickly, and leveling it will be quite problematic. If you increase the volume of sand or water, this will cause a decrease in strength and quality.
Preparatory work
After you have decided what kind of floor screed you will make, you need to prepare the base for pouring. To do this, you need to remove the old floor covering and all loose parts of the base and preferably vacuum it to remove dust from the surface.
Then we cover the base with a primer for better adhesion (Betokontakt is ideal, but a cheaper one is also possible).
For further work you need to find the zero level. To do this you will need a water level or a laser level.
We find the zero level for all rooms of the apartment at once. To do this, place a mark in an arbitrary place at a height of about 1-1.5 m from the floor and then transfer the marks to all the walls in the apartment using a water level.
You should have marks on all walls in all rooms. These marks must be connected with straight lines.
Now we measure the distance from the drawn level to the floor. This measurement must be taken in several places on each wall. The smallest value will indicate that in this place the floor height is maximum.
From the smallest value we subtract the thickness of the screed and measure the resulting length down from the previously drawn level. After connecting all the newly marked marks, a zero level will be obtained for all rooms. This is the level to which the future screed will be poured.
Cement screed is made from one part cement and three parts sand. But now there are many ready-made dry mixtures that just need to be diluted with water and can be used.
The technology for screeding floors in an apartment includes several stages. Ruberoid tape is glued to the walls below so that its upper edge is 15 cm higher than your future screed.
Also, if through holes and cracks are found in the floor, they must be sealed with non-shrink cement (BCC) so that later, when pouring the solution, it will not leak to the neighbors below.
The next stage of pouring is the installation of beacons. All further work depends on the quality and correct installation of the beacons. We use metal T-shaped guides as beacons.
We attach them to the same solution from which we will make the screed. Laying it out in piles. The first beacon should be at a distance of 20cm from the wall. Subsequent beacons are installed parallel to each other, at a distance of 30-40 cm less than the length of the rule.
After laying the beacons on piles of mortar, they must be leveled using a level. Alignment should be along the length of the beacon, as well as between all beacons. As a result, the level in all positions should be at zero.
After leveling, wait for the solution to completely harden.
After installing the beacons and the solution has hardened, you can proceed directly to pouring the solution. To do this, mix the solution and pour it between the two beacons, starting from the far edge.
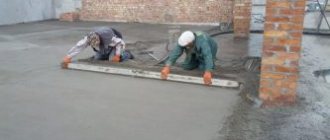
Then, using the rule, we tighten (level) it along the beacons towards ourselves. And so on until the entire floor screed is filled. It is better to do the filling together, since while one is leveling, the other is mixing the next portion of the solution.
READ MORE: Floor installation using joists
And now you have finished pouring the floor screed, but it’s still too early to relax. Now you need to create conditions under which it will harden properly.
It takes 24-28 days for the cement to completely harden and gain strength. To prevent the screed from drying out too early, it must be moistened 2-3 times a day. This should last about two weeks.
You can also cover it with film, then you can moisturize it as needed.
After 5-8 days you will be able to walk on the screed, but it will be completely ready in a month. Speeding up in such matters will not lead to anything good, but on the contrary, you can only ruin all the work done.
To work you will need:
- level (water or laser);
- lighthouses;
- concrete mixer;
- buckets for measuring components;
- container for unloading the finished mixture;
- shovels;
- rule;
- measuring accessories.
The screed device includes the following steps:
- preparation of the base;
- marking;
- installation of beacons;
- preparing the solution;
- laying and leveling;
- exposure until strength gains.
The screed is laid on different bases:
- on the ground;
- on reinforced concrete floors;
- for heat and sound insulation in “floating” floors
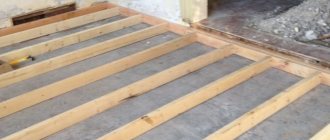
Concrete is not poured over wooden foundations. In this case, a dry screed made of gypsum fiber board or plywood sheets is used.
The most difficult thing is to prepare the base on the ground. You need to select the soil to a depth of 50 cm, lay geotextiles, drainage materials - crushed stone, gravel, sand, compact them in layers. Thermal insulation made of expanded clay, expanded clay concrete or expanded polystyrene is laid on top. Then dense waterproofing made of polyethylene 200 microns thick.
This multi-layer “pie” ensures the strength of the base, avoids freezing and wetting by surface water. At high groundwater levels, additional installation of the drainage system is required.
Reinforced concrete floors are the most convenient base for screeding. When preparing the base, it is enough to knock down uneven surfaces, clean the slab, and seal cracks and depressions. To increase adhesion, it is recommended to cover the surface with Concrete Contact. Since walking may damage the layer, it is better to postpone this stage until the beacons are installed.
A “floating” concrete floor screed does not have a rigid connection to the base.
The insulation layer consists of insulation and waterproofing. A damper tape is glued around the perimeter of the room, compensating for temperature and shrinkage deformations of the concrete.
Marking
It is desirable that the screed be in the same plane in all rooms. The horizon is marked using a water or laser level. The first step is to determine the highest point of the base, from which you will subsequently need to measure the height of the screed:
- for DSP not less than 30 mm;
- for “floating” - 40 mm;
- for solid concrete - 50 mm.
In the bathroom and toilet, the height of the screed may be 1-2 cm lower relative to other rooms. At one level, it is possible to divide the premises with a threshold. If it is intended to install a “warm floor” system, the layer thickness is assumed to be 15 mm greater than the pipe diameter.
Preliminary markings can be at an arbitrary distance from the floor, usually 1 m. The main thing is to set the horizon. The line is drawn on the walls with chalk or pencil. Its beginning and end must coincide.
Then the distance from the line to the floor is measured in all rooms. Where it is smallest, the zero level is set.
Now you need to move the thickness of the screed up from this point and transfer marks along the walls of the room or all rooms using a dye cord. In multilayer coatings, the thickness of all layers can be marked in this way.
To fix the height of the rough layer over the entire area, use:
- metal profiles;
- punched paper tape with screws and dowels;
- rappers;
- stripes or piles of solution.
When installing beacons, they are oriented along a line on the wall that specifies the height of the layer. 1-1.5 days after pouring the concrete, the beacons are removed, and their installation sites are filled with mortar and leveled.
READ MORE: How to make laminate flooring waterproof with your own hands, practical tips
You can make a floor screed in an apartment with your own hands, but first you need to decide on some nuances. First, you should practice properly preparing the working mixture. Secondly, you need to know that even floors can be created if beacons are installed before pouring. Proper floor screeding in an apartment is not a problem if you purchase all the necessary tools and equipment.
For this you will need:
- Water level.
- Roulette and knife.
- Trowel and spatula.
- Brush for applying waterproofing (or roller).
- Construction mixer.
- Dishes with a capacity of about 30 liters.
The following steps show how to properly screed a floor in an apartment.
They assume the following:
- Prepare the base.
- Calculate level differences.
- Install beacons.
- Prepare a solution.
- Fill.
- Allow the screed to dry.
The entire work process is divided into preparatory and main stages. It is important to strictly follow the instructions so as not to redo everything again or spoil the existing material.
Let's start screeding the floor in an apartment with our own hands with some necessary preparations:
- Clean and prime the base. We form a layer of expanded clay and sand 100 mm thick, moisten it with water, and compact it tightly.
- We carry out thermal insulation work. We use rigid, solid material (for example, polystyrene foam).
- We install waterproofing.
- We stretch the reinforcing or steel mesh.
- We carry out installation of additional elements and structures (warm floors or wiring).
