One of the most versatile materials, without the use of which no construction can take place, is concrete mortar.
The scope of application of such a tool extends to both capital structures and private facilities. It happens that a small amount of mortar is needed to perform independent construction work. It is quite possible to make such a volume yourself.
The proportions in which to dilute the cement depend on how and for what purposes the solution will be used.
Characteristics such as quality, strength, reliability directly depend on the ingredients and their ratio.
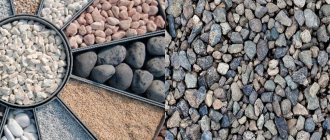
The basis for any cement mortar is directly cement, water and filler (sand, crushed stone, sawdust, slag). In some cases, special additives are used to give the solution additional qualities (plasticity, frost resistance, etc.).
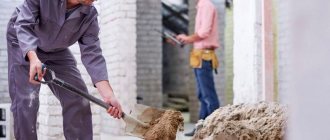
To complete the task you will need the following tools:
- electric drill or hammer drill (with special attachments); trowels; spatula; shovel.
a) Water.
If we are making not a dry mixture, but an ordinary classic solution, then first of all you need to pour water into the mixer. How much water should be poured into the mixer?
If you know the exact formula for the required amount of water for mixing, the first rain will make it impossible to use it. If the sand is wet, then less water needs to be poured.
The easiest way to navigate is by the amount of cement. If, for example, one bucket of cement is needed for one batch, then about one bucket of water will also be needed. So as not to overdo it with water for the solution (so that it is not liquid). It is best to fill it a little less than normal.
If you fill in little water for the future solution, then you will constantly be adding water, then adding sand and cement. This significantly lengthens the process of preparing the solution.
When you pour a little less water into the mixer than normal, the sand and cement mix in a liquid state much faster than in a thick state.
When you add the last ingredients (sand, cement) to the mixer, you add the rest of the required amount of water by eye.
Summary: in order for cement and sand to be mixed quickly and efficiently, they must be in a liquid state. We adjust the density of the solution at the end of the batch.
If you accidentally poured water into the solution (it turned out to be liquid), then it’s okay, just add a little cement and sand in the same proportion as required for this brand of solution (1:3; 1:4, etc.).
.
Cement-sand screed: composition, methods of execution
As for the most common capital method of organizing a coating, the characteristics here are virtually the same as those made using the semi-dry method. And the point, of course, is that the same cement and sand are used here and the addition of the same impurities is allowed. So:
- the thickness of the cement-sand floor screed should not be less than 2-2.5 centimeters (the larger limit can vary to significant values from 100 mm or more if reinforcement or plasticizers are used);
- the weight of cement-sand screed per 1 m2 with a minimum layer is 40-50 kg (higher ones can be lightened with various additives, for example, polystyrene foam granules);
- the strength of the cement-sand floor screed is enviable, like that of any other capital structure (the tabular indicators of a conventional mortar after hardening are from M150 to M180 - this is quite enough even for moving heavy equipment);
- the density of the cement-sand screed (thermal conductivity) is on average 2000 kg/m3 (if everything is done in compliance with the necessary details).
All of the above indicators are completely optional for people whose professional activities are far from construction.
Cost of work with materials: from 390 rub./m2
Order by phone:
8
Contact us and entrust all calculations to our specialists. You can be sure that they will offer the most profitable and technologically advanced solutions in any specific case. Everyone who contacts us will always have the opportunity to take advantage of:
- attractive prices;
- prompt execution of work;
- many years of experience of employees;
- professional consultations;
- official quality guarantee.
Call! You will like our conditions!
Marking of cement-sand mortars (GOST 28013-98 Construction mortars) is carried out according to the basic properties of mortar mixtures and the properties of the hardened mortar.
For floor screed, marking according to the properties of the hardened screed solution is important and used. Let's talk about it first. After this, let's look at the frost resistance and density of the cement-sand mortar.
In terms of its composition, CPS can be a regular cement-sand mortar or made from dry mixtures. The composition of such ready-made mixtures varies for different types of screed.
The solution for cement sintering is mixed from a mixture of cement (1 part) and sand (2.5-3 parts) with the addition of water (0.5 liters per 1 kg of cement). Plasticizers, modifiers and fillers are added to such a solution. The addition of these components to a cement-sand mortar eliminates the threat of cracks, increases the ductility of the screed and promotes rapid strength gain compared to a mortar mixed without additives.
In construction, ready-made dry mixtures are mainly used to prepare mortar. The packaging of the finished mixture indicates the volume of water required to prepare the solution and the consumption of the mixture per unit area for different screed thicknesses.
Requirements for the composition of mortars are determined by GOST 28013-98 “Construction Mortars”.
There are the following methods for constructing a DSP:
- Wet. A ready-made mixture is used for screeding.
- Semi-dry. The mixture is mixed at the work site.
- Dry. Dry backfill is used and then covered with sheet materials.
The popularity of semi-dry DSP is explained by the ability to significantly reduce surface hardening time. Typically this time is several hours. The use of semi-dry screed minimizes the risk of subsequent cracking and avoids leakage of water from the solution through the floors.
To obtain a high-quality screed, compliance with the technology of its construction is required.
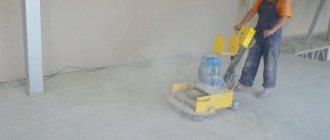
The surface under the screed device is thoroughly cleaned beforehand, pieces that flake off when tapped are removed. The surface to be prepared should be swept and, if possible, cleaned with a vacuum cleaner. Technological holes in the base and potholes are sealed with mortar and leveled.
Then the surface is primed. Using a primer will increase adhesion between the screed and the base. The primer eliminates the possibility of displacement of the lower layers of the screed during operation. The primer is applied in two layers, the second layer should be applied after the first has dried.
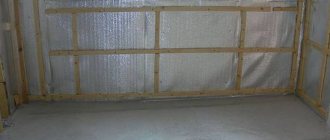
The damping tape is laid around the perimeter of the room after the applied primer has dried. The tape serves to seal the room and protect the screed.
Marking is faster and more convenient to do using a laser level. Do not forget that the thickness of the cement-sand screed cannot be less than 30 mm, otherwise the screed will crumble and crack. The thickness of the screed in a particular room is determined by the design or, in its absence, by the need to solve specific problems (hide communications, level the level of the base with a large slope, etc.).
Installation of beacons
Beacons are the guides along which the surface of the screed is leveled. Accordingly, the quality of the cement-sand screed directly depends on the correct placement of the beacons.
https://www.youtube.com/watch?v=5DMVk2EpxA0
To install screeds, ready-made metal or mortar beacons are used. The use of ready-made metal beacons greatly simplifies the work process.
The beacons are laid out strictly parallel along the surface. The width between the beacons depends on the length of the rule used and should be 200 millimeters shorter. If the rule has a length of 2000 mm, the beacons are laid out at a distance of 1800 mm from each other.
After marking the level, the beacons are raised to the required height and fixed using the mortar from which the screed will be made, building plaster or alabaster. Important! Beacons should not have deflections along their entire length. In places of deflections, gaskets are installed so that they are at the desired height, and the beacons are fixed.
Very important! If there is no door installed in the room, the level of the screed installed should not overlap the level of the future door. This can be avoided by starting work from the doorway.
The cost of the DSP device consists of the cost of the materials used and the cost of work. In Moscow, the cost of installing one square meter of central heating station starts from 400-430 rubles. True, we are talking about large volumes.
Ready-made dry mixtures are usually packaged in craft bags weighing 25-50 kg. Manufacturers claim that the consumption of dry mixture is about 20 kg per device of 1 m² of screed with a thickness of 10 mm. The cost of the bag varies depending on the composition of the mixture. Prices start from 130 rubles/bag (sand concrete).
A screed made from a mortar made from sand and cement is an almost perfectly flat base that is suitable for laying absolutely any floor covering, be it tile, laminate, linoleum or parquet. It is with the help of such a screed that most often they level rough foundations - concrete floors in houses, brick floors, and even simply create a foundation lying on ordinary soil.
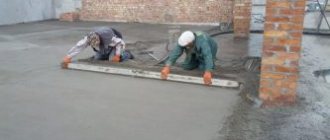
Cement-sand floor screed
Concrete floors are leveled using cement-sand screed
The main tasks of the screed are not only to level the surface, but also to the fact that it will redistribute the loads experienced by the floor, create a solid foundation, make it possible to equip heat and waterproof layers, and even in itself is an excellent option for heat and waterproofing. Inside this structure, you can lay various types of communications, equip a heated floor system, etc.
Reinforced screed on the ground
3D self-leveling floor in the bathroom
b) Detergent.
Today we add to the solution: dishwashing detergent or liquid soap. We usually buy dishwashing detergent from BIK in five-liter plastic bottles (to save money).
To prepare a cement-sand mortar, we add approximately 50 - 100 grams of detergent to the mixer. Determining the exact amount of detergent is problematic and depends on various factors.
The detergent must be added after the water so that it dissolves well and foams. Typically, the detergent dissolves and foams in a running mixer in about 3–5 minutes.
If you add detergent at the end of the batch, it will not dissolve well and the solution will not be elastic.
.
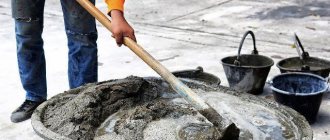
How to properly dilute
Proper mixing is the key to success. An even bigger guarantee is the correct sequence. Have you ever tried pouring cocoa powder into water? Doesn't stir. These lumps are difficult to break. It's the same with cement. Just remember about cocoa and never pour cement powder into water.
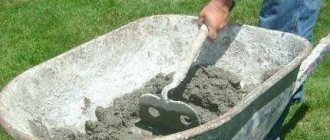
To properly prepare the solution, you must first mix cement with sand. It is necessary to mix thoroughly so that even the color becomes cement-sandy.
Next add water. Its amount depends on the moisture content of the sand. If the sand is wet, then the amount of liquid must be reduced. To mix large volumes, it is more convenient to use a concrete mixer. The quality of the building mixture is 40% better than with manual mixing.
d) Sand.
After the cement is completely mixed in the mixer with all the ingredients, add the remaining sand to the mixer.
If necessary, add a little bit of the missing part of the water. At the very end, we adjust the thickness of the solution.
We wait until the solution is completely mixed for another 3 - 5 minutes.
Total: the solution should be not too liquid and not too thick. The consistency is similar to store-bought sour cream. The solution should keep its shape; if you write something on it, the letters should not spread too much:
.
Summary:
To prepare a good solution for double mixing (for 8 buckets of ready-made solution) you need only 12-17 minutes.
.
.
.
For floor screed
Decorative materials for flooring have now become very finicky. They no longer want to use M50 or M75 solution. They need adhesion and a dust-free surface. Therefore, a solution of M100 and higher is often used for them. Well, the cement should be at least Portland M500.
Please note that if the fill is 5 cm or less, then gravel or crushed stone is not placed in it.
The following table shows the proportions of ingredients for potting solutions.
| Brand of solution | Amount of cement/share | Quantity of sand/share |
| M 150 | 1 (CEM 42.5) 1 (CEM 32.5) | 4 3 |
| M 200 | 1 (CEM 42.5) 1 (CEM 32.5) | 3 2,5 |
| M 300 | 1 (CEM 42.5) 1 (CEM 32.5) | 2,1 1,8 |
To make a good mortar that will not shrink too much and will not crack, you need to mix cement with sand and water in precise proportions. The amount of water is determined situationally. The average figure is a third of the total amount of cement used.
a) The water is clean.
Theoretically, you cannot use dirty water to prepare a solution such as:
- Rain.
— Water with oils (or an oil barrel for water).
But these are too strict rules that apply to critical buildings and structures (nuclear plants, bridges, etc.).
For civil construction (dachas, residential buildings) the water requirements are not so strict. We usually use water to prepare the solution: from wells, tap water, sometimes from lakes and rivers.
.
b) Detergent.
For a good and flexible solution, it is very important to add detergent so that the solution does not shrink. You can use various detergents (except cleaning agents).
Previously, for the elasticity of the solution, we added the cheapest washing powder, boiled laundry soap, white clay and even shampoo.
Recently, manufacturers of “Fagot” bricks have put forward requirements to build bassoon bricks only with hard mortar (without detergent). Allegedly, the detergent is causing their brick to burst. As practice has shown, bassoon bricks burst with both hard mortar and detergent.
Note: If you pour a lot of detergent into a batch, the cement mortar will lose strength. Too much detergent in the solution makes it airy (many air bubbles in the solution) and foamy. It looks like cotton wool.
Therefore, in order for the solution to be strong, detergent must be added to the solution without fanaticism.
.
PROFESSIONAL CONSTRUCTION OF CEMENT SEMI-DRY FLOOR SCREED WITH FIBER - EXPERIENCE SINCE 2002
•Firstly, the result of the work is a perfectly flat base, which is completely ready for laying parquet, linoleum, cork, etc. The use of a trowel during screed production eliminates the formation of voids and cracks on the surface of the screed.
•Secondly, the production of screed using this technology significantly speeds up the floor production process. It is possible to lay up to 250 m2 of screed per shift. After twelve hours, people can walk on the floor, and after four days the floor is completely ready for laying the finishing coating. And all this thanks to the minimal amount of water in the sand-cement mortar.
•Thirdly, in the production of mortar and its installation, it is possible to use various modern construction equipment from concrete pumps to pneumatic blowers. And the quality and composition of the solution allows it to be supplied to a height of up to eighty meters and a distance of up to one hundred and fifty meters.
•And fourthly, the production costs of this type of screed are very competitive. And all thanks to the low cost of materials used in production and the cost of work. Cement, sand, fiberglass for reinforcement are all much cheaper than leveling polymer mixtures and steel mesh or reinforcement.
Having shown all the advantages of semi-dry screed, it’s probably worth dwelling on the process of laying it. After all, most of the advantages are achieved by impeccably following production technology.
The impact resistance of a cement floor (according to SNiP 2.03.13-88) is characterized by the absence of chips when an object weighing up to 3 kg falls from a height of 1 m. The listed properties allow the use of cement-sand compositions for the installation of continuous floor screeds in residential, industrial, warehouse, retail, office premises on all floors, flat roofs, etc.
In addition to cement (Portland cement is usually used) and fine-grained quartz sand or gravel, various special fillers (fiber fiber) and modifiers (plasticizers, shrinkage and hardening regulators, etc.) are added to the cement-sand mixture. Fiber reinforcement of a cement-sand screed allows you to avoid the costs associated with traditional reinforcement of a cement floor with steel reinforcement.
When plasticizers are introduced into a cement-sand mixture, the delamination and water separation of the cement mortar decreases, the rate of hydration and setting of cement in the initial stage of hardening decreases, which contributes to the formation of a more uniform and fine-grained structure of the cement coating.
Cement-sand screeds based on modified Portland cement can be used as waterproofing and anti-corrosion protective layers for reinforced concrete foundations. The thickness of the cement-sand screed layer depends on several factors: the degree of unevenness of the base, the type of floor covering, and the presence of an insulating layer.
Laying cement-sand screed over large areas is usually carried out with specialized units (for example, TURBOSOL, PUTZMEISTER mortar pumps), which can significantly reduce labor costs and work time. The poured cement mortar is leveled and compacted; When the cement gains primary strength, the surface is smoothed with trowels and expansion joints are made.
When laying a monolithic cement screed over an area of more than 40 sq.m. immediately after grouting the surface, it is recommended to cut expansion (shrinkage) joints to prevent the appearance of cracks. The seams are cut into squares with a side of 2.5 m and to a depth of 1/3 of the layer thickness. The time for complete drying and strength gain of a screed based on conventional unmodified cement ranges from 25-30 days, depending on temperature and humidity, about a month.
Expansion, expansion joint in the screed.
When installing industrial floors based on cement-sand screed without the use of floor coverings, the surface is ground, impregnated with foam-filling compounds and antistatic agents, coated with polymer varnishes and paints to reduce dust separation and give the cement floor increased strength characteristics and decorativeness.
Properties of the screed: Acoustics It is necessary to choose a floor structure that will not allow sound to pass and spread throughout the structure. That is, the floor should dampen the sounds of the room well. Protection from airborne noise (conversations, screams; various collisions of objects in the air, for example, a child knocking on a drum), protection from impact noise (steps on the floor, objects and residents falling on the floor) and protection from combined noise (music playing in the speaker system , working home appliances) are extremely necessary.
We invite you to familiarize yourself with dry floor screed technology
Almost everyone is familiar with the sounds when (especially) neighbors (above) “walk right on their heads.” Of course, if neighbors make noise on purpose and demonstratively, then it will be difficult to protect your ears and nerves from them and it will be cheaper to deal with such neighbors than to create an entire soundproofing system. But when a normal household noise level is created, it is necessary to reduce this noise as much as possible and leave it in the room where it originates, so that the neighbors do not “deal with” you.
Types of floor screed
How to set beacons
Installation of beacons
Ready-made floor screed
If you plan to remove the beacons, this is done approximately 3-4 days after pouring the screed. After this, the resulting depressions are sealed with mortar. Then, during the first 3 days, the screed is watered with water and also covered with film so that it does not dry out. The film can be removed only after 10-14 days.
Drying cement-sand floor screed
The minimum drying time for the screed is 28 days. Previously, finishing of the floor cannot be done.
Almost anyone can make a screed if all requirements and instructions are met. However, it is recommended to first practice in a small room, and only then carry out work in the entire apartment.
c) Sand.
For facing masonry, it is very important that the sand is clay-free and of normal quality.
For example: they were building a two-story house and the sand for the facing masonry was mixed with clay. The customer decided to save money and imported sand at a cheaper price (with clay). Only two years have passed and all the seams of the facing masonry have become full of holes.
This happened because of the clay. Where the clay in the solution came out onto the front seam, it was washed away by the rain and holes formed.
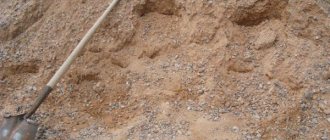
It is visually easy to determine whether sand is good (without clay) or not. The photo below shows that the sand is too yellow (not washed), there is a lot of clay in it - this is quarry sand:
It is better not to use such sand for facing masonry. This sand will be used for backfill (dirty masonry) and bedding.
For critical concrete (reinforced concrete belts, lintel crossbars, etc.), it is also not advisable to use sand that is too clayey.
The photo below shows good alluvial sand, containing almost no clay:
This sand is also mined in a quarry, but due to the fact that it is washed, it does not contain (or very little) clay and stones! We use alluvial sand for facing masonry (if good regular quarry sand is not available) and for critical concrete.
.
The ratio of sand, cement and water for repair work
Repairing seams, retouching chips on the facade and restoring some damage - all this is possible with the help of a homemade solution.
Composition of the cement mixture for repair:
- 1 hour (cement);
- 3 hours (sand);
- 0.5 hours (thickener).
The surface to be repaired must be clean. To effectively restore surfaces, good adhesion must be created. Therefore, to prevent the plaster from crumbling, never neglect the preparatory stage.
d) Cement.
To make a normal solution, you also need to pay attention to the quality of the cement. If the cement is weak, then it needs to be added more per batch.
We usually use to prepare the solution:
— Balakleyevsky cement grade 400 marked ShPTs ӏӏӏ/B-Sh-400.
— Balakleyevsky cement grade 400 marked PTs ӏӏ/B-Sh-400.
— Amvrosievsky cement grade 400 marked PTs ӏӏ/B-Sh-400.
We try not to use Kiev cement grade 400 marked PTs ӏӏ/B-Sh-400 to prepare the solution, because it is weaker. If you have to make a solution from Kyiv cement, then we throw almost twice as much of it into the mixer, and this is an almost double cost overrun.
.
Cement proportions for masonry
They say that what is built cheaply and cheerfully rests only on your word of honor. Let's not do that. Let's approach the process consciously.
We will mix the sand-cement mixture from the following materials:
- cement M400;
- clean sand;
- water;
- lime.
Lime is used to “insulate joints.” In general, sometimes masonry mortar is prepared from limestone to build warm houses. But the disadvantage of this composition is low strength. But if you mix cement and lime together, you get a durable composition with good thermal insulation properties.
The following tables show the proportions of components for mixing per 1 m3.
The proportions of the sand-lime mixture in shares for the M75 solution look like this:
- 1 part cement M400;
- 0.5 tsp lime;
- 5.5 hours of sand.
And if you use M500 cement, the components are taken in the following ratio:
- 1 tsp cement powder;
- 0.8 tsp lime;
- 7 hours of sand.
e) Additives for colored seams.
Sometimes we make a dark or black color for the front seam. The dark seam looks more contrasting and prettier. To make the seam darker, we add soot or graphite.
But unfortunately, after 10 years, the colored seam is washed out by rain and fades from the scorching rays of the sun.
Another drawback from color additives (graphite and soot) is that the grade of the solution is reduced. If too much graphite or soot is added to the solution, the solution becomes brittle and weak.
It is better to use more durable dyes for colored seams.
To make the front seam darker, the easiest way is to make a higher grade of solution, one to three. More cement means darker joint. It is also better to choose darker cement. For example, Balakleyevsky cement grade 400 with the marking ШПЦ ӏӏӏ/B-Sh-400 is one of the darkest cements.
.
.
.
As you know, brickwork is built at minus 10 degrees and below.
Facial masonry:
When constructing brick walls at minus 5 degrees, we do not add any additives. If you build brickwork without additives at a lower temperature, there may not be much crumbling on the face seam, especially if the seam is grouted with a semicircular joint.
At lower temperatures, potash has proven itself very well. It is not expensive, the cost of 50 kg is about 14 hryvnia.
Backfill masonry (rough):
If we build backfill masonry at minus 10 degrees, then we do not add any special chemical additives. The strength of the solution at sub-zero temperatures (without chemical additives) does not particularly decrease.
At lower temperatures, add potash.
.
Benefits and Features
Cement-sand screed has many advantages. This applies to its physical and physico-chemical parameters.
We invite you to familiarize yourself with Beacons for screeding concrete floors
Advantages of sand-cement screed.
- Evenness. Thanks to this method of leveling the floor, you can create an almost perfectly level base.
- Durability. Such a screed can easily serve for decades - on average, the service life is about 50 years.
- Strength. The screed does not deform under the pressure of heavy furniture; it is one of the most durable types of bases for a finished floor.
- Possibility to hide communications.
Inside the screed you can lay water or sewer pipes, a heated floor system, or electrical wires. There they will not disturb anyone and cannot be damaged. If it is necessary to repair communications laid inside the screed, the cement-sand layer will have to be partially or completely dismantled. Warm floor scheme - High sound insulation rate. The screed does not conduct sounds well, which means noise from neighbors below will not disturb the residents. Various soundproofing materials can also be laid under the screed.
- Possibility of thermal insulation equipment. The cement layer itself retains heat well, but the use of additional materials when installing the screed will provide reliable protection from the cold from the outside, and will also not release heat from the inside of the room to the outside.
- Low shrinkage rates. Despite the fact that during the drying process the sand-cement screed “shrinks” somewhat, it still has low shrinkage rates compared to other materials. And if installed correctly, it will not crack.
- Low cost of work. Compared to other methods of floor leveling, screeding is not expensive at all.
Leveling screed over insulation
But, like any other method of leveling the floor, cement-sand screed has its drawbacks, which you should be aware of before installing this type of base. The disadvantages of cement-sand screed are given below.
- Considerable mass. Cement screed exerts significant pressure on the floors, and therefore its use may be limited by this factor. For example, 1 m2 of cement-sand screed, laid in a layer of 1 cm, weighs about 20 kg.
- Long drying time. Before you can safely move on the screed and carry out further finishing of the floor, it is necessary to dry it well. The drying time is long - about a month.
- It is difficult to achieve a smooth surface manually. Fortunately, if this was not possible, but evenness is necessary, you can pour a self-leveling mixture on top of the screed.
- Difficult installation. Pouring screed is a very complex process, which is often carried out with the help of strangers. The work, of course, can be done independently, but it is important to follow all the steps and key points when pouring the screed. Otherwise it will crack.
Cracks in the screed
In any case, a properly poured screed is an excellent base option for any type of finishing coating. In addition, after drying during use, it is easy to clean, even if not covered with finishing, and is also not afraid of water.
This technology (also called German) provides additional advantages:
- The cost of installing a cement-sand screed with fiber fiber is less than the cost of installing a screed with conventional reinforcement.
- The installation of such a screed takes significantly less time due to the reduction in the drying time of the surface. This is achieved by reducing the volume of water used when mixing the solution. The screed is ready for laying the topcoat after 4 days.
- The DSP device with fiber fiber results in a completely flat base surface. This is achieved using a trowel, which eliminates all microdefects on the surface of the screed.
- In terms of impact resistance, such a screed fully complies with SNiP 22.03.13-88.
Preparation of the solution at negative temperatures.
Sand:
The main problem for preparing a solution in winter is frozen sand. It is best to prepare sand in advance. You can bring sand into a house under construction (with a roof and heating).
At large construction sites (in the north), the sand is specially heated.
Water:
It is best to pour hot or heated water into the mixer, then the solution will take longer to cool. In warm water, the detergent dissolves better and the solution becomes more elastic.
Anti-freeze:
Various means were used to prevent the solution from freezing (liquid and solid additives).
For example, some anti-freeze additives themselves froze in the cold - it’s funny that the anti-freeze additive froze itself! To check which liquid anti-freeze is good and which is not, we simply poured two types of anti-freeze into plastic disposable cups and put them in the cold.
It is best to use potash. How much potash should be added to the solution? Everything is described in detail on the potash packaging.
.