How to plaster cinder block walls?
Nowadays cinder block is the most profitable material for the construction of summer cottages, houses and garages; it is cheap and large in size.
But it has one drawback: it is hygroscopic and in places with high humidity it is better not to build with it. The cinder block is plastered with an ordinary cement-sand mortar, to prepare it you need to take 1 part of cement, 3 - 4 parts of sand and always 0.1 part of lime; such a solution is used where there is high humidity; such a solution begins to set after 40 minutes. .
Before plastering, we fill the wall with a plaster mesh and begin the plastering process. The walls need to be wetted; it is best to do this with a sprinkler.
I won’t speak for all manufacturers, but I personally came across cinder blocks of not very good quality, so I had to be very meticulous about plastering it so that nothing would fall off later. I’m not persuading anyone to do this, I’m just writing how I did it, perhaps it could have been done something cheaper, but somehow it turned out that way.
- First of all, I cleaned the cinder block from dust and dirt, stupidly took a Kölcher (high-pressure apparatus) and walked along the entire wall.
- First, I treated the entire wall with two layers of primer with a quartz coating, which resulted in a fairly durable film.
- Next, I bought a sheathing with reinforcement and tightened it to the wall with through bolts; I used a furniture bolt with a round head for this purpose.
- The next step was to take regular plaster, which is cheaper, and apply this mixture with a trowel, of course removing the excess.
- I attached a chain-link mesh to the rough layer; I did this until the solution was dry, as I attached it directly to the reinforcement with the help of a knitting wire.
- Since this is an external wall, I later used ShTs waterproofing plaster, I also chose the cheaper one, I took Bystrostroy.
- After thinking for a while, I decided to apply two more layers of cement-based coating-type waterproofing.
It turned out to be not cheap and has some problems, and the plaster consumption is quite large. But the wall is good and will last for a long time.
Why plaster sand block walls?
Hello! Plastering is not necessary, but it is advisable. Plaster creates a protective layer that protects the walls not only from getting wet, but also from freezing. In addition, plastered walls look more advantageous from an aesthetic point of view. The fact that sand blocks absorb moisture - not much, but still absorb it - will help you make a choice in favor of plastering. Moisture accumulates in the pores. If from the outside it evaporates more or less well, then penetrating deeper into the room, it remains there for a long time, especially if there is no ventilation system. Also, leaving sand blocks without plastering risks the fact that in the event of a sudden cold snap, the water in the blocks will freeze before it has time to evaporate. Although its quantity will be insignificant, it may be enough for the blocks to undergo destruction to one degree or another. Therefore, it is better to protect them from environmental influences with a layer of cement-based plaster. It would not be superfluous to add a certain amount of lime to the solution; as a rule, its proportion is about 0.6 parts of the solution. Lime will give more adhesion to the plaster elements. The resulting mixture is suitable for covering walls both on the outside and on the inside. I especially advise you to use cement-lime mortar if the room has high humidity, that is, more than 60%. The plastering solution is prepared as follows: it is necessary to mix cement, lime paste and sand in the following proportions:
• Cement – 1 part, • lime paste – 0.6 parts, • sand – 0.3 parts.
Everything needs to be mixed thoroughly. It should be remembered that the sand is sifted through a fine sieve. This is necessary to remove foreign particles such as stones, wood chips and others. You should also strain through a sieve and lime dough. The reason is the same - to remove undissolved lumps of lime.
In addition, you can use a water repellent - a liquid that is used to impregnate walls made of sand block or any other material. As a result, the surface acquires strong moisture-repellent properties. When choosing a brand of water repellent, pay attention to the composition and properties of the substance. The composition should not contain flammable elements, as well as substances hazardous to human health. Accordingly, the properties should be as follows:
• high heat resistance, • non-flammability, • high-quality waterproofing.
How and with what to plaster cinder block walls with your own hands: step-by-step instructions, video
Cinder block is a fairly popular and in-demand material in the construction of country houses, sheds, garages and even residential buildings, so it is important to consider the topic of how and with what to plaster cinder block walls with your own hands .
- large size of blocks, thanks to which work is carried out quickly;
- light weight of the material, which ensures ease of transportation and the ability to be easily carried around the facility;
- low solution costs;
- low price compared to most other materials for construction.
Along with this, the use of cinder block for construction also has disadvantages, for example, the fact that the material actively absorbs moisture. Therefore, it is practically not used for the construction of residential buildings.
To ensure that the material does not crumble and is not destroyed as a result, it must be finished. Therefore, plastering cinder block walls is a mandatory process. Moreover, this must be done in the first time after completion of construction, since the material begins to deteriorate almost immediately. It must be said that in order to slow down this process, the construction of the structure should not be carried out in the autumn-spring season, when it rains and the snow melts. Dry summer months are ideal.
So, let's look at how to plaster a cinder block wall with your own hands so that the building is protected from external destructive factors and lasts as long as possible, maintaining the necessary microclimate inside the building.
How to plaster cinder block walls using the “fur coat” method
Often cinder block buildings are plastered in a special way, creating a “fur coat” relief. It is simple and economical: the cement-sand mortar is diluted approximately half with water and sprayed onto the walls with a large brush. The first time the “fur coat” will turn out to be very modest, so it is better to repeat the spray 3-4 times (spaces for drying of the previous layers are required).
Cinder block is a fairly popular and in-demand material in the construction of country houses, sheds, garages and even residential buildings, so it is important to consider the topic of how and with what to plaster cinder block walls with your own hands .
- large size of blocks, thanks to which work is carried out quickly;
- light weight of the material, which ensures ease of transportation and the ability to be easily carried around the facility;
- low solution costs;
- low price compared to most other materials for construction.
Along with this, the use of cinder block for construction also has disadvantages, for example, the fact that the material actively absorbs moisture. Therefore, it is practically not used for the construction of residential buildings.
To ensure that the material does not crumble and is not destroyed as a result, it must be finished. Therefore, plastering cinder block walls is a mandatory process. Moreover, this must be done in the first time after completion of construction, since the material begins to deteriorate almost immediately. It must be said that in order to slow down this process, the construction of the structure should not be carried out in the autumn-spring season, when it rains and the snow melts. Dry summer months are ideal.
So, let's look at how to plaster a cinder block wall with your own hands so that the building is protected from external destructive factors and lasts as long as possible, maintaining the necessary microclimate inside the building.
Choosing the right plaster
Plastering cinder block walls can be done with any plaster-based solution. Literally anything will do, so you can choose the most inexpensive and common material – sand-cement mortar. As a rule, a small amount of lime is added to it.
If you need to make a choice from several types of materials, we recommend focusing on the following composition proportions:
- 1 part gray standard cement;
- 3 parts of standard size sand, without adding coarse-grained composition (pure fine mass);
- from 0.1 to 0.2 parts of lime.
To ensure that the finished solution, mixed by adding water, is plastic, a little detergent or a pre-prepared concentrated homemade soap composition is also poured into it. Soap should be laundry soap. Washing powder is also suitable for this purpose. It is also thrown into a small amount of water.
There can be 1-2 tablespoons of detergent per 10 liters of plaster, and 1 cup 100 grams of soap or powder solution. No more is needed - the finished product may foam a little, becoming covered with bubbles, which will complicate the task of applying the plaster.
Do-it-yourself plastering of cinder block walls is done using a composition with the addition of lime. In order not to make a mistake, first study the composition of the purchased product. Lime may already be in it. If you are just planning a purchase, then immediately choose ready-made dry powder in a bag.
Pros and cons of mineral wool and fiberglass
Both types of these materials are available in slabs and rolls. The performance and practical characteristics of mineral wool and fiberglass are almost identical. That is why both of these materials will be considered together.
The main advantage of these materials is their excellent thermal conductivity (about 0.041 W/(m 0C)) and sound insulation. Another indicator worth noting is fire resistance. Mineral wool and fiberglass practically do not burn and spontaneously extinguish in the absence of open fire.
The structure of fiberglass and mineral wool allows these materials to be laid even on uneven surfaces.
Perhaps the only drawback of these materials is that after getting wet they almost completely lose their thermal insulation and sound insulation properties.
Preparation of the solution
As part of the preparatory work, you need to end up with a dough - a thick composition. Lime is poured with water in a ratio of 1 to 3. The mass should be thoroughly mixed and then left for a day. The container is covered, or better yet completely closed, so that air access inside is limited.
Before plastering the cinder block wall, we finish preparing the mixture. The resulting aged “dough” is mixed with sand, then water is added, everything is mixed well. The plaster will be durable and hard, but it is not always needed. If you want to further enhance the strength, you can add a little extra sand (up to two additional parts).
Recipe for lime-clay mortar for preparing plaster mixture:
- 1 part lime dough;
- 1 part clay dough;
- 5 parts sand.
The recipe for clay-based dough is the same as for lime dough.
Lime-gypsum mortar is also suitable for the job. Everything is done in exactly the same way, but gypsum is added instead of clay. True, you need to use the resulting plaster immediately, otherwise it will begin to harden and will be unsuitable for use.
How to insulate a cinder block house with polystyrene foam: features
The method of laying polystyrene foam is in many ways similar to the method of insulating walls with mineral wool. The sequence of actions is as follows:
- First of all, the wall must be properly prepared. As in the first case, the surface is completely cleaned, puttied and primed.
- Next, glue is prepared according to a similar scheme and according to the instructions on the package. It is also necessary to take care of waterproofing, as it will provide protection from water.
- The wall of the house is covered with overlapping material, without allowing any cracks.
- After the wall is ready, it is reinforced with mesh. Next, give it time to dry and prime.
- The last stage is puttying the cinder block walls. Then you can start painting.
The insulation procedure is important from the point of view of the comfort of life in the house, and also helps to save on heating.
Building a house from cinder blocks has a number of obvious advantages. Such construction is economically profitable, because the walls of such a structure are erected quite quickly.
However, when building a house from cinder blocks, you need to know how to insulate cinder block walls and perform this procedure as efficiently as possible.
Calculation of the thickness of polystyrene foam for insulating a house.
Step-by-step instructions for plastering walls
The work is quite simple. How to plaster cinder block walls inside, as well as how to do it outside, can be understood when you begin. The scheme is similar and simple.
How to properly plaster external cinder block walls:
- We take the grid. We fasten it to the wall using nails driven carefully to a medium depth.
- We set up beacons. This is necessary if the work must be perfectly smooth. With the help of beacons it will be possible to simplify the task.
- Using a sprayer, apply running, slightly heated water to the wall. If there is no sprayer, this is done with a brush. The entire wall should be wet, but not to such an extent that water runs off.
- A primer is applied to the surface. It is also pre-purchased and diluted with water in the required proportions.
- When the primer has dried, plaster is applied on top. They throw it on with a spatula and level it with it. You can equalize the rule by removing excess material from the device. With the help of the rule, the surface is better prepared.
- Do-it-yourself plastering of cinder block walls is completed by grouting the surface. To do this, take a grater, preferably with a metal base.
We looked at how to plaster cinder block walls with your own hands. If you follow the basic rules and features of mixing the solution, the result can be smooth, beautiful, protecting the walls from the aggressive effects of moisture, wind and sunlight.
Methods for laying insulation
Today there are two optimal options: mineral wool (or glass wool) and polystyrene foam. Each of these materials has its own positive and negative qualities.
Scheme for insulating a wall made of cinder blocks.
Mineral wool is produced either in rolls or sheets. The material has the following positive aspects:
- the thermal conductivity indicator has a value of 0.041 W/(m°C), this characteristic may vary depending on the density of the material itself, but such a change will be insignificant;
- good sound insulation, here the density is of significant importance;
- fire resistance: if a fire occurs, then in the absence of open fire the material will quickly extinguish;
- ease of fixation: the structure of mineral wool allows you to easily cope with uneven surfaces, and it is also easy to eliminate voids.
But this material also has disadvantages:
- poor moisture insulation: if such cotton wool gets wet, the thermal insulation will deteriorate by 2 times;
- the installation technology itself has more complex features;
- rolls tend to roll, this factor is influenced by the dishonesty of contractors or improper insulation of cinder block walls on their own.
Polystyrene foam (extruded polystyrene foam), unlike the first option, is more dense in structure, which makes it more durable. The level of moisture absorption is approximately 10 times lower than that of mineral wool. But all qualities are significantly reflected in the price of the material.
Fastening mineral wool using lathing.
Polystyrene foam can be presented in the form of slabs, less often in rolls. The positive aspects of this material include the following:
- good resistance to moisture: even if water gets on the surface, the walls will not lose their thermal insulation properties;
- applicable on flat areas and covers them well;
- depending on the use of certain brands, it may have good fire resistance, therefore, like mineral wool, if there is no open fire near the source, this material will quickly extinguish.
Among the negative aspects, the following characteristics should be highlighted:
- low level of sound insulation;
- some types of foam plastic absolutely do not tolerate fire, therefore, when insulating the walls of a house, you should carefully select the brand, otherwise during a fire it can emit acrid smoke and support the fire itself;
- This material of the usual type has a rather fragile structure, this, in turn, leads to certain installation problems.
There is an opinion that rodents like this material. But it is not so. Rodents do not eat polystyrene foam, but they make their home in it, since it is warm enough.
When laying mineral wool, the surface must be primed
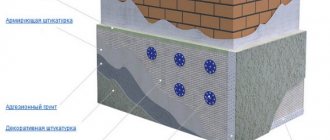
If you have chosen a material, but do not know how to insulate cinder block walls, follow our instructions. Since we are considering the option of insulating a finished house, the most acceptable option is “wet” installation.
For mineral or glass wool, the sequence of actions is as follows:
- Preparing the surface. At this stage, you should clean and plaster the cracks in your wall, as well as prime it. In addition, at this stage it is necessary to install a plinth to support the first row
- The next step is to prepare the glue for fastening. The preparation instructions will help you in this matter, as some compositions have differences in the preparation process.
- Then we apply glue to the slab of cotton wool and glue it to the wall. When gluing, it is worth remembering that there should not be cracks and gaps between the plates and it is best to overlap the joints or tightly hammer the cracks.
- Now we apply a layer of glue to the insulation and attach a fiberglass reinforcing mesh. We coat it thoroughly and let it dry for about a day.
- All that remains is to apply primer paint and plaster the surface. This can be done with either regular putty or decorative putty.
Foam sheets should be laid without seams, as shown in the photo
The method of insulation with foam plastic is in many ways similar to the method of “wet” laying mineral wool. By the way, the insulation of the loggia is done in the same way.
To attach polystyrene foam:
- We are preparing the wall. To do this, we clean it and plaster the cracks.
- We prime the wall surface.
- Prepare the adhesive solution and apply waterproofing. It should protect the foam from moisture and thereby preserve its properties.
- Now we glue the foam sheets. At the same time, cracks should not be allowed, otherwise all the work has been done in vain.
- After gluing the sheets, we prime the surface and attach a reinforcing mesh to them.
- After the surface has dried, we prime it again and our wall is ready for putty.
- After applying it, you should have a wonderful, smooth surface that you can paint according to your wishes.
- Insulating your home will help you not only significantly increase your living comfort and reduce heating costs. Thanks to high-quality exterior work, you can give your home an attractive appearance and save on air conditioning, since such a house will also heat up less.
The video in this article will help you look at this topic in more detail.
Finishing work with cinder blocks
If all the technological processes for constructing the walls of the house have been carried out correctly, you can begin finishing and decorating work with cinder blocks. Their implementation requires theoretical knowledge, correctly selected materials, precision and accuracy.
The walls of buildings built from cinder blocks are easy to prime, putty and paint. Finishing and finishing work includes insulating the house, covering walls with siding, tiling, plastering, and painting.
The work is carried out in the following sequence:
- Plastering the walls
- Doubling foam
- Stretch the reinforced mesh
- Plaster is applied
- Level up
- Primed
- Painted.
How to insulate a bathhouse or house made of cinder blocks
It is better to insulate cinder block buildings inside and outside.
To insulate walls you can use:
- foil;
- expanded polystyrene;
- polystyrene foam;
- mineral wool;
- basic insulation.
The choice of materials is quite wide and varied, so the choice of how and with what to insulate the walls of buildings made of cinder blocks depends only on you. It is worth noting that insulation will become more effective if you use different materials.
It is especially important to properly insulate the walls of the bathhouse so that they effectively retain heat. Good insulation will help reduce fuel costs.
Cinder block is an ideal material for building baths; it is not subject to rotting, it is not susceptible to fungus or mold. A bathhouse made of cinder blocks stands out for its fire safety.
But, although porous cinder blocks retain heat remarkably well, they easily absorb water. Because of this property, the cinder block loses all its positive qualities. Therefore, in order to prevent the formation of dampness inside the blocks, they are insulated.
Cinder blocks have gained wide popularity in the building materials market not only due to their low price, but also because all the necessary equipment for the production of cinder blocks can be purchased and made at home. The economic benefits of making cinder blocks yourself are quite obvious; in addition, you will not need to look for carriers to deliver the finished material.
However, we should not forget that any violation of production technology can lead to a deterioration in the technical characteristics of the cinder block. You can read about the main ones in this article.
Stages of insulation work
- wooden slats are placed on the interior walls;
- insulation is placed on the slats;
- they are covered with aluminum foil or foil film on top (this is another layer of hydro- and thermal insulation);
- wooden slats are stuffed onto the foil and finishing material is attached to them. The slats help create an air gap.
For external cladding, a ventilated facade is installed and the walls are also insulated, especially in the place where the steam room will be located. For finishing, you can use siding or other facing materials, but most often cinder block buildings are plastered on the outside.
How to insulate cinder block walls from the inside
Without insulation, a cinder block house will be cold.
In addition to thermal insulation materials, special films are used. Before insulating a cinder block house, let’s look at the types of films (membranes) that are used to protect thermal insulation. There are three types in total:
- wind barrier - does not blow through, allows moisture and steam to pass through;
- waterproofing – protection from moisture, allows steam to escape from the thermal insulation;
- vapor barrier - does not let anything through.
It is important to lay the membranes on the correct side, otherwise they will not perform their tasks. In principle, the choice of thermal insulation largely depends on the conditions under which the thermal insulation will be used. For example, in a house or a bathhouse, because in the latter there is not only an increased level of humidity, but also very high temperatures, especially in the steam room. It is very important that the thermal insulation withstands high temperatures and does not emit toxic substances.
The steam room in the bathhouse is insulated from the inside.
https://www.youtube.com/watch?v=ddM14gqXnRg
Internal insulation of a cinder block house is not recommended, unless, for example, you can use special paint with ceramic hollow spheres or penofol as additional thermal insulation. They are ineffective as independent materials. Thermal insulation of cinder block walls from the inside is practiced in steam saunas, when it is additionally necessary to protect the walls from moisture. In this case, the main thing is to prevent moisture from the steam room from getting into the insulation layer. Naturally, you can only use mineral wool. Work method:
- a wooden frame is erected on the inside of the walls in the steam room;
- Mineral wool, preferably basalt, is placed between the guides;
- foil insulation is spread over the sheathing - it is very effective for saunas, as it blocks infrared radiation and does not allow steam to pass through;
- a second tier of sheathing is installed on top of the foam foam;
- A wooden lining is attached to the second tier.
Mineral wool needs to be laid in two layers and ensure that the joints do not coincide. The minimum insulation layer is 10 cm. The main thing is not to forget to glue the foam foam joints with special (not stationery) tape. Also, the ventilation gap between the penofol and the wooden paneling should not be neglected. Without it, reflective insulation simply will not work, and besides, the condensation on the foam foam must evaporate.
Mineral wool is produced in rolls and sheets.
The most common way to insulate a cinder block house from the outside is to lay materials made of mineral or glass wool and polystyrene foam or extruded polystyrene foam.
First, let's look at mineral wool. Both types of material are produced both in rolls and slabs (see also the article Insulation with mineral wool: using the advantages of the material to the maximum). Since the properties of these two materials are approximately the same, we will consider them together.
The advantages of these materials include the following:
- It has a thermal conductivity of 0.041 W/(m 0C), this is a fairly good indicator, but depending on the density of mineral (glass) wool, although slightly, it can vary.
- It has fairly high noise insulation rates, which largely depend on the density of the wool.
- It has good fire resistance, which allows the cotton wool to extinguish in the absence of open fire.
- It is much more convenient to install on uneven surfaces, and also effectively fills voids.
The disadvantages of mineral (glass) wool include:
- Poor moisture insulation. That is, even with slight wetness, the insulation loses up to half of its thermal insulation properties.
- A more complex procedure for laying insulating material.
When using roll insulation, it is possible for individual parts in vertical structures to “fall over”. It is worth noting that this can only happen when doing the work yourself or due to the dishonesty of contractors.
Expanded polystyrene differs from extruded polystyrene foam in the manufacturing method. Extruded polystyrene foam, or polystyrene foam as it is called, has a much denser structure (see also the article Polystyrene insulation: characteristics, features, advantages).
In addition, it has a more durable structure, and its moisture absorption is almost 10 times less. But all these advantages are offset by its cost, since its price is much higher. Both types of foam are produced in slabs; sometimes extruded foam can be found in rolls.
Expanded polystyrene is produced not only in sheets, but can also be in rolls
- The thermal conductivity coefficient is 0.039 W/(m 0C), this is slightly better than that of mineral wool, but the difference is not significant.
- Due to the presence of moisture resistance, it can be briefly exposed to water, in addition, under its influence it does not lose its thermal insulation properties.
- Very convenient for installation on flat areas of the wall.
- Certain types of sheets are fire resistant, which allows them to extinguish in the absence of direct contact with a burning object.
The disadvantages of both types of expanded polystyrene include:
- Poor sound insulation of these materials.
- Some types of foam plastics with a low degree of fire resistance are quite fire hazardous and support combustion. At the same time, during combustion they emit acrid smoke (Also find out whether polystyrene foam is harmful as insulation).
- Ordinary polystyrene foam is quite fragile. Because of this, problems may arise during installation, or if moisture gets on it, freezing, installation will be difficult, since as a result the material may break.
The most common materials for insulating cinder block buildings are:
- fiberglass and mineral wool;
- extruded polystyrene foam and expanded polystyrene.
What is the difference between expanded polystyrene foam and extruded polystyrene foam? The popular name for extruded polystyrene foam is polystyrene foam. It has a rather denser structure than expanded polystyrene. It also practically does not absorb moisture. However, the cost of polystyrene foam is higher.
The materials are produced in the form of slabs (expanded polystyrene in rolls is much less common).
Main advantages:
- good thermal conductivity - 0.039 W/(m 0C);
- ease of installation;
- fire resistance - some types do not support the combustion process at all.
A significant disadvantage of polystyrene foam boards is the low level of sound insulation.
Laying foam plastic is carried out in almost the same way as installing mineral wool.
The first stage is surface preparation. Elimination of defects and application of primer. Next, after preparing the adhesive solution, we proceed to installing the insulation sheets.
After laying the insulation boards on top of them, you need to fix the reinforcing mesh. Next, this entire cake is carefully primed and puttied, after which you can proceed to the final stage - applying a decorative coating.
Regardless of what material the house is made of, it always requires insulation. Therefore, taking into account the material of construction, one or another insulation material should be selected. To insulate a cinder block house, you must first decide on the possible options, their installation technique and, of course, cost.
Here it should be taken into account that when coming from the inside, the dew point will move and stop between the wall and the coolant. As a result, moisture will appear on the surface, which will inevitably lead to fungus. And this, in turn, has a detrimental effect on the quality of thermal insulation of the house, not to mention the loss of usable space inside.
Therefore, by insulating the house from the outside, all these negative aspects are avoided. In many cases, experts note that this method is even better compared to work on internal walls.
How to plaster cinder block walls
Nowadays cinder block is the most profitable material for the construction of summer cottages, houses and garages; it is cheap and large in size. But it has one drawback: it is hygroscopic and in places with high humidity it is better not to build with it.
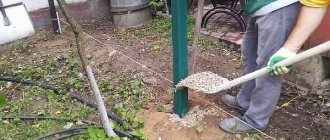
The cinder block is plastered with an ordinary cement-sand mortar, to prepare it you need to take 1 part of cement, 3 - 4 parts of sand and always 0.1 part of lime; such a solution is used where there is high humidity; such a solution begins to set after 40 minutes. .
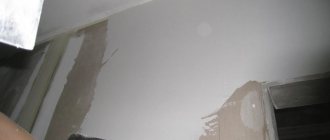
Before plastering, we fill the wall with a plaster mesh and begin the plastering process. The walls need to be wetted; it is best to do this with a sprinkler.
I won’t speak for all manufacturers, but I personally came across cinder blocks of not very good quality, so I had to be very meticulous about plastering it so that nothing would fall off later. I’m not persuading anyone to do this, I’m just writing how I did it, perhaps it could have been done something cheaper, but somehow it turned out that way.
- First of all, I cleaned the cinder block from dust and dirt, stupidly took a Kölcher (high-pressure apparatus) and walked along the entire wall.
- First, I treated the entire wall with two layers of primer with a quartz coating, which resulted in a fairly durable film.
- Next, I bought a sheathing with reinforcement and tightened it to the wall with through bolts; I used a furniture bolt with a round head for this purpose.
- The next step was to take regular plaster, which is cheaper, and apply this mixture with a trowel, of course removing the excess.
- I attached a chain-link mesh to the rough layer; I did this until the solution was dry, as I attached it directly to the reinforcement with the help of a knitting wire.
- Since this is an external wall, I later used ShTs waterproofing plaster, I also chose the cheaper one, I took Bystrostroy.
- After thinking for a while, I decided to apply two more layers of cement-based coating-type waterproofing.
It turned out to be not cheap and has some problems, and the plaster consumption is quite large. But the wall is good and will last for a long time.
In order for a newly built cinder block house to become reliable, warm and durable, it is necessary to protect its walls from bad weather and create a beautiful interior. Therefore, after the construction of the house, another important stage begins - finishing and finishing work.
Finishing work with cinder blocks
If all the technological processes for constructing the walls of the house have been carried out correctly, you can begin finishing and decorating work with cinder blocks. Their implementation requires theoretical knowledge, correctly selected materials, precision and accuracy.
The walls of buildings built from cinder blocks are easy to prime, putty and paint. Finishing and finishing work includes insulating the house, covering walls with siding, tiling, plastering, and painting.
The work is carried out in the following sequence:
- They putty on the walls, dowel the polystyrene foam, stretch the reinforced mesh, apply plaster, level it, prime it, paint it.
How to insulate a bathhouse or house made of cinder blocks
It is better to insulate cinder block buildings inside and outside.
To insulate walls you can use:
- foil; expanded polystyrene; polystyrene foam; mineral wool; basic insulation.
The choice of materials is quite wide and varied, so the choice of how and with what to insulate the walls of buildings made of cinder blocks depends only on you. It is worth noting that insulation will become more effective if you use different materials.
It is especially important to properly insulate the walls of the bathhouse so that they effectively retain heat. Good insulation will help reduce fuel costs.
Cinder block is an ideal material for building baths; it is not subject to rotting, it is not susceptible to fungus or mold. A bathhouse made of cinder blocks stands out for its fire safety.
But, although porous cinder blocks retain heat remarkably well, they easily absorb water. Because of this property, the cinder block loses all its positive qualities. Therefore, in order to prevent the formation of dampness inside the blocks, they are insulated.
Cinder blocks have gained wide popularity in the building materials market not only due to their low price, but also because all the necessary equipment for the production of cinder blocks can be purchased and made at home. The economic benefits of making cinder blocks yourself are quite obvious; in addition, you will not need to look for carriers to deliver the finished material.
However, we should not forget that any violation of production technology can lead to a deterioration in the technical characteristics of the cinder block. You can read about the main ones in this article.
Stages of insulation work
- wooden slats are placed on the interior walls; insulation is placed on the slats; they are covered with aluminum foil or foil film on top (this is another layer of hydro- and thermal insulation); wooden slats are stuffed onto the foil and finishing material is attached to them. The slats help create an air gap.
For external cladding, a ventilated facade is installed and the walls are also insulated, especially in the place where the steam room will be located. For finishing, you can use siding or other facing materials, but most often cinder block buildings are plastered on the outside.
Today, the construction market offers a new, modern method of insulating walls made of cinder blocks, which can be used both in a newly built room and in an old building.
Types of materials
Mineral wool is produced in rolls and sheets
The most common way to insulate a cinder block house from the outside is to lay materials made of mineral or glass wool and polystyrene foam or extruded polystyrene foam.
Mineral and glass wool
First, let's look at mineral wool. Both types of material are produced both in rolls and slabs (see also the article Insulation with mineral wool: using the advantages of the material to the maximum). Since the properties of these two materials are approximately the same, we will consider them together.
The advantages of these materials include the following:
- It has a thermal conductivity of 0.041 W/(m 0C), this is a fairly good indicator, but depending on the density of mineral (glass) wool, although slightly, it can vary.
- It has fairly high noise insulation rates, which largely depend on the density of the wool.
- It has good fire resistance, which allows the cotton wool to extinguish in the absence of open fire.
- It is much more convenient to install on uneven surfaces, and also effectively fills voids.
The disadvantages of mineral (glass) wool include:
- Poor moisture insulation . That is, even with slight wetness, the insulation loses up to half of its thermal insulation properties.
- A more complex procedure for laying insulating material.
When using roll insulation, it is possible for individual parts in vertical structures to “fall over”. It is worth noting that this can only happen when doing the work yourself or due to the dishonesty of contractors.
Expanded polystyrene and extruded polystyrene foam
Expanded polystyrene differs from extruded polystyrene foam in the manufacturing method. Extruded polystyrene foam, or polystyrene foam as it is called, has a much denser structure (see also the article Polystyrene insulation: characteristics, features, advantages).
In addition, it has a more durable structure, and its moisture absorption is almost 10 times less. But all these advantages are offset by its cost, since its price is much higher. Both types of foam are produced in slabs; sometimes extruded foam can be found in rolls.
The advantages of both types of foam include:
Expanded polystyrene is produced not only in sheets, but can also be in rolls
- The thermal conductivity coefficient is 0.039 W/(m 0C), this is slightly better than that of mineral wool, but the difference is not significant.
- Due to the presence of moisture resistance, it can be briefly exposed to water, in addition, under its influence it does not lose its thermal insulation properties.
- Very convenient for installation on flat areas of the wall.
- Certain types of sheets are fire resistant, which allows them to extinguish in the absence of direct contact with a burning object.
The disadvantages of both types of expanded polystyrene include:
- Poor sound insulation of these materials.
- Some types of foam plastics with a low degree of fire resistance are quite fire hazardous and support combustion. At the same time, during combustion they emit acrid smoke (Also find out whether polystyrene foam is harmful as insulation).
- Ordinary polystyrene foam is quite fragile. Because of this, problems may arise during installation, or if moisture gets on it, freezing, installation will be difficult, since as a result the material may break.
It is worth noting that, according to popular belief, polystyrene foam is actively eaten by rodents. This is not so, they make their nests in it, since it is warmer there, and in polystyrene foam it is much more audible than in mineral wool.
Choosing the right plaster
Plastering cinder block walls can be done with any plaster-based solution. Literally anything will do, so you can choose the most inexpensive and common material – sand-cement mortar. As a rule, a small amount of lime is added to it.
If you need to make a choice from several types of materials, we recommend focusing on the following composition proportions:
- 1 part gray standard cement;
- 3 parts of standard size sand, without adding coarse-grained composition (pure fine mass);
- from 0.1 to 0.2 parts of lime.
To ensure that the finished solution, mixed by adding water, is plastic, a little detergent or a pre-prepared concentrated homemade soap composition is also poured into it. Soap should be laundry soap. Washing powder is also suitable for this purpose. It is also thrown into a small amount of water.
There can be 1-2 tablespoons of detergent per 10 liters of plaster, and 1 cup 100 grams of soap or powder solution. No more is needed - the finished product may foam a little, becoming covered with bubbles, which will complicate the task of applying the plaster.
Do-it-yourself plastering of cinder block walls is done using a composition with the addition of lime. In order not to make a mistake, first study the composition of the purchased product. Lime may already be in it. If you are just planning a purchase, then immediately choose ready-made dry powder in a bag.
Important! Inside, the walls are treated with cement-limestone-sand mortar if there is no heating. If the operation of water or electrical equipment is planned, which will warm up the walls, then you can stop at lime mortar. The first will help overcome temperature changes and possible cracking of the material.
Conclusion
We talked about the types of external insulation of a cinder block house. We hope that this information will be useful to you and you will be able to choose the appropriate insulation option. In the video presented in this article you will find additional information on this topic.
Most often, the developer thinks about thermal insulation of a house made of cinder blocks with his own hands after the object is erected. This is largely due to the fact that cinder blocks vary greatly in their thermal conductivity.
This indicator can be in the range of 0.35-0.6 W/(m K). Thus, it is very difficult to determine in advance how well cinder blocks can insulate the interior space.
Why does a cinder block house need insulation?
Based on the building codes reflected in SNiP 02/23/2003, only 1.5-2 m can be considered the normal thickness of walls made of cinder blocks. But such thick walls are extremely expensive. Suffice it to say that for such a structure it will be necessary to build a massive and expensive foundation.
In order for the walls of a house made of cinder blocks to retain heat in the home, the best option would be to perform thermal insulation. Then you will be able to save money, provide conditions for a pleasant microclimate, and also make the house more aesthetically pleasing.
Preparation of the solution
As part of the preparatory work, you need to end up with a dough - a thick composition. Lime is poured with water in a ratio of 1 to 3. The mass should be thoroughly mixed and then left for a day. The container is covered, or better yet completely closed, so that air access inside is limited.
Before plastering the cinder block wall, we finish preparing the mixture. The resulting aged “dough” is mixed with sand, then water is added, everything is mixed well. The plaster will be durable and hard, but it is not always needed. If you want to further enhance the strength, you can add a little extra sand (up to two additional parts).
Recipe for lime-clay mortar for preparing plaster mixture:
- 1 part lime dough;
- 1 part clay dough;
- 5 parts sand.
The recipe for clay-based dough is the same as for lime dough.
Lime-gypsum mortar is also suitable for the job. Everything is done in exactly the same way, but gypsum is added instead of clay. True, you need to use the resulting plaster immediately, otherwise it will begin to harden and will be unsuitable for use.
Step-by-step instructions for plastering walls
The work is quite simple. How to plaster cinder block walls inside, as well as how to do it outside, can be understood when you begin. The scheme is similar and simple.
How to properly plaster external cinder block walls:
- We take the grid. We fasten it to the wall using nails driven carefully to a medium depth.
- We set up beacons. This is necessary if the work must be perfectly smooth. With the help of beacons it will be possible to simplify the task.
- Using a sprayer, apply running, slightly heated water to the wall. If there is no sprayer, this is done with a brush. The entire wall should be wet, but not to such an extent that water runs off.
- A primer is applied to the surface. It is also pre-purchased and diluted with water in the required proportions.
- When the primer has dried, plaster is applied on top. They throw it on with a spatula and level it with it. You can equalize the rule by removing excess material from the device. With the help of the rule, the surface is better prepared.
- Do-it-yourself plastering of cinder block walls is completed by grouting the surface. To do this, take a grater, preferably with a metal base.
We looked at how to plaster cinder block walls with your own hands. If you follow the basic rules and features of mixing the solution, the result can be smooth, beautiful, protecting the walls from the aggressive effects of moisture, wind and sunlight.
How to insulate a cinder block house from the outside with mineral wool
To do this, they are coated with a primer. If a cinder block house is already completely ready, and all that remains is to insulate the walls, then a method called wet laying is suitable.
In order to insulate a house, you need to follow these steps:
- Prepare the surface of the cinder block wall. It is cleaned of dirt, after which the cracks are removed by plastering and primed. At the same stage, you should take care of the base, which will serve as a support for the first row.
- Next, an adhesive solution is prepared onto which the insulation will be attached to the walls of the house. This process can be found on the product label. After the glue is ready, it is applied to the surface of the material, and then it is pressed against the wall. At this stage there is a very important point: it is best to overlap the masonry to avoid the formation of gaps between the slabs. Otherwise, you will have to take care to fill the cracks tightly.
- After the cinder block house is covered with material, you should take care of the reinforcing mesh. It is made from fiberglass. To attach it to the wall, it must be coated with glue and allowed time to dry completely (24 hours).
- The final stage of such work is the application of primer paint to the walls or plaster. In the latter case, both ordinary and decorative putty are used.
In general, there is nothing complicated about insulation. Everything is elementary and simple.
Scheme of internal and external foam insulation.
In general, there is nothing complicated about insulating a house made of cinder blocks. Everything is elementary and simple.