M4 lime mortar is often used for facade and interior finishing work, and is also successfully used for laying bricks. Mixtures based on slaked lime, which have proven themselves well for a long time, are distinguished by their plasticity, good heat-saving properties, and relatively low cost; and also because they harden rather slowly (this provides advantages during transportation). True, these compositions are inferior to their cement counterparts in strength.
Lime mortar components: water, lime (as a binder), filler (sand, gypsum or cement) and modifiers that help improve the properties of the mixture. Moreover, the binder component is used in the form:
- fluff (slaked lime or dry calcium hydroxide);
- lime paste, which is obtained by reacting quicklime with water (2 kg of lime is poured into 1 liter of water);
- lime milk (for 2 kg of lime there are 2 liters of water).
Classification of solutions
Lime mortars are classified according to the type of filler, the amount of lime content, density and physical and mechanical properties.
Based on the type of filling component, lime mortars are divided into simple and complex. If a simple mixture contains only lime, then a complex mixture also contains sand, gypsum, cement or clay.
According to the amount of lime content, solutions are thin, normal and fatty. Lean mixtures contain the least amount of lime and the most amount of sand, gypsum or cement (the ratio of the binder component to the filler is 1:5). In fatty compositions, the proportion of lime is 50% or more relative to the filling material. The main advantage of fatty lime mixtures is their plasticity.
Attention! Applying too thick a layer of grease will cause significant shrinkage and cracking.
The most dense are lime-cement mortars, which cannot be said about lime mixtures with gypsum: they are less dense.
There are two indicators that characterize the durability of the mixture - strength and frost resistance. In terms of compressive strength, M4 lime mortars are the least durable compared to other brands (for example, M25, M50, M75), and in terms of frost resistance, these compositions are not controlled at all.
Plaster consumption
The quality and durability of the finish depends on how correctly the plaster mixture is prepared.
It is important to remember that after preparation the mixture retains its properties for about 6 hours. Therefore, you need to rationally calculate the amount of solution for a specific area of work.
For example, on 1 square meter of surface it is necessary to use up to 12 kg of solution if it is applied in a layer 10 mm thick. If you make a thicker layer, up to 30 mm, then in the future the plaster may peel off and crack.
Preparing lime mortar for plastering
Since it is quite easy to make lime mortar for plaster, it is often used for finishing walls and ceilings. The technological process of arranging plaster includes three stages: spraying, primer and covering (total layer thickness - no more than 25 mm).
To prepare a plaster solution for spraying, mix fluff and sifted sand in a ratio of 1:3 or 1:4; for priming - in a ratio of 1:2; and for “covering” – 1:1.5. Then pour water and mix (be sure to remove quicklime pieces from the mixture).
Advice! For more convenient stirring of the mixture, we recommend initially mixing only 1/3 of the required volume of sand and water with fluff, then adding the remaining water and sand and mixing everything thoroughly again. Moreover, we pour water from a watering can, and do not pour it in a direct stream.
We get the fluff as follows:
- We place the lump lime in a metal (without signs of corrosion) or wooden container (not plastic).
Important! We choose the volume of the container taking into account the fact that during the process of extinguishing the fluff will increase 3-4 times.
- Fill the lime with cold water (1 liter of water per 2 kg of fluff) and cover with a lid. The boiling process begins.
Important! When extinguishing, a chemical reaction occurs (quite violent), which is accompanied by large heat release. Therefore, the use of goggles, protective clothing, rubber gloves and boots is mandatory.
- After boiling, mix the mixture thoroughly and let the solution brew for 2 weeks.
- Before direct use, sift dry calcium hydroxide through a construction sieve (to prevent poorly quenched particles from getting into the mixture).
Compositions based on fluff have a number of advantages:
- plasticity;
- antibacterial (especially important when finishing wooden surfaces);
- relatively low cost;
- sufficient drying period.
Advice! We recommend preparing lime mortar for plaster immediately before use. If it hardens: just pour water into it and stir.
Disadvantages of such mixtures:
- Lime hardens slowly: therefore, such a composition begins to “float” after a day.
Advice! When plastering walls, apply the second layer of the mixture only after the first has completely dried.
- Lime absorbs moisture well: therefore, it is not recommended to decorate rooms with high humidity with mixtures based on it.
Installation of "beacons"
This is a very important stage, on which the flatness, verticality and, accordingly, the aesthetic appeal of the plastered structure depend.
The technical meaning of “beacons” is to ensure the possibility of high-quality leveling of the plastered surface using the rule. Therefore, the distances between these elements are determined by the length of the working part of the rule, minus 50 millimeters per side for overlap. As “beacons” you can use: nails or wooden choppers. The best option is “blunders” made of cement mortar
If the length of the level is not enough, leveling is allowed using a flat wooden plank and an ordinary carpenter's level applied to the plane of the plank.
Lime-cement mortars
Cement-lime mortars are successfully used for facade finishing of buildings and for plastering walls of rooms with high humidity (over 65%). Cement, which is part of the lime mortar, increases water resistance, frost resistance and strength, and lime gives the mixture good plasticity. The disadvantage of lime-cement mortar for plaster is its relatively high cost (due to the high cost of cement).
For spraying, mix sand, cement and lime in a ratio of 2:1:5; then pour in enough water so that the mixture has the consistency of liquid sour cream. Apply a thin layer of this solution onto the wall using a trowel. There is no need to level it.
Algorithm for preparing the composition that we use as the main layer of plaster (thickness should not exceed 50 mm):
- mix the dry components of the mixture: cement (grade M400) and sand in a ratio of 1:2, 1:3, 1:4 or 1:5 (depending on how heavy the finished finishing mortar should be);
- in a separate container, dilute the lime dough to the consistency of a suspension: to do this, mix the dough and water in a 1:1 ratio;
- pour this suspension into the cement-sand mixture and mix (moreover, the mass of the suspension is equal to the mass of cement);
- Continuing to stir, add water until the required thickness is obtained.
Apply the main layer of plaster to the wall; remove the excess using the following rules; check the level vertically and horizontally.
Then we apply a thin finishing layer (the composition is the same as for the spray) and level it.
On a note! In order to obtain a plastic plaster mortar, for 25 kg of cement you will need: 14 kg or 37 liters of lime, 235 kg of sand and 60 liters of water. And to get a durable composition: 25 kg of cement, 7.5 kg or 18 liters of lime, 175 kg of sand and 50 liters of water.
Advantages and disadvantages
Lime plaster is widely used in finishing work due to the following advantages:
- Thermal insulation: retains heat in the room, allowing you to save on heating costs;
- fire safety: does not burn and does not support the combustion process;
- ease of use: thanks to elasticity and setting time, it facilitates the application process;
- hygiene: thanks to the alkaline structure, it prevents the formation of mold and mildew;
- vapor permeability: moisture does not accumulate under the plaster due to the ability to transmit steam;
- mechanical strength: the plaster does not crack even after driving nails into the wall.
However, there are also disadvantages to using lime mortars. The main one is the duration of hardening. Repairs can take a long time due to the fact that to apply each layer of plaster you need to wait until the previous one has dried.
Another inconvenience is caused by the fact that to prepare the lime mortar you only need slaked lime. And the time for self-extinguishing takes at least two weeks.
Lime plaster does not react well to humidity, so it should never be used for finishing bathrooms, basements or exterior facades in areas where the humidity is high. Cement-lime mortar can be used in bathrooms.
How to choose the right cement, what brands it comes in, read this article.
Lime-gypsum mortars
If there is a need to obtain a composition that sets quickly, then prepare a lime mixture with gypsum (hardening time - about 10 minutes):
- prepare the usual composition based on fluff and divide it into two parts;
- combine the first part with gypsum in a ratio of 2:1 and mix;
- add the second part of the composition based on fluff to this composition with gypsum and mix again;
- use the resulting mixture for 5-8 minutes (while continuing to constantly stir the mixture).
Advice! We recommend working with the lime-gypsum solution quickly and mixing it in small portions.
Such compositions are characterized by: fine grain size and lack of shrinkage. Disadvantages: the need to use them as soon as possible and the impossibility of using them in wet rooms. Most often, such mixtures are used for interior plastering of premises (they are rarely used outside).
Application
This is an excellent material for finishing work in bathrooms for laying tiles. And also for rooms with swimming pools, for outdoor work, etc. In addition, this solution is considered the easiest to manufacture. It is prepared in the following ratio: 1 part cement, 3 to 5 parts sand, 1 part lime.
To prepare the solution, take a certain container into which dry sand and cement are poured. Then, slaked lime diluted in water is added. Mix everything well, add water if necessary.
In general, the proportions in which the solution will be prepared depends on the type of construction and finishing work. The most common ratios are 1:1:6 - cement, lime, sand.
Cement must be of good and fresh grade 400 or 500.
Note: If cement is stored for a long time in incorrect conditions, it loses its properties. For example, if the M500 brand is stored for a long time, it becomes M450.
Sand must be sifted before use. If quicklime is used, it must first be slaked. Why is it poured into a container and filled with water. At the same time, one should not forget about safety precautions, because during a chemical reaction a large amount of thermal energy will be released.
Consumption
With a layer thickness of about five millimeters, the consumption of this plaster will be seven kilograms or from five to six liters. The thickness of the layer can be from five to thirty centimeters.
In practice, one fifty kilogram bag of cement will require forty kilograms of lime, five hundred and fifty kilograms of sand and one hundred liters of water.
Lime mixture for bricklaying
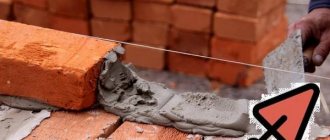
The scope of application of lime mortars for bricklaying is quite limited: they are mainly used for the construction of one-story buildings (lightly loaded walls and interior partitions). The main advantages of such a masonry mortar are its plasticity, low thermal conductivity and good adhesion. The disadvantages include low compressive strength (0.4 MPa) and fragility. Prepare lime mortar for bricklaying:
- Mix dry calcium hydroxide and sand in a ratio of 1:3, 1:4 or 1:5 (it all depends on the fat content of the binder).
Advice! To avoid the presence of lumps in the solution, sift the dry components of the mixture through a fine sieve.
- Stirring constantly, add water in small portions and bring the mixture to a consistency reminiscent of thick sour cream.
Lime mortar for masonry must meet the following requirements:
- be quite plastic in order to completely fill all the voids in the bricks and smooth out the unevenness of the seams;
- be strong enough not to cause wall deformation;
- remain plastic for a long time until curing.
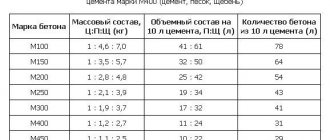
Instead of lime, you can use a cement component in the mixture. So, for example, using M400 cement, we mix cement, lime and sand in the ratio: for the M75 mixture – 2:1:10; M50 – 1:1:8. For cement M300: composition M75 – 2:0.5:8; M25 – 1:1.7:12. For cement M200: M75 – 2:0.5:5.
Taking into account some factors
Scheme of plastering walls.
In practice, the wall always has a certain curvature. Accurately accounting for this factor requires numerous measurements and calculations, which does not make much sense. An approximate account of the wall curvature can be made by introducing the average thickness of the actual layer into the calculation. To do this, the minimum and maximum thickness of the plaster layer is determined, and the average value of this value is found.
In the preliminary calculation, the area of the wall was taken as the area of a regular rectangle, i.e. as the product of length and height of the surface. In actual calculations, it is necessary to take into account the deviation of the wall height and parallelism. The average height of the wall and its average length are taken into account. Measurements are taken at three points - in the center and along the edges.
A more accurate calculation of the rough layer is made difficult by accurately measuring the size of defects. The size of the largest defects should be taken into account. For example, when taking into account the rough layer of a chipboard coating, the approximate volume of the seam between the sheets is calculated as the product of the length of the seam by the width of the gap and the thickness of the chipboard sheet.
Most often, accuracy of calculations is not needed.
This occurs due to the fact that the thickness of the main layer of plaster is standardized according to the maximum size.
Application instructions
All work is done gradually. You need to create three layers, each of which has its own functional purpose. This is the only way to achieve optimal results.
- Creating the first layer, spraying. Its purpose is to improve the adhesion of the first layer to the wall, as well as to fill all the voids and cracks to avoid the formation of voids. The optimal consistency is creamy, not too thick. The plaster is spread over the entire wall with a trowel. There is no need to level the layer. This process can be mechanized with a special spraying device. The layer thickness is small.
- The second layer is soil. He's the main one. Its thickness is up to 50 mm. The solution is doughy, thicker than for spraying. Application occurs using trowels or trowels. Excess solution will be removed by the rule. They also check the evenness of the surface.
- The final layer is the covering. It eliminates all defects, chips and creates a smoother and more uniform surface. The thickness of the mixture resembles a spray solution. Application occurs on a damp wall, the layer thickness is several millimeters. At the end, you need to treat the layer with a float to remove defects and make the wall smoother.
This was a technical process of applying limestone plaster. If you practice, you can do work inside or outside quickly and efficiently. This mixture has many advantages, including versatility, vapor permeability, plasticity and ease of application. And if everything is done correctly, the finish will last for decades.
A little about plasticizers
Making your own lime mortar
For those who have not yet encountered plasticizers, you should immediately remember what it is used for. A plasticizer is necessary for cement mortar or concrete in order to increase their fluidity and ductility. Ultimately, improving such indicators leads to an increase in the strength of the already hardened coating.
If you decide to add a plasticizer to your solution, you should know that the dosage may vary for each manufacturer. The average percentage is 0.5-1%; if converted to kilograms, then per 100 kg of cement it is necessary to add from 0.5 to 1 kg of plasticizer.
Related article: Wallpaper for a toilet in an apartment: 35 interior photos
If you are screeding a floor, then using a plasticizer is not a necessary step. However, its use will not be superfluous. It is important to remember that ordinary cement mortar cannot be used if you decide to lay porcelain tiles on walls or floors.
