Before describing all the advantages and disadvantages of screw piles, these elements and their technical capabilities should be described in detail. So, the screw design is a pipe with a wall thickness usually of at least 3 mm, rolled on one side. It is to this end of the pipe that a drilling blade of a special design is welded. In order to maintain structural strength, at least single-seam pipes are used for the manufacture of piles.
The drilling blades used usually have a diameter of 1.2 - 1.3 times the diameter of the main pipe, but on the market for similar products there are options with continuous threads instead of a single blade. Certain pile designs have specific areas of application and their designs may depend on the structure of the soil where they are used.
To prevent corrosion of screw piles, manufacturers coat them with special chemicals or anti-corrosion solutions. Some use galvanized material in the manufacture of piles, which is not susceptible to the aggressive effects of moisture in the soil.
How to make a pile foundation for a cottage?
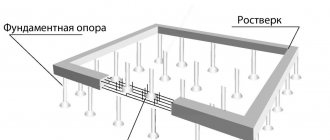
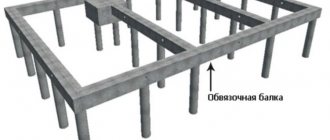
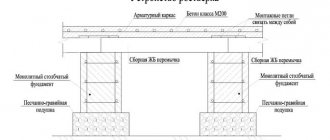
The most important element in a pile foundation is, of course, the piles, which are then connected to a grillage made in the form of a slab or beam floor.
For wooden cottages, buildings without grillages are most often used. In this case, piles in the form of columns are used; such a foundation is very reliable on soils with problems.
Pile foundations are distinguished by many characteristics:
- by grillage height (high or low);
- according to the rigidity of fastening piles with a grillage (rigid fastening is used in cases where the soils are very weak or in the presence of significant loads on the foundation itself, both horizontal and pull-out types).
When designing a pile foundation for a house, you need to calculate the required depth of the piles. It depends on the occurrence of low-compressible soil, as well as on the presence or absence of rocks present at the construction site. The sharp end of the pile must be immersed to a depth of more than one meter.
By design, there are several types of piles: piles - racks, which must rest on the ground, and hanging type piles, from which the load is transferred to the soil and the side surfaces of the entire structure of the pile.
Pile foundations can have different numbers of piles. Band-type grillages are usually installed under wall structures, which are reinforced with additional piles arranged in several rows.
There is also such a thing as “pile bushes” (several piles that are used to create and install columns).
Pile fields are used in the construction of pile foundations. They are mainly intended for buildings that are small in area, but have very high vertical load parameters.
DIY screw foundation
Modern technologies have somehow, completely imperceptibly, brought into our lives another innovation, previously available mainly only to the military and geologists (lovers of hard-to-reach places) - a screw foundation. At the same time, the relative simplicity and speed of creating such a structure using special piles gradually “pushes” aside the strip and column foundations that are familiar to us.
But is such a foundation really a universal solution for building a strong and durable foundation for a house? In the article we will tell you how to make it, give detailed step-by-step instructions,
Screw pile
Screw piles
This is a metal pipe (treated with a special compound that slows down the corrosion process), to the lower pointed end of which a blade is welded. Such a pile is screwed (screwed) into the ground (like a self-tapping screw into wood), practically without damaging it (only compacting it due to the immersion of the pipe) and, therefore, absolutely without reducing its load-bearing capacity.
These piles are available in several types:
- with a helical blade (used on soils with poor load-bearing capacity) or imitation threading along most of the length of the pile (such piles are usually used in northern regions, where it is necessary not to particularly disturb the permafrost when laying the foundation for buildings and structures);
- with different pipe diameters - the larger the diameter, the larger the weight of the building the pile can support (without its deformation), but do not forget that thicker piles (whose diameter exceeds 108 mm) cannot be tightened manually;
- with different blade diameters - for less durable and water-saturated soils, the blade diameter will be larger than for dry and dense soils.
And, of course, the type and shape of the pile also depends on the manufacturer that produces it.
What does a screw foundation look like?
The screw foundation looks like this:
- in the corners and at the intersections of internal walls, as well as along the length of the wall of the structure, piles are screwed into the ground (the pitch of the piles ranges from 1 to 3 meters);
- on top, all piles are cut to the same level and fastened with either metal or wooden beams to create a single rigid structure - a grillage;
- Between the ground level and the bottom of the building (grillage) there is a freely ventilated space.
Advantages and disadvantages
Difficulties in installing screw piles
This is a fairly simple design. However, here too there are pitfalls waiting for you:
- piles should be selected strictly in accordance with the calculation made by the designer based on hydrogeological surveys on your land plot, the depth of soil freezing, as well as the weight of the future building and the weight of the snow cover applied to the building in winter (otherwise you risk either overpaying for piles of greater length or diameter, or get a completely unstable structure that will “drive” within a year);
- depending on the soil, it can be quite difficult to screw piles into the ground manually (even if 4-5 people take part in this process);
- the presence of trees, tall bushes, fences or other structures in the immediate vicinity of the foundation site creates problems for driving piles manually;
- Not all companies do their work efficiently, following technology.
Installed pile
However, a screw foundation also has advantages:
- no extensive excavation work is required;
- can be installed on any terrain, without prior leveling of the terrain;
- work on driving piles into the ground is carried out almost at any time of the year.
The foundations can be laid on any soil except rocky, since the rock itself is an excellent strong foundation (for a strip or columnar foundation).
Preparatory work
Bathhouse on screw piles
It is quite possible to make the base for a small building (garage, gazebo, veranda, one-story wooden frame house):
- you can weld the pile yourself, using the drawings posted on the Internet, or weld the piles in a similar way (for this you will need to order a calculation, and then purchase one recommended pile at the factory);
- You can also immerse the piles into the ground yourself (with the help of friends), guided by the existing drawings when arranging them, and make a grillage.
For a screw foundation, you should not skimp on material. Piles should only be made from new pipes of the required thickness, and they should be thoroughly cleaned of rust and coated with a protective compound. Particular attention is paid to the quality of the welding joint at the point where the blade is attached, since on sufficiently dense soils the seam may burst, unable to withstand the load applied to the pile.
To facilitate the process of screwing the pile in its upper part (which you will then cut with a grinder), you need to make two holes - into them you will insert “bars”, with the help of which the pile is screwed into the ground.
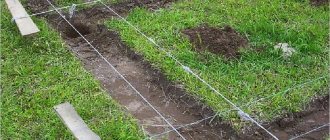
Marking a screw foundation
Site marking
Installation should be carried out as accurately and competently as possible. The maximum permissible error along the vertical section and between the piles is no more than 2 cm. Otherwise, in the future you may face the need to repair the grillage due to its sagging. And this, in turn, will lead to damage to the load-bearing wall and even skewing of the building.
The foundation on screw piles must be located so that the load on it and on the ground is distributed as evenly as possible. So take the house plan and break it down into rectangles. Support blocks should be located on their sides and diagonals, taking into account the required distance between them. In this case, each pile must be located in the center of all load-bearing beams of the house.
Marking the area for installation of piles
So, divide the house plan into rectangles, having previously determined the size of each of them. So, you can calculate the number of piles and distribute them over the area so as to evenly distribute the load on the foundation. After completing the planning, transfer the markings from the paper to the surface of the ground on which the house on stilts will stand. Drive in pegs at the pile installation points.
Features of calculating a pile foundation
In order to correctly calculate a pile foundation, you need to take into account many parameters, the most important of which include roof loads (depending on the type of material used).
In order to make the correct calculation, it is necessary to additionally take into account all types of operational loads that will be evenly distributed over the load-bearing structures of the cottage.
It is necessary to decide what loads the supporting structures can withstand in different types of soil.
When building a foundation on piles, it is necessary to take into account future possible redevelopments, for example, changing the shape of the roof or creating an attic floor.
Installation of a pile foundation must take into account all of the above parameters. Correctly made calculations of the pile foundation and all loads will guarantee the durability of any building.
Ordering pile work in Moscow
Our company carries out a full range of piling works with reinforced concrete piles, such as pile driving. Contact us and we will help you get high-quality driven piles for further construction. Call us or submit an online application:
Foundation for a house on stilts
Building a house is a responsible undertaking and it is necessary to start with some theoretical preparation. A pile foundation is the only opportunity to create...
More details
Foundation on screw piles
Our company is engaged in driving reinforced concrete piles, as well as leading drilling for piles. We are ready to help you and carry out these types of work in the shortest possible time...
More details
What are the advantages of a pile foundation?
…
More details
Useful materials
Reinforced concrete foundation
On this page we will look at the main types of reinforced concrete foundations, the technology of their construction and determine whether it is rational to build them yourself.
Composite piles
On the page there is information about composite piles and their scope of application, you will learn about the types of composite piles, GOST, driving technology, there is a visual video.
Geodetic layout of the pit for a pile foundation
Depending on the type of piles, as well as taking into account various options for their installation, certain steps are performed before constructing the foundation - this is geodetic work to lay out the pile field.
The entire breakdown of the pile field always begins from the axes and their points, which are carried out by theodolite onto special pegs located in the pit.
First, the theodolite must be centered in those places where the axis points and their intersections are located, and be oriented along the alignment to the final center of the piles. Where the piles should be, they are first installed and then securely grabbed with metal pins. In cases where the piles are not located on the axes, the position of the centers must be determined by perpendiculars. To do this, you can use either a tape measure or a pre-prepared template.
If the piles are located using the so-called cluster method, and are located at a fairly far distance from the axes of the layout, then it is best to carry out a parallel transfer of all the axes needed at the moment for subsequent alignment.
Before driving piles, you need to make sure that the piles will be driven strictly vertically. This can be checked using a theodolite in those places where the perpendicular planes should be, and you can also use a plumb line. Thus, it is possible to effectively take into account how correctly the process of driving a pile foundation is proceeding.
If it is planned to install a foundation without grillage, then those piles that need to be driven in are driven to the mark where they should be according to the project, i.e. how the pile field was laid out. Then the test is carried out using a level, and another device that can be used is a laser.
When installing monolithic grillages, you definitely need to drive a couple of piles to the mark that should be according to the project. They will subsequently serve as standards for working with other piles, which will also be driven to marks close to the design ones.
When the driving of the pile foundation is completed and all the piles are driven in, you need to level them to the place where they were cut down, and then, having determined the required length of the piles, you already know exactly what mark is needed for immersion. All marks that have already been determined must be drawn up in a special execution scheme.
When installing a monolithic grillage, you also need to place felling marks on the piles. After the felling has been completed, the pile field can be surveyed. For piles that are located at all possible intersections of the axes, you must remember to take out the axes of the pile field.
Where this procedure has been completed, you can begin installing the formwork and begin laying the reinforcement. A concreting mark is applied to all internal sides of the formwork and secured with nails.
After the process of driving piles, a mark of the bottom of the pile heads should be made on them. Guided by this mark, you need to secure the clamps supporting the heads. The installation of all caps must be carried out taking into account future possible displacements of the piles.
Driving piles
Upon completion of all preparatory and marking work, pile driving begins. This process is performed in the following sequence:
- The piling rig is equipped with a pile driver mast on which a diesel hammer is mounted;
- Using a winch mechanism and steel cables, the machine pulls the pile from the storage area into the coverage area of the boom equipment, after which the pole is slinged and lifted;
Rice. : Scheme for slinging reinforced concrete piles
- After the pile is lifted and installed in a vertical position, the head of the diesel hammer is put on it, the pole is secured in the fixing elements of the piledriver mast;
- The vertical position of the pile is verified and the diesel hammer delivers a series of guiding blows necessary for the pillar to correctly enter the ground;
- After the pile is immersed to a depth of 1-1.5 meters, the slings are removed from it and the pillar is driven to the designed depth.
Rice. : The process of driving a reinforced concrete pile
| Important ! After the pile is driven, the head of the diesel hammer is disconnected from it and the pile driver is relocated to the site of the next plunge. |
See also
Foundation on reinforced concrete piles in Zvenigorod
Foundation with grillage on piles
How to make a pile foundation
Development of soil for a pile foundation
Before soil development begins, either manually or using machinery, the following work must be completed:
- establish a vertical layout of the site;
- break and install the axes of the entire future pit along with its contours, with the installation and fastening of the axes on its cast-off;
- make reliable access roads;
- prepare special sites for dumping soil.
You are unlikely to have enough strength to excavate a pit manually, so it is best to use a bulldozer. You need to work with this equipment according to a trench work pattern. After the development of one tier along its entire depth is completed, the waste soil is moved using a bulldozer to a dump, and then work begins on the next tier. The number of tiers and depth should be determined only by the technical parameters of bulldozers.
Excavation of the soil with an excavator (with further loading of the excavated soil into dump trucks) should be carried out only with longitudinal walkers. This will significantly reduce the number of turns of equipment, and more optimally distribute resources and vehicles.
When you need to load soil onto dump trucks using an excavator, you should take into account the angle of rotation of its boom. It is unacceptable for it to be more than 70 degrees. By adhering to this simple condition, you can significantly reduce the cycle of all work, as well as significantly increase the efficiency of the equipment.
To successfully develop soil with an excavator, it is necessary to provide ramps and access roads to the work site for all the necessary equipment.
If the soil becomes unsuitable for further work, it must be removed from the area. In some cases, temporary dumps or specialized sites are created for soil. These dumps must be carefully planned so that the soil is not subject to excessive moisture.
The development of the bottom of the pit, which will be the basis of monolithic foundations, should be carried out with a slight shortage, while the naturalness of the soil should not be disturbed.
Installation of concrete preparation along beacons for a pile foundation
The process of laying concrete on beacons begins with the process of concrete preparation. These procedures are necessary in order to subsequently make it easier to deal with the next stage of work, namely, laying the waterproofing layer. In such procedures, low-grade mixtures are usually used. Most often you can find the use of mixtures M100 or similar M150.
In this case, installing a waterproofing layer is to prevent the appearance of capillary moisture that can escape from the ground. You need to choose a waterproofing layer based on the grades of concrete used.
To put it simply, laying concrete along beacons is a kind of final step in arranging concrete floors. During the laying process, vibration is performed, and then leveling and smoothing are required.
Sprinkling and leveling the base of the pile foundation with sand
When installing a pile foundation, it is also necessary to plan such an urgent part as a “sand cushion” at its base. It is needed to distribute loads throughout the lower part of the foundation when seasonal changes occur in the condition of the soil, for example, its heaving. Additionally, such a pillow serves as a tool for leveling its level.
It is best to use sand for this; it allows moisture to pass through perfectly, and if freezing occurs, the swelling effect does not occur, which quite often manifests itself in materials such as clay.
The advantages of using a pillow can be serious savings in building materials. If the soil is loose, then it is more advisable to remove it and fill it with sand instead.
According to existing standards, the sand cushion should be approximately 150 millimeters. Before laying the foundation, the sand cushion must be treated with water and then compacted thoroughly, using vibrating tools.
If the groundwater level is very high and the cushion may be washed out, then it is best to insulate it with geotextiles and also take care of the drainage system.
Working with sand shouldn't be difficult. This is a universal material that is constantly used in construction work. Due to its excellent characteristics and porosity, it is considered a material that allows water to pass through well. However, when treated with water and using vibrating tools, its porosity can be significantly reduced (up to 37 percent).
How strong the sand cushion will be depends, first of all, on the size of the grains present in the sand. If the pillow is made of large grains of sand, then deformation of the sand pillow does not occur.
Choosing the type of screw piles for your home
The main parameters for choosing screw products are the length and diameter of the pipe. The stability and service life of the structure depend on these parameters.
Important. The length of the pipe is selected based on the type of soil, since it must be buried to hard and dense rocks. The softer and more mobile the soil, the deeper you need to lower the pile and increase their number. The supports must be immersed below the freezing level of the soil in winter.
The diameter of the pile pipe directly depends on the type and weight of the building itself. On average, to construct a building using the frame method, products with a pipe diameter from 100 to 140 mm are used, depending on the weight of the material and the number of storeys of the building. Before choosing the type of support and their diameter, it is necessary to collect detailed information about the type of soil at the construction site, such as:
- soil type and distribution pattern of deep layers;
- the presence of groundwater and its level at maximum and minimum quantities;
- soil freezing depth;
- the estimated weight of the future house taking into account the snow load on the roof.
Types of piles for home
The most widely used piles are cast and welded types. Welded piles can be made independently and they come in the following types:
- Supports with double blades are used for soil types where a large amount of stone predominates;
- Supports with single large blades are standard for soft soil types and have an open tip type, in which the soil enters into the pile when it is twisted;
- Closed tip supports are suitable for all types of soil, but are used only in low-rise construction.
Important. Hollow welded supports are used exclusively for lightweight structures. This can wash one-story frame houses or technical buildings. With an increase in the number of piles, the construction of a one-story house with an attic is allowed.
Cast type products are used for the construction of heavier structures; they have a pointed tip and differ only in the size of the blades:
- Products with small blades are used for installation in frozen soils, where the possibility of distortion during installation is minimal;
- Medium blade sizes are used for thawed soils with a large amount of groundwater;
- Large blades are used for installation in ordinary loose soil in the absence or minimal presence of groundwater.
Cutting down pile heads yourself
It is difficult to imagine any construction work today without the use of modern technology. The emergence of unique devices greatly simplifies all work, reducing labor costs significantly.
Should I cut down the heads myself? Everyone must decide this question for themselves separately. But if you look into the recent past, it was quite hard and exhausting work, which also required remarkable physical strength and endurance, since all work was carried out with the help of a jackhammer.
This method of felling continues to this day. For private house-building, one person can hammer up to 12 piles in eight hours, but the labor costs will be very high.
Nowadays, more advanced mechanisms are used that make this hard work much easier. Today, to cut down the heads, you can use special hydraulic shears on an excavator or use a longitudinal cutter.
Installation of coating waterproofing for concrete preparation of a pile foundation
To protect against various types of aggressive influences, various measures are used to waterproof the pile foundation. Let's look at some of them:
- if the waters are of a slightly aggressive nature, then the foundation should be made of concrete grades that have the highest density properties, and Portland cement should be used as binding components, and it should contain pozzolan additives;
- if the groundwater is of a moderately aggressive nature, then in addition to the production of a concrete foundation of the highest density, it is necessary to use coating bitumen waterproofing of the pile foundation;
- if the degree of aggressiveness of groundwater is very strong, then all measures must be taken to isolate the foundation from these waters; it is necessary to use bitumen-based waterproofing materials.
In this case, the waterproofing of the pile foundation must be laid on the sides and under the base of the entire foundation. For these purposes, a thin layer of concrete is prepared in the pit, and then this layer is covered with a layer of waterproofing under the entire surface of the foundation base.
To improve the characteristics of concrete, polymer compounds are used in some of its types. They immediately received a new name: polymer concrete. You can read about how to waterproof a pile foundation, as well as about methods for providing protection from groundwater in SNiP 2.03.11-85.
Materials for making foundation piles
Depending on the magnitude of these same loads and the purpose of the building, piles are made from the following materials:
- Metal - this material owes its popularity in the production of piles to the appearance of various profiled metal products, which made it possible to produce rational shapes. The process of joining parts by welding also made these tasks easier. Metal piles are made mainly from steel, and are used where it is extremely difficult to deepen reinforced concrete piles, for example, in conditions of dense permafrost soils. Using the opportunity to build them up, they also strengthen weakened foundations. Advantages: lightness, compactness, ease of manufacture and transportation. Disadvantages: susceptible to corrosion;
- Reinforced concrete - the advantage of reinforced concrete in the manufacture of piles is determined by the largest number of loads that it can withstand in relation to other materials. Reinforced concrete is subject to any type of load - vertical, horizontal, lateral. Reinforced concrete piles can have a square or round shape of solid or hollow cross-section with a pointed end to facilitate entry into the ground. Hollow or tubular piles are made with a diameter of up to 1 m, which greatly facilitates their weight and transportation. Reinforced concrete piles are driven using pile drivers, vibrating hammers or the pressing method. Advantages: strength, reliability, durability. Disadvantages: heavy weight, transportation and deepening are impossible without special equipment;
- Wood - wooden piles are used if the loads from the building are not large, for example, during the construction of light outbuildings or wooden houses. The material used is mainly long-length pine, spruce and, less commonly, larch or oak. The diameter of wooden piles is from 18-40cm, length is 4-16m. To make it easier to hammer them in, they have a pointed end-shoe protected by sheet metal, which is immersed in the ground. A protective yoke ring is placed in the upper part so that the head does not crack when hammered. Wooden piles are difficult to penetrate into coarse-grained and gravelly sands. And it’s practically impossible to drive them into gravel or pebbles. Mechanical or vibratory hammers are used to drive into the ground. Advantages: lightness, strength. Disadvantages: susceptible to rotting and cracking.
The choice of material for piles is also influenced by the availability of a particular technology, the geological features of the development region, and the nature and characteristics of the building under construction. Based on all the collected research and analysis, a pile foundation project is created.
Installation of a protective screed for a pile foundation made of mortar
What is a cement-sand screed? This is a special coating that performs the functions of protection and leveling, which consists of water, cement and sand. When working on foundations, cement-sand screed is most often used to level floors.
Let's look at the basic operations that should be performed for alignment:
- complete cleaning of the entire subfloor from dirt and dust;
- leader of marks;
- It is imperative to install beacons at all levels of the finished floor;
- installation and fastening of all necessary guides using cement-sand mortar;
- preparation and arrangement of all junctions of screeds at the lower edge of the walls;
- preparation of cement mortar grade M150;
- delivery of the prepared mixture to the place where installation will take place;
- pouring mortar in those spaces in which beacons are installed;
- correct and thorough leveling of the surface is necessary;
- removing all irregularities and roughness from the screed surfaces;
- grouting the entire surface of the screed using trowels;
- cleaning the entire instrument from the solution.
After the solution is poured, you need to wait some time (about two days) for the screed to completely dry. Then you can pull out all the beacons that remained in the dried concrete after pouring. However, such a procedure is not entirely necessary. they can be left where they are.
If a positive decision is made to remove the beacons and after the extraction process is completed, the “gaping holes” can then be easily closed with a concrete solution.
If, in the process of applying the solution, due to negligence the surface turns out to be uneven, then you can simply rub these “problem” areas and brick (white silicate) can ideally help with this. When all the unevenness has been eliminated and the concrete has completely dried, you can begin other types of work.
As you can see, making a concrete screed is not at all difficult. The main thing is to follow the correct instructions and follow the tips and recommendations offered on this site.
You need to understand that cement screed is an important stage in the construction of a foundation on piles, and to protect the entire building, it is simply necessary to do it.
Anyone can cope with this difficult task, even if they have never tried to do such work before. It is only important to follow the sequence of all steps, and then your house on a pile foundation will be under reliable protection for a long time.
But of course, if you still have concerns that you won’t be able to cope, then you need to invite an experienced team of specialists who will help not only with advice, but also do all the work related to such a complex structure as a foundation as quickly and accurately as possible.
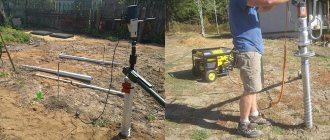
Direct installation of screw piles
The technology for installing screw piles involves the following steps:
- Marking the pile field using pegs, taking into account the load-bearing walls and corners of the future house. A distance not exceeding 3 meters must be maintained between piles. Failure to comply with this requirement may lead to sagging of the beams of the house.
Marked pile field
- The perimeter is marked using 4 pegs driven into the corners of the house. This is necessary to level the location of the house - it should be parallel to the road and neighboring plots.
- Screwing corner piles requires careful adherence to dimensions. It is imperative to ensure that the piles are twisted exactly in the center of the beam.
- Installation of screw piles requires minor preparatory work. First, you need to dig a small pit under each pile, focusing on the preliminary markings. The depth of the pit should not be more than half a meter. After this, you can screw in the piles themselves.
The optimal depth for screwing piles is 1.6 meters. If the depth is less than one and a half meters, then evaporation is possible due to frost heaving.
The process of screwing a pile
Final stage
It also includes several steps:
- Trimming the piles using a hydraulic level is necessary in order to level them in height. The cut part of the pile is 15-20 centimeters and must include technological holes.
- Concreting with a solution of cement and sand. This is necessary to protect the pipe cavity from corrosion and increase service life. For reliability, you can use reinforcement.
- Welding of heads. The head is a reinforced platform welded to a pipe having a slightly larger diameter than the pile itself. The heads have holes for attaching beams. The seams remaining after completion of welding work must be cleaned and coated with an anti-corrosion solution.
The pile-screw foundation is installed quickly enough and does not require time for shrinkage. This makes it very convenient, since the piping and actual construction of the house can begin the very next day (as soon as the cement and sand solution has hardened).
Installation and installation of formwork for a pile foundation
Of course, everyone wants to do the job efficiently, and at the same time save the construction budget. When constructing formwork for a pile foundation in the most ordinary soil, wells are often drilled for piles with a small diameter (from 20 to 25 cm) and a depth of 70 to 90 cm.
After that, formwork for a pile foundation made of asbestos-cement pipe (diameter 20 cm) is inserted into the drilled well. To a third of the height, the foundation formwork is filled with a specially prepared concrete mixture, and then this formwork pipe is raised slightly so that a monolithic concrete base is formed under it for the foundation piles. After this, you can fill the formwork pipe for the pile foundation almost to the very top.
A metal rod is often used to compact the concrete to a level that should be 10 cm below the top edge of the formwork pipe. That's all that is needed to make a pile for such a foundation.
Next, we wait two or three days and then lay wooden blocks on the top of the pile to form the floor frame. Then we align the longitudinal beams of the foundation and screw in the anchor metal elements, and concrete their lower part in the formwork pipes. The formwork for the pile foundation is ready.
This simple and cheap method of installing a pile foundation can be used to build small wooden garden houses. If a pile foundation is installed under a brick house, then more durable frames are used, i.e. deeper penetration of piles.
Concreting a pile foundation using a deep vibrator
Deep vibrators are used to compact concrete mixtures (for example, concrete grades B-25 and B-35). A vibrator with a flexible shaft should not be moved further than one and a half times the radius of action; it is recommended to work in one place in vibration mode from 20 to 30 seconds In this case, it is necessary to maintain a sufficient depth of immersion in the previously laid and not hardened layers of concrete
The main signs of readiness (compaction) of concrete:
- the concrete mixture has stopped settling;
- the large aggregate is completely covered with the solution;
- laitance appeared on the main surface, as well as at the junction with the formwork;
- the air bubbles stopped coming out.
An hour after finishing the concreting process, the vibrator and other tools should be thoroughly cleaned of concrete residues and other dirt.