Rubber tiles are an innovative finishing material with excellent performance characteristics and a wide range of applications. The installation process of crumb rubber coating is quite simple and does not require high qualifications from the performer. Let's consider the technology of laying crumb rubber coating when working with various substrates.
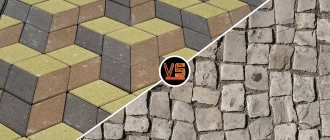
The difference between rubber tiles and other coatings: the pros and cons of the material
Compared to traditional paving slabs or paving stones, rubber coating is more practical, safe to use and decorative.
In addition, tiles made from crumb rubber have a number of additional advantages:
Despite the significant advantages, rubber coating also has a couple of disadvantages, which concrete screed and paving slabs do not have:
- Rubber crumb tiles are one of the most expensive ways to decorate a local area. However, such costs are usually justified by the long service life.
- There are restrictions on the use of polymer tiles. The location of the coating is unacceptable near fire sources (open fireplace, barbecue, etc.). Firstly, rubber combustion products are harmful to human health, and secondly, a falling ember will burn through the tiles and can cause the fire to spread.
Scope of application of crumb rubber slabs
Good technical and operational characteristics have made it possible to use rubber paving slabs in various fields.
How to choose rubber tiles
Rubber tiles are selected depending on their purpose and the type of base on which they will be laid. The coating is available in different dimensions and different configurations.
Basic rules for choosing the thickness of the coating material:
- In exhibition centers and large trading floors, volumetric covering models are used - 100*100 cm, 100*50 cm or 50*50 cm.
- Rubber tiles for paths and open summer cottages have a size of 50*50 cm.
- For arranging children's/sports grounds, technical areas, balconies and terraces, tiles measuring 35*35 cm are suitable.
Rubber tile size selection table
Important! Rubber tiles for playgrounds and running tracks must have a thickness of at least 25-30 mm. In addition to high strength, this coating has shock-absorbing, sound and vibration insulating qualities.
Features of installation of rubber coating
The technology for laying rubber tiles is somewhat different from installing traditional flooring. When arranging a coating made of rubber material, it is important to consider some nuances:
Technology for laying rubber tiles on a solid base
You can lay a path or platform made of rubber coating on asphalt, a concrete base or on top of a wooden flooring.
Tools and materials
To complete the work you will need:
- rubber plates 20 mm thick;
- rubber curb elements;
- sharp knife;
- glue for rubber surfaces (it is better to choose an adhesive composition based on polyurethane - this is the substance used when pressing crumb rubber into slabs);
- container for glue;
- vacuum cleaner or broom;
- ruler and building level;
- chalk for marking;
- notched spatula;
- foam sponge and brush;
- rubber hammer.
Preparatory work
The surface of the base must be smooth, without cracks or depressions. The concrete screed should not crumble or peel off. Any defects and unevenness must be removed and the surface cleaned of excess debris.
To ensure reliable adhesion of rubber tiles to the base, several rules must be followed:
- air and material temperature - 10-20°C;
- air humidity - up to 70%;
- When laying the coating near water (the area around the pool, piers, etc.), it is necessary to apply a double layer of glue.
Installation sequence
Let's look at how to lay rubber tiles on asphalt. Algorithm of actions:
Advice. If glue appears on the front side of the tile, it must be removed immediately with a sponge. After drying, it will be difficult to do this and stains will remain on the surface.
Laying rubber coating on the ground
Preparing the base
Rubber tiles for summer cottages often have to be laid on the ground. In this case, tiles of greater thickness (30-80 mm) are used and the base is prepared more thoroughly - a “three-layer” pillow is created.
- Clear the area of weeds.
- Remove the top layer of soil (the depth of the “pit” is about 140-210 mm).
- Compact the area well.
- Lay fine crushed stone on top of the soil. The height of the pillow is 50-100 mm. The thickness of the crushed stone layer depends on the purpose of the coating: for paths - 70 mm is enough, for a sports/children's playground - 100 mm, and for placing a car - at least 200 mm.
- The second layer is a cement-sand cushion, thickness - up to 70 mm. Crushed stone can be covered with sand alone, but adding cement will add strength to the coating.
- Level the surface and begin laying the rubber coating - tiles.
Installation rules
When laying tiles on the ground, you must adhere to some rules:
Laying rubber tiles: video
Caring for rubber tiles
The tiles are resistant to adverse weather conditions and temperature fluctuations, so there are no special tips for using and caring for the rubber coating. Thanks to its properties, the tiles are insured against the formation of mold, fungi and damage to the coating by rodents.
If the surface becomes dirty, just rinse it under medium pressure with water from a hose. Stubborn stains and stubborn dirt can be scrubbed with a brush dipped in soapy water.
Ice on the surface must be carefully chipped with an ice ax and removed with a stiff brush or shovel. You need to remove snow from the rubber coating with a broom or plastic flat shovel. If the area is very large, you can use a snowblower.
Installation of rubber tiles is an interesting, practical and non-standard solution for arranging the local area. The installation process does not take much time and even non-professional builders can do it.
Only tiles with a thickness of 40mm or more can be laid on sand.
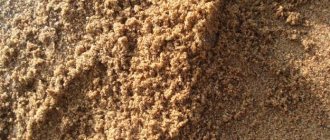
The base can be sand, screenings, sand-cement mixture, etc. Before laying the tiles, the base must be properly prepared.
First you need to dig a hole in the ground, then pour a layer of crushed stone at least 6 cm thick into it and compact it. After the crushed stone, we fill in a layer of sand, also about 6 cm thick. The layer of sand must be spilled with water and compacted.
Rubber tiles are laid directly on compacted sand; you can also put a thin layer of sand under the tiles without tamping, but this is not necessary. Rubber tiles with a thickness of 40 mm or more are suitable for laying on sand. Rubber tiles 500 x 500 mm have a special relief base that increases adhesion to sand. It is also required to be equipped with plastic bushings, which prevent the tiles from moving relative to each other during operation.
“Coil”, “Wave” or “Brick” paving stones are laid in the same way as concrete tiles, that is, simply on sand and then compacted. For greater reliability, the ends of the tiles can be glued to each other with polyurethane glue.
Often during installation it is necessary to cut tiles; a jigsaw or a hacksaw with a medium or fine tooth is good for this. When laying rubber tiles, we strongly recommend using EcoSpline rubber edging.
Laying rubber tiles on a solid base.
A solid base is a concrete screed, asphalt, wood or plywood covering, or metal.
The tiles are installed by gluing them with polyurethane glue to a solid base.
Before starting work, it is necessary to prepare the tiles for laying; small pieces of rubber may remain on the back side around the perimeter, which must be removed with a knife. It is important that the back side of the tile is smooth.
The main requirement for the base is the absence of dust and a flat surface. To increase the adhesion of the tiles to the surface, the base must be treated with a primer prepared from a binder and turpentine in a ratio of 1 to 1, if you are installing on a screed.
When the base is ready, apply a thin layer of polyurethane glue to it and level it with a spatula. Next, apply the thinnest possible layer of glue to the entire back side of the tile and lay it on the base. After the tile has been laid and leveled, we press it against the floor with a weight, it is very important to press down the corners, otherwise they will peel off during use. The tile must remain under the load until the glue dries.
The drying speed of the glue depends on humidity and temperature; under normal conditions, one-component glue (temperature about 20 °C) dries in 24 hours.
Laying diagrams for EcoSpline rubber tiles with bushings
Rubber tiles have been in great demand for a long time, as they are a very high-quality, durable and reliable material. This look is very easy to install, and it also has many advantages. Tiles made from rubber crumbs are characterized by their special strength and varied texture. Rubber tiles are available in a wide variety of colors, and their practical qualities distinguish them quite favorably from ordinary paving slabs.
Laying rubber tiles
The tile, made of rubber, is absolutely non-slippery, which is why it is not dangerous even in the event of ice. This material can be a very good option for creating garden paths. The great advantage of such tiles is that it is possible to select tiles of a wide variety of shapes and color options. Laying such tiles is very simple and if the installation is carried out correctly, it will not lose its original shape, and weeds will not grow through it.
Tiles made of rubber are one of the safest, easy-to-maintain and simple coverings that are suitable for arranging absolutely any area.
Rubber tiles are a modern finishing material that has excellent performance characteristics and has a fairly wide range of applications. Installation of rubber tiles is quite simple and it is possible to do it yourself, without the help of specialists. The great advantage of this material is that it can be used to work with absolutely any base.
Compared to ordinary paving slabs, the rubber base is characterized by the fact that it
:
- More practical;
- Safe to use;
- Has a beautiful decorative appearance.
Rubber tiles can be laid on the ground or a solid base. In order for the product to serve for a long time, the thickness of the facing material used must be at least 30 mm, and the shape of the tile itself is selected strictly in accordance with the existing features of the site being developed.
Before laying rubber tiles, you need to mark areas and paths, marking the boundaries with pegs driven into the soil and a stretched cord. Then, inside the marked contour, you need to make a recess to the depth of a spade bayonet and level the carefully prepared base. Place a layer of crushed stone on top of the well-compacted soil, level it and compact it. Place a layer of sand on top of the crushed stone and compact it well to fill the resulting cavities in the crushed stone.
Important! If you plan to make rubber curbs, then their installation is carried out along a control cord on top of a layer of clean sand, connecting the elements together with special fastening sleeves.
You need to make a cement mortar from cement and sand, lay it on top of the sand and after hardening, install the rubber tiles.
Rubber tiles for arranging a shooting range
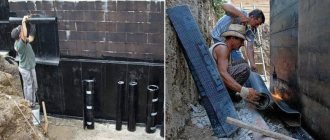
Reinforced rubber tiles, for example, Rubblex Target, are used to decorate the walls of the shooting room of a shooting range. Anti-ricochet tiles meet the requirements of GOST R 52212-2004. Owners of shooting ranges willingly use a reinforced version of the modular rubber coating when arranging the protective finish of the gallery. The material, made from crumb rubber and a polyurethane binder, has high damping properties, which allows it to absorb significant bullet energy. Reservation in combination with a bullet-repellent coating allows you to avoid ricochet from an accidental shot. The thickness of the rubber plates depends on the type of weapon used. For example, a machine gun requires an anti-ricochet plate with a thickness of at least 40 mm. A protective damping rubber layer of at least 20 mm should be used for the gun. Rubber modules are securely mounted on ceilings and walls using polyurethane adhesive. Also, tile flooring is laid on the floor base. The modular coating is repairable. As the rubber plates wear out, it is necessary to replace damaged modules.
DIY rubber tiles
Making tiles with your own hands is quite simple. This durable and at the same time elastic coating is used for finishing in private houses and apartments, administrative buildings, shopping centers, and sports complexes. The production of rubber tiles involves the use of special rubber crumbs. Old car tires are used as a base for making tiles, which are crushed using special crushers.
The mixture for making rubber tiles includes:
:
- Particles of crumb rubber;
- Special glue;
- Dyes;
- Fillers.
To carry out the work, special glue is widely used, as a result of which the mass acquires the required plastic consistency. The prepared mixture is poured into a special mold, where it undergoes the final formation of the product. The tile production technology involves installing molds in special ovens, where the products are subjected to low-temperature processing. To obtain a durable and reliable material, the entire process must be carried out strictly in accordance with all technological conditions.
Manufacturing method
The main raw materials for the production of such tiles are fractions of crumb rubber. It is considered a product of processing used car tires. Of all known types, automobile rubber is the most durable and durable raw material. High quality raw materials are used in production: natural rubber, synthetic rubber, as well as softening oil and other necessary fillers. This is explained by the fact that the tires of a car during operation must confidently withstand long-term and heavy loads. Plus, tires have such properties as resistance to acids and alkalis, excellent elasticity, bending strength, and stretching.
Today there is a problem in the disposal of car tires, and they are a source of pollution. The production of tiles from such rubber protects the environment and also saves resources.
The first stage of production is the formation of the initial mixture, which consists of an adhesive composition made on a polyurethane basis and rubber crumbs, as well as non-toxic coloring pigments. Using a special mixer, stir the mixture until a homogeneous mass is obtained, and then send it for molding.
Raw materials can be produced using several methods. Using vibration casting technology, it is necessary to fill the molds with the prepared mixture, which are located on a table that vibrates. Then keep at a certain temperature for several days. The floor covering is beautiful with a smooth and glossy surface.
To obtain a loose surface or any pattern, it is necessary to use the option of cold or hot vibration pressing. At the first stage, the same process is performed as in the previous form, but in order to finally give the product its shape, it is necessary to hold it in a press under high pressure. Then the required time is set according to the technology and placed in a thermal cabinet. After this, the product is ready to be sold.
The coating will be of high density and elasticity. It is used to lay sidewalks.
Rubber tiles
Proper laying of rubber tiles on a concrete base
The modern market offers many different building and finishing materials. Rubber paving slabs are widely used, which are distinguished by their particular strength, reliability and wear resistance.
It is used for arranging
:
- Children's playground;
- Pool areas;
- Arrangement of sidewalks and garden paths;
- Sports grounds;
- As a floor covering.
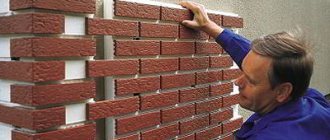
Laying such a product on a concrete base must be carried out strictly in compliance with special technology. During installation, you must first clean the concrete surface from dust and debris. To carry out a more thorough cleaning of the surface, it is best to use a broom and vacuum cleaner. Using a spatula, carefully distribute the adhesive composition over the entire surface to be equipped, alternately in different zones. You need to start laying tiles from the very center of the working surface. To do this, lay the prepared tiles 20 mm thick and press them tightly to the base.
Subsequent tiles should be laid with a small gap. If glue gets on the front side, it must be removed immediately.
Leave the finished surface to dry for 2 days. During this entire time the site cannot be used. When installing tiles, be sure to ensure that accumulated air does not remain under the base of the tiles. You can eliminate air under the tile by pressing on the surface of the rubber product.
Paving slab production technology
Catalog: Forms, Equipment, Concrete additives
There are two methods for producing paving slabs: vibration casting and vibration pressing. The first method has clear advantages:
- a large number of units of manufactured products;
- smooth surface;
- high quality products.
The technology of creation by vibration casting allows the use of construction dyes and additives in concrete, which improve the quality of the finished product and make the paving stones bright.
What will you need?
- vibrating table;
- concrete mixers;
- bath with electric heating elements;
- stripping table.
Approximate recipe for concrete mass (proportions)
The forming material is made differently for two layers. Let's look at the recipe for each of them:
- The first (textured) provides the main indicators of tile quality:
- cement - 500 kg;
- crushed stone with sand (ratio 2:1);
- plasticizing additives (the amount depends on the type);
- dye - 7.5-12 kg (affects the level of saturation).
- The second (main) acts as the main carrier of strength and forms the desired thickness of the tile.
- cement - 250 kg;
- crushed stone with sand (ratio 1:1);
- plasticizing additives (see recommended consumption on the packaging);
- no dye.
Composition 1 cubic meter ready solution:
When making gray tiles, there is no dye in the front layer.
Composition 1 cubic meter ready-mixed concrete:
Installation of rubber tiles
Recently, rubber tiles, which are widely used for flooring, have become in great demand. The technology for installing tiles is quite simple and even a novice master can easily cope with this task. Before you begin finishing floors using this material, you must first carefully prepare the base.
Foundation preparation is divided into several categories, namely
:
- Removing old coating;
- Alignment;
- Cleaning and drying;
- Primer.
After all preparatory procedures have been completed, installation can begin. Installation of tiles begins from the very center of the room being equipped. To mark the central point of the room, it is necessary to take all the required measurements and draw two straight lines in the middle to the opposite walls. At the intersection of these lines you need to start laying the tiles.
You need to lay the tiles moving away from you in diagonal rows. When installing tiles, you must avoid gaps between individual elements.
Only a small seam, 1.5 mm wide, is allowed. You need to move on the laid tiles very carefully so as not to move them. Installation of rubber tiles does not take much time, and after installation is completed, you need to leave it for some time until it dries completely.
Rubber tile laying technology
Rubber tiles are a fairly new invention, which have become widespread almost from the first days of use. The installation technology is quite simple, the most important thing is that the base is perfectly level.
In particular, the installation of rubber tiles is carried out on
:
- Asphalt;
- Wooden flooring;
- Concrete.
Initially, preparatory work is carried out, implying careful leveling of the surface and its subsequent cleaning. Then you need to remove all existing damage and defects so that there are no chips or peeling of the base. The process of laying tiles involves maintaining a certain temperature regime. So the air temperature should be within 10-20 degrees, and the humidity should not exceed 70 percent. To install rubber tiles, you need to use a special glue that ensures fastening strength. If the tiles are installed in an open area, it is necessary to install special borders to ensure greater strength.
Advantages of rubber tiles
The advantages of rubber tiles are quite obvious, and thanks to this, they are in demand. The variety of textures and colors used allows you to lay out the surface with a wide variety of colors and patterns.
In addition, the advantages of such material include
:
- Resistance to temperature changes;
- Ease of storage and transportation;
- Simplicity of installation and ease of repair work.
This coating has good traction with the sole, which is why it is widely used for the construction of playgrounds, gyms and running tracks.
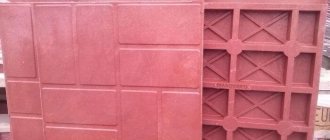
Rubber facing tiles (pavilastic) are a relatively young finishing material for facing horizontal surfaces. The long-term problem of recycling worn-out car tires was solved in a rational way - by mechanically processing rubber into raw materials and then making it into a finishing material with high technical and aesthetic characteristics. Let's look at what this material is and how easy it is to lay rubber tiles yourself.
Pavilastic PUZZLE - the optimal solution for children's and sports playgrounds
Manufacturing technology
Car tires are made from high-quality rubber containing up to 50% natural or synthetic rubber. Taking into account the high technical characteristics of this material, a technology for manufacturing rubber facing tiles from it was developed. Old tires are processed into crumb rubber of a given fraction (0.4-10 mm), cleared of textile or steel cord.
The resulting raw materials are mixed with polyurethane glue and dye, then the mixture is laid out in molds and compacted by vibration. Rubber tiles are produced by one of two types of vulcanizing pressing - hot or cold, after which the forms filled with the mixture, depending on the technology used, are subjected to appropriate heat treatment.
Technical characteristics of pavilastic
Rubber tiles have many advantages over other finishing materials, allowing them to be widely used as a protective and decorative coating for facing horizontal surfaces exposed to aggressive use.
Rubber coatings can be produced in the form of tiles or rolls of various thicknesses
- The high durability of the coating (up to 15 years) is determined by:
- strength and wear resistance due to the high density of rubber;
- high resistance to mechanical damage associated with the high elasticity of the material;
- frost resistance;
- resistance to oils and most chemicals;
- possibility of making spot repairs with your own hands.
- The safety of pavilastics is ensured by:
- anti-slip effect of the front surface of the rubber tile;
- ease of everyday care, including cleaning from dirt and ice;
- low risk of injury from a fall;
- high noise-absorbing properties;
- environmental friendliness, resistance to the formation of mold, moss and fungi on the coating;
- The aesthetic appeal of pavilastic is justified:
- variety of colors, shapes and sizes of tiles;
- UV resistance (does not fade in the sun).
General performance characteristics of rubber tiles: · durability - more than 10 years of operation
Advantages of rubber crumb tiles
Safety is one of the main advantages of rubber paving slabs. Rubber coating absorbs impacts well when falling, so it is installed on playgrounds and sports grounds where there is a high risk of injury.
Sound absorption - rubber perfectly absorbs sound, which is why it is laid out in fitness rooms. Then dumbbells and other sports equipment do not hit the floor so hard. The steps are light and silent, and the surface has a pleasant spring under your feet.
Comfort - soft rubber coating creates a feeling of home comfort. It is not without reason that such tiles are often used in yoga centers, in various meditation and training classes, where it is necessary to create the most relaxing environment.
Easy to install and repair . So, you figured out where to put the tiles, put them down and you can immediately walk on them. Unlike, for example, concrete, which takes several days to dry. Paving slabs are assembled like a puzzle; a professional team of workers is not needed to lay them. And there is no need to additionally prepare the surface - it can be either hard or friable. The main thing is that there are no obvious protrusions or irregularities.
In addition, during repairs, you do not need to check the blind area and sand level, or cut tiles of the required size with a circular saw, as when replacing paving stones. You simply remove the damaged “puzzle” and insert a new one.
Durability . Rubber tiles are not afraid of high humidity, temperature and increased loads; they serve all year round, maintaining their appearance and functionality.
Variety of decor. A huge selection of tile shapes and sizes, colors, patterns and ornaments, which allows you to realize the wildest fantasies of architects, builders, landscape designers, owners of country houses and cottages.
Application area
There is no point in talking about restrictions in the use of rubber tiles - there are practically no restrictions, and judge the scale of the area of application for yourself:
- children's playgrounds
- stadiums and sports grounds
- walking paths in parks
- areas near swimming pools, skating rinks, fountains
- local areas
- parking lots and parking entrances
- Living spaces
- production and warehouse premises
- auto repair shops and service centers
Features of the material
Depreciation. Rubber tiles have an elastic structure that is shock-absorbing, so they are indispensable on playgrounds and sports grounds - where the likelihood of falls is high.
Frost resistance. Rubber tiles can withstand frosts down to -40C and do not lose their properties when using winter reagents.
Draining properties. Due to the low porosity of the surface of rubber tiles, moisture evaporates from it very quickly. This means that when temperatures change - which is not uncommon in winter - slippery ice does not form on such tiles, and snow is very easily removed.
Microbiological resistance. Rubber crumb material and a special solution for laying such tiles prevent the formation of mold on the surface and the germination of grass at the joints.
UV protection. The dyes used in the tile manufacturing process do not fade in the sun.
Disadvantages of rubber tiles
Even rubber tiles slip. So which one is better to choose?
Increasingly, legal proceedings end in favor of visitors to shops and cafes who fall on slippery floors. To protect yourself from large fines and people from serious injuries, lay textured rubber tiles.
Specifically textured, since smooth tiles on the street at a certain ratio of air temperature and humidity can become covered with an ice crust.
Fire hazard. Of course, if a cigarette butt falls on it, nothing will happen, but if you like to make a fire at your dacha, then it is better to equip the barbecue area with ceramic rather than rubber tiles.
High price. The cost of rubber tiles is higher than that of budget ceramic or concrete tiles. But in this case, you overpay for the unique properties of the crumb rubber material. Therefore, if comfort and safety are important to you, as well as a durable, aesthetically attractive coating, then feel free to choose rubber tiles. Later you will understand how profitable and pleasant an investment this is.
Application of rubber tiles
Based on the high characteristics of pavilastic, its use is more than justified on such objects as:
- sports grounds, stadiums, gyms;
- pedestrian paths of country houses and summer cottages;
- garage floors;
- parking places for passenger vehicles;
- children's playgrounds;
- areas adjacent to swimming pools, fountains, artificial ponds and skating rinks;
- dressing rooms;
- kitchens (tiles made of relin - smooth, dense rubber up to 8 mm thick), bathrooms;
- flights of stairs;
- warehouses and workshops.
In each case, the technology for laying rubber tiles has its own small characteristics, but we will consider the general rules for installing pavilion on horizontal bases with our own hands.
Methods for laying rubber tiles
Technologies for finishing surfaces with pavilastics can be divided into two types:
- laying rubber tiles on the ground;
- installation on a solid base.
Laying pavilastics on the ground base
The technology for installing rubber tiles on the ground is used when arranging paths of a country house, the floors of gazebos and summer kitchens, parking lots for passenger vehicles, children's playgrounds, etc. The thickness of the cladding used must be at least 30 mm, the format of the tiles is selected in accordance with the geometric features of the area being equipped area.
Preparing the base
First, they use a tape measure to mark the paths and areas, marking the boundaries of the areas with pegs driven into the ground with a marking cord stretched over them. Then, inside the contour over the entire area, soil is excavated to the depth of a spade bayonet (≈25 cm), the resulting base is leveled and compacted with an electric vibrating plate or a home-made tamper.
The soil base is thoroughly compacted, after which a layer of sand is added
A layer of crushed stone of a fraction of 20-40 mm is poured on top of the compacted soil in a layer of 10-15 cm, leveled and also compacted by compaction. Then sand is poured on top of the crushed stone in a layer of 5 cm and compacted to partially fill the cavities in the crushed stone.
If you plan to use rubber curbs, then they are installed using a control cord on top of this layer of clean sand, connecting the elements together with fastening sleeves.
With your own hands, prepare a dry mortar in a ratio of 1:6 from cement M 400 and sand, which is laid in a 5 cm layer on top of clean sand, leveled and compacted. This composition, due to its hygroscopicity, will harden in a week and will serve as a durable concrete base for the rubber coating.
After completing this operation, the base is ready for installation of rubber tiles.
Rubber tiles are a universal finishing material that can be laid on various types of substrates.
Installation of rubber lining
Rectangular pavilion can be laid, like tiles, directly, offset or diagonally. Laying products of more complex shapes, such as puzzles, can also be oriented differently relative to the borders. Installation of the coating is carried out horizontally, without a slope, since the proportions of the dry cement-sand mortar under the pavilastic will ensure sufficient porosity of the base after curing, and water will flow through the tile joints into the ground.
The elements of the rubber coating are fastened to each other with your own hands using connecting sleeves or end locks provided by the design; the horizontality of the lining is controlled with a bubble level. When fitting, it is convenient to cut the pavilion with a jigsaw or a hand saw with fine teeth. Small voids between the tiles and the border are filled with pieces of trim, which can be attached to the main cladding with epoxy glue.
After installation is completed, the coating is gently watered with water from a garden watering can, and within a day you can already walk on the tiles.
Laying on a solid base
Installing a rubber coating on a solid base differs from laying it on the ground only in the technology of preparing the floor for finishing and in the method of attaching the pavilion to the surface being tiled.
Depending on the base material (asphalt, concrete or wood), a primer is selected, with which the surface to be coated is covered in two layers.
When laying rubber tiles, it is better to use a polyurethane-based adhesive, since mixtures based on polymers are used as a binder in the manufacture of pavilion.
An example of installing rubber tiles on a solid base is finishing a bathroom floor with pavilion, which differs from laying on the ground only in the preparation of the surface and the method of attaching the cladding. The use of this material as a bathroom flooring is fully justified due to the high hydro-sound- and heat-insulating properties of pressed rubber. But laying it on the kitchen floor is undesirable due to the porosity of the rubber, which will accumulate grease and other food contaminants.
Laying pavilastic on a solid base using an adhesive mixture
If the bathroom has an axis of symmetry, that is, the correct shape, it is better to start installation from the center of the room, having first laid tiles on the floor without using glue.
Instructions for using glue are usually available on the glue container, and should be followed strictly. Apply the adhesive mixture with a brush, roller or spatula with your own hands to the surface of the base in the layer specified in the instructions and leave for the required time. The pavilastic is placed on the design site, pressed against the base and tapped on top with a rubber mallet. The adjacent tile is laid in the same way, but using connecting sleeves. There should be no air bubbles or un-glued areas under the tiles, and no gaps between the products.
The drying time of the adhesive mixture depends on the type of glue and can range from one to several days.
Paving technologies for rubber paving slabs
Laying tiles from rubber crumbs is carried out using different technologies. It is fixed both with glue and directly on the ground.
Paving with glue
paving rubber paving slabs with glue
When paving tiles using this method, an adhesive composition with polyurethane components is used, which combines the crumbs into full-fledged slabs. The procedure consists of several stages and requires the implementation of a number of rules:
- Before applying the glue, the working base is cleaned of dirt and treated with a layer of primer.
- Work can be performed at temperatures in the range of +10…+25°C. The permissible air humidity is 70%.
- The surface that will interact with moisture is covered with two layers of glue.
- The paving procedure is carried out from the center of the tile, regardless of its shape.
Do-it-yourself installation technology implies compliance with the following rules:
- There should not be large gaps between the products, and unevenness on the surface is unacceptable.
- Air is removed from under the coating.
- The adhesive composition cannot be applied to the side parts of the material.
If you follow the instructions and take into account the basic requirements, the design will be ready for use within two days.
Paving rubber tiles on the ground
paving rubber paving slabs on the ground
If the rubber coating is laid on an open area, such as a curb or a sports stadium, it is necessary to use a material at least 3 cm thick. The paving procedure is carried out according to the following guidelines:
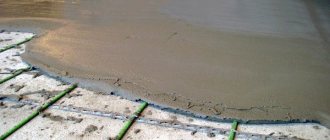
- Initially, you need to remove the top layer of soil, getting rid of plant roots or weeds.
- Next, you should compact the base, creating a 7-20 cm layer of crushed stone. The thickness of this layer is determined by the purpose of the coating.
- At the final stage, a cement screed 7 cm high is installed.