Expansion joints are a very important and necessary element of the floor, which is made of concrete. They are designed to reduce loads on structural elements where deformation is possible due to fluctuations in air temperature and seismic phenomena.
A very important technological point when constructing a foundation made of concrete for laying floor coverings is the cutting of special expansion joints; this is recommended by the technical requirements of SNIP (Building Norms and Rules). These seams provide an excellent opportunity to make a floor screed that is as resistant to various dynamic influences as possible. It is recommended to cut expansion joints at certain intervals along the entire quadrature of the pour made of concrete with wall gaps, where the required size edge strip of the required geometry specified in SNiP is installed.
If expansion joints in concrete floors are made correctly and in a timely manner, then the construction project or structure will last a long time. Statistics on the operation of buildings equipped with seams show that they can withstand the following negative factors:
- temperature fluctuations;
- shrinkage processes;
- chemical reactions in the thickness of the floor;
- creep of concrete.
Self-leveling coating device
When the surface of the future floor is thoroughly prepared: cleaned of grease and dust, coated with a primer and completely dried, the prepared polyurethane composition is applied. Using a special rubber squeegee and a rule, the mixture is evenly spread over the concrete.
- A certain amount of care is required to ensure that the layer thickness in all areas of the work is the same.
- After pouring, you should run a toothed roller over the entire floor to release any trapped air trapped under the liquid.
- Treatment with a roller takes on average 15-25 minutes, depending on the area of the room. This activity should be carried out before the mixture begins to thicken.
Great attention must be paid to protecting the damp surface from various contaminants and splashes of water. Especially if the room is not equipped with doors and windows.
Insulation seams
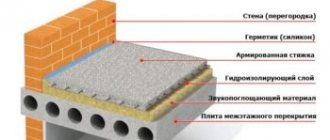
During the operation of a building, its structures are subject to various deformations. There are many reasons for these deformations: these are the influence of the external environment, the movement of foundation soils and temperature effects, and the operation of intra-shop equipment, if this is production, etc. To avoid the transfer of deformations from walls and foundations to concrete floors, in places where the concrete floor screed comes into contact with other building structures - walls, columns, foundations for equipment, etc.
make insulation joints that allow the floor to operate independently of other structural elements of the building. In addition, during the hardening process, concrete shrinks, that is, it decreases in volume. If the screed has a rigid connection to a fixed object, for example, the foundation of a building, then it is likely to crack, since shrinkage cannot be compensated for.
The insulating seam is made along the walls and around all columns. If the screed borders another foundation, for example, a foundation for equipment, then the seam is made around the entire foundation. The insulation joints around the columns can be square or round. The square seam should be rotated 45° relative to the column section and made opposite its right angle.
If this is not done, cracks will most likely appear in the screed. If equipment moves through an insulating seam that is not intended for places with high loads (entrances), then the screed here can be made 25% thicker and, using a wedge, returned to the original thickness with a slope of no more than 1:10.
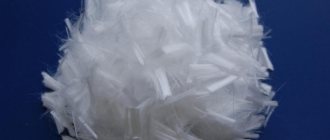
usually it is 13 mm. In regions with frequent temperature transitions above 0 ° C, to increase the service life of the seams, it may be necessary to caulk them. Insulating joints are usually filled with prepared fiber and sealant or similar materials, it is important that the insulating material does not protrude onto the surface of the screed.
For columns, insulating seams are made as follows. When pouring screeds, formwork is installed around them along the seam line. After the concrete has set, the formwork is removed and insulating material of the required thickness is laid in its place. The gap remaining between the seam and the column is filled with concrete and smoothed. Insulating joints around columns can also be made in hardened concrete, whereby the joint is cut to the full depth of the screed and filled with insulating material.
Why are expansion joints made in concrete structures?
Narrow slots made to a depth of about one-third of the thickness of the structure can also serve as shrinkage joints. Subsequently, cracks form exactly along the slots. A tongue and groove connection is also possible; To break the bond, the tongue and groove surfaces are covered with bitumen .
Expansion joints are made to the entire depth and width of the concrete structure
.
There should be no holes in the joint filling material through which concrete could leak out during its laying. The reinforcement should not cross the seam. Concrete surface finishing. If special finishing is not required, for example plastering, coating, chiseling, the vertical surfaces of walls
, columns and beams are rubbed with a carborundum or other hard block moistened with water. This is done immediately after stripping, but no later than 24 hours.
When grouting, the “cement stone” that has protruded through the cracks and edges of the form is removed, and the resulting liquid cement paste
fills indentations on the surface and gives the concrete a uniform appearance. Large depressions on the surface should be sealed with the same solution that was included in the concrete. Horizontal surfaces of floors and platforms should be leveled with timber and smoothed with a wooden trowel.
If a particularly smooth surface is required, use a steel trowel (picture):
See also the construction of a “hydroponic tray” from monolithic concrete, and the design of the expansion joint in it
Step-by-step installation of self-leveling floors
Today, the use of self-leveling floors is becoming increasingly popular both among large construction companies and among private specialists. They are distinguished by their rather lightweight device technology, which you can use with your own hands without much effort. You will need a minimum of simple tools, and mixtures for self-leveling floors can be found in any construction supermarket.
Installation of self-leveling floors
The process of arranging this type of coating goes through several stages. Provided that all technological requirements corresponding to a specific step are carefully followed, the result is a strong and durable foundation.
The process of creating such a floor is expressed by the following actions:
- preparing the base for pouring;
- coating the working surface with a primer;
- pouring the polymer mixture;
- cutting seams and their subsequent sealing.
Shrink seams
The shrinkage of concrete as it dries is usually 0.32 cm per 30 cm linear length. The concrete screed dries unevenly from top to bottom. Its upper part dries faster and shrinks more than the lower part, so the screed tends to curl up, and the edges become higher than the center. As a result, internal stresses arise in the concrete, leading to the formation of cracks.
Shrinkage joints can be made by inserting special joint strips while the concrete is still plastic, or by cutting the joints after finishing the concrete. The seams should be cut along the axes of the columns and joined to the corners of the seams running along the perimeter of the columns. The distance from the column to the perimeter seam should be equal to two to three times the thickness of the screed.
Floor cards formed by shrinkage joints should be made as square as possible, and L-shaped cards elongated along the length should be avoided. The length of the card should not exceed 1.5 times the width. Shrinkage joints should be straight and, if possible, without branches. In aisles and driveways, shrinkage joints should be placed at a distance equal to the width of the screed. Paths wider than 360 cm must have a longitudinal seam in the center.
READ MORE: Moisture-resistant chipboard for flooring, installation tips
In the courtyards of buildings, the distance between joints should not exceed 3 m in all directions. The general rule is that the smaller the card, the less likely it is to randomly crack. Shrinkage seams must also be made on the outer corners, otherwise cracks may develop from the corners. A section of the screed with a very sharp angle is highly likely to crack; such cases should be avoided if possible.
Why do we need an expansion joint in concrete, its types and methods of implementation?
The ability of concrete pavements to expand at elevated temperatures and humidity and to contract when these indicators drop is known to all experienced builders. Because if such structures do not have the ability to freely compress and expand, then the resulting stresses will destroy the structure. This is especially important during the drying stage of the mixture in the first ten days.
What is the purpose of expansion joints in concrete structures and its types?
When organizing monolithic concrete floors, this structural element is a prerequisite that can withstand factors such as shrinkage and temperature changes. This is especially true for heated floors. According to building regulations, an expansion joint in concrete must be made in the following cases:
- screed area exceeds 40 m²;
- complex floor configuration;
- the length of one side of the room exceeds 8 m;
- along the perimeter of the walls;
- near doorways;
- places of connection of structures;
- high floor temperature.
An analysis of the causes of volumetric deformations shows that structures equipped with seams are able to counteract factors such as:
- shrinkage;
- changes in ambient air humidity;
- temperature fluctuations;
- chemical reactions occurring in concrete mixtures;
- creep of concrete.
Classification
The most commonly used types of expansion joints:
- insulating;
- shrinkage;
- structural.
This division is based on the features of the application of one type or another; let’s look at each of them in more detail.
Insulation seams
The main task of this expansion joint in concrete structures is to eliminate the transfer of deformations from capital architectural elements to the floor screed. Main location:
- along the walls;
- around the columns;
- foundation perimeter.
The operation is carried out by laying insulating material along the walls or other structures of the room before applying concrete mortar.
Shrink seams
The hardening of the concrete coating in its mass occurs unevenly - the top layer dries more intensively than the bottom. As a result of this, the level of the screed at the edges is higher than in the center; as builders say, it wraps up. As a result of the resulting stresses, cracks form.
To prevent their occurrence and take control of this process, shrinkage seams are cut. Usually they are placed along the axes of the columns and joined to the corners of the same cut elements running along the perimeter of the columns. Cutting is done to a depth corresponding to 1/3 of the thickness of the screed after finishing the coating. The work is performed using a joint cutter with an irrigation function.
But another option is also possible - by installing slats of certain sizes at the stage of plasticity of the concrete surface.
Construction seams
This type of demarcation is arranged in places where the day shift for laying screed ends. The shape of the end should have the form of a tongue-and-groove connection; you can use slats laid across the longitudinal line, and on one side they should be treated with bitumen for ease of dismantling.
During construction, it is important to keep in mind that the expansion joint in concrete also acts as a shrinkage joint, allowing minor horizontal movements.
It is highly desirable to achieve their maximum coincidence and compliance with the project documentation; any changes must be agreed upon.
Why is sealing needed?
In rooms with increased requirements for water resistance, seams are sealed, since excess moisture promotes peeling of coatings. The activation of this process increases in the presence of high temperatures.
Sealing helps prevent exposure to water and other aggressive substances, as well as clogging of the joint space. When choosing a sealant, the operating conditions and loads to which concrete pavements are subjected must be taken into account.
Main types of sealants:
- mastics (polybutylene);
- hot and cold curing thermoplastics (bitumen, butyl rubber);
- thermosets (vinyl acetate, polyurethane, polysulfide);
- silicones.
For example, most floor coverings in industrial plants must be easy to clean and at the same time withstand heavy loads. Sealants for such floors must be both flexible and hard enough to prevent chipping.
Eventually
Any structure, both in individual elements and as a whole, is constantly in motion, which is associated with changes in volumes, static effects of structures, foundation deformations and other factors. Therefore, the decision on the arrangement of seams should be based on a strict definition of their functional purpose. It is the correct choice and implementation of the desired type that will ensure the durability and reliability of the building.
There are several options for the location of the seam in the structural design of the building:
- in flooring;
- in the ceiling;
- in foundations;
- in load-bearing walls;
- in facade structures.
The sealing elements used in the work must be durable and elastic, and in most cases, waterproof.
kakpostroit.su
Preparatory work
As a rule, self-leveling floors have concrete at the base, which has the following characteristics:
- Only M200 concrete is used, which provides a compressive strength of 21 MPa.
- The tensile strength is at least 1.5-2 MPa. When this criterion is not met properly, there is a high probability of the polymer coating peeling off from the concrete.
- The permissible limit of moisture content in concrete does not exceed 4%. Otherwise, the risk of delamination of the self-leveling floor with screed also increases.
When compacted soil or a bed of gravel is used as a base, a waterproofing coating is a mandatory requirement.
Construction seams
In the practice of installing concrete floors, it is very rare that the screed is poured without long breaks (more than 1 day). This is only possible in small areas and subject to an uninterrupted supply of concrete mixture. Typically, pouring is carried out with technological breaks, during which time the laid concrete has time to gain a certain strength.
In places where concretes with different laying periods come into contact, it is advisable to cut construction joints. Construction joints are cut where the day's concrete work has been completed. If possible, they are performed at a distance of at least 1.5 m from any other types of seams located parallel to them.
The shape of the edge of the tie for a construction seam is usually done using the tongue-and-groove principle. If the side projections are made of wood, a 30° cone is sufficient for a screed with a thickness of 12...20 cm (45° cones are not allowed). Metal cones are also used. They should be installed according to the manufacturer's instructions.
https://www.youtube.com/watch?v=pvWxsA_9hC4
Taper seams work like shrinkage seams: they allow small horizontal, but not vertical movements. Metal cones are not recommended for floors with heavy wheel traffic: in such cases, it is better to use a “hairpin” joint. If a construction seam occurs where neither a shrinkage nor an insulation seam is desired, sleepers (slats) placed across the seam can be used.
The latter should be installed in the middle of the depth of the screed at the correct angles to the seam. These slats should not be confused with the smooth steel “hairpin” slats described below, which provide horizontal movement of the seam. Stud joints are usually used in areas with pedestrian traffic, as well as in floors with high loads from wheeled vehicles.
The purpose of the pin is to hold the two edges of the seam level as the wheel passes through the seam. To ensure horizontal movement of the seam, the studs must be embedded in the concrete on at least one side of the seam. For proper operation, the studs must be at the same level and parallel to each other.
How to make expansion joints in a blind area?
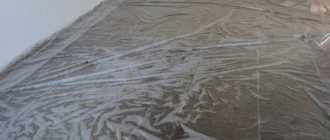
Caring for freshly laid concrete. Immediately after finishing the grouting, the concrete screed should be covered with an overlapping polyethylene film with a thickness of 40-60 microns. Periodically (1-2 times a day) it is necessary to moisten the surface (and then cover it again with film) for 4-5 days. Moistening is performed to ensure optimal conditions for concrete maturation and protection from drying out (cracking).
Attention! If during the care of the concrete (4-5 days) you need to perform other work (cutting joints, grinding, etc.): open the concrete in small areas and immediately cover it with plastic film after completing the work.
8. Construction of expansion (shrinkage) joints.
Attention! It is necessary to cut the seams BEFORE grinding the concrete (vibration during grinding can lead to cracking of the screed).
The maximum distance between seams depends on the grade strength of the concrete, the presence of reinforcement and other factors.
Recommended maximum distances between joints (in concrete floor thicknesses) and cutting times.
| Concrete floor | Without reinforcement | With reinforcement | Start cutting* |
| "Ordinary" concrete | 40 | 60 | 3-6 days |
| With the additive "Elastoconcrete-A1" | 80 | 120 | 1-2 days |
| With the additive "Elastoconcrete-A2" | 80 | 120 | 2-3 days |
| With the additive "Elastobeton-B" | 120 | 200 | 1-2 days |
* - Start cutting seams from the moment the screed is laid.
In fact, cutting seams should be done “the sooner, the better,” but so that the edge of the seam is not destroyed during cutting.
Follow the concrete floor screed technology accurately and you will get a high-quality concrete floor.
17Jul16
Any concrete structures are not 100% stable objects. Reinforced concrete (RC) and concrete structures have a harmful property - “breathing”, the ability to linearly expand under the influence of elevated temperatures and linearly contract under the influence of low temperatures. The “breathing” of concrete can only be localized using an expansion joint.
Priming the floor for pouring
This process involves treating the concrete floor with a special impregnating mixture. Possessing deep penetration properties, the primer increases the adhesion of polymer compounds to the base.
If necessary, pure quartz sand is added to the liquid to enhance the setting effect. After drying, the top layer of the screed acquires a rough surface, similar to sandpaper.
- Using a simple roller, the entire surface of the concrete floor should be covered with the composition.
- If there is a need to apply a second layer of primer, a break must be allowed for the screed to dry. During the break, the applied mixture polymerizes.
Slicing rules
Cut seams should be straight and clean. The worker performing this operation must know when and how deep to cut them, what joint should be next, and how to prevent the blade from wearing out too quickly when using very hard aggregate in concrete. Joints should be made as soon as the concrete has gained sufficient strength so that it will not be damaged by a blade, but before random cracks can appear in the concrete.
Cutting seams with a conventional seam cutter should begin no earlier than 24 hours and no later than 72 hours after finishing the finishing of the concrete. When wet cutting (meaning cutting on soft concrete with a special Soft Cat floor cutter), such conditions usually arise 4...12 hours after finishing the concrete.
However, cutting seams after 24 hours is also possible under certain conditions. To do this, the worker must make a test seam a few hours after the concrete begins to harden. If, when cutting a test seam, aggregate particles fall out of the concrete, then it is too early to start. The operation should begin when the blade, together with the concrete, cuts the aggregate grains.
When cutting seams, you should always have spare equipment available in case the main one fails. In hot weather or if there is a risk of cracking, it is necessary to cut every third or fourth seam before cutting the intermediate seams. Usually the seams are made in the same sequence in which the concrete was laid.
READ MORE: How to level an old wooden floor
The depth of the seam should be equal to 1/3 of the thickness of the screed. This creates a zone of weakness in the screed, and when the concrete shrinks, it cracks in this zone, i.e. it cracks directionally and not randomly. In this case, the edges of the resulting crack have a certain roughness, which eliminates vertical displacements of the edges until the crack becomes too wide.
Not long ago, a method of dry, light cutting of joints was invented; it is performed immediately after finishing the concrete. A worker, using a long handle, can cut up to 10 m of seam without moving on the concrete. To cut longer seams, a worker wearing special boots with smooth soles can walk along the screed and use a 2-meter handle. This type of seam is cut only to a depth of 2…3 cm.
In order for the finished screed and the completed floor to be strong and not crack, you need to cut it correctly.
Creating expansion joints
Self-leveling floors are not as susceptible to deformation as concrete screed. However, when it is necessary to fill a large surface area, the construction of expansion joints is a prerequisite.
The process of cutting the seam is carried out in sections measuring 600x600 cm, the cutting depth is 1/3 of the total thickness of the polyurethane layer. Thanks to such seams, the compressive load is removed from the surface, and the likelihood of the formation of arbitrary cracks and splits is prevented.
In total, the process of making such seams can be divided into two stages:
- cutting expansion joint;
- its complete sealing.
In this case, the temperature regime must be strictly observed. The indicator should not fall below 0°C and not exceed 30°C.
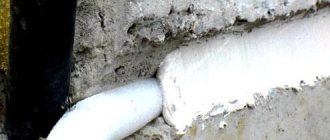
Seam in the screed, filled with sealant and covered with cement mortar
Let's consider how, using diamond drilling of holes in concrete, you can make a separating element on an already dry screed.
- At the first stage, using a string or a long plaster rule, a line is drawn along which we will cut the grooves. On average, the width of the ditch should be 20-30 cm and the depth 3-4 cm.
- After we have made all the necessary markings, we cut the concrete with a wall chaser, setting the cutter to the required depth. Considering that cutting reinforced concrete with diamond wheels is carried out to a small width, we cut several grooves. We cut out the concrete with a hammer drill, trying to do it as evenly as possible.
- We lay out a temporary profile in the middle; for this, even slats up to 5 cm wide or an aluminum profile, which is used when installing drywall, are suitable.
- The profile is filled with concrete on both sides. After about 1-2 hours the profile is dismantled.
- After the concrete has completely dried, the resulting gap is filled with sealant and smoothed.
Installation of an expansion joint in a concrete floor using technology
The accumulated practical experience allows us to produce expansion joints in concrete floors while ensuring functional tasks.
Key stages of the process:
- Concreting the floor. After the floor is filled and sanded, adhesive-backed strips are installed in the groove area. They are easily removed after the concrete has hardened and then grouted.
- Bringing it to readiness. Special units equipped with diamond discs are used to process the hardened layer. The technology allows cutting to be carried out within two days after concreting is completed.
- When cutting dried material and removing rails, ensure the integrity of the groove edges.
Algorithm for performing the work:
- We mark the surface.
- Mark the required depth.
- We cut out the seam, checking the quality of the work done.
- Prepare the required section size.
- The cavity is sealed using sealant.
The work should be completed two days after concreting is completed. When cutting seams, it is important to focus on the integrity of the edges and observe the depth dimensions with an orientation of 30% of the thickness of the formed screed.
Sealing seams
Sealing is a prerequisite for the functioning of the seam; it is performed using the following materials:
- Sealing cord: a cord made of foamed polyester is placed in the slot, which retains its elasticity under constant temperature changes;
- Sealant: the most popular method, a special case of which is pouring mastic (we’ll talk about it separately). After drying, the sealant completely closes the groove and at the same time prevents the penetration of water;
- Waterstop: a special material made of polyethylene, rubber or PVC in the form of a profiled tape, laid when pouring the screed;
- Deformation profile: a special rubber profile on metal guides is used. Rubber will not let water and dirt into the groove, distribute the load on the screed and prevent the concrete from cracking. The profile can be overhead or built-in.
Sealing with mastic
Mastic is the most popular sealing method. It can be acrylic, latex, polyurethane.
Now let's look at the sealing process using mastic in detail:
- Prepare tools and materials: mastic, brush, small triangular spatula, deep primer, sealant gun;
- We prepare the base: it must be dry, free from fungus and dust, free from any oil, grease, rust, old paint - everything that can affect the setting of the mastic. Before sealing with sealant, you need to blow it with compressed air, treat it with a brush and sandblaster, and then treat it with a primer;
- Mixing the sealant: mix the paste and hardener until a homogeneous composition is obtained. Do not violate the recommended ratio! You can slightly improve the fluidity by adding about 10-12 tablespoons of gasoline (about 50 grams) per 1 kg of the finished composition;
- We apply the sealant: pour the compound into the gun, then apply it evenly along the entire length, level the spatula flush with the floor. After 40 minutes, apply the thinnest layer of cement to the groove and after 1 week at most the sealant will set.
To make cleaning easier and to support the seam edges under traffic loads, cut seams must be sealed. Sealing allows you to protect them from the penetration of water and aggressive media, as well as from clogging. The type of sealant depends on the loads and operating conditions. For example, food processing plants require floors that are easy to clean and can withstand heavy truck traffic.
In industrial floors with high traffic loads, the joints must be filled with an appropriate material that will provide joint support and withstand high loads. The material is applied no less than 28 days after laying the screed. Elastomeric (flexible) sealants are used only where the seam will not be subject to loads from equipment wheels.
They are applied quickly and can withstand large movements when opening and closing the seam. Before sealing, the seam should be cleaned of dust and debris by blowing it with compressed air, cleaning it with a mechanical brush or sandblaster. When using a compressor for this, you need to make sure that it does not leave an oil film in the seam.
In our opinion, most warehouses and industrial premises, logistics complexes, parking lots, car service centers, shopping centers, etc. are objects where floors are subject to moderate loads. However, the concrete floors there are gradually deteriorating. To obtain a durable concrete floor that is resistant to traffic, pedestrian and other loads, temperature changes, corrosion and other influences, it is necessary to use materials of the appropriate quality, accurately carry out all technological operations when installing floors, correctly cut expansion joints and carry out subsequent maintenance of the floors.
READ MORE: Do-it-yourself cork floor installation technology, how to install it correctly, video instructions
Sealing recesses
Before laying the final floor covering, one more work needs to be done, which consists of filling the compensation recess with some material intended for this purpose and sealing it with sealant. This is necessary to ensure that moisture, debris, and various aggressive environments do not get into the prepared furrows, which can negatively affect the structure and integrity of the concrete. However, you cannot use just anything as a sealant. You should only use materials that are suitable for such purposes due to their properties.
Sealing seams with silicone is the fastest and cheapest method
Today there are several materials on sale that are recommended both for the initial filling of the technological recess and for use as a finishing sealant. Here are the main ones.
- Overhead and built-in profiles for arranging expansion gaps. This is the most expensive material, which is used to form a seam at the time of pouring the base of the floor. It is a double-sided corner profile, in the middle of which there is a rubber insert, which is both a damper and a sealant that closes the seam. Good for use with thick screeds.
- A sealing strip, the price of which is not so high, will be cheaper. It is an elastic band made of foamed polymer. It is laid in the seam in one or two layers and sealed with sealant on top.
- Profiled strips, also called waterstops, are placed in the cement mortar when it is poured. Made from polymers or rubber (the former have a lower price), they have the ability to smooth out deformation processes occurring in concrete.
- Sealants for filling cavities are the most practical and in demand. These are all kinds of mastics that are produced by different manufacturers, and therefore the price for them is different. After sealing the seam, the sealants set, but remain elastic, performing damping functions. They are good because they are easy to use and reliably seal the seam. There are one-component ones, which are ready for use, and consisting of two ingredients, which are mixed before sealing the recess.
Important! When purchasing materials for sealing joints, do not prioritize low cost. Often inexpensive materials are made from low-quality raw materials and therefore may not perform damping functions. And this will lead to premature cracking of the screed, the repair of which will cost much more.
Types and purpose of seams
Types of expansion joints and their purpose
The main list of expansion joints consists of three types. Each type is characterized by its own range of issues, the solution of which it provides. However, there is a general functional principle common to all types of seams - to prevent the destruction of the floor under the influence of external factors or uneven load on the entire base structure.
Here is a basic list of seams and their purpose.
- Shrink seam. Typically, concrete floors dry out in patches. On the surface, moisture disappears faster; on the lower layers of the base, this process proceeds much more slowly. As a result, pressure builds up inside the structure, causing cracks to appear. Under the influence of ambient temperature and moisture in the air, this process is further aggravated. It is impossible to stop this action, but it must be subdued and streamlined. If a large floor area needs to be poured with concrete, shrinkage joints (otherwise known as expansion joints) should be cut along the surface of the base. As the screed dries, the seams separate, thereby eliminating the risk of random cracks.
- A construction seam is relevant if it is not possible to complete the entire process of filling the surface at once. When the concrete is laid, after a short amount of time, it sets, losing a small percentage of the liquid. Collapses and cracks often occur at the junction of existing concrete and newly poured concrete. If work had to be suspended due to various circumstances, construction seams are cut at the joint areas. Their location must be consistent with the location of other types of seams.
- Insulation joint - used in buildings that are systematically exposed to various types of pressure: ground movement, mechanical or temperature fluctuations. To prevent the transfer of load from the vertical structure to the floor, an insulating seam is installed at the junction of the base and the wall, then the screed does not depend on the vibrations of the vertical structure of the structure. Seams of this type are cut along the perimeter of each wall, describing existing columns, supporting structures and individual fragments that have their own foundation.
Conventionally, expansion joints are divided into two types:
- technological type;
- permanent type.
The first point refers to construction and shrinkage seams. Their installation is carried out during the installation process. Once the concrete takes its hardened form, these joints are no longer necessary. After the screed has dried, they are rubbed with mortar. The permanent type of seams includes insulating ones, since the need for them does not pass due to the constant impact of deforming factors on the supporting structures of the building.
What is an expansion joint in concrete?
Any concrete structures are not 100% stable objects. Reinforced concrete (RC) and concrete structures have a harmful property - “breathing”, the ability to linearly expand under the influence of elevated temperatures and linearly contract under the influence of low temperatures. The “breathing” of concrete can only be localized using an expansion joint.
What is the expansion joint for?
In accordance with the current building codes and rules of the Russian Federation, expansion joints in concrete must be provided in the following cases:
- The total area of the floor screed, blind area or concrete platform for other purposes exceeds 40 square meters;
- The concrete floor has a complex configuration;
- The length of the wall of the room exceeds 8 meters;
- Expansion joints should be along the perimeter of monolithic walls, along the outer perimeter of the doorway and at the junction of concrete structures;
- On all concrete structures operating in conditions of temperature changes.
An empirical analysis of the reasons causing volumetric deformations shows that reinforced concrete products with expansion joints in concrete effectively withstand the following unfavorable factors:
- Volumetric shrinkage;
- Regular changes in environmental humidity;
- Significant temperature changes;
- Creep of concrete;
Types of expansion joints depending on the type of concrete structure:
- In self-leveling floors, blind areas and concrete platforms;
- In floor slabs;
- In concrete foundations;
- In load-bearing walls and interior partitions;
- In the facades of buildings.
Classification of commonly used types of expansion joints
- Insulating. The main task of the insulating seam is to prevent the transfer of deformation forces from capital objects to the floor screed. In accordance with this task, there are the following types of location of insulating seams: along the walls, along the perimeter of the columns, along the perimeter of the foundation. The technology for creating an expansion joint of this type consists in laying a special material around the perimeter of a particular structure before pouring concrete;
- Shrink seam. As is known, setting and hardening of concrete occurs unevenly. The upper layers set and dry quickly, while the deeper layers dry relatively slowly. As a result, internal stresses arise, causing the formation of cracks. To prevent this phenomenon, so-called “shrinkage seams” are cut. The seams are located along the axes of the columns and join the corners of the elements located along the perimeter. The depth of the “cut” should correspond to 30% of the thickness of the floor screed. The actual “cutting” is done using special equipment or by installing special slats at the pouring stage;
- Structural expansion joints. This type of joint is installed in the place where the day shift or portion of laying screed on a concrete site ends. Typically, a structural expansion joint consists of a thin strip of wood, a strip of glass, or a layer of soft bitumen. It should be borne in mind that an expansion joint of this type “works” as a shrinkage joint, smoothing out small horizontal movements of individual parts of the concrete structure.
Sealing expansion joints
Expansion joints of concrete structures operating in conditions of high humidity, as well as expansion joints of external concrete structures, must be sealed using one of several methods to choose from. Otherwise, under the influence of temperature expansion, a stable destruction of the concrete pouring boundary occurs, which can ultimately lead to the destruction of the entire structure. Materials used to seal the expansion joint:
- Polybutylene mastic;
- Hot and cold hardening thermoplastics (bitumens or butyl rubbers);
- Thermosets;
- Silicone materials.
Advice for private developers! Practice shows that the most effective and relatively inexpensive way to seal an expansion joint in a concrete structure is the technology of treating the joint where the next portion of concrete is poured with bitumen mastic.
To do this, you should use a material that retains its properties at both high and low ambient temperatures. For example, bitumen mastic from the brands BITUMAST, MACSEAL and others.
In this case, after pouring the next portion of concrete, it is enough to treat the pouring boundary with bitumen mastic and continue pouring at your discretion after a certain time without losing the performance and strength properties of the concrete structure being poured.
salecement.ru
Use of sealants
How to use sealant correctly
Once the base has completely hardened, all seams are carefully sealed. In addition to its functional role, this event creates the proper aesthetic appearance of the structure. Penetration of various contaminants and moisture into the seam is prevented, the influence of which often provokes the appearance of cracks and chips.
There are several well-known methods for sealing seams:
- A gernite sealing harness is used. It is placed directly into the seam cavity.
- Special sealing compounds that fill expansion joints.
- Also, polymer or rubberized seals are laid along the seam cavity.
- In large shopping centers and large public institutions, such seams are formed with special profile structures that also serve a decorative role.