How to make an earthen floor
The cheapest floor is earthen. It does not require financial costs, has a very simple structure, but at the same time it has low strength and strongly absorbs moisture. Such coverage can be done temporarily if the construction budget is very limited. This option is also suitable for those who do not often use the garage and are on the road most of the time.
The process of arranging an earthen floor is very simple:
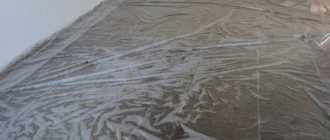
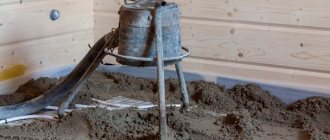
when marking the area for the foundation, the entire plant layer is removed; Removing soil inside the garage after filling the base, the internal space is cleared and leveled; Using a tamper, carefully compact the base; Tamping: When the roof has already been installed in the garage, a layer of greasy clay with a thickness of 10 cm is poured onto the floor; carefully compact the base. Backfilling and compacting clay
You can do without clay, but it significantly increases the strength of the floor and provides good protection from moisture.
Preparatory work
Before you get started, there are some things to consider:
- ground water level;
- possibility of flooding;
- slope of the site.
If these factors do not meet building codes, then all obstacles must be removed. Otherwise, the arrangement of the floor will result in wasted money.
In the classic version, the entire structure will be a “sandwich”. The base is gravel and sand. A rough concrete screed is laid on it, on top of which waterproofing, insulation and finishing screed are placed. This layering will provide rigidity and strength to the garage floor.
We clear the surface of the future foundation from loose soil, level and compact the resulting area. We install wooden beacon posts along the walls every meter. They will control the height of the gravel and sand poured. It is necessary to leave a distance of at least 1 cm between the floor and the walls so that when the garage shrinks and temperature changes, the coating does not crack. This gap is filled with polystyrene foam insulation. Those craftsmen who do the work with their own hands also know that the finishing screed should be made at a slope towards the exit. This ensures the possibility of water drainage.
How to make an earthen floor
First, all construction debris that may accumulate there during construction is removed from the garage. Next, the entire fertile layer is removed. Completely all the way down to “clean” soil without vegetation and roots. The thickness of the layer can be different - somewhere 10-15 cm, and somewhere 50-60 cm. Regardless of this, the entire fertile layer must be removed. It contains a lot of organic matter, microorganisms, and insects. Organic matter will rot, spreading corresponding odors, and microorganisms will contribute to the appearance of mold and fungi; insects are also not the best neighbors.
Remove all fertile layer
Having reached clean soil, it is leveled, the same clean soil is poured in layers of about 5 cm (you can dig a hole somewhere nearby or bring it in). Each layer is well compacted. It’s good if there is a vibrating platform, a roller or some other similar device. If you don’t have one, you can make a manual tamper yourself. There are two options:
a thick steel plate with a T-shaped handle welded in the center: a piece of log of substantial diameter with a crossbar-handle nailed at the top.
Each layer is compacted with this tamper. So, tamping in layers, fill the pit to the ground level, maybe even a little higher. The upper layers are molded, creating a slight slope towards the door so that water that gets into the garage drains.
Dirt floor with crushed stone
To create a more serviceable floor, the top layers are replaced with clay, but it is very difficult to compact it, and high density must be achieved. Another option is to pour some gravel onto the compacted earthen floor and ram it into the ground with a tamper. Here, most likely, you will need a vibration platform. But you get a solid base in which even the wheels leave no traces. The advantages of this option also include the fact that there will be much less dirt in the garage.
This is what a vibro-form looks like. It can be rented
With this we can assume that the earthen floor in the garage was made with your own hands. Not the best option, but definitely the cheapest.
We recommend: Which lining is best for a bathhouse - 6 optimal options
4
Paving slabs - we make durable and inexpensive floors
If we can’t afford porcelain stoneware, we make the floor base in the caravan from paving slabs. This material is usually used outdoors. But, believe me, it is perfect for a garage. Sidewalk tiles are durable, practical, and require small joints during installation. It costs half the price of porcelain stoneware, is available in a variety of shades and shapes, and guarantees a good anti-slip effect. In addition, it can be laid using the “dry” method.
Installation of paving slabs is carried out as follows:
1. We place beacons in the corners of the room. We level them with a level and thread, taking into account all existing slopes and surface irregularities.2. If the tiles are laid directly on the ground, it must first be cleared of grass, roots, debris, and then thoroughly compacted.3. On the compacted earthen base, pour a layer of crushed stone (you can use screenings) 5–10 cm thick. Then fill it with a cement-sand (1 to 3) mixture.4. We tamp the mixture. We place slats along the beacons and level the layer of sand and cement. We must get a level base. Then the tiles will stand no lower and no higher than the planned coating level.
Now lay the tiles dry. The process is complete. We got a reliable floor. The only unpleasant thing is that paving products quickly become dirty. After a couple of years of use, they become covered with indelible stains from technical fluids, oil, and gasoline. The problem can be partially solved by regularly painting the tiles in some dark color.
Installation of beacons
In order for the garage floor to be level, it must be leveled. It is more convenient to do this with the help of a special long bar, which is called the “rule” (emphasis on the letter “I” - from the word edit). This plank is supported on even planks set at the required level. They are called lighthouses.
Any flat and long objects can be used as beacons. These can be pipes, bars, special beacons, which are sold in construction stores. They must be placed at the same level as the concrete slab level mark on the walls.
Beacons are placed from the far wall, towards the one in which the doors are located (most often it turns out that along a long wall). The installation step is 25-30 cm narrower than the length of the rule. If the rule is 150 cm long, the distance between the beacons should be 120-125 cm. They retreat about 30 cm from the wall, place the first beacon, then others with a given distance.
This is how a concrete floor in a garage is poured along the beacons
They are usually installed on islands of a thickly mixed solution. They lay out the slide a little higher than necessary, and press the beacon into it so that it is at the desired level.
When installing beacons, you can make a slight slope of the concrete floor towards the doors (0.5-1 cm per meter). In this case, the water will flow by gravity from the floor to the street. Just note that in this case more concrete is required - you have to lift up the edge of the floor farthest from the entrance, but this is compensated by ease of use.
The next day after pouring, the beacons are removed, the voids are filled with mortar and leveled to the same level as the previously filled floor.
Garage floor made of paving slabs
Many people think that paving slabs are for roads and sidewalks, but not for garage floors. However, it is not. The percentage of hygroscopicity, that is, moisture absorption, is higher than that of porcelain stoneware, but experience and operation show a guarantee of quality and reliable use. This problem can be compensated for by the fact that the thickness of the products is greater than that of the previous version, the material is laid almost dry, the width of the seams and after rubbing them, all debris can simply be swept up with a broom.
Product advantages:
different design options are available; durability depends almost entirely on careful use; the surface of the product is smooth and non-slip, which, in turn, allows you to easily remove debris using a broom; the material is wear-resistant.
Porcelain tiles for garage floor
To decide whether or not to make a garage floor from porcelain stoneware, you need to know not only the advantages of such a coating, but also the disadvantages.
Among the positive characteristics it should be noted:
strength - one square centimeter of coating can withstand a 200-kilogram load; impact resistance; moisture resistance; with proper care, tiles can last for decades; having anti-slip properties; low thermal expansion rate; easy care; resistance to chemical reagents.
Disadvantages that characterize porcelain tiles for garage floors:
high price; to lay it yourself, you must have the appropriate skills; installation of this coating is a long and troublesome task; fragility - the material must be transported carefully.
Preparing a garage for renovation construction work
To make repairs in the garage, you will first need to inspect all the places where problem areas are observed. Check the condition of the roof joists, roof covering, walls - whether the plaster is peeling off, and so on.
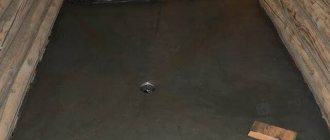
The inspection hole , while making it possible to repair the car yourself, is also the source (often the main one) of all the problems in the garage. Therefore, you need to check if it is raw. And if so, then the garage is built in a place with a high groundwater level, and then this becomes a real problem; to eliminate it, you will need to install a drainage system, careful waterproofing, which may require significant investments, and this may not always bring the desired result.
A damp pit creates dampness throughout the garage, which entails a lot of unpleasant consequences both for the car itself (it rots faster) and for the walls, ceilings, and roof of the garage. It’s probably worth going into more detail about how to deal with pit dampness in a separate article. Here we will only say that dampness in the inspection pit is a fairly common phenomenon, and if you are at the selection stage before buying a garage, but your plans do not include repairing the car yourself, then it is definitely better to buy a garage without a pit.
Waterproofing an inspection pit in a garage - laying a thick waterproof film, then covering the walls of the pit with boards or metal. siding, pouring screed on the garage floor
If we talk about a metal garage , then you should pay special attention to the presence of rust. If metal protection measures are not taken care of in time, rust will soon begin to destroy the structure. To prevent this, surfaces and affected areas are treated with anti-corrosion solutions. The rust is cleaned, removed with a rust converter , the surface is primed , and then covered with acrylic anti-corrosion or latex water-dispersion paint.
In order for a metal garage to last for decades, it must be carefully and timely treated with anti-corrosion agents.
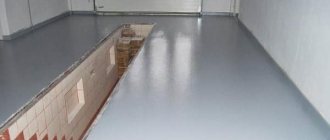
Self-leveling floor
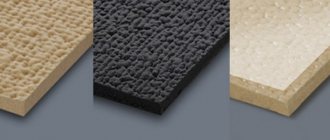
Polymer coating packaging
Self-leveling flooring is expensive, but the benefits of such a coating well justify the cost. The service life of a self-leveling floor is at least 40 years, it has very high strength, is easy to clean, does not burn, and has a perfectly flat surface. Epoxy and polyurethane industrial mixtures are best suited for garages. You can carry out the installation yourself, because the filling technology is very simple.
Preparing the surface - removing everything unnecessary
Step 1. Preparatory work
The rough base is cleaned of dust and all cracks are sealed. Recesses more than 3 cm deep are also filled with solution and dried. After this, the floor is treated with a primer twice.
Mix the composition
Decorative "chips"
Step 2. Pouring the mixture
The floor solution is prepared exactly according to the instructions, otherwise the quality of the coating will decrease. During operation, the temperature in the garage should not be less than 10 and above 25 degrees. If the room is large, pouring is done in stages, dividing the area into several sections. Level the mixture with a needle roller, carefully removing air bubbles. It will take about 20 days to dry, after which the coating is ready for use.
Filling the coating
We recommend: DIY garage accessories - homemade machines, tools
Scatter the “chips” as you pour. Enjoying the result
Main defects
Defects in concrete foundations do not occur by chance. They are caused by violations during the installation of the floor covering or during its operation.
The main defects are: cracks, chips, floor peeling, craters, height differences, dusty surface, etc.
Cracks
Cracks are the most common defect. When they appear, carbon dioxide and salts enter the material along with water, leading to the destruction of concrete. The main causes of cracks are:
- violation of the proportion of cement and water during the preparation of the concrete mixture;
- movements at the base;
- low structural reinforcement.
Peeling
Delamination of the floor is the appearance of air bubbles on the base with a diameter of up to 70 mm or delamination of large areas of the surface. As a result, the strength of the structure is reduced, and some areas may become unusable.
The main reasons for this defect are violations of concrete pouring technology and the presence of pollutants on the surface.
Changes
Changes in elevation can lead to premature damage to the outer layer. Their causes are the filling of the base with incorrect installation of the guides or failure to grout the surface.
Dustiness
A dusty surface is formed when the strength of the top layer is weak.
The main reasons for severe dustiness are: poor quality of the cement component in the solution, freezing of the top layer and poor maintenance of the concrete surface.
Peeling of the finishing layer
Peeling of the finishing coating is a significant defect that affects the service life of the base. It occurs due to the low water resistance of the material caused by the lack of waterproofing, installation of the floor on a surface with a humidity exceeding 4%, etc.
Craters
Craters or small through holes occur when the base is poorly processed with a roller or when it is arranged without the use of soil (or in insufficient quantities).
Making a wooden floor in the garage with your own hands
And in the case of a wooden floor in a garage, there will be no differences at the first stage: you need to remove the fertile soil, level and compact the bottom of the resulting pit. Then it is fashionable to lay a layer of waterproofing (roofing felt, waterproofing, film, membrane) on the bottom, and a layer of sand or gravel on it. Sand and gravel need to be compacted, but the density is not so critical, but bringing the bedding “to the horizon” is important - check how evenly the “cushion” lies using a level, but not small, but no less than a meter.
With insulation
Logs are installed on this bedding - large cross-section timber. The step is no more than a meter. It is advisable to arrange it so that the car wheels are above the joist or not far from it, and the rest can be distributed as it turns out.
Before laying, the logs are impregnated with a protective impregnation against rotting (for wood in direct contact with the ground), and then treated with fire retardants (reducing flammability). To prevent rotting, logs can be impregnated with mining, but their flammability will only increase. So this is not a very good option, although it is cheap. You can also use sleepers. They are already impregnated, but have a persistent characteristic odor.
Logs are laid on compacted crushed stone. In this case they were laid lengthwise, but more often they are laid across
Next, the space between the joists can be filled with insulation. The best option is polystyrene foam. If your budget allows, take extruded with a density of 35 kg/m3. It does not rot, fungi and microorganisms do not multiply on it, and mice do not eat it. In addition, it does not allow or absorb water. Insulation and waterproofing in one fell swoop. Layer thickness is at least 5 cm, but preferably 10 or more. If there is still space, you can fill in broken bricks and expanded clay. These materials are not the best solution, as they are hygroscopic (absorb moisture). Instead, you can use a new material - granulated foam glass. It is many times “warmer” than expanded clay, does not absorb water, and is not so expensive. In principle, you can only fill foam glass (in granules or broken glass) between the joists. It will be good too. But in any case, you don’t need to fill the entire space, right under the boards. A ventilation gap of at least 5 cm is required. Then the boards will not rot.
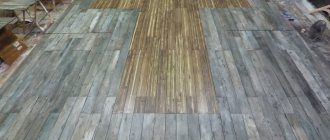
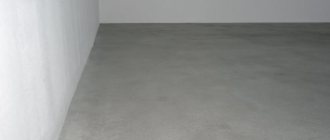
Finished wood floor
Boards are laid across the installed joists. This is a regular edged board with a thickness of 40-50 mm. When laying, do not try to pack them very tightly. It is better if there is a gap of 3-5 mm between the boards. That's all, the insulated wooden floor in the garage with your own hands is finished.
Logs on posts
There is an option for a “cold” wooden floor in the garage - on posts. A layer of gravel is poured onto the leveled soil and compacted. Brick columns are placed on the gravel with the expectation that logs can then be laid on them. The distance between the posts is about 1 m. That is, if the width of the garage is 4 m, then there are two posts at the edges and two in the middle. Since the distance between the logs is also 1 m, such rows of columns are located every meter. After two weeks, the solution will set and logs can be laid on the posts.
One of the options for installing columns
Ruberoid is laid on each column in two layers. It can be replaced by coating with bitumen mastic (twice). If the height of the posts is not the same, pieces of wood, plywood and other similar materials can be laid between the joists and posts. It is important that they are held tightly and that the logs are level. Next is laying the floor boards.
We recommend: How to make a potbelly stove for a garage: making a potbelly stove with your own hands correctly
1
Types of flooring for a car in the house – what to choose from?
Garage floors are constructed using several technologies using different materials. Choosing a specific technique can be difficult for inexperienced motorists. It should be borne in mind that such coatings must necessarily have:
1. High level of fire safety and resistance to moisture.2. Good strength, resistance to deformation under the influence of mechanical loads.3. Low expansion rate under the influence of temperature fluctuations.4. Resistant to the negative effects of petroleum products, solvents, acids, oils and other aggressive compounds used to service the vehicle.5. Durability, ease of maintenance, the ability to arrange it yourself.
Concrete, porcelain stoneware and slab floors meet these requirements. They are considered the most durable and reliable. But, of course, they have both advantages and disadvantages. Concrete bases are popular among many car owners. They can be used even in very difficult conditions. Such floors can withstand the weight of both cars and trucks, are not afraid of chemicals, and do not burn. But over time, the concrete surface takes on a very unsightly appearance. It is almost impossible to wash off stains of gasoline, oil and other technical liquids from such floors. For lovers of cleanliness and order, this is, of course, unacceptable.
A more durable analogue of concrete foundations are floors made of ready-made reinforced concrete slabs. They are essentially eternal. It is impossible to spoil such a coating or destroy it. But the use of reinforced concrete products requires considerable financial costs. The slabs, which have considerable weight, first need to be brought and then laid somehow. This cannot be done without special equipment and a couple of assistants.
Economy options for garage coverings - earthen and wooden - are now unpopular. They are installed very rarely. The earthen floor actively absorbs moisture, its strength leaves much to be desired. But the costs for it will be minimal. Wood flooring is also cheap. They are easy to install yourself, resulting in an environmentally friendly coating. But its service life will be minimal – 5–6 years. It is recommended to make wood floors in cases where the garage is rarely used.
The described grounds are considered traditional. Almost every driver knows about the rules for their arrangement and operation. Let's not repeat ourselves. Instead, we will talk about modern materials and products that have become increasingly used in garage flooring in recent years.
We recommend
Options for finishing walls in an apartment - a review of modern materials How to insulate the walls of a house from the inside - an analysis of modern materials Do-it-yourself warm floor in the garage - creating comfort for yourself and your car