Formwork - types of concrete boundaries
There are several types of formwork used in construction as a strong and reliable foundation for concrete (or reinforced concrete) structures:
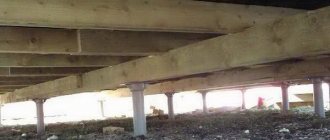
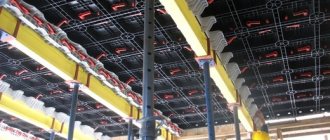
- Horizontal formworks are used for the construction of floor slabs, have considerable thickness and are necessarily reinforced with steel rods;
- Vertical formworks are used in the construction of thin but strong walls of non-standard configuration;
- Inclined and architectural formworks serve as a means of design expression when creating unique concrete structures.
Fence formwork is characterized by the greatest ease of manufacture and smallest dimensions among all other “concrete boundaries” . If you have minimal carpentry skills, it’s easy to do it yourself, which is especially important when building a fence.
The fact is that a typical fence is a rather long structure and at the same time of the same type. There is no need to spend a lot of effort to arrange the entire formwork line at once - you can and should prepare the pouring in separate sections. When it is possible to remove the formwork without compromising the strength of fresh concrete, the removed boards are reassembled at another location. This way you can significantly save on raw materials when making homemade formwork. And installation of ready-made structures in a new location is easier and faster.
Collapsible plastic formwork
Collapsible plastic ready-made formworks for columns are similar to metal ones, but they are much lighter. True, there is talk about their lack of reliability. However, there are many very positive reviews.
To assemble such formwork, it will be necessary to invite specialists. It is necessary to work with this material carefully, using special tools, so it is usually impossible to do without professional craftsmen. Plastic formwork is usually rented from construction organizations.
An example of a universal plastic formwork block for pouring columns. The system for fastening structural parts is well shown. The convenience of such systems lies in the fact that many blocks are universal, allowing you to set the required cross-sectional dimensions of rectangular columns in a certain range. The parts of the block are fastened with special locks, and for greater reliability, the opposite sides are also tightened with pins made of reinforcement, which are fixed using special washers. After pouring and hardening of concrete, these pieces of reinforcement remain in the monolith and serve to increase the strength of the foundation pillars.
Prefabricated reusable structures are also convenient because they can be used to form formwork for poles of different heights, which is the best option if you plan to install a gazebo on a slope.
However, plastic collapsible formwork on the scale of building a regular gazebo also seems like a big overkill.
Boards or plywood can be used to construct a columnar foundation if you plan to make the pillars square or rectangular in cross-section. For supports with a round cross-section, other available methods are used to create a form for concrete mortar.
DIY fence formwork: choosing material
Typically, the material for making “fence” formwork is boards. Chipboard and fiberboard boards are not suitable for this purpose, due to their swelling under the influence of moisture. Particle boards can be used in small formwork structures, but only once, after dismantling they will have to be thrown away. Of course, very high-quality and even formwork is obtained from special steel plates, but they are not produced for fences; metal formworks are used when pouring floor slabs, bridges, overpasses and other critical structures during capital construction.
Any formwork for concrete pouring must meet the following requirements:
- Precise and tight fit of boards to each other;
- Margin of safety - the weight of even a small concrete structure is very large, the boards must withstand the mass of concrete without deflection or deformation;
- Possibility of easy dismantling without serious damage to the integrity of the boards.
If, after each “move” to a new installation site, the formwork requires lengthy restoration, it means that it was assembled incorrectly or dismantled irresponsibly. A high-quality formwork structure can easily withstand dozens of movements along the line of the future fence.
The formwork is assembled from strong and dry boards with a thickness of 20 mm, without cracks, large knots, rottenness and other obvious defects. Standard shields with approximate dimensions of 100-200 cm in length to 50-60 cm in height are knocked together from boards. Each shield has several rear mounting strips. The nails are driven into the front (concrete) part of the formwork and bent on the opposite side onto the fastening strips.
The specialists of the site REMOSKOP.RU have prepared a special calculator for you : Formwork calculator . You can easily calculate the formwork.
In addition, you will need external reinforcement bars with a cross-section of 50x50 mm and a length of at least a meter. To join narrow gaps between panels, it is permissible to use sheets of durable multi-layer plywood. The same plywood will be required for the visible (top) part of the fill.
Materials for production
Formwork forms for columnar foundations can be made from different materials. Most often, wood or plywood is used to create it, less often - metal sheets. It is very convenient to use ready-made pipes made of polymer materials or asbestos cement as forms.
They are used as permanent forms. If you plan to use removable forms, then, as a rule, wood is used. The same material is excellent for making formwork for a columnar foundation with your own hands.
The formwork structure can be assembled from boards 15-20 cm wide and 25-40 mm thick. The boards are attached to wooden blocks. In addition to boards, the following are used to assemble shields:
- chipboard;
- plywood with laminated surface;
- steel sheets.
Advice! To install forms from steel sheets, bolted connections and steel angles are used.
When constructing a columnar foundation in dense soil, roofing felt formwork can be used. This option is more often used for bored piles installed at great depths.
Panel formwork
Standard factory-made panel formwork can be used for the construction of a columnar foundation. These are panels made of laminated plywood in metal frames, fastened with special fasteners.
From the shields, forms are assembled with a size equal to the outer diameter of the future pillar. When using standard formwork, you do not need to buy materials to assemble the forms, but you will have to pay to rent a set of equipment.
Metal sheet and pipes
To create the columns of a columnar foundation, metal pipes or metal sheets rolled into pipes can be used. This material is used to construct permanent forms. Metal forms additionally strengthen the foundation structure and protect them from negative external influences.
The easiest way is to use pipes of the required diameter. From metal sheets with a thickness of no more than 0.8 mm, round and square shapes are bent. The edges are connected using self-tapping screws. You can use mounting angles installed from the outside for assembly.
Wood and plywood
Wood and plywood are the most popular materials for creating formwork, including for columnar foundations. The materials are affordable and easy to use. The material is used to assemble panels, from which boxes are then formed.
To make the surfaces of the box smooth and easier to separate from concrete surfaces, planed boards or laminated plywood are used for installation.
How to make formwork for a fence - step-by-step diagram
Step 1: Marking
The importance of this stage of “fence construction” is often underestimated. The future fence is drawn on the ground with a slight movement of a tarpaulin boot, after which the digging of a trench, knocking together of formwork and mixing of concrete mixture begins - the desire to advance towards the construction goal runs ahead of sanity. First you need to completely mark the entire perimeter of the future fence. Surely, its length will be tens (or even hundreds) of meters.
There may be stumps and other heavy “surprises”, ditches and other utilities. It is better to go around the obstacle than to heroically uproot stumps and drill tunnels for drainage in the path of the future fence. It is likely that there will be a significant difference in height along the fence line. If at the starting point the deepening of the formwork into the ground is 15 cm, then on the other side of the site it is quite possible to reach a pouring depth of half a meter. Or vice versa - all this should be taken into account at the marking stage, before installing the first limiting panel of our formwork.
Step 2: Digger
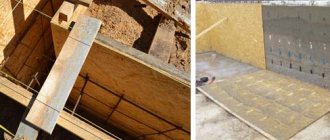
The ditch for the fence is dug with a significant margin of width. For example, if the thickness of the fill is determined to be 30 cm, then the width of the ditch should be 50-60 cm. This is due to the need to fasten the panels with side bars, which are dug into the ground 30-40 cm deeper than the formwork panels. Like marking, soil excavation is carried out along the entire line of the future fence. The total depth of excavation work should be 10-15 cm greater than the buried part of the formwork. As we remember, concrete cannot be poured directly onto the soil layer; a gravel-sand cushion under the concrete layer will be required.
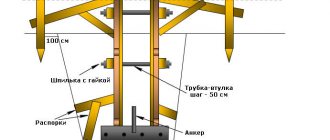
Step 3: Installing Vertical Bars
Inside the ditch, along its edges, a double row of holes is dug for bars with a cross-section of 50x50 mm. It is permissible to loosen the soil a little with a shovel and drive in the bars with proper strength and strictly vertically. The distance between improvised piles should be 100 cm when pouring 30 cm wide, 120-130 cm when the foundation is 20 cm thick, etc. The upper part of the bars should protrude significantly above the dug ditch. For example, if the visible part of the fill is 20 cm, then the bars should rise above it by 20-25 cm. This will be required for further fastening of the formwork, for its rigidity and strength.
Step 4: Installation of panels and plywood
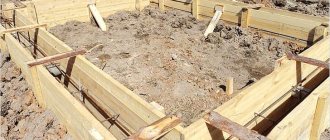
A double line of wooden panels is assembled along the exposed vertical bars. It is very important that they are positioned strictly vertically and at the same distance from each other. It may be necessary to adjust the position of the supporting bars for the required accuracy of the position of the shields. When all the existing shields are mounted vertically in the ditch, gravel with a layer of 5-7 cm and sand of a similar thickness are poured onto its bottom. This creates the necessary “cushion” for concrete pouring and further strengthens the formwork panels.
The vertical bars are securely fastened together using horizontal strips. Be sure to use long self-tapping screws, not forgetting to control the accuracy of the formwork panels when fastening. Once the opposing formwork panels are connected into a single structure, they can be reinforced with earth or gravel on the outside of the ditch.
Step 5: Installing Plywood
All that remains is to install the cut plywood sheets between the boards and the poured sand. The width of the plywood corresponds to the depth of the pour; it is enough to push it tightly into the gap between the sand and the boards. Under the weight of the concrete, the plywood sheet will press against the wood and give the entire pour the necessary smoothness. Install the necessary reinforcement elements between the formwork boards - to strengthen the concrete or fasten the fence structure. Now you can start pouring concrete into the finished tape “container”.
Step 6: Linear Continuation
Dismantling the formwork after the concrete mixture has hardened is performed in the reverse order. First, the horizontal planks between the bars are removed, then the vertical piles are pulled out, and then the formwork panels are moved to the edge of the ditch. Lastly, the plywood inserts are removed. All parts of our formwork constructor are transferred to a new place - and the work is repeated, starting from step No. 3.
“Do you need a foundation for a fence?” - the question is by no means rhetorical, especially when it comes to a protective structure. The fence can only perform decorative functions, but it is still better if it serves as a durable protective structure. Indeed, a reliable foundation is required for every capital building, including fencing.
All the subtleties and pitfalls in the manufacture of formwork, how to avoid wasting time, what types of materials are best to use - this article will tell you this and much more from a theoretical and practical point of view.
Reinforcement of foundation formwork
Reinforcement is necessary to give the created monolith the necessary strength. Rods of different diameters and cross-sections, wire and mesh with different cell sizes can be used as reinforcement. The reinforcement must create a strong spatial frame inside the block (slab, pillar). That is, all its elements must be rigidly connected to each other. It is best to use welding, but you can fasten rods with twisted mounting wire. Simply placing single rods on a layer of concrete and pouring them will not provide a reinforcement effect.
The best reinforcement is reinforcement with a complex corrugated surface; it provides good adhesion to concrete.
And when pouring, the reinforcement must be inside the concrete monolith. This will protect it from corrosion, and the reinforced concrete block itself from weakening
The distance of the reinforcement from the outer edge of the concrete is at least 5 cm; it is especially important that the lower edge of the reinforcement is covered from the ground with concrete - that is, the reinforcement is “suspended” in the formwork. And when poured, it ends up inside a concrete monolith. This will protect it from corrosion, and the reinforced concrete block itself from weakening.
You can “hang” the reinforcement cage from the clamps, using those elements that will protrude above the surface of the foundation after pouring (and then used to fasten the lower crown), or you can use double pouring with holding time after pouring the first thin layer (an irrational method). It is better to fill the foundation immediately, as a monolith, with a break in pouring of no more than a day - only then can the layers adhere firmly.
To reinforce the pillars, you need 4 longitudinal rods with a diameter of 12 mm, connected by a crossbar made of reinforcement with a diameter of 8 mm every 25-30 cm. the distance between the rods is from 5 to 15 cm. It is better to bend clamps for transverse reinforcement. If the seismicity of the area is higher than 7, the diameter of the rods is increased - up to 16 mm and 12, respectively.
Reinforcement of grillage and strip foundation
They try to make the grillage wider than the pillars; with a pillar of 250 mm, the width of the grillage is 350 mm , the installation scheme for the reinforcement is the same, only with high seismicity in the grillage, the pitch of the ties is reduced to 25 cm, and it is still better to use welding. If the walls are framed, fasteners (studs) for the frame are immediately placed into the foundation, usually two on each side of the corner and every meter along the length of the wall. The fasteners can be rigidly tied to the reinforcement or laid when laying the last layer of concrete.
Reinforcement of a monolithic slab
When pouring it, you can use one layer of reinforcing mesh, but it is better to make a “two-level” structure from two layers of mesh, between which rods are installed as supports. As a rule, boards are installed only along the outer perimeter of the slab, and the filling is carried out according to the principle of “leveling the floor”, and the slab can also be insulated using sheet foam.
The seismic hazard indicator for your region can be found in SNiP
Why is formwork needed?
Any concrete worker will answer the question that the most important thing is the correct formwork. First of all, it is worth mentioning the need for a foundation for the fence. It doesn’t matter what material it is made of - the main task is not to let the enemy into the owner’s possessions. As you know, there are three main ways to overcome a fence:
- jump over, climb over;
- break the fence itself, make a hole in it;
- make a dig.
Many animals: dogs, cats, chickens, rats and others are capable of performing the last of the “feats”, not to mention wild animals in the countryside - martens, ferrets and weasels. That is why the foundation is so necessary, and in order for the building to look aesthetically pleasing and level, it should be made protruding above the surface of the earth .
Usually the height is no more than 25 cm, which prevents the destruction of the fence material and protects it from destructive “earth” moisture and other harmful environmental factors. There are also higher plinths with significant differences in landscape level. In any case, formwork will be required to save effort, time and materials. You simply cannot do without it.
How and by what formulas the calculation of concrete cubes for a foundation is carried out - read here.
From this article you will learn how to correctly calculate the amount of reinforcement for a foundation.
You can see a clear example of calculating foundation loads in this material.
What can formwork be made from?
Typically, formwork is built from wood , knocking down boards into monolithic and strong panels. However, in recent years, the abundance of building materials has made it possible to expand the arsenal for its manufacture. In principle, you can use any slabs and sheets, various waste materials - whatever is at hand. In combination with load-bearing elements, they will cope with their task perfectly. Load-bearing materials include:
- slate;
- Fiberboard;
- a metal sheet;
- plywood
Laminated chipboard copes well with this task. The smooth surface distinguishes it from others, because... concrete does not cling to the walls of the formwork, effectively filling voids.
However, in the absence of anything else or in order to save money, you can use non-laminated chipboard. The value of the slab itself lies in the ease of installation, the availability of the material, and it is especially worth noting its main advantage - its load-bearing capacity. It largely depends on the thickness of the sheet, however, even with a standard 16 mm, the structural strength is quite high, and therefore can withstand significant loads.
Formwork made of glass-magnesite sheets
Installing formwork in one, two, three!
This section will be useful as a practical guide to action or a cheat sheet for experienced craftsmen. The main practical techniques and methods of work are outlined here. So, the production of formwork for a strip foundation for a fence using the panel method from wood materials is carried out in several steps:
- Preparation . This stage includes marking and digging a trench for the foundation, preparing materials, checking tools and fixtures. Before starting excavation work, it is necessary to make markings along the entire length of the fence. It will help to identify possible obstacles and obstacles during excavation - they could be an inconspicuous at first glance stump or ditch, tree or utility pipe. Next, you should prepare materials and tools. In total, you will need: a bayonet and pick-up shovel, a hacksaw or jigsaw, a screwdriver, a hammer, a level, a plumb line, timber, plywood, a board, nails and screws. Additionally, you may need a crowbar, a pry bar, an ax for removing roots and other work, and reinforcement that will add strength to the concrete and significantly extend the life of the fence.
- Manufacturing of formwork elements . Shields, as the basis of the formwork, can be easily made from chipboard by sawing the slab into strips of the required size, or from boards knocked together into a single sheet. The number of such panels depends on individual needs: either it is formwork for the entire length of the foundation for one-step pouring, or only for individual sections 3-9 meters long.
- Installation . Before installation, it is better to waterproof the surfaces of the boards in order to prevent the rapid removal of moisture from the concrete, which leads to drying out and cracking of the monolith. This technique is especially relevant in hot and dry weather. So, for example, using liquefied tar or waste oil can solve this issue. Or you can simply cover the surface of wood panels with plastic film or use a special water repellent. So, the shields are ready, the ditch is dug, sand and gravel are filled in layers of 5 cm - like a cushion for concrete. This is followed by the installation of vertical stakes made of timber at an equal distance from 0.5 meters to 1 meter, depending on the load-bearing capacity of the sheet material. The shields are attached to the stakes using screws or nails.
When fastening the formwork, it is better to leave the screw heads on the outside. This will ensure simple and neat disassembly in the future.
Then, through the drilled holes, the shields should be fastened transversely to each other with reinforcement or thick wire. For additional strength, side braces are installed, and gussets are also attached transversely at the top using scraps of timber. Don't forget about the fittings. The work is done and the formwork is ready!
The nuances of installing formwork on a slope
Everyone knows that there are no perfectly flat areas - the ground level tends to “run away” a couple of degrees up or down. Moreover, if a small slope does not create any special problems, then a slope of more than 10 degrees requires a special approach when constructing a fence and installing formwork.
In fact, there is nothing complicated here. There are only two options:
- Place the fence and foundation in one straight parallel line with the landscape relief. This is the simplest, but less aesthetic and “correct” method.
- The second, more correct and aesthetic option is a kind of falling ladder from support to support. The foundation also forms a step after each column. All horizontal lines are strictly level. Beautiful! Aesthetic! But it's impractical. The formwork for such a foundation has its own specifics.
As stated above, many people, for reasons of proper manufacturing, choose a “cascading” fence on a slope. Let's consider the manufacture of such formwork in more detail:
- The installation of formwork is complicated by the uneven terrain. When pouring concrete at once, you need to take into account that it is better to start from the bottom up. The panels for the formwork are similarly “oblique”. They must match the slope. Naturally, such modifications create additional difficulties during manufacturing. Also, do not forget that you still need to cover the protruding ends of the future step with transverse sections of the board.
- Another rule for constructing a stepped foundation is the correct excavation of the soil. It should be carried out in such a way that the bottom of the trench is also level and runs in steps parallel to the line of the future base. This technique will increase the resistance of the foundation to slipping and minimize premature destruction of the structure.
Advice from the “experienced”
Practice confirms that sometimes there are nuances that theory is silent about:
- When making formwork, you should ensure that there are no exposed nails or screws inside the structure. Such oversights can lead to problems when removing shields.
- A fiberboard sheet, for example, needs to be nailed down not only from the outside, but also from the inside for reliability.
- Concrete loves cloudy weather, since the presence of moisture in it after the first hardening phase will allow it to gain the remaining strength, which is about 30%. Quite significant, isn't it? If the weather is dry and hot, you can sprinkle the surface of the solution with wood shavings, which will retain moisture and give the desired coolness.
High-quality formwork can last for many years and be the basis for hundreds of pours, so it is worth paying attention to the quality of its assembly. Dismantling must also be careful. For convenience, you can and even need to use so-called clips for transverse ties of panels using reinforcement.
Requirements for formwork and foundation preparation
The construction of formwork is a prerequisite for the construction of a fence, regardless of its type. The structure forms a fixed frame. Do-it-yourself formwork must meet the following conditions:
- prevent possible bends;
- withstand the weight of the foundation;
- support and ensure straight lines of the future foundation.
You can make formwork for the foundation of a fence under construction from plywood, metal or simple boards. The structure should be easy to install and dismantle. The material is selected taking into account the height of the foundation above the ground level.
Construction of formwork is a prerequisite for building a fence
The process of erecting formwork built for a foundation with your own hands begins with digging a hole. For a brick fence, a pit is dug around the entire perimeter; for other structures, it is enough to form ditches where the pillars will be installed.
The depth of the ditch is a meter; in places where there are no posts, a distance of 50 cm is allowed. The width depends on the fence.
The prepared holes are filled with a sand cushion of 10 to 15 cm and compacted until the cushion becomes a solid, durable base.
Types of fence posts
The difficulty of installing fence posts directly depends on the material from which the fence sections are made. There is no point in installing lightweight sectional “cloths” made of corrugated sheets or mesh on monumental brick pillars; at the same time, heavy reinforced concrete sections cannot be mounted on metal columns.
In some fence models, the supports look more impressive than the sections
Traditionally, the following types of fence posts are distinguished:
- brick - for fences made of brick, metal, wood;
- wooden - for fences made of chain-link mesh and picket fences;
- metal - for fences made of corrugated sheets, mesh, metal;
- asbestos-cement pipes - for mesh and metal fences;
- concrete - for concrete fences.
Construction of formwork
Materials for the structure are prepared in advance. More often, plywood panels or chipboard (a board made of wood chips) are used, and supports are wooden blocks.
To ensure that the self-built formwork is level, string is stretched along the edges of the ditch from one corner to the other (marking). Every 50 cm, beams are driven into the soil, retreating from the edge of the ditch about half a meter. The boards are installed carefully so that they do not sway.
Plywood or chipboard is lowered from one side of the pit and pressed closely against the sand bed. The same work is done from the other end of the trench. Notched bars - horizontal ties - are nailed to the plywood with nails. They are mounted slightly above ground level.
The supports are installed at an angle of 45°. The supports are driven into the ground and to the top edge of the plywood. Supports mounted at an angle will not allow concrete to disturb the even line of the formwork.
Preparation for installation of panel formwork for strip foundations
Fastening elements keep the formwork from deformation that occurs under the influence of the weight of concrete
Homemade wooden formwork, usually removable, is used when part of the foundation (basement) rises above the ground and consists of:
- The panel part , it is adjacent to the concrete, this is the plane of formation of the structure. It is assembled from boards 20-30 mm thick, 150-250 mm wide. The required surface is assembled from horizontally located boards and fastened with transverse bars (stitching strips), the pitch of the strips is 0.5-1 meter, the greater the weight of the concrete in the formwork, the more frequent the step. The nails are driven in from the side of the board facing the concrete, carefully recessing the heads. They should be approximately 10-20mm longer than the total thickness of the package; the protruding ends of the nail are bent perpendicular to the surface of the shield. It is desirable that the lower end of the fastening strips be longer than the shield and pointed - then the shields can be driven into the ground along the perimeter of the trench.
- Fastening and spacer elements , which should keep the formwork from deformation that occurs under the influence of the weight of concrete. They use bolts, wooden blocks (beams), reinforcement, and ties. They make clamps that hold the formwork on top (since the concrete will push its walls) and struts - installed at an angle, with emphasis on the ground, beams.
- Support posts for temporary fastening. They are used when concreting beams, grillages, and floors. Racks are usually made of timber, often with a widening at the top. The more racks and the wider their supporting area, the better. When pouring a high (raised above the ground) grillage of a strip-column foundation, you can use stacks of bricks as racks under the lower formwork panel.
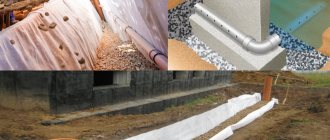
- Waterproofing – film, roofing felt.
About
Pouring the structure
Following the sequence of work, a durable formwork for the fence is built. It’s not difficult to make it yourself. Before filling with cement, reinforcement is performed under the foundation.
- Reinforcement bars are being prepared. Thickness 10 mm. They are mounted 5 cm from the bottom of the pit. A support is installed under the pins.
- 10 cm is removed from the ditch wall, and the first two rows of reinforcement are installed. Horizontal pins are attached to the vertical at a distance of 40 cm from each other.
- By welding, vertical lines are connected to horizontal rods to form a single, strong structure.
Foundation for a fence
After installing the reinforcement, a cement mortar is prepared.
- Cement and water are mixed in a large container using a drill with a special attachment. Ratio: 0.7 cement is added to part of the water.
- Sand is mixed into the resulting mixture, slightly more than 3:1. Crushed stone is added, the proportions are the same.
- Lastly, there is a plasticizer of no more than 1% of the total mass of the solution. The composition is mixed until homogeneous.
- Cement is poured into the formwork in layers to prevent the formation of air bags and is pierced with an iron rod.
- After finishing the work, the channels are covered with film and sprayed with water twice a week.
The cement hardens completely within 28 days. The formwork is removed on the 15th day in the reverse order:
- the strips between the bars are removed;
- the piles and panels of the structure are dismantled to the edge of the pit;
- plywood is dismantled.
Pouring permanent formwork
When erecting a fence, the question may arise of how to make permanent formwork for the fence with your own hands. To do this, all components are fastened together as in a constructor.
Permanent formwork for the foundation is assembled from various materials:
- expanded polystyrene;
- solution of cement and wood chips;
- fibrolite - small sawdust with magnesite.
The selected blocks are connected to each other by jumpers. This prevents the concrete from leaking. The tongue and groove fastens the top row to the first line. When using blocks, supports are not installed. Only reinforcement with rods is carried out, the circumference is 8 mm.
The cement mortar is poured in layers of 20 cm, with piercing. In order not to damage the formwork, the solution is poured from a height of no more than a meter.
Fixed formwork made of polystyrene foam.
The fixed system provides:
- less amount of work;
- durability and corrosion resistance of the foundation;
- correct line geometry.
Features of fence formwork
If for light fencing structures the foundation is not considered a mandatory attribute, then for heavy fences (for example, brick) one cannot do without it.
Formwork is used to give the concrete base the required dimensions and shape. Its correct manufacture is a guarantee of the strength and durability of the foundation. Let's look at how to make fence formwork yourself. When constructing formwork for the foundation of a fence, it is necessary to take into account the following features of such structures:
- Relatively light weight. Even metal or brick fences act on the ground with less force than the walls of a house.
- Large length and small width of the foundation.
- Lack of protection from weather conditions and freezing.
These factors do not allow the use of a shallow foundation when constructing a fence. However, pouring a massive base is also irrational, as this will have a bad effect on the cost of the future structure. Therefore, the best option is a column-strip foundation.
To fill such a base, a combined formwork with vertical and horizontal (wall) elements is used. Vertical structures are installed under supports. It is most convenient to install cylindrical pillars, because under them you can use formwork made from cheap and accessible materials - thick cardboard or roofing felt. For the strip part of the base (grillage), the formwork is assembled from other materials.
Formwork on a slope
The construction of formwork for a foundation on a slope requires slightly different steps. There are horizontal level differences in different parts of the dug hole. Therefore, at the lowest point of the ditch, the formwork is built higher than at a high point in the trench.
Reinforcement is made from large diameter rods or the number of iron pins is doubled. After reinforcement, concrete is continuously poured. Pouring formwork on a slope in several stages will lead to cement rupture along the boundary of the layers.
The foundation is carefully compacted to prevent the formation of air bubbles. The poured solution hardens for about a month.
Nuances when installing formwork
When constructing formwork, screws and nails should not stick out inside the building. This leads to problems when removing plywood panels.
Plywood and chipboard sheets are nailed on the outside and inside: the strength of the structure is ensured.
When pouring formwork in hot, dry weather, the concrete is sprinkled with fine sawdust to keep the cement moist and cool.
High-quality formwork, built with your own hands, is the key to the strength of the future building. The permanent system serves as an additional layer of waterproofing under the foundation. The removable design allows you to use it repeatedly and move parts along the fence line.
Fence formwork is the simplest restrictive structure for pouring a concrete mixture into the foundation. It's easy to do it yourself. To build formwork for a fence, the simplest carpentry skills are sufficient. The formwork for the fence, built with your own hands, must create straight lines of the foundation, support its weight and be easily dismantled.
Formwork material
Chipboard is suitable for foundation installation
The most preferred material for constructing formwork for a fence is boards. For a structure such as fence formwork, you need good boards without defects.
Chipboard slabs get wet and are not suitable for reassembly, but the boards can withstand the weight of concrete without bending. Chipboard slabs can be used for installation of foundation formwork only if they are covered on the inside with a layer of waterproofing.
The boards are used to make shields 2 meters long and 60 centimeters high. You also need rear fastening strips, into which nails are driven from the concrete side and bent onto the strips. In addition, sheets of strong, thick plywood are needed to join the gaps between the panels and cover the upper visible part of the fence.
If formwork is needed for free-standing fence posts, then it is made with your own hands from polystyrene molds.
What material should I use to assemble the formwork for the fence?
When choosing what to make formwork from, you need to take into account that it must meet the following requirements:
- be durable and easily support the weight of a concrete structure;
- have no gaps so that concrete does not leak out through them;
- do not bend and maintain the specified parameters until the final hardening of the concrete mixture;
- easy to install and dismantle;
- have a low cost.
Edged boards have the required set of technical characteristics. Therefore, it is from them that the formwork for the fence is most often constructed. For installation work it is necessary to use wood with a thickness of more than 20 mm. At the same time, it must be dry, strong, without pockets of rot and large knots.
The boards are used to assemble boards about 75 cm high and 150-200 cm long. The boards are connected to each other using bars with a cross-section of 50x20 mm. Another element of the formwork is supports, which are used as wooden blocks with a section of 50x50 mm .
In addition to the materials described above, to create the formwork you will also need:
- screwdriver;
- level;
- marking cord;
- hammer;
- roulette;
- waterproofing material;
- nails, screws.
Excavation part of the work
Trench for laying tape
Most often, the fence has a considerable length. The formwork for the fence is made in separate parts, but the ditch for the fence is dug the entire length at once. This can be done with a rented mini-tractor. To install a fence consisting of individual posts, separate holes 1 meter deep are dug.
If stumps and other obstacles are encountered, the ditch bypasses them. It is necessary to take into account the difference in elevation on the site and make adjustments to the depth of the ditch.
The depth of the trench is measured from the lowest point of the area where the fence is installed. If the area of the site is uneven, you need to make a fence with steps.
The most appropriate foundation width is 30 centimeters; the ditch should be made twice as wide. The depth of the foundation is half a meter, the ditch should be 20-30 centimeters deeper.
If you dig holes for pillars with your own hands, their depth should be at least a meter. The dug holes for the pillars are filled with sand to a depth of 15 centimeters, the sand is compacted strongly, wetting the sand with water for density.
If the terrain of the area is uneven, when the fence is built like a ladder, the bottom of the trench should also be stepped. You need to do the filling yourself from the bottom up and do not forget to cover the ends of the next step with a cross board.
We recommend watching a video of the process of digging a trench and preparing it for pouring.
Installation of formwork
Now it’s worth moving on to considering how to make such a design. First of all, in order to create formwork for the foundation of a fence with your own hands, you need to carry out a whole series of preparatory work. First of all, calculations are made:
- First, the length of the perimeter of the entire fence is calculated, which is required to estimate the amount of materials required;
- Next, the height of the fence is calculated, which determines the depth of the formed base;
- After this, all the necessary materials are selected and purchased;
Now construction preparation takes place, which consists of the following:
- The entire area is marked to indicate the contours of the future structure;
- After this, the surface of this area is prepared, when all debris and vegetation are removed from it.
After completion of preliminary activities, the first stage of excavation begins. According to the previously completed markings, dig holes and trenches of the required depth with a shovel or using a small-sized excavator:
- Locally, with a depth of up to 80 cm for the purpose of installing support pillars, and in areas where the load will not fall, a recess can be created up to 50 cm;
- When the fence is planned to be built from brick or heavy stone, the depth along the entire perimeter should be 80 cm.
When all the trenches and holes have been dug, you should:
- To backfill in a sand-gravel mixture 10 cm deep, the need for it is due to the creation of a waterproofing layer, as well as giving the base of the structure greater stability;
- Next, you should flood the trench with water to ensure greater density of the material, and compact the laid layer with a special tool.
It is important to provide additional margin for the width of the excavated groove. This is due to the fact that bars are installed in it, directly on which the panel structure itself will be supported.
After completing the preparatory stage, the production of shields begins to create the future frame. For this purpose, it is recommended to use particle boards or boards. The number of such elements is determined by the total area and length of the fence being built. The sequence for installing formwork for a fence with your own hands is as follows:
- First, the surface of the boards is waterproofed, for which waste oil or tar is used;
- Further along the edges of the trench, lenkas are dug;
- After this, stakes are driven strictly vertically into the ground, the spacing between them should be the same and be within 0.5-1 m. The correctness of the horizontal level should be checked with a building level;
- It is recommended to use bars with a cross-section of 50*50 mm, having a length greater than the height of the base, in order to improve the strength of the structure;
- Now the panels should be secured to the support posts with nails or self-tapping screws. It is recommended to install the caps from the outside in order to simplify the subsequent dismantling of the structure;
- After this, side jibs are attached to the formwork from the outside, also made of wooden blocks that have a bevel on one side. They should rest exactly in the center of each shield on one side, and on the other side to the ground.
- Next, the resulting panel structure is fastened with threaded fittings or knitting wire through pre-prepared holes;
- The reinforcement elements are installed, and bars are installed in the upper part of the frame being created. This will prevent the structure from diverging under the pressure of poured concrete;
- Fixing brackets are placed in each corner;
- The last step is to seal the cracks to prevent cement from leaking out of the structure.
All stages of installing the formwork for the future fence can be carried out independently, without involving strangers.
Additionally, internal waterproofing of the wooden structure is carried out using ordinary polyethylene. This will reduce the likelihood of loss of moisture in the concrete solution, as well as its saturation of the formwork elements. If this is not done, then this situation threatens to violate the integrity of the structure and its destruction, followed by leakage of the poured solution. This will require additional expenses to restore the integrity of the frame, as well as re-filling the entire sector of the formwork with mortar.
Installation of wooden structures
Inside the trench, at a distance of 1 meter from each other, the bars are driven strictly vertically close to the wall. They should hold very tightly and protrude 35 centimeters above the dug ditch. Wooden panels are assembled along these bars. The vertical bars are correctly fastened with transverse strips using long self-tapping screws. For reliability, the vertical bars can be supported by bars located diagonally.
Expanded clay is great for filling pillows
At the bottom of the ditch between the installed shields, pour 7-8 centimeters of gravel or expanded clay and the same amount of sand to create a cushion for concrete. A properly made gravel-sand cushion with your own hands increases the strength of the foundation. In order to make a pillow, the mixture is compacted, constantly pouring water over it. The resulting dense bottom is covered with waterproofing material to prevent the concrete liquid from being absorbed into the soil, thereby increasing the hydration of the concrete. Then plywood is pushed between the sand and the boards to cover the gaps between the boards.
Do-it-yourself horizontal reinforcement is installed between the boards, then vertical rods are welded to it every half meter. Short transverse rods are welded to the horizontal rods every meter. It is necessary to reinforce the concrete, because strong gusts of wind put enormous loads on the fence. To install a three-dimensional frame, metal rods 10 millimeters thick are needed. The shape of the frame for the pillars is made even more rigid.
Watch the video on how to correctly carry out the entire process of installing the base.
After this, the structure is filled with concrete mixture. Gate supports are cast simultaneously with the foundation. The poured base of the fence will dry in 20 days. According to construction theory, the time for complete hardening of concrete is 28 days, but some experts claim that the formwork for the fence can be removed after 10 days.
Concrete needs to be watered frequently. In hot weather, the concrete surface can be covered with wet sawdust and constantly moistened.
Installation of supports
Concreting columns
A profile pipe should be installed in each pit, around which a brick column will be laid or a reinforced concrete structure will be poured. A metal base is welded to the bottom of the pipe, which will prevent the workpiece from sinking into the soil. After filling the hole with concrete, metal crossbars are welded to the pipes to secure the spans before digging in, pre-treated with anti-corrosion compounds.
A post with a channel located near the gate
For pillars located near the gates, channels (160 mm) or more massive pipes are installed. Gates will be mounted on them. The pillars are connected by a concrete bridge, providing additional strength. If you plan to install sliding gates, reinforcement with a embedded part welded to it (channel No. 16-20 or angle 100x100) is concreted into the foundation between the pillars.
To extend the life of the fence, the pipes for the posts must be protected from moisture. To do this, the metal is cleaned of rust. The surface is degreased and primed. After this, two layers of paint are applied. The ends of the pipes are sealed with special plugs. Before further work, the correct installation of the pillars is checked with a level.
Dismantling a wooden structure
After the concrete has completely hardened, dismantling the formwork is done in the reverse order. First, the horizontal cross bars are dismantled. Then the bars are pulled out and the formwork panels are pushed towards the edges of the ditch. After this, the plywood inserts are removed and everything is moved to a new location. The process of dismantling the mold can last several days.
Making formwork for a fence of the correct shape is necessary in order to get a strong fence, the foundation of which will last for a long time and will reliably protect your yard.