Skirting boards have long been an integral part of the interior and are actively used in room decoration. Manufacturers make this piece of furniture from different materials, which ultimately can affect the choice of tool and cutting method when it is necessary to obtain perfectly accurate corner joints. The article will touch upon the question of how to cut the plinth correctly and with what, in order to be able to join two parts as accurately as possible without the use of decorative overlays.
Plastic skirting board
Main types of floor skirting boards
Until recently, it was impossible to find other types of skirting boards on the market other than wooden ones. These products are still popular, although they are gradually losing ground to more practical and durable products.
Varieties by type of material:
- Wooden. This is a classic option. The reason why such skirting boards are still in demand is the raw material used in manufacturing. After all, when building eco-housing, people choose products made from natural materials. Wood products are made from various types of wood, and therefore differ in decorative qualities and durability.
Wooden skirting boards
- Veneered. Various materials can be used to make the main part, but only veneer made from high-quality wood species is used as the top covering. Upon external inspection, without knowing the distinctive features, a veneered plinth is practically no different from a wooden one.
Veneered plinth
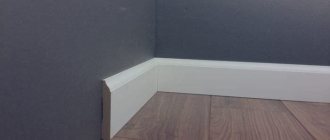
- PVC plinth. This type of product becomes more popular every year due to its practicality and low price. Plastic skirting boards are made with various characteristics, which helps to select products exclusively for the needs of the homeowner. For example, for semicircular walls, manufacturers offer flexible options, moreover, they are practically not inferior in decorative properties to wooden baseboards.
PVC skirting board
Advantages of plastic products
Compared to their counterparts made of wood or MDF, plastic skirting boards have a number of advantages. Their undoubted advantages include:
- Durability and strength.
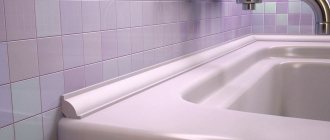
- Moisture resistance. They are suitable for installation in rooms with high humidity (bathrooms, showers and toilets).
- They do not need to be painted or have any other protective coating applied.
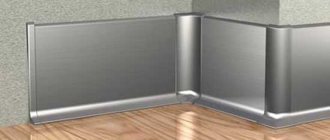
- The construction market offers a huge selection of colors: from a variety of solid colors to ones that imitate the structure of expensive types of wood. It is easy to choose fillets for any interior design of the room.
- Easy to process and attach to the wall.
- Convenient aftercare. The only limitation: it is unacceptable to use abrasive cleaning agents that can scratch the top decorative layer.
- Affordable price.
- Safety for human and animal health. All modern polymer materials for this purpose are manufactured in strict accordance with sanitary standards and requirements.
Cutting the corner of a plastic skirting board
Only from the outside, it may seem that cutting corners is a simple matter and does not require much knowledge and experience. However, this is just an outside view. When you take it on yourself, especially if it’s the first time, your hands begin to shake and the slightest incorrect action will lead to rejection of the part.
Skirting cutting process
An incorrectly executed cut will lead to the appearance of gaps, which means that such a connection is not suitable for joining in the corners: the decorative component is disrupted, and the practical component suffers no less.
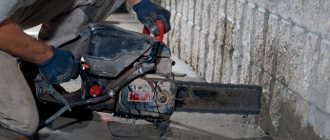
Tools for work
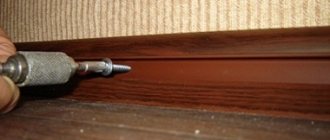
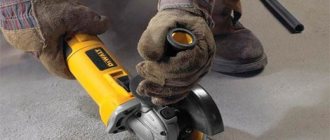
To make the cut as efficiently as possible, workers use a hacksaw. However, this tool is not suitable in all cases. For example, to cut thin skirting boards, it is better to use a grinder or metal scissors. Although these tools also require the experience of a specialist.
Cutting skirting boards to finish a corner
Using a stencil
This method is suitable if the room where you plan to install skirting boards has non-standard dimensions.
How to cut a plastic skirting board:
- We cut a strip from any flexible material that matches the width of the baseboard.
- By attaching the prepared material to the corner, we form its shape.
- The resulting stencil is applied to the plinth and a corner is cut out from the resulting blank.
Using a stencil
Miter box - an auxiliary tool for cutting corners
To make the work of cutting corners not so difficult, a miter box was invented, which is a small block with a recess for the plinth. The device has special gaps for cutting at different angles.
The process of working with a miter box
The plinth is laid inside, and having chosen the desired angle, the cut is made using a hacksaw for metal or a fine-toothed tenon.
Important! It should be understood that to form the connections, blanks from two plinths are used, the shapes of the corners of which are mirror opposite to each other.
After placing the plinth in the miter box and choosing an angle, make sure that the workpiece moves a little further from the cut point. If the plinth is smaller in size relative to the device itself, it is recommended to fix the first one. Otherwise, the plinth will move, and it will no longer be possible to obtain a high-quality cut.
Using a miter box
If you don’t have a miter box, a ruler and pencil will do.
The lack of a miter box, and the reluctance to make a stencil, leads to the next method, the main tools of which are a ruler and a pencil.
How to properly cut a plinth for an internal corner:
- Take measurements of the width of the product.
- Transfer the resulting value to the end part of the plinth.
- Draw a line with a pencil from the corner to the marked point.
- Cut according to the mark.
- The second plinth is applied to the first (formed) and is also cut. It is important that the cut is mirror-like.
Drawing for stencil
Tools
In order to make a corner on the ceiling plinth, you don’t need much:
- Ruler or tape measure
- Miter box
- Hacksaw
- Sharp knife
- Pencil
As a rule, any home master has all this in his arsenal. But not all of them know how to make corner joints on ceiling plinths. Therefore, before you start working with those parts that will go into use, you can practice on small pieces that will not be used, or take one whole part for training.
If you are sticking products made of polystyrene or polyurethane, it would be a good idea to wash your hands thoroughly, since these things are usually bright white, and hand marks are clearly visible on them.
You shouldn’t put too much pressure on them during installation either - despite their apparent strength, they bend and crumple quite easily.
Well, having skills in working with different tools won’t hurt. If everything is being done for the first time, then you should be careful, especially with stationery knives, they are very sharp.
Useful tips
- According to some craftsmen, installation of skirting boards begins from the inner corner.
- A room with precise geometric shapes will result in angles that are exactly 90 degrees.
Forming corners
- If possible, all cuts are recommended to be made only using a miter box. It is this device that will help achieve the most accurate result.
- After trimming, it is necessary to carry out mandatory grinding of the end parts of the plinth. This approach will help to obtain a tighter connection.
Using a miter box
- If the baseboards have a cable channel, it is initially recommended to remove the top cover to mask the wires and attachment points.
- Cutting corner parts is done at the very beginning, so as not to be distracted by this procedure during the work process.
Protractor and miter box for non-standard angles
- To decorate corners, use special corner joints. Also, do not forget about the end parts of the plinth - cover them with decorative caps.
Elements for connecting skirting boards
Installation process
Installation does not require any special skills. Following the classic installation scheme, the product will not begin to leak or deform. Proper installation will guarantee good protection against moisture and mold. Therefore, installation should be taken seriously and responsibly. Installing a plinth comes down to the following steps:
- First of all, you should thoroughly clean the edge of the bathtub and the walls. There should be no bumps, mold, fungi, remnants of old glue or other formations. Wipe surfaces with alcohol or other grease-dissolving solution. Let the treated areas dry, you can use a hairdryer to dry.
- The next step will be taking measurements of the bathtub and marking them on the curb. Many people apply the baseboard and mark the measurement on it with a pencil. Having completed the measurement, proceed to trimming the profile. Trimming at the joints between the walls is done at an angle of 45°. A miter box is used for this. This is a special carpentry device for cutting profiles at the desired angle. Thus, another gap is not formed at the junction of the skirting boards, the presence of which is undesirable.
- Once the first two stages are completed, you should tape the edge of the bathtub and the walls with special tape. This will protect the surfaces from glue or other fastening material. The bath itself is covered with film to avoid accidental contact of glue or sealant on the surface.
- Apply foam, caulk, or construction adhesive where the corner meets the tub and the wall. The layer of foam or other type of fastening should not be too thick. Place the baseboard on the glue layer and press it well. If excess foam appears when pressing, remove it immediately. The time for setting the baseboard is 20 minutes. After this period of time, the joints should be treated with sealant on both the bathtub and wall sides.
Article on the topic: Garden house 15 sq. m
This is a classic installation scheme for plastic skirting boards. There is another way to attach corners. But it is used at the construction or renovation stage. Laying the plinth occurs during the period of gluing the tiles to the walls. It consists in the fact that the profile wall that extends onto the wall is hidden under the tile itself. This is a more labor-intensive and very complex technological process. However, it is more reliable and durable. On the other hand, if you want to remove or change the baseboard, you will have to break the tiles. This method of laying the profile is used quite rarely.
If the baseboard is installed correctly, water will not penetrate into the space between the bathtub and the wall. If the product does not fit tightly in some places, it is glued again. It is very important to treat the joints and joints well with sealant, otherwise moisture will penetrate into the micro-holes, and the feasibility of the entire structure will come to naught. The quality of the profile does not matter if it is not installed correctly. It is very important to do the installation according to the basic rules of the classic installation scheme.
Skirting for the floor: cutting it correctly
If the room has been renovated according to Euro standards, then the corners must certainly correspond to 90°. Then there is nothing easier than using a miter box. Having laid the plinth inside the device, select a cut angle of 45° and prepare the corners on two plinths.
Angle for corner joining
However, perfectly straight angles are not so common, and there are usually some deviations in one direction or another. In this case, it is necessary to mark the floor with a pencil.
How to cut a plinth according to the markings:
- Two parallel horizontal lines are drawn.
- Approximately in the middle, a dividing line is drawn, which is placed across the marking.
- At the top, by attaching the protractor to the transverse line, we determine the angle of 45 degrees and put a mark on both sides.
- We do the same at the bottom.
- Applying a ruler to the marks, we apply a cross-shaped marking.
The result should be the letter “F”. If you want to get cut angles of 45, 90 or 135o, you can always use this little trick by placing the plinth on the corresponding line.
The finished result
detailed instructions
Here is an example of instructions on how to cut a plinth at an angle using a miter box and a tenon:
- Having taken the dimensions and made sure they are correct, we lay the plinth inside the device and press it against one of the walls.
- Taking into account the shape of the corner, we select the correct groove for cutting the baseboard with a tenon.
- You need to saw without jerking, with careful and smooth movements.
Nowadays, hardware stores offer various options for masking corner joints, and therefore, in some cases, you can make straight cuts without worrying about the decorative component of the joint.
Instructions for forming an outer corner:
Outside corner
Forming an internal corner:
Internal corner
Formation of the final plinth:
The final part of the plinth