Buy laminate and underlay
omaric.ru Select laminate and underlay.
Buy the flooring in advance and leave it for 48 hours in the room where you plan to install it. The laminate will rest and its humidity will be equal to room temperature. It’s not worth purchasing two or three months in advance, since during repairs there will inevitably be wet processes and moisture, which laminate has no use for. The Lifehacker Telegram channel contains only the best texts about technology, relationships, sports, cinema and much more. Subscribe!
Our Pinterest contains only the best texts about relationships, sports, cinema, health and much more. Subscribe!
Purchase the underlay based on the area of the room, but the laminate - with a margin of 5-10% for trimming. With direct installation there is always less waste, with diagonal and complex shapes of rooms - more.
Methods for installing laminate panels
How to lay laminate using three installation methods: glue method, Click-lock system and Lok-lock system?
The first option is used least often, and it is similar to the parquet laying system. The process consists of covering the edges of the laminate boards with an adhesive solution and tightly connecting them to each other. This method is rarely used due to some of its disadvantages: installation is quite labor-intensive; short service life (adhesive mixtures dry out quickly); there is no possibility of repairing a separate part of the coating.
We advise you to study - Types of roofing materials for roofs
The most popular option is to install the laminate yourself using the “Click” locking system. This is due to the simple installation procedure. The boards are inserted into one another at an angle of 30 degrees and pressed against each other. After this, using a block and a hammer, one panel is slowly driven into the previous one.
Using the “Lok” locking system, the boards are laid horizontally. You need to leave a small gap between the panels. The tenon is aligned with the groove, continuing fastening until the lock is activated.
To make everything look aesthetically pleasing, you need to know how to lay laminate flooring correctly. You should adhere to the following rules:
- To calculate the laminate correctly, draw a diagram of the room in which you will lay the flooring. Then indicate the locations, location of niches, baseboards, radiators and other things.
- The plan must be completed in as much detail as possible using actual dimensions.
- The area of the room should be measured by the floor surface, and not by the walls.
- Purchase plank sizes that match the dimensions of the room.
- Carefully study the information (labels, pictures) located on the packaging by the supplier.
- To buy a high quality product, you should not save money. Look carefully at the class of the selected product: this is decisive in the service life of the laminate.
- Choose the method in which you will install the laminate yourself. The method of calculating the material and subsequently choosing the installation method depends on this.
- Handle laminate boards with care to avoid chipping and damage.
- It is necessary to leave a gap between the wall and the panel of at least 10 mm. If this is not done, the integrity of the coating will be compromised after a year: the panels will come apart at the seams.
- In each subsequent row, the planks must be laid with a shift in relation to the adjacent one. This provides high strength to the floor covering.
- Laying laminate flooring must be started from the corner, not far from which the radiator and heating pipes are located.
- It is recommended to store packages with laminate for 2 days in the room where it will be installed.
By studying the features of choosing a material and the procedure for laying laminate flooring with your own hands, you can get a high-quality floor covering that will serve you for many years, remaining beautiful and durable.
Prepare tools and materials
Not many tools are required to mark, trim and lay laminate flooring. Most devices are either readily available or inexpensive. In addition to tools, you will need some consumables. Here's the full list:
- five-meter tape measure;
- pencil;
- carpenter's square;
- compass;
- sharp knife;
- a hand saw with a fine tooth or a jigsaw, a circular saw;
- hammer or mallet;
- chisel;
- feather drills;
- drill or screwdriver;
- perforator;
- laminate staples;
- tamping block and wedges (can be replaced with pieces of laminate);
- laminate;
- substrate;
- vapor barriers (if necessary);
- plinth with fittings;
- transition thresholds;
- glue;
- scotch;
- masking tape.
Calculation
At the first stage, it is necessary to correctly calculate the optimal volume of material. To do this, you need to know the size of the room, the overall dimensions of the laminate and decide on the installation method. Along with the traditional row, with each next board offset by ½ of the board, diagonal installation is often used.
First you need to draw a room plan with dimensions. It is important to take into account all angles and mandatory placement on the threshold. Knowing the dimensions of the rooms, you can easily calculate its area by multiplying the width by the length.
Advice
Each laminate manufacturer indicates on the packaging not only the number of boards, but also their total area.
By dividing the square footage of the room by this value, you can get the optimal number of packages. The value should be rounded up.
However, in practice it is quite difficult to take into account non-business waste and possible defects during the installation process. Therefore, experts recommend increasing the volume, depending on which laminate laying scheme was chosen.
- Row longitudinal +10%.
- Row transverse +15%
- Diagonal +20%.
Having purchased the right amount of decorative flooring, you should take care of other consumables and tools.
Prepare the base
rmnt.net
The subfloor for laying laminate must be perfectly flat. Manufacturers allow differences of no more than 2 mm per 1–2 m. Otherwise, the locks will wear out due to loads and the slats will gradually separate.
Egger Group YouTube channel
Requirements for differences relate to the general plane of the surface, and not the horizontal. If the floor is without bumps or holes, but has a slope in any direction, then this will not affect the quality of installation.
Wooden floor
- Check all boards for bends and creaks. If necessary, strengthen the floor with self-tapping screws and replace bad areas.
- Make sure that the base differences are within acceptable limits. If not, level the floor using a scraper or lay down a layer of plywood.
Concrete floor
- Clean off pieces of plaster and sagging on the screed.
- Check height differences. If they are more than 2 mm, level the surface by grinding, self-leveling floor or additional screed.
- Wait until the concrete is completely dry. It takes 28 days.
- Vacuum or sweep the floor thoroughly to remove all dust.
Linoleum
- Check the base differences. If they are within acceptable standards, the laminate can be laid directly on top of the linoleum. If not, it is better to completely dismantle the coating.
- When laying on linoleum, additional waterproofing is not required.
Floor preparation
Alignment
Leveling the floor
To make laying laminate flooring easy, you need not only to select the material, but also to level the surface of the floor. For a floor with a cement-concrete base, a screed is made. When the mixture hardens and becomes strong, proceed to installing the finished floor. Obvious unevenness of the floor will create air gaps under the laminated flooring. In these places the panels will sag, which will quickly lead to wear of the coating. That is why the evenness of the base is of great importance.
Substrate
Underlay for laminate flooring
Spread out the underlayment material from the original wall. The length of the floor must be completely covered. If the substrate used is of a roll type, it is simply rolled out; if in sheets, then they are laid out, and the joints are tightly fixed with tape or a stapler. Fixing the canvas with staples has one caveat: the laminate coating can rub against metal notches, which creates an unpleasant squeak. It is better to spread the substrate as the laminated coating is built up, since walking on it is not recommended.
Concrete floor
Concrete floor
Laying laminate flooring on a concrete floor requires preliminary sealing of cracks and seams, or complete pouring of the concrete screed.
Wooden floor
Wooden floors
You can correctly level a wooden floor using a plane. It is used to process protruding fragments. You can also remove small irregularities and wooden “lint” by scraping. To seal cracks, putty is used. The covering of the old wooden floor is leveled using plywood or other sheet material. It is attached with self-tapping screws around the perimeter and in the center of the sheet, observing a checkerboard pattern, in increments of 15 cm.
Tiled floor
With tiles
Question: “How to properly prepare a tile floor for laying laminate?” Few are asked, since this option is used less frequently. The slope of such a coating should be less than 4 mm for every 2 meters of area; this is checked using a level. Otherwise, the floor needs to be leveled. A large slope causes furniture to “move” on the floor, and cabinets may not open.
It is permissible to lay laminate flooring on linoleum without holes or large tears. Preparing such a base is simple: wash and vacuum thoroughly.
Determine the direction of the light
The lamellas are laid parallel to the rays of light / education-web.ru
For laminate with chamfers, the direction of installation depends only on your preferences and the designer’s ideas. A coating without chamfers looks better when the slats are positioned parallel to the rays of light from the window. So the joints between the boards are almost invisible.
At the same time, laying along a wall with windows allows you to visually expand the room and is quite often used in narrow corridors and hallways.
Select installation method
There are two options: straight and diagonal. In the first case, the planks are placed along one of the walls, in the second, installation starts from the corner of the room and is done diagonally at an angle of 45 degrees.
On the left is straight laying, on the right is diagonal / dekoriko.ru, italstroy.ru
The direct method is the most common. It's simpler and faster. The amount of trimming and waste is minimal - 3–5%. If you are laying laminate flooring for the first time, choose this method.
Diagonal laying is used less frequently. This option is much more complicated, but also looks more advantageous. Especially on open areas of the floor. There is more pruning and waste - 10–15%. Of course, it requires skill and patience, so choose the diagonal method only if you are confident in your abilities.
Laminate installation options
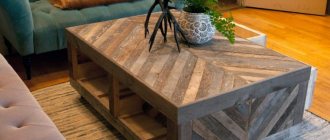
Along the length of the room
Along the length of the room
To visually lengthen the room, this option is the most effective. Such a spread is created using classical masonry in three ways:
- The new row is shifted by about a third from the previous one, otherwise called deck offset;
- Placement between adjacent rows on half a panel.
- Asymmetrical masonry, when the panels are placed in different directions.
Advantages and disadvantages
easy to install
saving on material, in this case there is much less waste;
adjustment of parts is minimal;
the room becomes a little longer.
no if the installation sequence is correct
Width
Along the width of the room
Increases the width of the space. This way the laminated boards are positioned parallel to the natural light source.
Advantages and disadvantages
the ability to join the volumetric pattern of the floor covering
the seams are not visible against the general background due to the angle of incidence of the light
if the laminate has a chamfer, this option will emphasize the content of natural wood
the surface relief seems more pronounced and similar to wood, but at the same time it is smooth without nicks
if relaxation furniture, for example a sofa, will be placed opposite the window, then laminate floors will be an excellent addition to this solution
the visual space of the room expands significantly
more building materials are required to cover the floor, which leads to additional costs;
installation will require more time than for classical installation, and parts will have to be adjusted frequently
Diagonally
Diagonally across the apartment
According to the method, panels are mounted at an angle of 40 to 60°. It is used much less frequently than other methods.
Advantages and disadvantages
Great for non-standard layouts, such as L-shaped
the room is transformed thanks to non-standard design and bold geometry
for rooms with several cross light sources it will be an excellent solution;
laid out in a checkerboard pattern, which visually expands the boundaries;
will be an excellent addition to the minimalist style.
large financial investments;
30% more materials are required than standard installation;
The joints quickly become unusable and wear out.
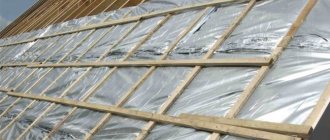
Install a vapor barrier
Since laminate is not 100% resistant to moisture, it is necessary to prevent it from getting into the slats. This is not relevant for a wooden base or linoleum, but when laying on concrete screeds, a vapor barrier must be installed.
Special membranes or ordinary polyethylene film with a thickness of 200 microns or more are used as an insulating layer. You can do without a vapor barrier if the substrate under the laminate has such a layer.
Film strips are laid overlapping / homemasters.ru
Lay the insulation with overlapping strips of 20 cm and connect the joints with tape. The canvases must be perpendicular to the direction of the substrate, and that, in turn, to the laminate. If the topcoat is laid from the front wall to the back, then the underlay is laid from left to right, and the vapor barrier is the same as the laminate.
Install the backing
The sheets of backing are connected end-to-end and do not overlap each other / srbu.ru
Place a layer of backing on the base. Connect all sheets or strips end to end and secure with tape. There is no need to overlap, as this will create unwanted differences.
Next, when installing the laminate, be careful not to move the backing. To do this, you can lay it not on the entire surface of the floor, but in parts.
Calculate the layout of the slats
bricoartdeco.com
Laminate planks must be at least 20–30 cm in length and at least 5 cm in width. To achieve this, you must first estimate how entire slats fit along the length and width of the room. And then cut the planks of the first row so that the last one is no narrower than 5 cm.
Egger Group YouTube channel
Don’t forget about the expansion joint around the perimeter of the room and take it into account in your calculations. The slats are trimmed so that there is a gap of 7–10 mm between them and the wall.
If the room is more than 8–10 m in length or width, manufacturers recommend installing dividing thresholds. The latter will isolate sections of the laminate from each other to reduce deformation from fluctuations in humidity and temperature. Think about where to place these joints so that they are less noticeable.
The same joints will be at the junctions of the boards with the tiles or laminate of other rooms. In this case, it is better to install dividing thresholds strictly under the door leaf. So, with the doors closed, the joints will not be visible from either one or the other room.
Lay the first row
vdomishke.ru
Installation of the first row is the most difficult and responsible. All subsequent ones will copy the first one, so it is important to lay it evenly along the wall. Otherwise, the pattern will unfold and the floor will look ugly.
YouTube channel Kronostar
- Inspect the laminate locks and remove small debris and dust from them.
- Cut the lock on the short side of the first board and place it on the floor. Insert the second one into it at a slight angle.
- Align the width of the slats exactly to avoid any “teeth” and lower the second board, clicking the lock into place.
- Place wedges at each wall to accommodate the expansion gap. They can be cut from pieces of laminate.
- Completely assemble the first strip in this way.
- Don’t cut the last lamella, but for now just lay it overlapping on top.
- Mark the length of the last plank, trim it and install it in the right place. Don’t forget: it should be no shorter than 20–30 cm.
How to cut laminate
- Place a wedge against the wall and place the board to be cut on top of the row in which it will lie.
- Mark with a pencil the distance to the front surface of the adjacent lamella.
- Draw a straight line using a square.
- Cut the board to the mark with a jigsaw, hacksaw or circular saw.
When using a jigsaw, consider the direction of the teeth. If they are oriented away from you, the laminate should be face up. If the teeth are facing you, turn the board face down. This way you will avoid chipping.
If you don't have a power tool, cut with a hacksaw or other fine-toothed saw. Do not apply much force so that the cut is neat and without chipping. To be on the safe side, you can stick masking tape along the line.
What to do if the wall is uneven
- Completely assemble one strip and move it close to the wall.
- Using a compass, find the place where the laminate is as far away from the wall as possible.
- Using a compass, mark this distance on the laminate along the entire length of the strip.
- Draw a line along the marks. It will completely copy all the irregularities of the wall.
- Cut out pieces on each laminate board, reassemble the row and install.
How to cut laminate correctly?
How to cut laminate
To ensure that burrs do not appear on the top surface after cutting, it should lie “face” in the upward direction. To ensure that your cut is even, craftsmen use guides - rulers, the material of which should be wood or metal. At its core, a ruler is needed to ensure that the hacksaw does not step on the desired side. If you need to cut flooring material crosswise, it is best to use squares. You need to press it against the long side, and the second one will be the guide.
Consider the drawing
bricoartdeco.com
Most types of laminate are produced with an arbitrary pattern, and it is unlikely that the lamellas will match one another. In fact, this is not necessary: this way the coating will look too artificial and will look like linoleum.
Some manufacturers have laminate with pattern selection. This is usually indicated on the packaging and in the instructions. To ensure the design matches, the boards must be used in order from one pack.
If you plan to lay the laminate flooring staggered, open three or four packages and take one lamella from each. This will make the drawing as arbitrary as possible.
Place the remaining rows
YouTube channel Kronostar
Continue laying subsequent rows in a similar manner. Collect the slats along the short side into one strip, and then install it in the previous row and snap it into place. With the remaining piece from trimming, in order to save money, you can start a new row.
stroy-podskazka.ru
Cut the lamellas of the last row to the desired width, assemble them into one strip and finish laying. You may need a Z-clip to snap them in place.
How to make a pipe joint
Egger Group YouTube channel
- Place a board and mark the center of the pipe.
- Using a square or tape measure, measure the distance from the wall to the center of the pipe.
- Mark the center of the hole for the pipe on the slats.
- Using a jigsaw or a feather drill, make a hole 8–10 mm larger than the diameter of the pipe.
- Cut out the piece of laminate that is interfering with installation, and after installation, glue the piece into place.
- The holes themselves can then be covered with plastic rosettes.
How to make a joint with a door frame
YouTube channel Kronostar
- Take a piece of laminate 15–20 cm wide, insert it into the lock and move it close to the door frame.
- Place masking tape over it.
- Place the hacksaw on a piece of wood and cut through the door frame. The protruding part goes all the way through, and the deep part is 5–7 mm.
- Use a chisel to chop off the cut pieces and check how the laminate fits.
Specifics of diagonal laying
It’s not difficult to create an unusual, original laminate flooring; you just need to know how to correctly lay the laminate diagonally and what are the features of diagonal laying compared to classical technology. The necessary tools and the preparatory process are no different from conventional installation.
Follow the recommendations of experts, and the question of how to properly lay laminate flooring will disappear by itself.
The conditions are the same - a clean and as smooth surface as possible, for which it is recommended to use special self-leveling mixtures. They are applied to a floor cleared of debris and leveled with a spatula.
After the preparatory stage has been completed, the diagonal installation of the laminate floor begins:
1. Choose the direction of laying the boards. The optimal angle is ≈ 35-45º.
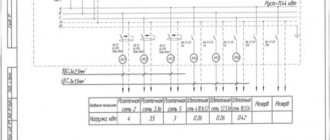
2. Calculate the amount of laminate. Here lies the first feature, since the diagonal calculation has a formula - to the area of the room you need to add the product of the width of the room x 1.42 x the width of one board. For example: the length of the room is 5 m, the width is 3 m, the length of the selected laminated board is 1 m, and its width is 0.1 m. Then:
- room area 5 x 3 = 15 m²;
- area of spare material 3 x 1.42 x 0.1 = 0.436 m²;
- substitute the values into the formula 15 + 0.436 = 15.436 m²;
- divide the result by the area of one board (0.1 x 1 = 0.1) and get the number of laminated boards, i.e. 15.436/0.1 = 154.36 ≈ 155 pieces + 10% margin ≈ 170 panels will be required for diagonal flooring.
3. Pull the rope diagonally to control the laying angle and prevent deviations.
4. After the leveling mixture has hardened, the surface is covered with cellophane, on top of which a substrate or cork sheets are laid with the joints sealed with tape.
5. To simplify the installation process, experts advise starting diagonal laying from the center of the room, since working with long panels is much more convenient than with small triangles.
6. Having laid several rows, check whether the angle of inclination is maintained evenly, and click the boards using a rubber hammer for adjustment.
7. Spacers fix the gaps between the covering and the walls.
8. Equip pipe passages, if any, sealing them with silicone sealant of a suitable shade.
9. Remove the spacers and install the plinth, preferably with ready-made internal channels for pulling cables.
The main differences between diagonal laying:
- the first panel of each new row is selected separately, rather than using sections of the last board of the previous row, as with the standard method;
- to cut the last panel in a row, proceed as follows: measure the distance to the wall, taking into account the expansion joint on one side and put a point on the board, then measure the distance on the opposite side and mark a new point, then connect the points and cut along the intended line with a jigsaw with the wrong side sides;
Remember these features, follow the recommendations of experts, and the question of how to properly lay laminate flooring will disappear by itself. Videos that will solve all the problems will help you visualize the installation process, and the time spent watching will be fully repaid with an elegant, beautifully laid laminate floor. Good luck with your renovation.
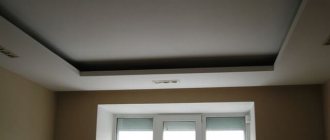
Install the thresholds
pol-exp.com
There are several types of thresholds. In addition to appearance, they differ only in the mounting option. Some are held on through dowels, others on hidden ones, and others have a special mortgage that is attached to the floor with screws and to the front part with a latch.
The nuances of installing one type of threshold or another are always indicated on the packaging. In general, the procedure is as follows:
- Measure the required length of the threshold and cut off the excess part.
- Distribute the fasteners evenly across the entire width of the opening.
- Drill holes using a hammer drill along the marks.
- Secure the threshold: all the way through, inserting screws into the groove or through the mortgage.
- If the fastener is not through, tap the threshold through a soft guide until it is completely seated.